Page 3 of 626
TABLE OF CONTENTSSECTIONPAGE
2GRAPHICAL TABLE OF CONTENTS
......................................................7
3GETTING TO KNOW YOUR VEHICLE
...................................................13
4GETTING TO KNOW YOUR INSTRUMENT PANEL
.........................................133
5SAFETY
........................................................................165
6STARTING AND OPERATING
.........................................................249
7IN CASE OF EMERGENCY
...........................................................391
8SERVICING AND MAINTENANCE
.....................................................435
9TECHNICAL SPECIFICATIONS
........................................................497
10MULTIMEDIA
....................................................................509
11CUSTOMER ASSISTANCE
............................................................601
12INDEX
..........................................................................607
1
2
3
4
5
6
7
8
9
10 11
12
Page 7 of 626
described for technical and/or commercial reasons. For
further information, contact an authorized dealer.
If applicable, refer to the Owner ’s Manual Supplement for
related information.
NOTE:After reviewing the Owner ’s Information, it should
be stored in the vehicle for convenient referencing, and
remain with the vehicle when sold.
When it comes to service, remember that your authorized
dealer knows your vehicle best, has factory-trained techni-
cians and genuine MOPAR® parts, and cares about your
satisfaction.
HOW TO USE THIS MANUAL
Essential Information
Consult the Table of Contents to determine which section
contains the information you desire.
Since the specification of your vehicle depends on the items
of equipment ordered, certain descriptions and illustra-
tions may differ from your vehicle’s equipment.
The detailed index at the back of this Owner’s Manual
contains a complete listing of all subjects.
Symbols
Some vehicle components have colored labels whose sym-
bols indicate precautions to be observed when using this
component. Refer to “Warning Lights and Messages” in
“Getting To Know Your Instrument Panel” for further
information on the symbols used in your vehicle.
ROLLOVER WARNING
Utility vehicles have a significantly higher rollover rate
than other types of vehicles. This vehicle has a higher
ground clearance and a higher center of gravity than many
passenger vehicles. It is capable of performing better in a
wide variety of off-road applications. Driven in an unsafe
manner, all vehicles can go out of control. Because of the
higher center of gravity, if this vehicle is out of control it
may roll over while some other vehicles may not.
Do not attempt sharp turns, abrupt maneuvers, or other
unsafe driving actions that can cause loss of vehicle con-
trol. Failure to operate this vehicle safely may result in a
collision, rollover of the vehicle, and severe or fatal injury.
Drive carefully.
1
INTRODUCTION 5
Page 12 of 626
Page 67 of 626
The heated steering wheel control button is located on the
center of the instrument panel below the touchscreen and
within the climate or controls screen of the touchscreen.
•Push the heated steering wheel button
once to turn
the heating element on.
• Push the heated steering wheel buttona second time
to turn the heating element off.
NOTE: The engine must be running for the heated steering
wheel to operate.
Vehicles Equipped With Remote Start
On models that are equipped with remote start, the heated
steering wheel can be programmed to come on during a
remote start.
This feature can be programmed through the Uconnect
system. Refer to “Uconnect Settings” in “Multimedia” for
further information.
Page 73 of 626
Sun Visor “Slide-On-Rod” Feature — If Equipped
The sun visor “Slide-On-Rod” feature allows for additional
flexibility in positioning the sun visor to block out the sun.
1. Fold down the sun visor.
2. Unclip the visor from the center clip.
3. Pivot the sun visor toward the side window.
4. Extend the sun visor blade for additional sun blockage.
NOTE:The sun visor blade can also be extended while the
sun visor is against the windshield for additional sun
blockage through the front of the vehicle.
EXTERIOR LIGHTS
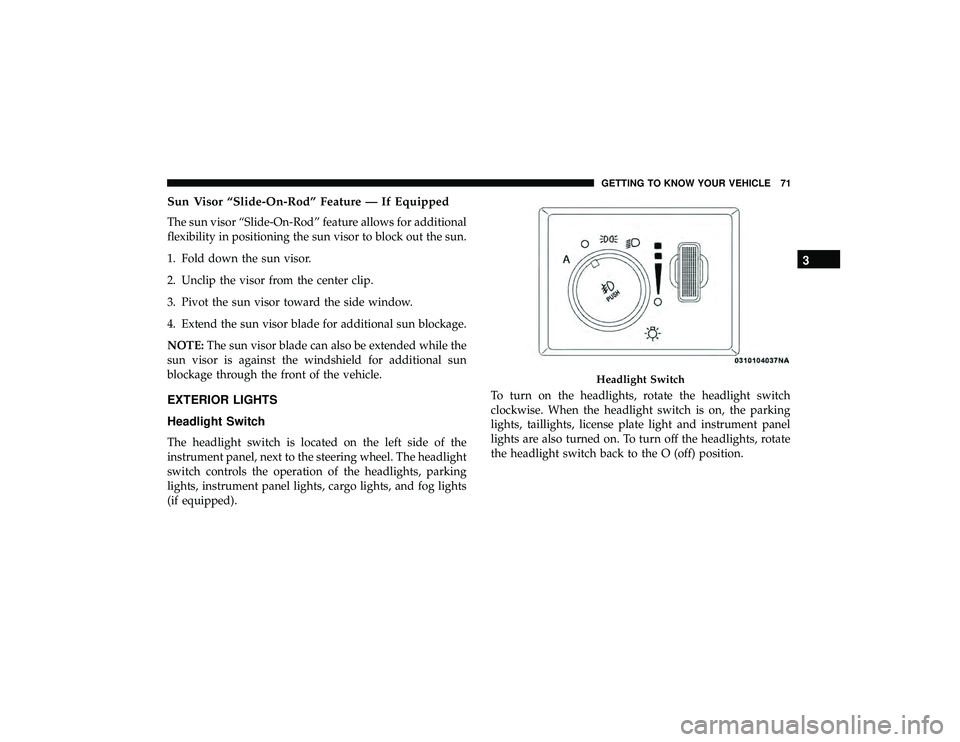
Headlight Switch
The headlight switch is located on the left side of the
instrument panel, next to the steering wheel. The headlight
switch controls the operation of the headlights, parking
lights, instrument panel lights, cargo lights, and fog lights
(if equipped). To turn on the headlights, rotate the headlight switch
clockwise. When the headlight switch is on, the parking
lights, taillights, license plate light and instrument panel
lights are also turned on. To turn off the headlights, rotate
the headlight switch back to the O (off) position.
Page 75 of 626
•The DRL function may be disabled through the
Uconnect system. Refer to “Uconnect Settings” in “Mul-
timedia” for further information.
The headlight switch must be used for normal nighttime
driving.
High/Low Beam Switch
Push the multifunction lever toward the instrument panel
to switch the headlights to high beams. Pulling the multi-
function back toward the steering wheel will turn the low
beams back on, or shut the high beams off.
Automatic High Beam — If Equipped
The Automatic High Beam Headlamp Control system
provides increased forward lighting at night by automat-
ing high beam control through the use of a digital camera
mounted on the inside rearview mirror. This camera de-
tects vehicle specific light and automatically switches from
high beams to low beams until the approaching vehicle is
out of view. NOTE:
•
The Automatic High Beam Headlamp Control can be
turned on or off by selecting “ON” under “Auto High
Beam” within your Uconnect settings, as well as turning
the headlight switch to the AUTO position. Refer to
“Uconnect Settings” in “Multimedia” for further infor-
mation.
• Broken, muddy, or obstructed headlights and taillights
of vehicles in the field of view will cause headlights to
remain on longer (closer to the vehicle). Also, dirt, film,
and other obstructions on the windshield or camera lens
will cause the system to function improperly.
If the windshield or Automatic High Beam Headlamp
Control mirror is replaced, the mirror must be re-aimed to
ensure proper performance. See a local authorized dealer.
Flash-To-Pass
You can signal another vehicle with your headlights by
lightly pulling the multifunction lever toward you. This
will cause the high beam headlights to turn on, and remain
on, until the lever is released.
3
GETTING TO KNOW YOUR VEHICLE 73
Page 76 of 626
Automatic Headlights — If Equipped
This system automatically turns the headlights on or off
according to ambient light levels. To turn the system on,
rotate the headlight switch to the A (auto) position.
When the system is on, the Headlight Delay feature is also
on. This means the headlights will stay on for up to 90
seconds after you turn the ignition switch to the OFF
position. To turn the automatic headlights off, turn the
headlight switch out of the A (auto) position.
NOTE:The engine must be running before the headlights
will turn on in the Automatic Mode.
Parking Lights And Panel Lights
To turn on the parking lights and instrument panel lights,
rotate the headlight switch clockwise. To turn off the
parking lights, rotate the headlight switch back to the O
(off) position.
Headlights On Automatically With Wipers
If your vehicle is equipped with Automatic Headlights, it
also has this customer-programmable feature. When your
headlights are in the automatic mode and the engine is
running, they will automatically turn on when the wiper system is on. This feature is programmable through the
Uconnect system screen. Refer to “Uconnect Settings” in
“Multimedia” for further information.
If your vehicle is equipped with a “Rain Sensitive Wiper
System” and it is activated, the headlights will automati-
cally turn on after the wipers complete five wipe cycles
within approximately one minute, and they will turn off
approximately four minutes after the wipers completely
stop.
Refer to “Windshield Wipers And Washers” in “Getting To
Know Your Vehicle” for further information.
NOTE:
When your headlights come on during the day-
time, the instrument panel lights will automatically dim to
the lower nighttime intensity.
Headlight Delay
To aid in your exit, your vehicle is equipped with a
headlight delay that will leave the headlights on for
approximately up to 90 seconds. This delay is initiated
when the ignition is turned OFF while the headlight switch
is on, and then the headlight switch is cycled off. Headlight
delay can be cancelled by either turning the headlight
switch on then off, or by turning the ignition ON.
74 GETTING TO KNOW YOUR VEHICLE
Page 81 of 626
Dimmer Controls
The brightness of the instrument panel lighting can be
regulated by rotating the dimmer control up (brighter) or
down (dimmer). When the headlights are on you can
supplement the brightness of the instrument cluster dis-
play, radio and overhead console by rotating the control to
its farthest position up until you hear a click. This feature
is termed the “Parade” mode and is useful when head-
lights are required during the day.
WINDSHIELD WIPERS AND WASHERS
The windshield wiper/washer controls are located on the
multifunction lever on the left side of the steering column.
The front wipers are operated by rotating a switch, located
on the end of the lever. For information on the rear
wiper/washer, refer to “Rear Window Wiper/Washer” in
this section.
Multifunction Lever
3
GETTING TO KNOW YOUR VEHICLE 79