Page 534 of 682

5-205
Driving your vehicle
5
Driving with a trailer
Towing a trailer requires a certain
amount of experience. Before setting
out for the open road, you must get
to know your trailer. Acquaint your-
self with the feel of handling and
braking with the added weight of the
trailer. And always keep in mind that
the vehicle you are driving is now
longer and not nearly as responsive
as your vehicle is by itself.
Before you start, check the trailer
towbar and platform, safety chains,
electrical connector(s), lights, tyres
and brakes.
During your trip, occasionally check
to be sure that the load is secure,
and that the lights and trailer brakes
are still working.
Distance
Stay at least twice as far behind the
vehicle ahead as you would when
driving your vehicle without a trailer.
This can help you avoid situations
that require heavy braking and sud-
den turns.
Passing
You will need more passing distance
up ahead when you’re towing a trail-
er. And, because of the increased
vehicle length, you’ll need to go
much farther beyond the passed
vehicle before you can return to your
lane.
Backing up
Hold the bottom of the steering
wheel with one hand. Then, to move
the trailer to the left, move your hand
to the left. To move the trailer to the
right, move your hand to the right.
Always back up slowly and, if possi-
ble, have someone guide you.
Making turns
When you’re turning with a trailer,
make wider turns than normal. Do this
so your trailer won’t strike soft shoul-
ders, kerbs, road signs, trees, or other
objects. Avoid jerky or sudden
manoeuvres. Signal well in advance.
Turn signals
When you tow a trailer, your vehicle
has to have a different turn signal
flasher and extra wiring. The green
arrows on your instrument panel will
flash whenever you signal a turn or
lane change. Properly connected,
the trailer lights will also flash to alert
other drivers you’re about to turn,
change lanes, or stop.
When towing a trailer, the green
arrows on your instrument panel will
flash for turns even if the bulbs on
the trailer are burned out. Thus, you
may think drivers behind you are
seeing your signals when, in fact,
they are not. It’s important to check
occasionally to be sure the trailer
bulbs are still working. You must also
check the lights every time you dis-
connect and then reconnect the
wires.
Page 540 of 682

6-2
What to do in an emergency
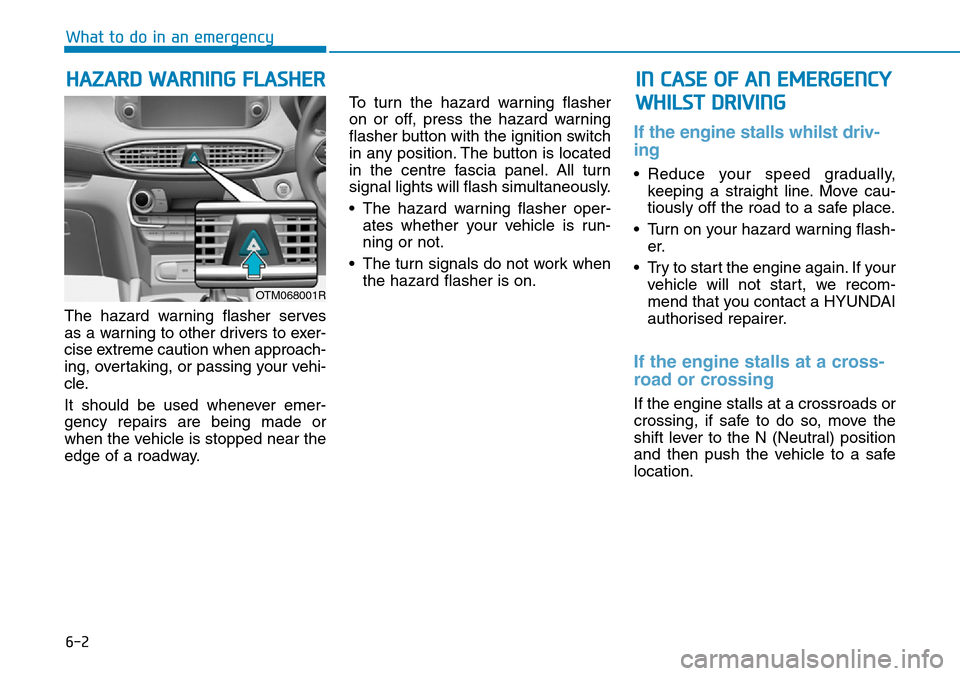
The hazard warning flasher serves
as a warning to other drivers to exer-
cise extreme caution when approach-
ing, overtaking, or passing your vehi-
cle.
It should be used whenever emer-
gency repairs are being made or
when the vehicle is stopped near the
edge of a roadway.To turn the hazard warning flasher
on or off, press the hazard warning
flasher button with the ignition switch
in any position. The button is located
in the centre fascia panel. All turn
signal lights will flash simultaneously.
• The hazard warning flasher oper-
ates whether your vehicle is run-
ning or not.
• The turn signals do not work when
the hazard flasher is on.
If the engine stalls whilst driv-
ing
• Reduce your speed gradually,
keeping a straight line. Move cau-
tiously off the road to a safe place.
• Turn on your hazard warning flash-
er.
• Try to start the engine again. If your
vehicle will not start, we recom-
mend that you contact a HYUNDAI
authorised repairer.
If the engine stalls at a cross-
road or crossing
If the engine stalls at a crossroads or
crossing, if safe to do so, move the
shift lever to the N (Neutral) position
and then push the vehicle to a safe
location.
HAZARD WARNING FLASHER IN CASE OF AN EMERGENCY
WHILST DRIVING
OTM068001R
Page 577 of 682

7
Fuses ......................................................................7-42
Instrument panel fuse replacement ...........................7-43
Engine compartment panel fuse replacement.........7-44
Fuse/Relay panel description ......................................7-45
Light bulbs.............................................................7-59
Headlamp, position lamp, turn signal lamp
and daytime running light bulb replacement ...........7-60
Front fog lamp .................................................................7-63
Headlamp and front fog lamp aiming ........................7-64
Side repeater lamp replacement .................................7-69
Rear combination lamp bulb replacement ................7-69
High mounted stop lamp replacement .......................7-71
License plate light bulb replacement .........................7-72
Interior light bulb replacement ....................................7-72
Appearance care ..................................................7-74
Exterior care ....................................................................7-74
Interior care......................................................................7-78
Emission control system .....................................7-81
Crankcase emission control system ...........................7-81
Evaporative emission control system.........................7-81
Exhaust emission control system ...............................7-82
Selective Catalytic Reduction .......................................7-85
Urea gauge .......................................................................7-85
Malfunction with the SCR system ..............................7-87
Clearing the vehicle-restarting restriction ...............7-88
Adding the urea solution ...............................................7-89
Storing the urea solution ..............................................7-92
Urea solution purity........................................................7-92
Page 583 of 682

7-8
Maintenance
Owner maintenance schedule
When you stop for fuel:
• Check the engine oil level.
• Check the coolant level in the
engine coolant reservoir.
• Check the windscreen washer fluid
level.
• Check for low or under-inflated
tyres.
Whilst operating your vehicle:
• Note any changes in the sound of
the exhaust or any smell of exhaust
fumes in the vehicle.
• Check for vibrations in the steering
wheel. Notice if there is any
increased steering effort or loose-
ness in the steering wheel, or
change in its straight-ahead position.
• Notice if your vehicle constantly turns
slightly or “pulls” to one side when
travelling on smooth, level road.
• When stopping, listen and check for
unusual sounds, pulling to one side,
increased brake pedal travel or
“hard-to-push” brake pedal.
• If any slipping or changes in the
operation of your transmission
occurs, check the transmission fluid
level.
• Check the automatic transmission
P (Park) function.
• Check the parking brake.
• Check for fluid leaks under your
vehicle (water dripping from the air
conditioning system during or after
use is normal).
At least monthly:
• Check coolant level in the engine
coolant reservoir.
• Check the operation of all exterior
lights, including the stoplights, turn
signals and hazard warning flashers.
• Check the inflation pressures of all
tyres including the spare for tyres
that are worn, show uneven wear,
or are damaged.
• Check for loose wheel lug nuts.
At least twice a year:
(i.e., every Spring and Autumn)
• Check radiator, heater and air condi-
tioning hoses for leaks or damage.
• Check windscreen washer spray
and wiper operation. Clean wiper
blades with a clean cloth damp-
ened with washer fluid.
• Check headlamp alignment.
• Check muffler, exhaust pipes,
shields and clamps.
• Check the seat belts for wear and
function. Be careful when checking your
engine coolant level when the
engine is hot. This may result in
coolant being blown out of the
opening and cause serious
burns and other injuries.
WARNING
Page 635 of 682
7-60
Maintenance
Information - Headlamp
desiccant
(if equipped)
This vehicle is equipped with desic-
cant to reduce fogging inside the head-
lamp due to moisture.
The desiccant is consumable and its
performance may change based on the
used period or environment.
If fogging inside the headlamp due to
moisture continues for a long time, we
recommend that you consult a
HYUNDAI authorised repairer.
Headlamp, position lamp, turn
signal lamp and daytime run-
ning light bulb replacement
Type A
(1) Daytime running light
(2) Daytime running light/
Position lamp
(3) Headlamp (High)
(4) Headlamp (Low)
(5) Turn signal lamp
(6) Front fog lamp (if equipped)
i
OTM078087L
•Handle halogen bulbs with
care. Halogen bulbs contain
pressurised gas that will pro-
duce flying pieces of glass that
could cause injuries if broken.
•Wear eye protection when
changing a bulb. Allow the bulb
to cool down before handling it.
WARNING
OLMB073042L
Page 637 of 682
7-62
Maintenance
7-62
Turn signal lamp
1. Engage the parking brake and dis-
connect the negative battery
cable.
2. Remove wheel guard clips (wheel
guard : 4 pieces, under the front
bumper : 3 pieces).3. Push the wheel guard aside and
remove the bulb socket-connector
by turning it counterclockwise.
4. Remove the bulb from the turn sig-
nal lamp assembly.
5. Install a new bulb.
6. Connect the bulb socket-connec-
tor.
7. Install the wheel guard in the
reverse order.
Daytime running light/position lamp
If the LED lamp does not operate, we
recommend that you have the vehi-
cle checked by a HYUNDAI autho-
rised repairer.
Type B
(1) Daytime running light
(2) Daytime running light/
Position lamp
(3) Support Headlamp (High/Low)
(4) Headlamp (High/Low)
(5) Turn signal lamp
(6) Front fog lamp (if equipped)
OTM078088L
OTM078059
OTM078055
Page 644 of 682
7-69
7
Maintenance
Side repeater lamp replace-
ment
If the LED lamp does not operate, we
recommend that you have the vehicle
checked by a HYUNDAI authorised
repairer.
Rear combination lamp bulb
replacement■Ty p e A
(1) Tail/Stop lamp
(2) Tail lamp
(3) Turn signal lamp
(4) Backup lamp
(5) Rear fog lamp (if equipped)
■Ty p e B
(1) Tail lamp
(2) Stop lamp
(3) Turn signal lamp
(4) Backup lamp
(5) Rear fog lamp (if equipped)
OTM078010ROTM078004L
■Type A (Standard)
OTM078050L
■Type B (LED)
Page 646 of 682

7-71
7
Maintenance
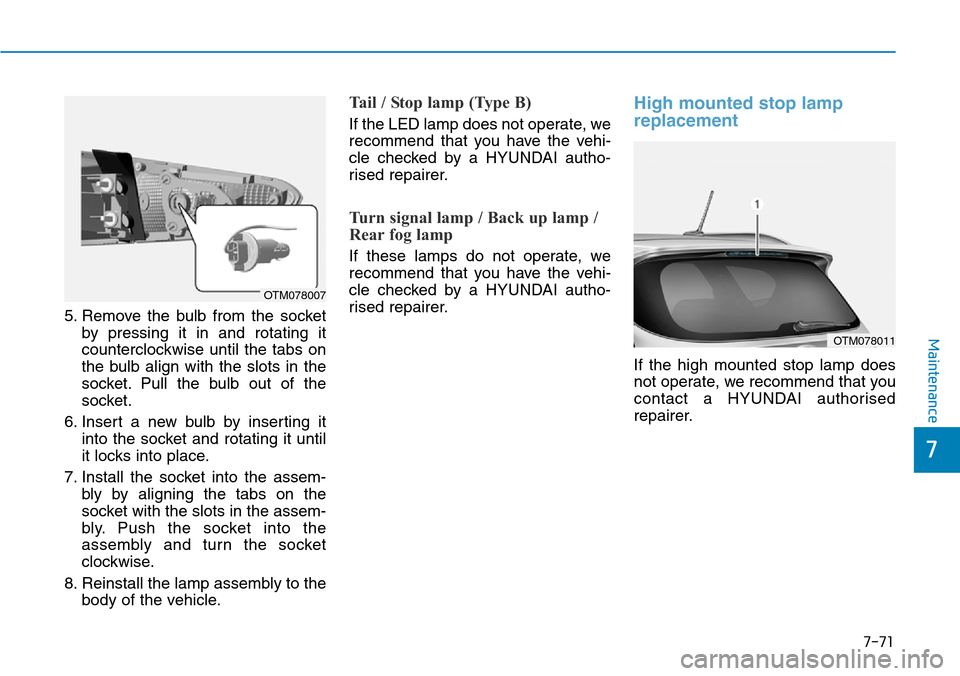
5. Remove the bulb from the socket
by pressing it in and rotating it
counterclockwise until the tabs on
the bulb align with the slots in the
socket. Pull the bulb out of the
socket.
6. Insert a new bulb by inserting it
into the socket and rotating it until
it locks into place.
7. Install the socket into the assem-
bly by aligning the tabs on the
socket with the slots in the assem-
bly. Push the socket into the
assembly and turn the socket
clockwise.
8. Reinstall the lamp assembly to the
body of the vehicle.
Tail / Stop lamp (Type B)
If the LED lamp does not operate, we
recommend that you have the vehi-
cle checked by a HYUNDAI autho-
rised repairer.
Turn signal lamp / Back up lamp /
Rear fog lamp
If these lamps do not operate, we
recommend that you have the vehi-
cle checked by a HYUNDAI autho-
rised repairer.
High mounted stop lamp
replacement
If the high mounted stop lamp does
not operate, we recommend that you
contact a HYUNDAI authorised
repairer.
OTM078011
OTM078007