2019 AUDI TT ROADSTER towing
[x] Cancel search: towingPage 4 of 304

Table of contents
About this Owner's Manual......
SUMIMALY: ; « ss6% : osen ss sean cs poe s
QC CCeS Skis: si esis a 6 ores os ewe
Cockpit overview.............-000005
Indicator lights overview...........0.
Display and operation............
Instrument cluster...............
Instrument cluster overview...........
Coolant temperature indicator.........
Tachometer.......... 0.0 eee eee eee
Odometer as = s eee = seen ge zee a tows e
Outside temperature display...........
Fuellevel.......... 0. cece eee eee eee
Multifunction steering wheel..........
Vehicle functions « se-0 2. ese ve eee ees
MessageS ... 0... eee eee eee
Starting and driving.............
Opening and closing.............
Central locking 2.2% ieee seven a eevee
Luggage compartment lid.............
Power windows.............0.00 0005
Garage door opener...............0..
POWER EOPE: « «cece 0 csv « o semiens 6 0 eens
Automatic power top.................
Wind deflector ecax « x came + 5 yom 2 4 ews
Power top emergency operation........
Lights and Vision.................
Exterior lighting ssivses + « ssa 3s inane 9 & sou
Interior lighting. ................000.
VISION s « s saas ss sees Fo Hees Eo ee ee
Windshield wipers..............00005
Digital compass................0000.
Storage... eee eee eee
Luggage compartment...............
NOD
OO
11 il 12 12 15
16
21 21 21
27
28
30
3.
33 35 35
38 38
40
Al 42
44
46 46
46
48
48
48 48 49
50
Warm and cold...
Climate control system............00.
DRIVING: & tacos 6 2 maemo e eae 0 x iano 4
General information .
Steering.........6.
Starting and stopping
Electromechanical par
Starting to drive.....
theengine.......
king brake.......
Automatic transmission..............
Trailer towing.......
Driver assistance.
Assist systems...
Speed warning system...............-
Cruise control system
Audi active lane assist
Audi side assist
Audi drive select (drive settings) ........
Parking aid.......
Introduction........
Rear parking system .
Parking system plus.............-.00.
Rearview camera
Intelligent Technology...........
Electronic stabilization control (ESC) ....
StEOKing © esse we wssuse
All wheel drive (quattro) ..............
Rear spoiler........
Energy management .
Information about data recorded by
vehicle control modules...............
Infotainment system............
Multi Media Interface............
Traffic safety information.............
Introduction........
MMI On/Off knob with joystick function . .
MMI operation......
MMT OU CPi ccm. » 6 camere
Control knob with joys
Letter/number speller
tick function. ....
52
56 56 57 57 59
61
61
69 70 70 70
70
72
75
77
80
80
81
81
82
84
84
86
86
88
89
89 90
91
91 92
92
92
92
92
93
94
97
98
Page 6 of 304

Table of contents
Kiteerairbagsicc 2 secs ee esac a w anaes ¥ vo 204
Side airbags. ........... eee eee eee 206
SRC SARSEY ois i ese se ween 4 & ese a 210
Important information............... 210
Child 'safety S@atSiivec 2s gcan
Additional information............... 222
Maintenance and Care........... 223
Checking and Filling............. 223
Fuel... 2. cece eee eee eee eee 223
Refuelingjecs ss sees se ane + eeee § s peme 224
Emissions control system...........4. 227
Engine compartment................. 227
ERGINGOtls seus 2 x seme « ¥ neue =e oRBER Fae 230
Cooling:system . « sscses v < ssesens vo eevee so ave 234
Brake fluid... 2... eee eee eee 235
Electrical SySteMi wis ¢ scm ae mews eg ey 236
Battery: « & cess 6 6 ceva © 5 mews « wenn ¥ © oi 236
Windshield washer system...........- 238
Service interval display............... 239
Wheels ........ 0... eee 240
Wheels and Tires . . 240
Tire pressure monitoring system....... 256
Tire pressure monitoring system....... 258
Care and cleaning................ 262
General information wo. ceo saeco es 262
Car washes...............2..20.00005 262
Cleaning and care information......... 263
Taking your vehicle out of service....... 267
Do-It YOUrSEUT v5 ¢ «gee8 & peas es eee 268
Emergency assistance........... 268
General
information................. 268
EQUIPITICNE sass ¢ ¢ eens + eeen a 3 ces 3s He 268
Tire mobility kit ose: <2 cere ae eee se ees 268
Replacing wheels..............000005 270
Sparetire........... 0.00.0 20.000000. 274
TOWING scsvss = ¢ wesos « § eeons & 2 Keres 4 = HES 274
Fuses and bulbs.................. 277
FUSES an + x css 5 © ames + © eRe = Beem He 277
BULDSisi0e svowave 4 6 oniuen a a stants a Hanon w 8 ave 279
Customer information........... 280
Accessories and technical
CHANGES: « s seve + a wees ¢ s eee oe ee Ze 280
Warratttys: < s wexsas os menus vo oncans © 0 sence 280
Audi Literature Shop.............005- 280
Driving in other countries............. 280
Maintenance, repairs, and technical
modifications...............02.-00 280
Accessories and parts..............-. 282
Reporting Safety Defects.............. 282
Declaration
of compliance for
telecommunications equipment and
electroniesystemss: + - seca ss sec oo waren 283
Technical data.................... 285
Identification data................0.. 285
Ne@hicle’datiabaccic = 2 cms » @ canseae » 1 sumone a oo 285
TWAS Rey + xaos 5c owe co UE a eee se 287
Page 35 of 304

8S58012721BA
Power top
Power top
Automatic power top
General information
The power top opens and closes automatically.
When open, the power top is stored completely
in the power top compartment. The power top
can be opened or closed at speeds up to 30 mph
(50 km/h). The power top will not open when the
temperature is below 5 °F (-15 °C).
Under normal conditions, the power top is wind-
and waterproof. In rare cases, small droplets of
water may form under extreme weather condi-
tions such as torrential or prolonged rain. That is
normal and no cause for concern.
Follow
the care instructions to keep the power
top free of leaks and to maintain its appearance
=> page 262, Care and cleaning. Also observe the
following:
— Open and stow the power top only when it is
clean and dry. Stowing the power top when it is
damp can create imprints in it, and if it is left
that way for long periods of time, mildew and
other damage can form. To prevent scratching
or damaging the power top, do not use any
sharp-edged objects to remove ice and snow.
The rear window may be cleared with a stand-
ard ice scraper.
— Do not leave the power top open for several
weeks or the creases in it may become discol-
ored.
— Do not open the power top when the tempera-
ture is below 32 °F (0 °C). The fabric in the
power top loses elasticity in sub-zero tempera-
tures.
Opening and closing the power top
toad B
= >
im oC
Fig. 27 Center console: power top switch (example)
Opening and closing the power top
> Switch the ignition on.
> To open or close the power top, pull/press and
hold the button during the entire process.
Opening/closing the power top using the
one-touch function
> Switch the ignition on.
> To open/close the power top all the way, briefly
pull/press the power top switch. It is not neces-
sary to hold the switch. The one-touch function
is only available at speeds between 4 mph
(6 km/h) and 30 mph (50 km/h).
The status of the power top is shown in the in-
strument cluster when operating the power top
switch.
A message will appear in the instrument cluster
if the power top cannot be opened or closed
> page 34.
ZX WARNING
— When operating the power top, make sure
the function is not affected by wind or other
factors and that it does not interfere with
other drivers.
— Never drive when the power top is not
locked correctly. The wind from driving
could cause the power top to open. This can
result in injuries and damage to the vehicle.
— Make sure no one will be injured by the pow-
er top supports and other moving compo-
nents when opening and closing the top. >
33
Page 50 of 304

Stowing and using
Stowing and using
Ashtray
Applies to: vehicles with ashtray
2 3 ° >
c o
Fig. 50 Center armrest folded up: ashtray
The ashtray is placed in the center console under
the center armrest.
Opening and closing
> To open or close the ashtray, fold the cover up
or down.
Emptying
> To empty the ashtray, pull it upward and out.
ZA WARNING
Never use the ashtray to hold paper, because
this increases the risk of a fire.
Cigarette lighter
Fig. 51 Center armrest folded up: cigarette lighter
The
cigarette lighter only works when the igni-
tion is switched on.
> Fold the center armrest up to reach the ciga-
rette lighter, if necessary.
> Press the cigarette lighter in.
48
> Remove the cigarette lighter when it pops out.
The cigarette lighter may be used as a power
source for the tire mobility kit/compact spare
tire* compressor only when absolutely necessary.
Z\ WARNING
— The cigarette lighter only works when the ig-
nition is switched on. Incorrect usage can
lead to serious injuries or burns. To reduce
the risk of injuries, never leave children un-
attended in the vehicle with the vehicle key.
— Be careful when using the cigarette lighter.
Inattentive or unsupervised use of the ciga-
rette
lighter can cause burns.
Power sources
When the ignition is switched on, you may be
able to use the electric power sources for exter-
nal devices, depending on the vehicle equipment.
12 volt sockets
You can connect electrical accessories to the 12
volt sockets. The power usage must not exceed
120 watts.
The 12 volt sockets are labeled with the & or
12V symbol. They are located in the front center
console* and on the side trim panel in the lug-
gage compartment*.
USB ports
Applies to: Vehicles with USB port
You can charge mobile devices using the USB
ports. The USB ports are labeled with the «<> or
[4 symbol or CHARGE ONLY.
Z\ WARNING
—To reduce the risk of fatal injury, store all
connected devices securely when driving so
that they do not move around inside the ve-
hicle when braking or in the event of an acci-
dent.
— Incorrect usage can lead to serious injuries
or burns. To reduce the risk of injuries, never
leave children unattended in the vehicle
with the vehicle key. >
Page 51 of 304

8S58012721BA
Stowing and using
@) Note
— Read the operating manuals for the con-
nected devices.
—To reduce the risk of damage to the vehicle
electrical system, never attempt to charge
the vehicle battery by connecting accesso-
ries that provide power to the power sour-
ces.
— Do not connect any device whose network
class (voltage) does not match the network
class designed for the socket.
— Disconnect the connectors from the power
sources carefully to reduce the risk of dam-
aging them.
Storage
(ety miele (Te
Applies to: vehicles with cup holders
BFV-0075
S Ss
2
= eg a
Fig. 53 Center armrest folded up: cup holder
> To use the cup holder under the center armrest,
fold it upward > page 47.
> Fold the plastic bracket toward the rear, if nec-
essary > fig. 53.
ZX WARNING
Spilled hot liquid can increase the risk of acci-
dents and injuries.
— Never drive with containers that contain hot
liquid such as coffee or tea. The hot liquid
could spill and cause burns during a colli-
sion, sudden braking or other vehicle move-
ment. Spilled hot liquid can also increase
the risk of accidents and injuries.
— Only use soft containers in the cup holders.
Hard cups and glasses can increase the risk
of injury during a collision.
— Never use the cup holder or the adapter as
an ashtray because this is a fire hazard.
C) Note
Beverage containers in the cup holders should
always
have a lid. Otherwise, the liquid inside
could spill and cause damage to vehicle
equipment.
Additional storage
You will find a range of storage compartments
and holders at different locations in the vehicle.
— Compartments in the doors
— Storage area in the glove compartment. The
glove
compartment can be locked using the
mechanical key > page 23.
— Storage compartment under the center arm-
rest*
— Storage compartment between the seat backr-
ests
— Key compartment in the center console
— Storage compartment on the rear side of the
seat*. The compartment can hold a maximum
weight of 2.2 lbs (1 kg).
ZA WARNING
—To reduce the risk of injury, make sure the
covers for all storage compartments are al-
ways closed while driving.
— Only use the storage compartments in the
door trim panels to store small objects that
will not stick out of the compartment and
impair the function of the side airbags.
49
Page 52 of 304

Stowing and using
Luggage compartment
General information
All pieces of luggage or objects must be securely
fastened in the luggage compartment. Note the
following to maintain good vehicle handling:
> Distribute the load evenly in the luggage com-
partment.
> Stow heavy luggage as far forward in the lug-
gage compartment as possible.
» Use non-elastic cords attached to the tie-downs
to secure objects.
Z\ WARNING
— Loose objects can be thrown around the ve-
hicle interior during sudden driving or brak-
ing maneuvers, which increases the risk of
an accident. Always stow objects securely in
the luggage compartment and secure them
at the tie-downs. Use straps suitable for
heavy objects.
— If pieces of luggage or objects are secured
to the tie-downs with unsuitable or dam-
aged straps, this can increase the risk of in-
jury during braking maneuvers or accidents.
— When transporting heavy objects, the vehi-
cle characteristics will change due to the
shift in the center of gravity, which increases
the risk of an accident. You may need to
adapt your driving style and speed to the
current conditions.
— The cargo net is only strong enough to se-
cure light objects. Heavy objects are not ade-
quately secured. Attempting to secure heavy
objects increases the risk of injury.
— Never exceed the permitted axle and load
and vehicle weight > page 286.
— Never secure a child safety seat to the tie-
downs.
— Never leave your vehicle unattended, espe-
cially if the luggage compartment lid is
open. Children could enter the luggage com-
partment and close the luggage compart-
ment lid from the inside. This creates the
risk of fatal injury, since the children would
be locked in and may not be able to escape
by themselves.
sO
— Do not allow children to play in or on the ve-
hicle. Close and lock the luggage compart-
ment lid as well as all other doors when you
leave the vehicle.
— Never transport passengers in the luggage
compartment. Every passenger must be cor-
rectly secured with the safety belts in the
vehicle > page 182.
() Note
Make sure that the heating grid strips for the
rear window defogger are not damaged by
abrasive objects.
G) Tips
— The tire pressure must be adapted to the
load > page 250.
— You can purchase straps at specialty stores.
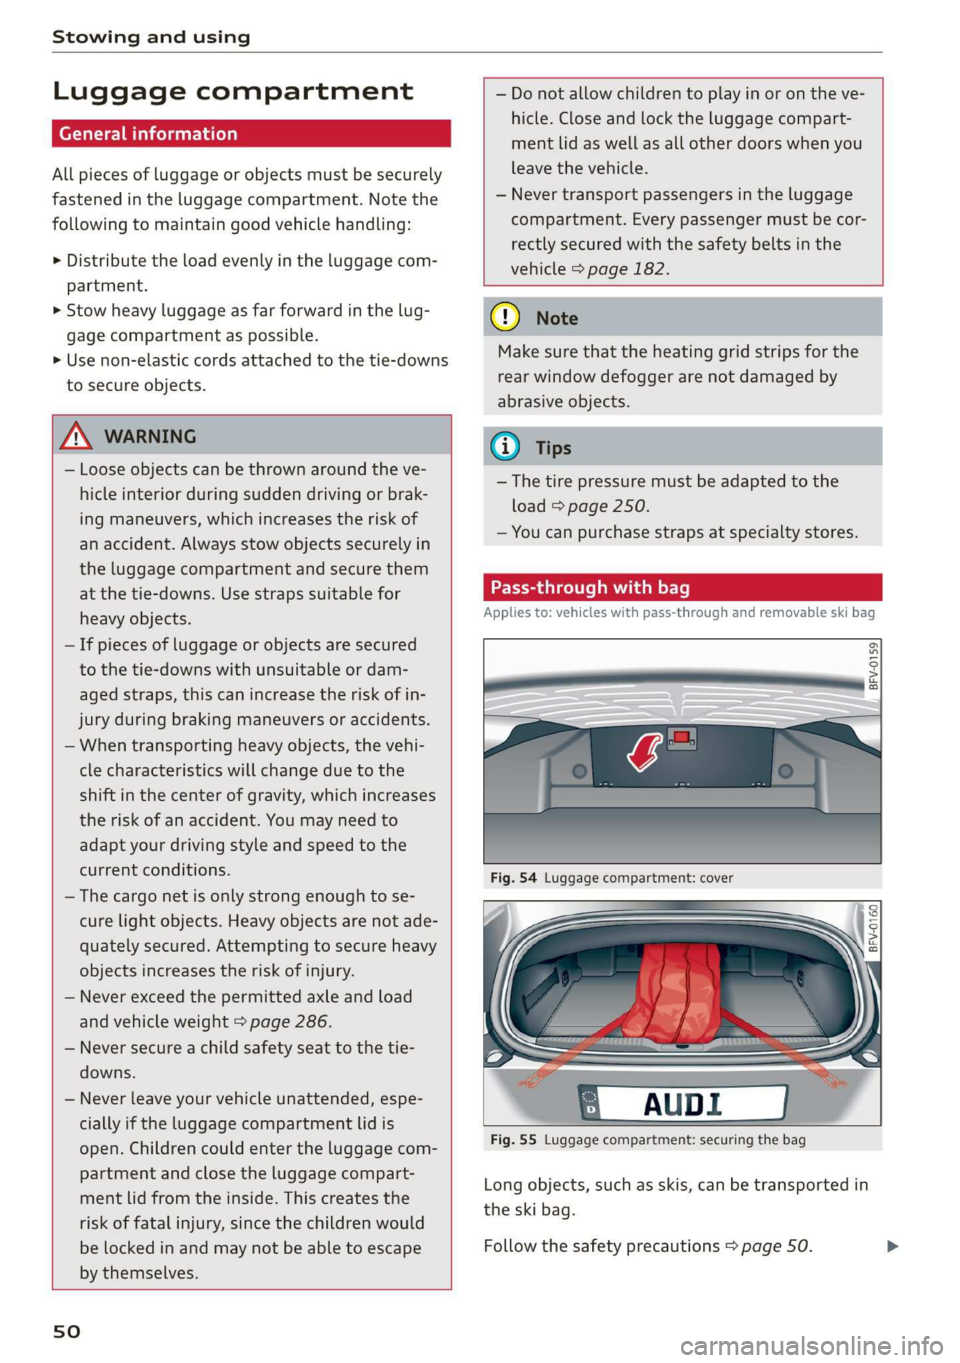
Pass-through with bag
Applies to: vehicles with pass-through and removable ski bag
BFV-0159
Fig. 55 Luggage compartment: securing the bag
Long objects, such as skis, can be transported in
the ski bag.
Follow the safety precautions > page 50.
Page 53 of 304

8S58012721BA
Stowing and using
Loading
> Open the storage compartment cover between
the seat backrests.
> Open the luggage compartment lid.
> Press the release button and fold the cover for
the pass-through towards the luggage com-
partment © fig. 54.
> Slide the bag from the luggage compartment
into the vehicle interior with the zipper facing
toward the rear > /\.
> Load the ski bag.
Securing
> Secure the carabiner hooks on both straps in
the corresponding rear tie-downs > fig. 55.
Z\ WARNING
After loading the bag, it must be tied down
with both straps.
@) Tips
— Only fold the ski bag up if it is dry.
— Lay skis in the bag with the points facing
forward and ski pole points facing the rear.
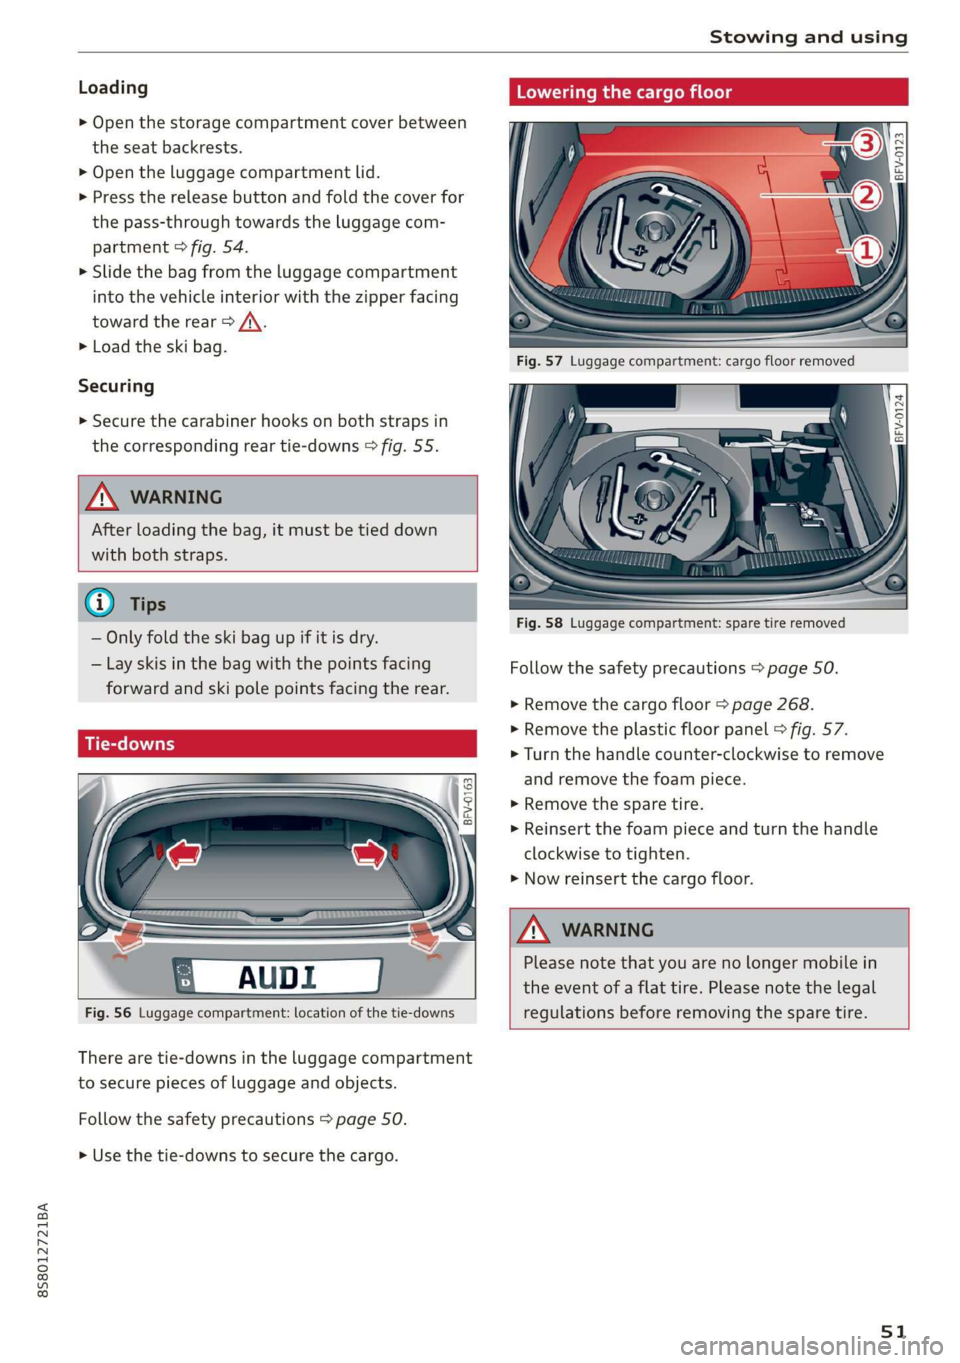
Fig. 56 Luggage compartment: location of the tie-downs
There are tie-downs in the luggage compartment
to secure pieces of luggage and objects.
Follow the safety precautions > page 50.
> Use the tie-downs to secure the cargo.
Lowering the cargo floor
BFV-0124
Fig. 58 Luggage compartment: spare tire removed
Follow the safety precautions > page 50.
> Remove the cargo floor > page 268.
> Remove the plastic floor panel > fig. 57.
> Turn the handle counter-clockwise to remove
and remove the foam piece.
> Remove the spare tire.
> Reinsert the foam piece and turn the handle
clockwise to tighten.
> Now reinsert the cargo floor.
ZA WARNING
Please note that you are no longer mobile in
the event of a flat tire. Please note the legal
regulations before removing the spare tire.
51
Page 67 of 304

8S8012721BA
Driving
— Power is still transferred to the wheels when
the engine is running at idle. To prevent the
vehicle from “creeping”, you must keep your
foot on the brake when the engine is run-
ning and the selector lever is in the "D", "S"
or "R" position or “tiptronic” mode is select-
ed.
— Do not inadvertently press the accelerator
pedal when the vehicle is stationary. Other-
wise the vehicle will start to move immedi-
ately, even if the parking brake is set. This
could result in a crash.
— Do not press the accelerator pedal when
changing the selector lever position while
the vehicle is stationary and the engine is
running.
— Never engage the R or P selector level posi-
tions while driving. It could cause a crash.
— Before driving down a steep slope, reduce
your speed and shift into a lower gear with
“tiptronic”.
— Do not ride the brakes or press the brake
pedal
too often or too long when driving
downhill. Constant braking causes the
brakes to overheat and can substantially re-
duce braking performance, increase braking
distance, or cause complete failure of the
brake system.
— If you must stop on an incline, always hold
the vehicle in place with the foot brake or
parking brake to prevent it from rolling
back.
— Never hold the vehicle on an incline with a
slipping clutch. The clutch opens automati-
cally when it becomes too hot from the over-
load. The | indicator light turns on and a
message appears > page 67 when the
clutch is overloaded.
— If the engine must run while you are work-
ing in the engine compartment with the
hood open, make sure a gear is not engaged.
The selector lever must be firmly in the
P position and locked in place and the park-
ing brake must be set > page 227. Other-
wise, the vehicle could begin moving when
increasing the engine speed, even with the
parking brake set.
CG) Note
— When stopping on an incline, do not try to
hold the vehicle in place by pressing the ac-
celerator pedal while a driving gear is se-
lected. This can cause the automatic trans-
mission to overheat and can damage it. Set
the parking brake or press the brake pedal
to prevent the vehicle from rolling.
— Allowing the vehicle to roll when the engine
is stopped and the selector lever is in the N
position will damage the automatic trans-
mission because it is not lubricated under
those circumstances.
— The transmission can overheat and be dam-
aged under certain driving and traffic condi-
tions such as frequent starts, creeping for a
long time, or stop-and-go traffic. When the
fs} or & indicator light turns on, stop the
vehicle at the next opportunity and let the
transmission cool > page 67.
— Allowing the vehicle to roll when the engine
is stopped will damage the S tronic trans-
mission because it is not lubricated
=> page 274, Towing.
@) Tips
For safety reasons, the parking brake is re-
leased automatically only when the driver's
safety belt is fastened.
Hill descent control
The hill descent control system assists the driver
when driving down hills.
Hill descent control is activated when the selec-
tor lever is in the "D" or "S" position and you
press the brake pedal. The transmission automat-
ically selects a gear that is suitable for the hill.
Hill descent control tries to maintain the speed
that was selected at the time of braking, within
physical and technical limitations. If may still be
necessary to adjust the speed with the brakes.
Because hill descent control cannot shift down
farther than 3rd gear, it may be necessary to shift
into tiptronic mode in very steep areas. In this
65
>