2019 AUDI TT ROADSTER remote start
[x] Cancel search: remote startPage 10 of 304

Quick access
Red indicator lights
Anti-lock braking system (ABS)
=>page 19
Safety systems ¥
>page 18
Brake pads
=>page 16
Electromechanical parking brake
>page 17
Tire pressure
=> page 256 or > page 258
Brake system ¥
=>page 16
Brake system 4
=>page 16
Electromechanical parking brake
=>page 17
Electromechanical parking brake
=>page 17
Cooling system
=>page 17
Tire pressure
Engine oil pressure => page 256 or © page 258
> page 231
Electrical system
=> page 236
Engine stop while driving
>page 18
Safety belt
>page 18
Electromechanical steering Y
=> page 89
Steering lock
>page 18
Central indicator light
=>page 19
Engine start system
>page 18
Transmission malfunction
=> page 67
Engine control
>page 19
Malfunction Indicator Lamp (MIL) ¥
=>page 227
Engine speed limitation
=> page 11
Engine oil level (MIN)
=> page 231
Engine oil sensor
=> page 231
Electrical system
=> page 236
Tank system
>page 19
Washer fluid level
>page 19
Windshield wipers
Rear spoiler = page 19
=> page 90 Remote control key
=> page 58
Yellow indicator lights
Electronic Stabilization Control (ESC)
v
=>page 19
Electronic Stabilization Control (ESC)
Vv
=>page 19
Battery in remote control key
=> page 23
Bulb failure indicator
=>page 19
Headlight range control system
=> page 20
Adaptive light
Anti-lock braking system (ABS) ¥ > page 20
=>page 19
Light/rain sensor
=> page 20
Page 24 of 304

Opening and closing
BFV-0278
Fig. 11 Your vehicle key set
@ Remote or convenience key*
The convenience key* is a remote control key with
special functions > page 24 and > page 57.
You can unlock/lock your vehicle with the remote
control key. A mechanical key is integrated in the
remote control key > page 23.
@ Key tag with vehicle code*
The vehicle code* on the key tag can be rubbed
off. It does not have a function.
Replacing a key
If a key is lost, see an authorized Audi dealer or
authorized Audi Service Facility. Have this key de-
activated. It is important to bring all keys with
you. If a key is lost, you should report it to your
insurance company.
Number of keys
You can check the number of keys assigned to
your vehicle in the Infotainment system. To do
this, select the [MENU] button > Vehicle > left
control button > Service & checks > Vehicle in-
formation. This way, you can make sure that you
have all the keys when purchasing a used vehicle.
Electronic immobilizer
The immobilizer prevents unauthorized use of
the vehicle.
Under certain circumstances, the vehicle may not
be able to start if there is a remote control key
from a different vehicle manufacturer on the key
chain.
22
Data in the master key
When driving, service and maintenance-relevant
data is continuously stored in your remote con-
trol key. Your Audi service advisor can read out
this data and tell you about the work your vehicle
needs. This applies also to vehicles with a con-
venience key*.
Personal convenience settings
If two people use one vehicle, it is recommended
that each person always uses “their own” master
key. When the ignition is turned off or when the
vehicle is locked, personal convenience settings
for the following systems are stored and as-
signed to the remote master key.
— Climate control system
— Parking aid*
— Active lane assist*
— Side assist*
— Drive select
The stored settings are automatically recalled
when you unlock the vehicle, open the doors or
turn on the ignition.
ZA WARNING
If you leave the vehicle, switch the ignition off
and take the vehicle key with you. This applies
particularly when children remain in the vehi-
cle. Otherwise the children could start the en-
gine or operate electrical equipment such as
power windows.
() Note
Protect the remote control key against high
temperatures and direct sunlight.
@) For the sake of the environment
XX Do not dispose of remote control keys in
household trash. They contain materials that
can be recycled. Contact an authorized Audi
dealer or authorized Audi Service Facility for
more information.
G) Tips
— The operation of the remote control key can
be temporarily disrupted by interference >
Page 33 of 304

8S8012721BA
Opening and closing
Press both of the outer buttons on the con-
trol unit > page 30, fig. 25 until the yellow
LED (2) turns off and the green LED @ blinks.
This procedure clears the standard codes that
were set at the factory and does not need to
be repeated again to program the other but-
tons.
Briefly press the button in the control panel
that you want to program.
Wait until the yellow LED (2) blinks. The pro-
gramming mode is active for five minutes.
Go in front of the vehicle with the original re-
mote control transmitter for the system that
you are programming to the control panel
button.
Programming the button: step 2 at the
radiator grille
6. Hold the remote control transmitter at the
vehicle radiator grille > fig. 26.
Now press the remote control transmitter
until the turn signals on your vehicle blink.
This can take up to 30 seconds.
If the emergency flashers blink three times,
the programming was successful. If the
emergency flashers only blink one time, the
five-minute time limit for programming has
expired or the programming was unsuccess-
ful. Repeat the programming procedure
starting from the third step or change the
distance to the radiator grille.
If the garage door or other systems do not
open with the HomeLink buttons even if the
programming was successful, the system
may use a rolling code instead of a fixed
code. You must also then perform rolling
code programming > page 31.
The other two buttons in the control panel can be
programmed using the instructions given above.
Start with step 3.
Deleting button programming
The programmed buttons cannot be deleted indi-
vidually. They must be deleted all at once. Repro-
gram the buttons if necessary.
> Switch the ignition on.
> Press both of the outer buttons on the control
unit until the yellow LED (2) turns off and the
green LED (@ blinks.
Reprogramming buttons
> Switch the ignition on.
> To reprogram an individual button, press the
desired button until the green LED (@) turns off
and the yellow LED (2) starts to blink (after ap-
proximately 20 seconds). Release the button
immediately. The programming mode is active
for five minutes.
> Continue with step 5.
@ Tips
— The distance needed between the remote
control transmitter and the garage door
opener module in the radiator grille
=> fig. 26 depends on the system you are
programming.
— Depending on the system model, you may
need to release the button on the remote
control transmitter while it is programming
and press it again. Hold every position you
try when programming for at least 15 sec-
onds before trying a new position. Keep an
eye on the vehicle turn signals while doing
this.
Rolling code programming
Applies to: vehicles with garage door opener
On some systems, programming a rolling code is
also necessary.
Identifying a rolling code
> Press the button in the control unit that is al-
ready programmed again and hold it down.
>» Watch the green LED @) > page 30, fig. 25. If
the green LED blinks quickly, the system (such
as a garage door) has a rolling code.
> Program the rolling code as follows:
Activating the system motor unit
> Locate the programming button on the system
motor unit. The exact location and color of the
button may vary depending on the brand.
> Press the programming button on the system
motor unit (usually this will activate a “display” >
31
Page 46 of 304

Lights and Vision
Replacing windshield wiper blades
he
B8R-0379
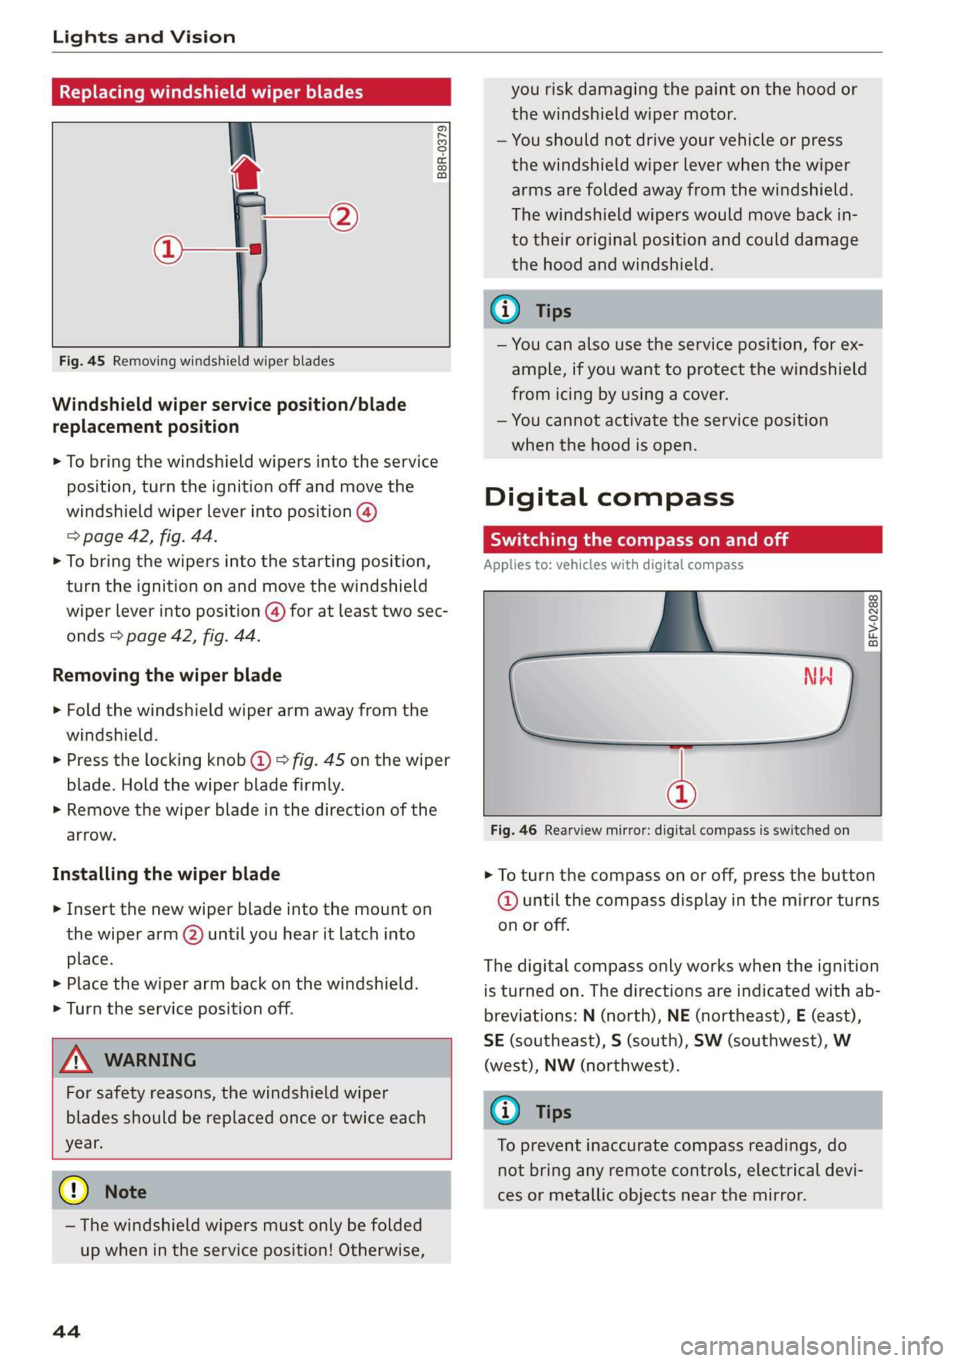
Fig. 45 Removing windshield wiper blades
Windshield wiper service position/blade
replacement position
> To bring the windshield wipers into the service
position, turn the ignition off and move the
windshield wiper lever into position @)
> page 42, fig. 44.
> To bring the wipers into the starting position,
turn the ignition on and move the windshield
wiper lever into position (@) for at least two sec-
onds > page 42, fig. 44.
Removing the wiper blade
> Fold the windshield wiper arm away from the
windshield.
> Press the locking knob (@) > fig. 45 on the wiper
blade. Hold the wiper blade firmly.
> Remove the wiper blade in the direction of the
arrow.
Installing the wiper blade
> Insert the new wiper blade into the mount on
the wiper arm (2) until you hear it latch into
place.
» Place the wiper arm back on the windshield.
> Turn the service position off.
Z\ WARNING
For safety reasons, the windshield wiper
blades should be replaced once or twice each
year.
@) Note
— The windshield wipers must only be folded
up when in the service position! Otherwise,
44
you risk damaging the paint on the hood or
the windshield wiper motor.
— You should not drive your vehicle or press
the windshield wiper lever when the wiper
arms are folded away from the windshield.
The windshield wipers would move back in-
to their original position and could damage
the hood and windshield.
G) Tips
— You can also use the service position, for ex-
ample, if you want to protect the windshield
from icing by using a cover.
— You cannot activate the service position
when the hood is open.
Digital compass
Scale ma meel eR meme a
Applies to: vehicles with digital compass
BFV-0288
NW
@
Fig. 46 Rearview mirror: digital compass is switched on
> To turn the compass on or off, press the button
@ until the compass display in the mirror turns
on or off.
The digital compass only works when the ignition
is turned on. The directions are indicated with ab-
breviations: N (north), NE (northeast), E (east),
SE (southeast), S (south), SW (southwest), W
(west), NW (northwest).
(i) Tips
To prevent inaccurate compass readings, do
not bring any remote controls, electrical devi-
ces or metallic objects near the mirror.
Page 61 of 304

8S58012721BA
Driving
authorized Audi Service Facility immediately to
have the malfunction corrected. To start the en-
gine, press and hold the [START ENGINE STOP
button.
Remote control key: hold back of key
against the designated area. See owner's man-
ual
This message appears if there is no convenience
key inside the vehicle or if the system does not
recognize the key. The convenience key may not
be recognized, for example, if it is covered by an
object that disrupts the signal (such as a brief-
case), or if the key battery is weak. Electronic de-
vices such as cell phones can also interfere with
the signal.
To still be able to start or stop the engine, see
= page 59, Starting the engine when there is a
malfunction.
B Remote control key: key not detected. Is the
key still in the vehicle?
The BSB indicator light turns on and this message
appears if the convenience key was removed from
the vehicle when the engine was running. If the
convenience key is no longer in the vehicle, you
cannot switch the ignition on or start the engine
once you stop it. You also cannot lock the vehicle
from the outside.
Please press the brake pedal
This message appears if you do not press the
brake pedal when starting the engine.
Please select N or P
This message appears when starting or stopping
the engine if the selector lever is not in the "N" or
"P" position. The engine will not start/stop.
Starting the engine when there is a
Tare iira dea)
It may not be possible to start the engine under
certain circumstances, for example, if the bat-
tery
in the vehicle key is drained, if interference is
affecting the key or if there is a system malfunc-
tion.
Fig. 66 Steering column/remote control key: starting the
engine if there is a malfunction
As long as the message ?) Remote control key:
hold back of key against the designated area.
See owner's manual is displayed, you can emer-
gency start your vehicle.
> Press the brake pedal.
> Press the [START ENGINE STOP] button.
> Hold the master key in the location indicated in
the illustration ?) © fig. 66. The engine will
start.
> If the engine does not automatically start,
press the [START ENGINE STOP] button again.
(i) Tips
You can view the message again by pressing
the [START ENGINE STOP] button.
Electromechanical
parking brake
The ©) switch is located under the selector lever
in the center console.
Your vehicle is equipped with an electromechani-
cal parking brake. The parking brake is designed
to prevent the vehicle from rolling unintentional-
ly and replaces the hand brake.
59
Page 298 of 304

Index
Rearspoile tics + 2 sesame» © ssemte ow aucun 2 v eae © 90
Cleaning....... 06... cece eee eee eee 264
Rearview camera
refer to Parking systems............. 81, 82
Rearview mirror dimming.............04 42
Rear window defogger...........--...55+ 54
Recirculation mode..............e eee eee 53
RECUPe rations « « cece 0 x avers © o sanene @ = ener 15
Refueling « = ssa «2 sews vo enews ¥ x ere #2 owe 224
Remote control
Garage door opener..........-..000000- 30
Remote:control-key, cesses co cise © @ came» 9 ore 22
Convenience opening and closing......... 29
Keyreplacements: x sav 5 = apse + o awe & os 22
LED. o suse « seeseon 4 i ivewoe & oar a 8 one 0 Wares 23
Mechanical key..............-.00000 000 23
Persorializationiay: s 2 wes 9 s awene ay enow 2 aE 22
Replacing the battery.................. 23
Unlocking and locking.............eeeee 24
Removing the caps (wheel bolts)......... 270
Removing the wheel hub covers.......... 270
Repalt’s wecas os wows vo aimee 6 1 oeee a a ee oo 280
Airbag system... 1.2... 2c eee eee eee 203
Replacement key........... cece cece eee 22
Replacement parts...............00 000s 282
Replacing windshield wiper blades......... 44
Reporting Safety Defects................ 282
Reset
refer to Restart (MMI) .......... 000 eee 176
Restart (MMI) « csssoss « 2 cvs x & cameos & & ramon © 3 176
REEACtOE sass s x neve & e Rae ye HOR 8 E ROG 3 185
Reverse (automatic transmission).......... 62
Rewinding (audio/video file)............. 160
RIMS 2... eee ee 254
Ringtone settings...................00. 122
Route criteria. ..... 2.2... eee ee eee 139
Route guidance
refer to Navigation................-.. 132
Running direction (tires)..............-. 273
S
Safe driving. ........ 0... c eee cece eee 177
Safe driving habits................0.00. 177
296
Safety
Airbag system..... 2.2... 00. e eee eee ee 189
Belts « wri 2 y omy © Ramen 3 2 BRR ao Bee EE 182
Correct seating position............... 178
Telephone ...... 0... 0. cece cece eee 110
Safety belt microphone...............45 123
Safety belt position...............0000 186
Safety belts worn by pregnant women.... 186
Safety belt pretensioner
Service and disposal.................. 188
Safety belts.............0022.000- 182,185
Cleaning =< = s ses + 4 game + yews as ews ee 265
Danger to passengers who do not wear a
safety belt... 0.0.2... eee eee eee 183
FaStening » = seen s woerg se eps patee ae He 185
Timproperly: worMiscsss «2 css © o execu ©» eevee 187
Indicator light.................-00000- 18
NOE WOT: « ¢ caees + « wewie = & emg ¥ wees 5 183
Safety belt position .......... 000s ee ee 186
Safety belt tensioner.................. 187
Safety instructions... ..........0e.0 eee 184
Securing child safety seats............. 219
Special considerations for pregnant wom-
ON = seme ¢ sews so HES Gv FES Ge eR et oe 186
Unfasteniy ccc oc ees x s mami oo mane 2 we 187
Warning/indicator light............... 182
Wort properly: zc ss cers = & eee 5 ¢ ews 184
Safety belt warning light................ 182
Safety instructions
for using child safety seats............. 213
For using safety belts................. 184
Monitoring the Advanced Airbag System... 202
Safety systems (indicator light)............ 18
Saving fuel
Energy consumers..........-.0-.0-0005 is
ReCUperation): < sues s xeay © s dome = x wee = 15
SGafi (FA(O) eee: + « wees 5 = eee 4s een 2» eee 148
Screwdriver............00000 cece eee eee 268
SDcardreader.............--2----00-5 153.
Search
refer to Free text search............... 100
Search area (point of interest)............ 135
Searching for anentry.............-.... 100
Seat heating............. 0. e eee eee eee 54
Seating Capacity ior . « cscavor es asor « puiereme o 6 sae 182