2019 AUDI TT ROADSTER emergency towing
[x] Cancel search: emergency towingPage 4 of 304

Table of contents
About this Owner's Manual......
SUMIMALY: ; « ss6% : osen ss sean cs poe s
QC CCeS Skis: si esis a 6 ores os ewe
Cockpit overview.............-000005
Indicator lights overview...........0.
Display and operation............
Instrument cluster...............
Instrument cluster overview...........
Coolant temperature indicator.........
Tachometer.......... 0.0 eee eee eee
Odometer as = s eee = seen ge zee a tows e
Outside temperature display...........
Fuellevel.......... 0. cece eee eee eee
Multifunction steering wheel..........
Vehicle functions « se-0 2. ese ve eee ees
MessageS ... 0... eee eee eee
Starting and driving.............
Opening and closing.............
Central locking 2.2% ieee seven a eevee
Luggage compartment lid.............
Power windows.............0.00 0005
Garage door opener...............0..
POWER EOPE: « «cece 0 csv « o semiens 6 0 eens
Automatic power top.................
Wind deflector ecax « x came + 5 yom 2 4 ews
Power top emergency operation........
Lights and Vision.................
Exterior lighting ssivses + « ssa 3s inane 9 & sou
Interior lighting. ................000.
VISION s « s saas ss sees Fo Hees Eo ee ee
Windshield wipers..............00005
Digital compass................0000.
Storage... eee eee eee
Luggage compartment...............
NOD
OO
11 il 12 12 15
16
21 21 21
27
28
30
3.
33 35 35
38 38
40
Al 42
44
46 46
46
48
48
48 48 49
50
Warm and cold...
Climate control system............00.
DRIVING: & tacos 6 2 maemo e eae 0 x iano 4
General information .
Steering.........6.
Starting and stopping
Electromechanical par
Starting to drive.....
theengine.......
king brake.......
Automatic transmission..............
Trailer towing.......
Driver assistance.
Assist systems...
Speed warning system...............-
Cruise control system
Audi active lane assist
Audi side assist
Audi drive select (drive settings) ........
Parking aid.......
Introduction........
Rear parking system .
Parking system plus.............-.00.
Rearview camera
Intelligent Technology...........
Electronic stabilization control (ESC) ....
StEOKing © esse we wssuse
All wheel drive (quattro) ..............
Rear spoiler........
Energy management .
Information about data recorded by
vehicle control modules...............
Infotainment system............
Multi Media Interface............
Traffic safety information.............
Introduction........
MMI On/Off knob with joystick function . .
MMI operation......
MMT OU CPi ccm. » 6 camere
Control knob with joys
Letter/number speller
tick function. ....
52
56 56 57 57 59
61
61
69 70 70 70
70
72
75
77
80
80
81
81
82
84
84
86
86
88
89
89 90
91
91 92
92
92
92
92
93
94
97
98
Page 6 of 304

Table of contents
Kiteerairbagsicc 2 secs ee esac a w anaes ¥ vo 204
Side airbags. ........... eee eee eee 206
SRC SARSEY ois i ese se ween 4 & ese a 210
Important information............... 210
Child 'safety S@atSiivec 2s gcan
Additional information............... 222
Maintenance and Care........... 223
Checking and Filling............. 223
Fuel... 2. cece eee eee eee eee 223
Refuelingjecs ss sees se ane + eeee § s peme 224
Emissions control system...........4. 227
Engine compartment................. 227
ERGINGOtls seus 2 x seme « ¥ neue =e oRBER Fae 230
Cooling:system . « sscses v < ssesens vo eevee so ave 234
Brake fluid... 2... eee eee eee 235
Electrical SySteMi wis ¢ scm ae mews eg ey 236
Battery: « & cess 6 6 ceva © 5 mews « wenn ¥ © oi 236
Windshield washer system...........- 238
Service interval display............... 239
Wheels ........ 0... eee 240
Wheels and Tires . . 240
Tire pressure monitoring system....... 256
Tire pressure monitoring system....... 258
Care and cleaning................ 262
General information wo. ceo saeco es 262
Car washes...............2..20.00005 262
Cleaning and care information......... 263
Taking your vehicle out of service....... 267
Do-It YOUrSEUT v5 ¢ «gee8 & peas es eee 268
Emergency assistance........... 268
General
information................. 268
EQUIPITICNE sass ¢ ¢ eens + eeen a 3 ces 3s He 268
Tire mobility kit ose: <2 cere ae eee se ees 268
Replacing wheels..............000005 270
Sparetire........... 0.00.0 20.000000. 274
TOWING scsvss = ¢ wesos « § eeons & 2 Keres 4 = HES 274
Fuses and bulbs.................. 277
FUSES an + x css 5 © ames + © eRe = Beem He 277
BULDSisi0e svowave 4 6 oniuen a a stants a Hanon w 8 ave 279
Customer information........... 280
Accessories and technical
CHANGES: « s seve + a wees ¢ s eee oe ee Ze 280
Warratttys: < s wexsas os menus vo oncans © 0 sence 280
Audi Literature Shop.............005- 280
Driving in other countries............. 280
Maintenance, repairs, and technical
modifications...............02.-00 280
Accessories and parts..............-. 282
Reporting Safety Defects.............. 282
Declaration
of compliance for
telecommunications equipment and
electroniesystemss: + - seca ss sec oo waren 283
Technical data.................... 285
Identification data................0.. 285
Ne@hicle’datiabaccic = 2 cms » @ canseae » 1 sumone a oo 285
TWAS Rey + xaos 5c owe co UE a eee se 287
Page 71 of 304

8S58012721BA
Driving
ZA WARNING
— The parking lock may only be released using
the emergency release if the parking brake
is set. If it is not working, secure the vehicle
from rolling using the brake pedal or other
suitable means, such as blocking a front and
a rear wheel. An unsecured vehicle may roll
away, which increases the risk of an acci-
dent.
— Only activate the emergency release while
ona level surface or a slight slope.
—To reduce the risk of an accident, you must
not drive when the emergency release is ac-
tivated.
Trailer towing
General information
Your Audi is not designed to tow a trailer.
Towing a trailer with your Audi is not recom-
mended and can cause damage to the car. Dam-
aged caused by towing a trailer is not covered by
your Audi Warranty.
69
Page 276 of 304

Emergency assistance
> The wheel bolt tightening specification must be
90 ft lbs (120 Nm). Have it checked as soon as
possible with a torque wrench. Drive carefully
until then.
> Have the faulty wheel replaced as quickly as
possible.
Spare tire
General information
Applies to: vehicles with space-saving spare tire (compact
spare tire)
—maa
BFV-0166
The spare tire is intended for short-term use only.
Have the damaged tire checked and replaced if
necessary by an authorized Audi dealer or author-
ized Audi Service Facility as soon as possible.
There are some restrictions on the use of the
compact spare tire. The compact spare tire has
been designed specifically for your type of vehi-
cle. Do not replace it with the spare tire from an-
other type of vehicle.
Removing the spare tire
> Turn the handle > fig. 197 @ counter-clock-
wise.
>» Remove the spare tire.
Removing the vehicle jack
> Lift up the cover on the right side of the lug-
gage compartment and remove the vehicle
jack.
Snow chains
For technical reasons, the use of snow chains on
the
compact spare tire is not permitted.
If you have to drive with snow chains and a front
tire fails, mount the spare tire in place of a rear
274
tire. Install the snow chains on the rear tire that
you removed, and install that in place of the
front tire that failed.
Z\ WARNING
— After installing a spare tire, the tire pressure
must be checked as soon as possible.
— Do not drive faster than SO mph (80 km/h)
with a compact spare tire. Driving faster
than that increases the risk of an accident.
— To reduce the risk of an accident, avoid hard
acceleration or braking and driving fast
around curves with the compact spare tire.
— To reduce the risk of an accident, never drive
with more than one compact spare tire.
— Normal summer or winter tires must not be
mounted on the compact spare wheel rim.
Towing
General information
You should only perform the steps that follow if
you have the necessary tools and technical ex-
pertise.
Towing requires a certain amount of practice. Au-
di recommends contacting a towing company to
have the vehicle transported.
You should only have your vehicle towed by an-
other vehicle when disabled in exceptional cir-
cumstances. Inexperienced drivers should not
tow.
Notes on towing
When the engine is stopped, the transmission
will not be sufficiently lubricated if traveling at
high speeds and long distances:
— The maximum permitted towing speed is 30
mph (50 km/h).
— The maximum permitted towing distance is 30
miles (50 km).
Additional information on towing with a tow
truck
The vehicle may only be towed with the front axle
raised. Do not wrap any chains or cables around
the brake lines.
Page 277 of 304

8S8012721BA
Emergency assistance
If the vehicle should be towed with the axle
raised, then the ignition must be switched off to
reduce the risk of damage to the drivetrain.
Tow bar and towing cable
The vehicle can be towed with a tow bar or tow-
ing cable. Both drivers should be familiar with
the special considerations when towing, especial-
ly when using a towing cable.
Always make sure the traction force does not ex-
ceed the permitted level and there are no shock
loading conditions. There is always the risk of the
coupling becoming overloaded when driving off-
road.
For the most safety and security, drive with a tow
bar. You should use a towing cable only if a tow
bar is not available. Use a towing cable made of
synthetic elastic cable similar elastic material.
ZA\ WARNING
— Towing highly increases the risk of an acci-
dent, for example from colliding with the
towing vehicle.
— To reduce the risk of an accident, do not al-
low anyone to remain inside the vehicle
when it is being transported by a tow truck
or a special transporter.
@) Note
— If normal towing is not possible, for exam-
ple if the transmission is faulty or if the
towing distance is greater than 30 miles
(50 km), then transport the vehicle on a
special carrier.
— If the vehicle is towed by a tow truck at the
axle that is not permitted, this can cause se-
vere damage to the transmission.
— The vehicle must not be tow started for
technical reasons.
@) Tips
—If there is a power failure, the selector lever
will not move out of the "P" position. The
parking lock must be released using the
D_ Requirement: the vehicle battery must have a sufficient
charge level.
emergency release before towing the vehi-
cle > page 68.
— Follow the local legal regulations for tow-
ing.
Read and follow the important information under
=> page 274.
Preparations
> Only secure the towing cable or tow bar at the
designated towing loops > page 276,
=> page 276.
> Make sure the towing cable is not twisted. Oth-
erwise it could disconnect from the towing loop
while towing.
» Switch the emergency flashers on in both vehi-
cles > page 40. However, do not do this if it
prohibited by law.
Towing vehicle (front)
> Only start to drive when the towing cable is
taut.
> Be especially careful when accelerating.
> Avoid sudden braking or driving maneuvers.
Vehicle being towed (rear)
» Make sure the ignition is switched on so that
the steering wheel is not locked and so that you
can use the turn signals, the horn, and the
windshield wipers if needed > A\.
> The brake booster only works when the engine
is running. Power steering only works when the
ignition is switched on and the vehicle is roll-
ing )). If the brake booster and power steering
are not functioning, you must press the brake
pedal much harder and use more force to steer.
> Release the parking brake > page 59.
> Select the "N" selector lever position.
> Make sure the towing cable is always taut.
275
>
Page 278 of 304

Emergency assistance
Z\ WARNING
Never tow a vehicle using a tow bar or towing
cable if the vehicle does not have electrical
power.
Front towing loop
———
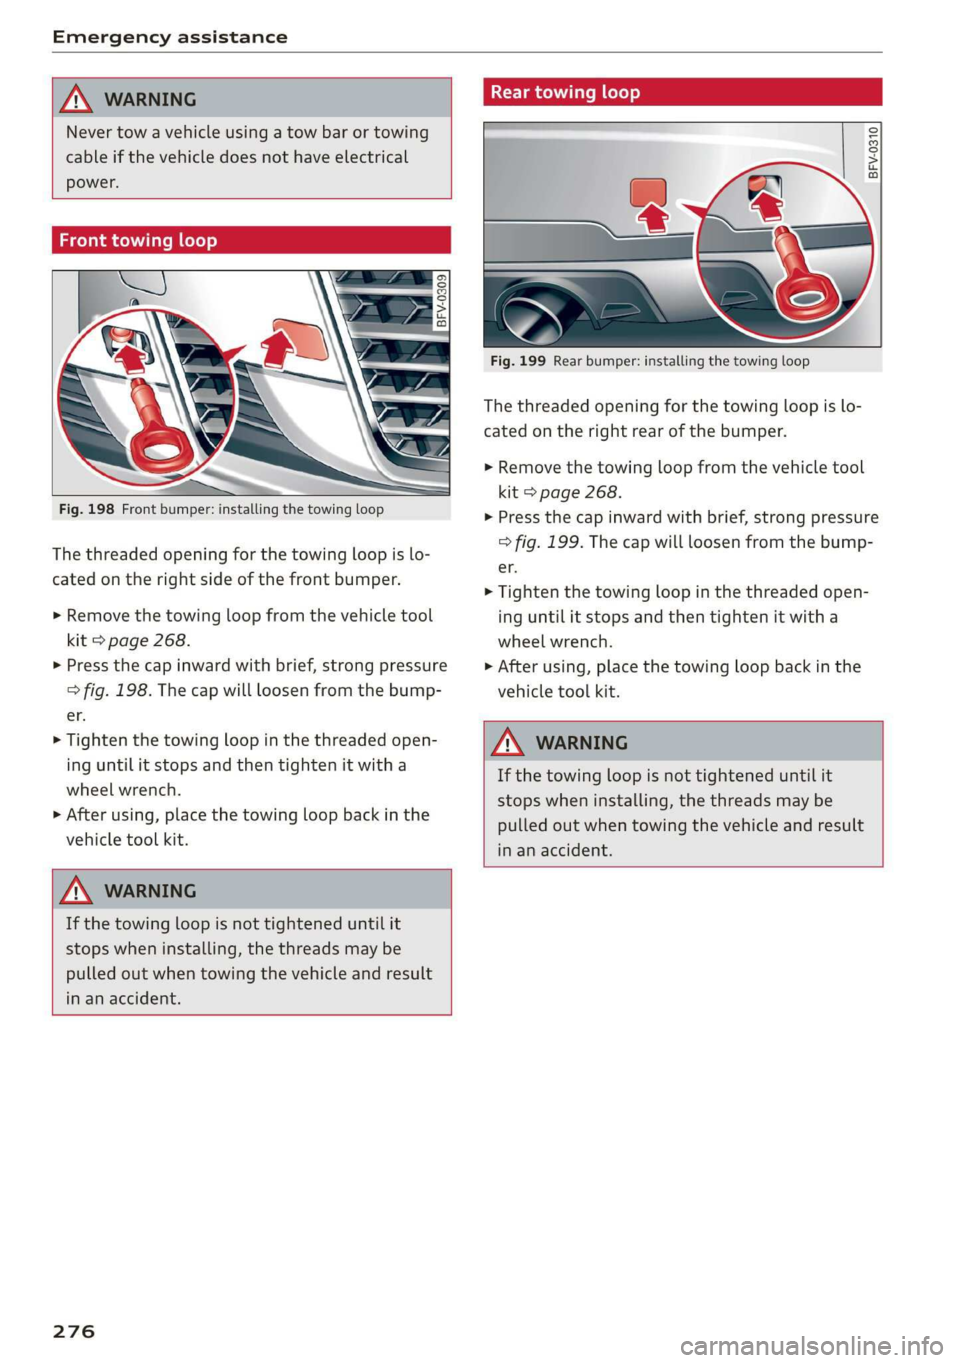
Fig. 198 Front bumper: installing the towing loop
The threaded opening for the towing loop is lo-
cated on the right side of the front bumper.
> Remove the towing loop from the vehicle tool
kit > page 268.
> Press the cap inward with brief, strong pressure
> fig. 198. The cap will loosen from the bump-
er.
> Tighten the towing loop in the threaded open-
ing until it stops and then tighten it with a
wheel wrench.
> After using, place the towing loop back in the
vehicle tool kit.
ZX WARNING
If the towing loop is not tightened until it
stops when installing, the threads may be
pulled out when towing the vehicle and result
in an accident.
276
Rear towing loop
BFV-0310
Fig. 199 Rear bumper: installing the towing loop
The threaded opening for the towing loop is lo-
cated on the right rear of the bumper.
> Remove the towing loop from the vehicle tool
kit > page 268.
> Press the cap inward with brief, strong pressure
> fig. 199. The cap will loosen from the bump-
er.
> Tighten the towing loop in the threaded open-
ing until it stops and then tighten it with a
wheel wrench.
» After using, place the towing loop back in the
vehicle tool kit.
Z\ WARNING
If the towing loop is not tightened until it
stops when installing, the threads may be
pulled out when towing the vehicle and result
in an accident.