2019 AUDI TT ROADSTER interior lights
[x] Cancel search: interior lightsPage 4 of 304

Table of contents
About this Owner's Manual......
SUMIMALY: ; « ss6% : osen ss sean cs poe s
QC CCeS Skis: si esis a 6 ores os ewe
Cockpit overview.............-000005
Indicator lights overview...........0.
Display and operation............
Instrument cluster...............
Instrument cluster overview...........
Coolant temperature indicator.........
Tachometer.......... 0.0 eee eee eee
Odometer as = s eee = seen ge zee a tows e
Outside temperature display...........
Fuellevel.......... 0. cece eee eee eee
Multifunction steering wheel..........
Vehicle functions « se-0 2. ese ve eee ees
MessageS ... 0... eee eee eee
Starting and driving.............
Opening and closing.............
Central locking 2.2% ieee seven a eevee
Luggage compartment lid.............
Power windows.............0.00 0005
Garage door opener...............0..
POWER EOPE: « «cece 0 csv « o semiens 6 0 eens
Automatic power top.................
Wind deflector ecax « x came + 5 yom 2 4 ews
Power top emergency operation........
Lights and Vision.................
Exterior lighting ssivses + « ssa 3s inane 9 & sou
Interior lighting. ................000.
VISION s « s saas ss sees Fo Hees Eo ee ee
Windshield wipers..............00005
Digital compass................0000.
Storage... eee eee eee
Luggage compartment...............
NOD
OO
11 il 12 12 15
16
21 21 21
27
28
30
3.
33 35 35
38 38
40
Al 42
44
46 46
46
48
48
48 48 49
50
Warm and cold...
Climate control system............00.
DRIVING: & tacos 6 2 maemo e eae 0 x iano 4
General information .
Steering.........6.
Starting and stopping
Electromechanical par
Starting to drive.....
theengine.......
king brake.......
Automatic transmission..............
Trailer towing.......
Driver assistance.
Assist systems...
Speed warning system...............-
Cruise control system
Audi active lane assist
Audi side assist
Audi drive select (drive settings) ........
Parking aid.......
Introduction........
Rear parking system .
Parking system plus.............-.00.
Rearview camera
Intelligent Technology...........
Electronic stabilization control (ESC) ....
StEOKing © esse we wssuse
All wheel drive (quattro) ..............
Rear spoiler........
Energy management .
Information about data recorded by
vehicle control modules...............
Infotainment system............
Multi Media Interface............
Traffic safety information.............
Introduction........
MMI On/Off knob with joystick function . .
MMI operation......
MMT OU CPi ccm. » 6 camere
Control knob with joys
Letter/number speller
tick function. ....
52
56 56 57 57 59
61
61
69 70 70 70
70
72
75
77
80
80
81
81
82
84
84
86
86
88
89
89 90
91
91 92
92
92
92
92
93
94
97
98
Page 23 of 304

8S8012721BA
Opening and closing
Opening and closing
Central locking
You can lock and unlock the vehicle centrally. You
have the following options:
— Remote control key > page 24
— Sensors in the door handles* > page 24
— Lock cylinder on the driver's door > page 26,
or
— Interior central locking switch > page 25
Automatic locking function (Auto Lock)
The Auto Lock function locks all doors and the
luggage compartment lid once the speed has ex-
ceeded approximately 9 mph (15 km/h).
The vehicle can be unlocked if the opening func-
tion in the central locking system switch is used
or one of the door handles is pulled. The Auto
Lock function can be switched on and off in the
Infotainment system => page 26.
In the event of a crash with airbag deployment,
the doors will also automatically unlock to allow
access to the vehicle.
Selective door unlocking
The doors and luggage compartment lid will lock
when they close. You can set in the Infotainment
system whether only the driver's door or the en-
tire vehicle should be unlocked when unlocking
=> page 26.
Turn signals
The turn signals flash twice when you unlock the
vehicle and flash once when you lock the vehicle.
If the blinking continues, one of the doors or the
luggage compartment lid is not closed or the ig-
nition is still switched on.
Unintentionally locking yourself out
Only lock your vehicle when all of the doors and
the luggage compartment lid are closed and the
remote control key is not in the vehicle. This re-
duces the risk of locking yourself out accidental-
ly.
The following conditions prevent you from lock-
ing your remote control key in the vehicle:
— If the driver's door is open, the vehicle cannot
be locked by pressing the & button on the re-
mote control key or by touching the locking
sensor* ona door.
— If the most recently used convenience key* is
inside the luggage compartment, the luggage
compartment lid will automatically open again
after closing it.
— If the last convenience key* that was used is de-
tected inside the vehicle, the vehicle cannot be
locked from the outside for a brief time > ©.
@) Note
Applies to: Vehicles with convenience key
— If the convenience key* that was last used is
detected inside the passenger compart-
ment, then the vehicle cannot be locked
from the outside. The turn signals will flash
several times to indicate this. If you do not
open the vehicle within a short time to re-
move the vehicle key, then the vehicle will
lock automatically. This prevents the vehicle
from being left unlocked for long periods of
time. The key will then be locked inside the
vehicle.
— If the convenience key* that was used last is
detected inside the luggage compartment,
it will not be possible to lock the luggage
compartment and the luggage compart-
ment lid will open. The turn signals will
flash several times to indicate this. The
doors will lock. Always take the convenience
key with you, or unauthorized people may
be able to enter the vehicle.
G) Tips
— Do not leave valuables unattended in the ve-
hicle. A locked vehicle is not a safe!
—The LED in the driver's door rail blinks when
you lock the vehicle. If the LED lights up for
approximately 30 seconds after locking,
there is a malfunction in the central locking
system. Have the problem corrected by an
authorized Audi dealer or authorized Audi
Service Facility.
21
Page 32 of 304

Opening and closing
Garage door opener
Applies to: vehicles with garage door opener
TTA
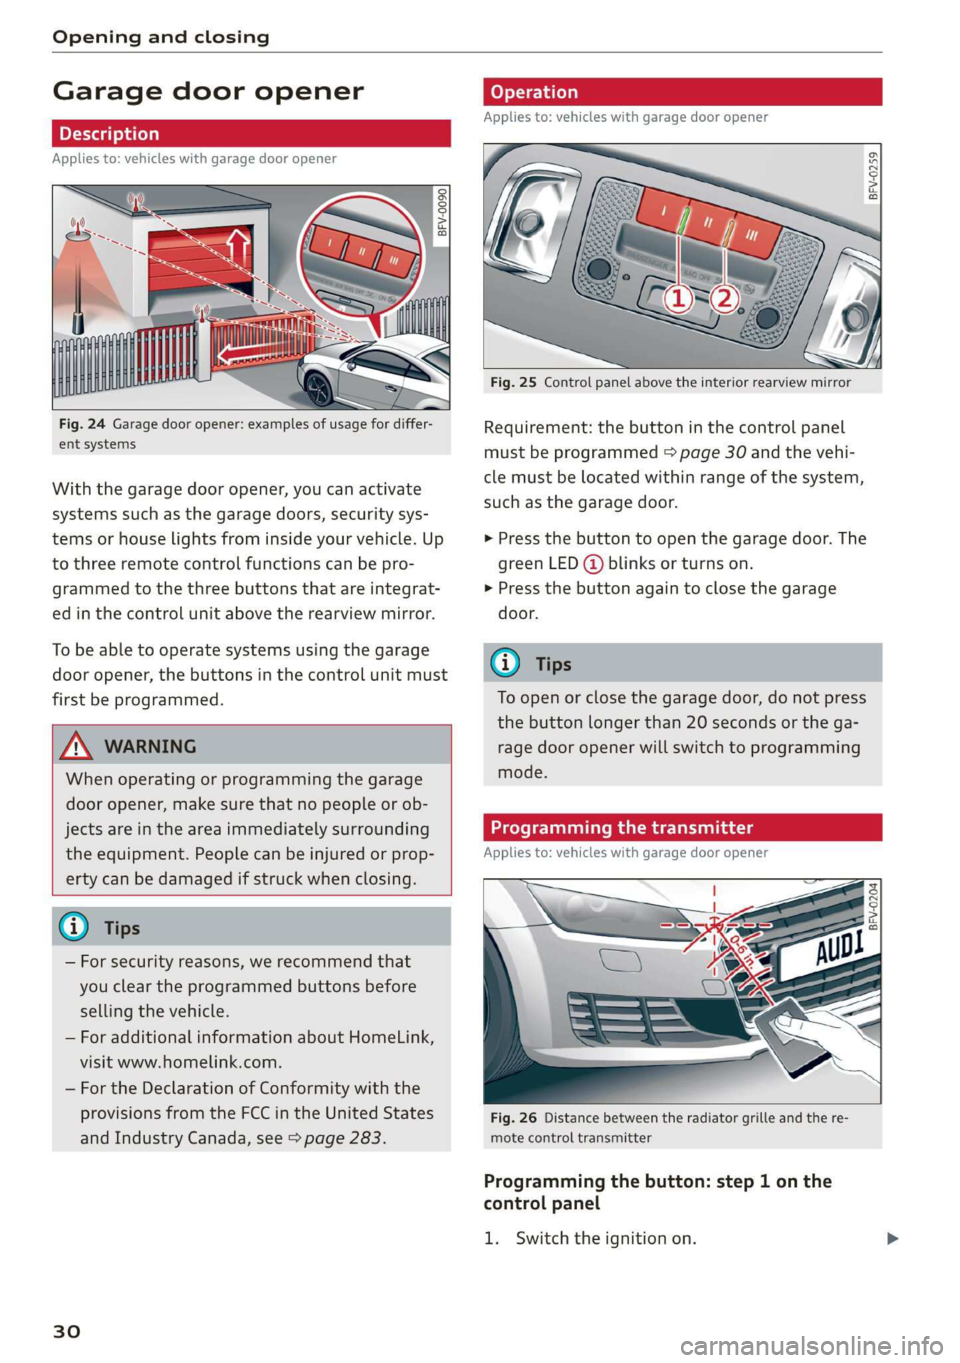
Fig. 24 Garage door opener: examples of usage for differ-
ent systems
With the garage door opener, you can activate
systems such as the garage doors, security sys-
tems or house lights from inside your vehicle. Up
to three remote control functions can be pro-
grammed to the three buttons that are integrat-
ed in the control unit above the rearview mirror.
To be able to operate systems using the garage
door opener, the buttons in the control unit must
first be programmed.
ZX WARNING
When operating or programming the garage
door opener, make sure that no people or ob-
jects are in the area immediately surrounding
the equipment. People can be injured or prop-
erty can be damaged if struck when closing.
— For security reasons, we recommend that
you clear the programmed buttons before
selling the vehicle.
— For additional information about HomeLink,
visit www.homelink.com.
— For the Declaration of Conformity with the
provisions from the FCC in the United States
and Industry Canada, see > page 283.
30
Applies to: vehicles with garage door opener
a a
aq
g >
i o
Fig. 25 Control panel above the interior rearview mirror
Requirement: the button in the control panel
must be programmed > page 30 and the vehi-
cle must be located within range of the system,
such as the garage door.
> Press the button to open the garage door. The
green LED (@ blinks or turns on.
» Press the button again to close the garage
door.
@ Tips
To open or close the garage door, do not press
the button longer than 20 seconds or the ga-
rage door opener will switch to programming
mode.
Programming the transmitter
Applies to: vehicles with garage door opener
BFV-0204
Fig. 26 Distance between the radiator grille and the re-
mote control transmitter
Programming the button: step 1 on the
control panel
1. Switch the ignition on.
Page 42 of 304

Lights and Vision
Automatic headlights
You can adjust the following settings in the Auto-
matic
headlights menu:
Activation time - you can adjust if the headlights
switch on Early, Medium, or Late according to
the sensitivity of the light sensor.
Audi adaptive light* - you can switch adaptive
light On and Off.
Daytime running lights*
USA models: the daytime running lights can be
switched on or off using the MMI. Select On or
Off.
Canada models: this function cannot be switched
off. They activate automatically each time the ig-
nition is switched on. This menu item is shown
with a “gray background”.
Entry/exit lighting
The entry lighting function illuminates the area
outside the vehicle when you unlock the vehicle
when it is dark. To switch on the function, select
Entry/exit lighting.
The exit lighting function illuminates the area
outside the vehicle when you turn the ignition off
and open the driver's door when it is dark. To
switch on the function, select Entry/exit light-
ing.
The entry/exit lighting only works when it is dark
and the light switch is in the AUTO position.
Emergency flashers
1. 3 q 2
> im o
Fig. 39 Center console: emergency flasher button
The emergency flashers makes other drivers
aware of your vehicle in dangerous situations.
40
> Press the A button to switch the emergency
flashers on or off.
You can indicate a lane change or a turn when the
emergency flashers are switched on by using the
turn signal lever. The emergency flashers stop
temporarily.
The emergency flashers also work when the igni-
tion is turned off.
@ tips
You should switch the emergency flashers on
if
—
you are the last car in a traffic jam so that
all other vehicles approaching from behind
can see your vehicle
— your vehicle has broken down or you are
having an emergency
— your vehicle is being towed or if you are tow-
ing another vehicle
Interior lighting
Interior lighting
Fig. 40 Headliner: interior lighting
4 - Door contact switch. The interior lighting is
controlled automatically.
A switch is no longer needed to switch the read-
ing lights on. A swiping movement or a brief tap
on the light is all that is needed to switch the
light on or off. If you hold your finger on the
reading light when switching it on, this can dim
the light down to a certain level.
Interior lighting
There are other optional interior lighting func-
tions that are available. Several functions canbe >
Page 43 of 304

8S58012721BA
Lights and Vision
set in the Infotainment system. Select in the In-
fotainment system: MENU button > Vehicle > left
control button >Vehicle settings > Interior light-
ing.
sda ata t cela
BFV-0015
Fig. 41 Instrument illumination
The brightness of the instrument cluster and the
center console can be adjusted.
> Press the knob to release it.
> Turn the knob toward "-" or "+" to reduce or in-
crease the brightness.
> Press the knob again to return it to its original
position.
Vision
Adjusting the exterior mirrors
5
Ss
z
z o
Fig. 42 Driver's door: knob for the exterior mirrors
Turn the knob to the desired position:
CY/® - Adjusts the left/right exterior mirror.
Move the knob in the desired direction.
GA - Heats the mirror glass depending on the out-
side temperature.
SA - Folds the exterior mirrors*. In the Infotain-
ment system, you can select if the mirrors fold in
automatically when you lock the vehicle
=> page 26.
Front passenger's exterior mirror tilt
function*
To help you see the curb when backing into a
parking space, the surface of the mirror tilts
slightly. For this to happen, the knob must be in
the position for the front passenger's exterior
mirror.
You can adjust the tilted mirror surface by turn-
ing the knob in the desired direction. When you
move out of reverse and into another gear, the
new mirror position is stored and assigned to the
key you are using.
The mirror goes back into its original position
once you drive forward faster than 9 mph
(15 km/h) or turn the ignition off.
Z\ WARNING
Curved mirror surfaces (convex) enlarge the
field of vision. However, they make objects in
the mirror appear smaller and farther away.
You may estimate incorrectly when you use
these mirrors to gauge your distance from the
vehicles behind you when changing lanes,
which increases the risk of an accident.
Qo Note
If the mirror housing was moved by outside
forces (such as an impact when maneuver-
ing), you must use the power folding function
to fold the mirror all the way out. The mirror
housing must not be moved back into place
by hand because this could impair the func-
tion of the mirror mechanism.
G@) Tips
If the power adjusting function malfunctions,
the glass in both mirrors can be adjusted by
pressing on the edge of it by hand.
41
Page 44 of 304

Lights and Vision
Dimming the mirrors
Manual dimming rearview mirror
> Pull the lever on the bottom of the mirror back.
Automatic dimming rearview mirror*
> The interior rearview mirror and exterior mir-
rors* dim automatically when light shines on
them, for example from headlights on a vehicle
behind you.
Z\ WARNING
Electrolyte fluid can leak from automatic dim-
ming mirrors if the glass is broken. Electrolyte
fluid can irritate skin, eyes and airways.
— Repeated or long-term exposure to electro-
lyte fluid can lead to irritation of the air-
ways, especially in people with asthma or
other respiratory conditions. Take deep
breaths immediately after leaving the vehi-
cle or, if this is not possible, open all of the
doors
and windows as wide as possible.
— If electrolyte fluid enters the eyes, flush
them thoroughly with a large amount of
clean water for at least 15 minutes and then
seek medical attention.
— If electrolyte fluid comes into contact with
the skin, flush the affected area with clean
water for at least 15 minutes and then clean
with soap and water and seek medical atten-
tion. Clean affected clothing and shoes thor-
oughly before wearing again.
— If the fluid was swallowed and the person is
conscious, flush the mouth with water for at
least 15 minutes. Do not induce vomiting
unless this is recommended by medical pro-
fessionals. Seek medical attention immedi-
ately.
@) Note
If the glass on an automatic dimming mirror
breaks, electrolyte can leak out. This liquid
damages plastic surfaces. Remove the liquid
as quickly as possible, for example using a
wet sponge.
42
G) Tips
— If the light reaching the rearview mirror is
obstructed, the automatic dimming mirror
will not function correctly,
—The automatic dimming mirrors do not dim
when the interior lighting is turned on or
the reverse gear is selected.
BFV-0298
Fig. 43 Sun visor
The vanity mirrors on the sun visors have covers.
Slide
the cover in the direction of the arrow.
Windshield wipers
Switching the windshield wipers on
BFV-0019
Fig. 44 Windshield wiper lever
Move the windshield wiper lever to the corre-
sponding position:
© - Windshield wipers off
@- Interval mode. To increase/decrease the wip-
er intervals, move the switch @ to the left/right.
In vehicles with a rain sensor*, the wipers turn on
in the rain once the vehicle speed exceeds ap-
proximately 2 mph (4 km/h). The higher the sen-
sitivity of the rain sensor* is set (switch @) to the >
Page 47 of 304

8S58012721BA
Lights and Vision
Adjusting the magnetic zone
Applies to: vehicles with digital compass
BFV-0293
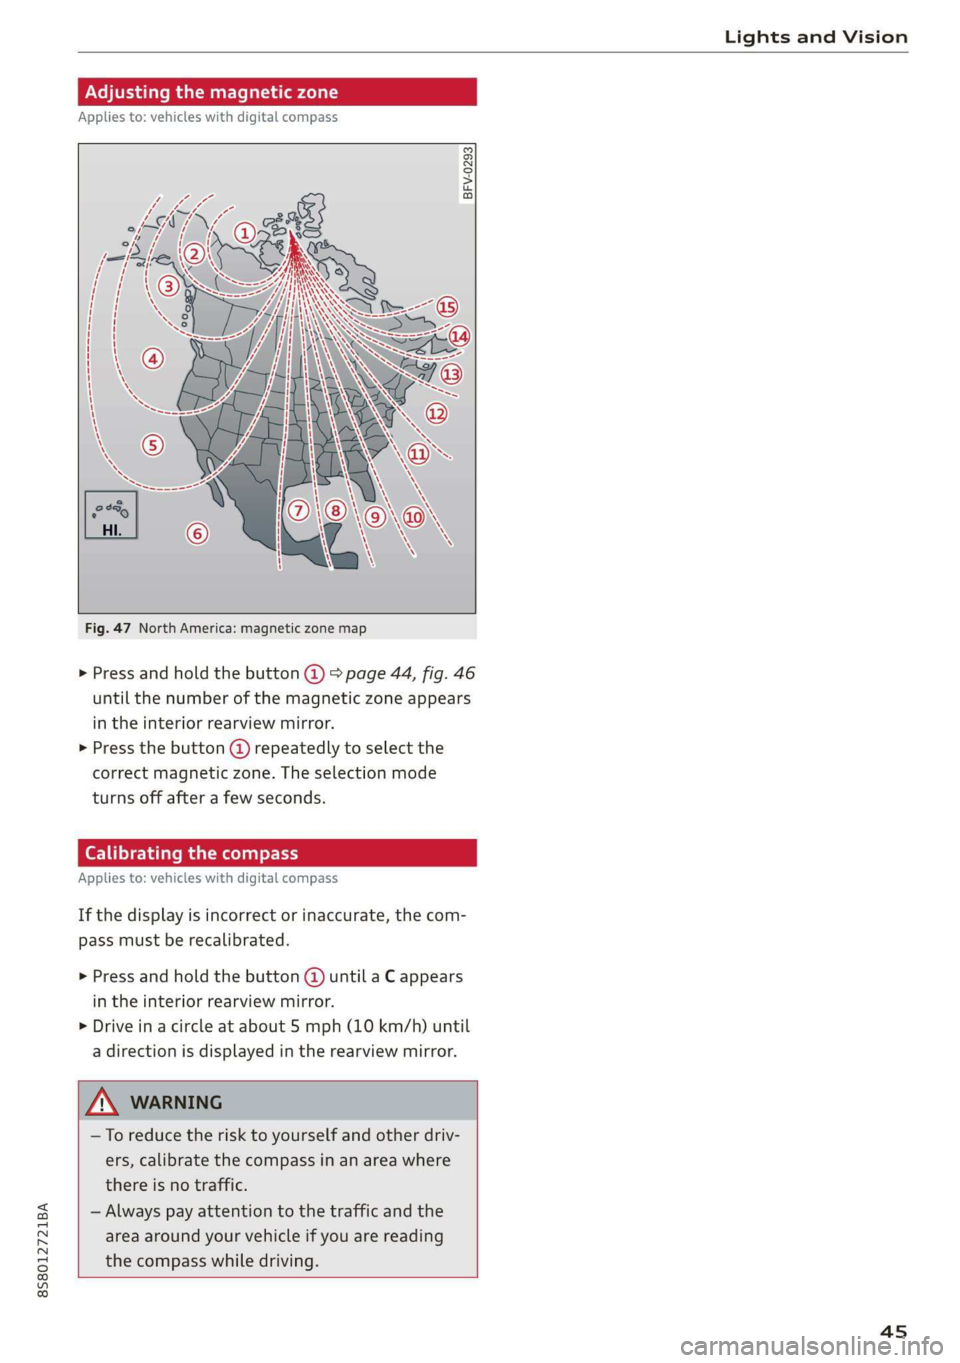
Fig. 47 North America: magnetic zone map
> Press and hold the button @) > page 44, fig. 46
until the number of the magnetic zone appears
in the interior rearview mirror.
> Press the button @) repeatedly to select the
correct magnetic zone. The selection mode
turns off after a few seconds.
Calibrating the compass
Applies to: vehicles with digital compass
If the display is incorrect or inaccurate, the com-
pass must be recalibrated.
> Press and hold the button @ until a C appears
in the interior rearview mirror.
> Drive in a circle at about 5 mph (10 km/h) until
a direction is displayed in the rearview mirror.
—To reduce the risk to yourself and other driv-
ers, calibrate the compass in an area where
there is no traffic.
— Always pay attention to the traffic and the
area around your vehicle if you are reading
the compass while driving.
45
Page 106 of 304

Voice recognition system
Voice recognition system
Operating
Applies to: vehicles with voice recognition system
You can operate many Infotainment functions
conveniently by speaking.
Requirement: the ignition and the MMI must be
switched on. A system language supported by
the voice recognition system must be set. There
must be no phone calls in progress and the park-
ing aid must not be active.
> Switching on: briefly press the [2] button @)
=> page 14, fig. 10 on the multifunction steer-
ing wheel and say the desired command after
the Beep.
> Switching off: press and hold the |™] button.
Or: say the command Cancel.
> Pausing: say the command Pause. To resume,
press the |] button.
> Correcting: press the [>] button one time ©
=> page 12, fig. 6. Or: say the command Correc-
tion.
Input assistance
The system guides you through the input with
visual and audio feedback.
— Visual input assistance: after switching on
voice recognition, a display with a selection of
possible commands appears. The command
display can be switched on/off under [MENU] >
Settings > left control button > MMI settings >
Speech dialog system.
— Audio input assistance: to have the possible
commands read, press the [2] button on the
multifunction steering wheel briefly and say
Help.
For the system to understand you:
Speak clearly and distinctly at a normal volume.
Speak louder when driving faster.
Emphasize the words in the commands evenly
and do not leave long pauses.
Do not speak a command when the voice recogni-
tion system is making an announcement.
104
Close the doors, the windows, and the sunroof*
to reduce background noise. Make sure that pas-
sengers are not speaking when you are giving a
voice command.
Do not direct the vents toward the handsfree mi-
crophone, which is near the front interior lights
on the roof headliner or on the driver's safety
belt*. For additional information on the safety
belt microphone, see > page 123.
Only
use the system from the driver's seat be-
cause the hands-free microphone is directed to-
ward that seat.
Additional settings
See > page 176, Voice recognition system.
ZA\ WARNING
— Direct your full attention to driving. As the
driver, you have complete responsibility for
safety in traffic. Only use the functions in
such a way that you always maintain com-
plete control over your vehicle in all traffic
situations.
— Do not use the voice recognition system in
emergencies because your voice may change
in stressful situations. The system may take
longer to dial the number or may not be
able to dial it at all. Dial the emergency
number manually.
G) Tips
—The dialog pauses when there is an incom-
ing phone call and will continue if you ig-
nore the call. The dialog ends if you answer
the call.
— There are no voice guidance* prompts when
a dialog is active.
— You can select an item in the list using ei-
ther the voice recognition system or the
control knob.