2019 AUDI TT ROADSTER low oil pressure
[x] Cancel search: low oil pressurePage 10 of 304

Quick access
Red indicator lights
Anti-lock braking system (ABS)
=>page 19
Safety systems ¥
>page 18
Brake pads
=>page 16
Electromechanical parking brake
>page 17
Tire pressure
=> page 256 or > page 258
Brake system ¥
=>page 16
Brake system 4
=>page 16
Electromechanical parking brake
=>page 17
Electromechanical parking brake
=>page 17
Cooling system
=>page 17
Tire pressure
Engine oil pressure => page 256 or © page 258
> page 231
Electrical system
=> page 236
Engine stop while driving
>page 18
Safety belt
>page 18
Electromechanical steering Y
=> page 89
Steering lock
>page 18
Central indicator light
=>page 19
Engine start system
>page 18
Transmission malfunction
=> page 67
Engine control
>page 19
Malfunction Indicator Lamp (MIL) ¥
=>page 227
Engine speed limitation
=> page 11
Engine oil level (MIN)
=> page 231
Engine oil sensor
=> page 231
Electrical system
=> page 236
Tank system
>page 19
Washer fluid level
>page 19
Windshield wipers
Rear spoiler = page 19
=> page 90 Remote control key
=> page 58
Yellow indicator lights
Electronic Stabilization Control (ESC)
v
=>page 19
Electronic Stabilization Control (ESC)
Vv
=>page 19
Battery in remote control key
=> page 23
Bulb failure indicator
=>page 19
Headlight range control system
=> page 20
Adaptive light
Anti-lock braking system (ABS) ¥ > page 20
=>page 19
Light/rain sensor
=> page 20
Page 17 of 304

8S8012721BA
Instrument cluster
Vehicle functions
On-board computer
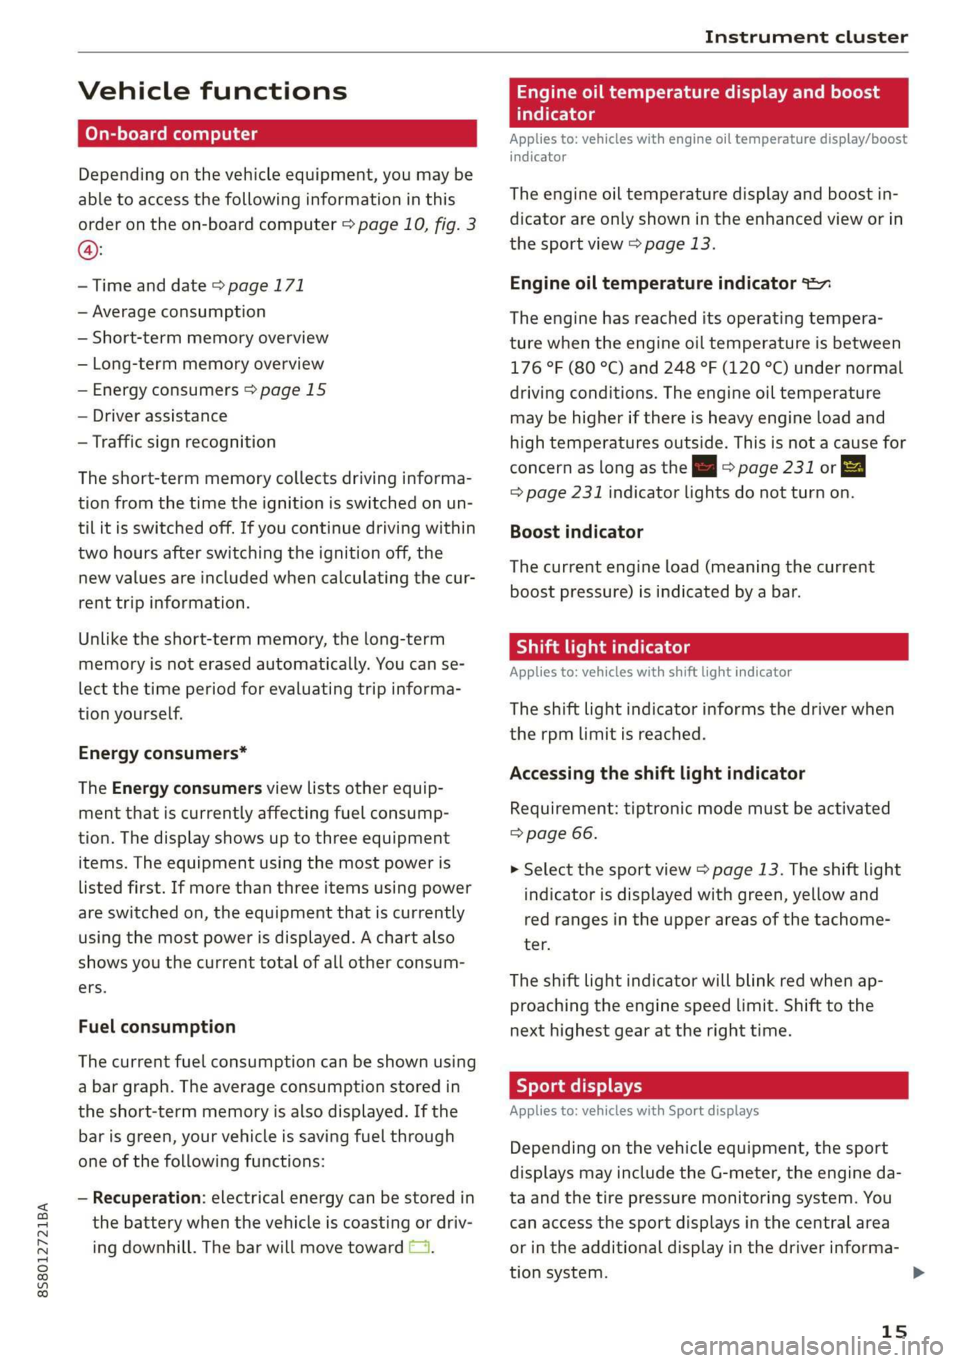
Depending on the vehicle equipment, you may be
able to access the following information in this
order on the on-board computer > page 10, fig. 3
@:
—Time and date > page 171
— Average consumption
— Short-term memory overview
— Long-term memory overview
— Energy consumers > page 15
— Driver assistance
— Traffic sign recognition
The short-term memory collects driving informa-
tion from the time the ignition is switched on un-
til it is switched off. If you continue driving within
two hours after switching the ignition off, the
new values are included when calculating the cur-
rent trip information.
Unlike the short-term memory, the long-term
memory is not erased automatically. You can se-
lect the time period for evaluating trip informa-
tion yourself.
Energy consumers*
The Energy consumers view lists other equip-
ment that is currently affecting fuel consump-
tion. The display shows up to three equipment
items. The equipment using the most power is
listed first. If more than three items using power
are switched on, the equipment that is currently
using the most power is displayed. A chart also
shows you the current total of all other consum-
ers.
Fuel consumption
The current fuel consumption can be shown using
a bar graph. The average consumption stored in
the short-term memory is also displayed. If the
bar is green, your vehicle is saving fuel through
one of the following functions:
— Recuperation: electrical energy can be stored in
the battery when the vehicle is coasting or driv-
ing downhill. The bar will move toward (1.
Engine oil temperature display and boost
atelte- hele
Applies to: vehicles with engine oil temperature display/boost
indicator
The
engine oil temperature display and boost in-
dicator are only shown in the enhanced view or in
the sport view > page 13.
Engine oil temperature indicator =
The engine has reached its operating tempera-
ture when the engine oil temperature is between
176 °F (80 °C) and 248 °F (120 °C) under normal
driving conditions. The engine oil temperature
may be higher if there is heavy engine load and
high temperatures outside. This is not a cause for
concern as long as the = => page 231 or EA
= page 231 indicator lights do not turn on.
Boost indicator
The current engine load (meaning the current
boost pressure) is indicated by a bar.
Shift light indicator
Applies to: vehicles with shift light indicator
The
shift light indicator informs the driver when
the rpm limit is reached.
Accessing the shift light indicator
Requirement: tiptronic mode must be activated
=> page 66.
> Select the sport view > page 13. The shift light
indicator is displayed with green, yellow and
red ranges in the upper areas of the tachome-
ter.
The shift light indicator will blink red when ap-
proaching the engine speed limit. Shift to the
next highest gear at the right time.
Sy eame ENE
Applies to: vehicles with Sport displays
Depending on the vehicle equipment, the sport
displays may include the G-meter, the engine da-
ta and the tire pressure monitoring system. You
can access the sport displays in the central area
or in the additional display in the driver informa-
tion system. >
15
Page 58 of 304

Driving
Driving
General information
A new vehicle must be broken in within the first
1,000 miles (1,500 km) so that all moving parts
work smoothly together, which helps to increase
the service life of the engine.
Do not drive higher than two-thirds of the maxi-
mum permitted engine RPM during the first 600
miles (1,000 km) and do not use full accelera-
tion. The engine can be increased RPM gradually
during the next 300 miles (500 km).
rela ire ma Mae aoa Cle (
@) Note
When driving on poor roads, over curbs, and
on steep ramps, make sure that components
that hang below the vehicle, such as the spoil-
er and exhaust system, are not struck because
they could be damaged. This especially ap-
plies to vehicles with low ground clearance
and vehicles that are heavily loaded.
Driving through water on roads
Note the following to reduce the risk of vehicle
damage when driving through water, for example
on flooded roads:
— The water must not be any higher than the bot-
tom of the vehicle body.
— Do not drive faster than walking speed.
ZA\ WARNING
After driving through water or mud, the effec-
tiveness of the brakes may be reduced due to
moisture on the brake rotors and brake pads.
A few careful brake applications should dry off
the brakes and restore the full braking effect.
@) Note
Vehicle components such as the engine,
transmission, suspension, or electrical sys-
56
tem, can be severely damaged by driving
through water.
G) Tips
— Determine the depth before driving through
water.
— Do not stop the vehicle, drive in reverse, or
switch the engine off when driving through
water.
— Keep in mind that oncoming vehicles may
create waves that raise the water level and
make it too deep for your vehicle to drive
through safely.
— Avoid driving through salt water, because
this can cause corrosion.
Efficient and environmentally-conscious
The amount of fuel consumption, the environ-
mental impact, and the wear to the engine,
brakes, and tires depends mostly on your driving
style. Note the following information for efficient
and environmentally-conscious driving:
— Do not let the engine run while the vehicle
parked.
— Turn off electrical equipment that is not need-
ed, for example seat heating*.
— Anticipate upcoming traffic situations while
driving to avoid unnecessary acceleration and
braking.
— Utilize the engine braking effect.
— Avoid driving short distances or at high speeds
when possible.
— Avoid adding extra weight to the vehicle if pos-
sible, for example by not leaving roof racks or
bike racks installed when they are not needed.
— Have maintenance performed regularly on the
vehicle.
— Do not drive with winter tires during the summ-
ef,
— Make sure the tire pressure is correct
=> page 250.
G@) Tips
The amount of noise produced by the vehicle
can increase significantly when driving with a >
Page 233 of 304

8S8012721BA
Checking and Filling
Audi recommends
Sbastrol | ZIDIGE Prarzssional
Audi recommends using the LongLife high-per-
formance engine oil from Audi Genuine Parts.
I Tet
Engine oil pressure
i Turn off engine! Oil pressure too low
Stop driving and switch the engine off. Check the
engine oil level > page 231.
— If the engine oil level is too low, add engine oil
=> page 232. Only continue driving once the in-
dicator light turns off.
— If the engine oil level is correct and the indica-
tor light still turns on, turn the engine off and
do not continue driving. See an authorized Audi
dealer or authorized Audi Service Facility for as-
sistance.
Engine oil level
Applies to: vehicles with oil level warning
3 Please check oil level
— You may continue driving for the time being.
Check the engine oil level as soon as possible
=> page 231, Checking the engine oil level.
—If the engine oil level is correct and the indica-
tor light still turns on, drive at low engine
speed to an authorized Audi dealer or author-
ized Audi Service Facility.
Engine oil sensor
Bs Oil level sensor: oil change necessary. Please
contact Service
Fuel has entered the engine oil. This will cause
the engine oil level to rise slowly and the engine
oil quality to decrease. Do not extract engine oil
to reduce the level, because this will increase the
risk of engine damage. Drive to an authorized Au-
di dealer or authorized Audi Service Facility im-
mediately to have engine oil extracted.
3 Oil level system: malfunction! Please con-
tact Service
The sensor that checks the engine oil level has
malfunctioned. Drive to an authorized Audi deal-
er or authorized Audi Service Facility immediately
to have the malfunction corrected.
& Oil pressure sensor: malfunction! Please
contact Service
The sensor that checks the engine oil pressure
has malfunctioned. Drive to an authorized Audi
dealer or authorized Audi Service Facility immedi-
ately to have the malfunction corrected.
Engine warm-up request*
i Please drive to warm up engine
Fuel has entered the engine oil, either due to low
outside temperatures or frequent short drives.
Drive until the engine is warm so that the fuel in
the engine oil will evaporate. Avoid high engine
speeds, full accelerating, and heavy engine loads
when doing this.
@ Tips
The oil pressure warning EZ is not an oil level
indicator. Always check the oil level regularly.
Checking the engine oil level
Q
BsVv-0588
&
Fig. 175 Oil dipstick (example): checking the engine oil lev-
el
Observe the safety precautions > A\ in General
information on page 228.
>» Park the vehicle on a level surface.
> Shut the engine off when it is warm.
> Wait approximately two minutes.
> Open the hood > page 229.
> Remove the oil dipstick > page 230, fig. 174,
wipe it off with a clean cloth and insert it all the
way in again.
> Remove the oil dipstick again and then read the
oil level > table on page 232.
231
>
Page 237 of 304

8S58012721BA
Checking and Filling
Observe the safety precautions > page 227, Gen-
eral information.
Checking the engine coolant level
>» Park the vehicle on a level surface.
> Switch the ignition off.
> Read the coolant level on the coolant expansion
tank > page 230, fig. 174. The coolant level
must be between the markings @) 9 fig. 177
when the engine is cold. When the engine is
warm it can be slightly above the upper mark-
ing.
Adding coolant
Requirement: there must be a residual amount of
coolant in the expansion tank >@.
If you must add coolant, use a mixture of water
and coolant additive. Mixing the coolant additive
with distilled water is recommended.
> Allow the engine to cool.
>» Place a large, thick towel on the coolant expan-
sion tank cover.
> Remove the cover (@) 9 fig. 177 carefully to the
left > AX.
> Add the correct mixture ratio of coolant
> page 234 up to the upper marking @)
> fig. 177.
> Make sure that the fluid level remains stable.
Add more coolant if necessary.
> Close the cap securely.
Coolant loss usually indicates that there is a leak.
Immediately drive your vehicle to an authorized
Audi dealer or authorized Audi Service Facility
and have the cooling system inspected. If the
cooling system is not leaking, coolant loss can re-
sult from the coolant boiling due overheating
and then being forced out of the cooling system.
compartment. This increases the risk of
burns. The cooling system is under pressure.
When you no longer see or hear steam or
coolant escaping, you may open the engine
compartment with caution.
— When working in the engine compartment,
remember that the radiator fan can switch
on even if the ignition is switched off, which
increases the risk of injury.
— Coolant additive and coolant can be danger-
ous to your health. For this reason, store the
coolant in the original container and away
from children. There is a risk of poisoning.
@) Note
Do not add coolant if the expansion tank is
empty. Air could enter the cooling system and
damage the engine. If this is the case, do not
continue driving. See an authorized Audi deal-
er or authorized Audi Service Facility for assis-
tance.
Brake fluid
BFV-0229)
Z\ WARNING
— The engine compartment in any vehicle can
be a dangerous area. Stop the engine and al-
low it to cool before working in the engine
compartment. Always follow the informa-
tion found in > page 227, General informa-
tion.
— Never open the hood if you can see or hear
steam or coolant escaping from the engine
Fig. 178 Engine compartment: cap on brake fluid reservoir
Observe the safety precautions > /A\ in General
information on page 228.
Checking the brake fluid level
> Read the brake fluid level on the brake fluid res-
ervoir > page 230, fig. 174. The brake fluid lev-
el must be between the MIN and MAX markings
oA.
The brake fluid level is monitored automatically.
Changing the brake fluid
Brake fluid should be changed at regular inter-
vals. Have the brake fluid changed by an
235
Page 245 of 304

8S8012721BA
Wheels
windows, power seats, radio, and
heater, to the extent that these
items are available as factory-in-
stalled equipment (whether in-
stalled or not).
Aspect ratio
means the ratio of the height to
the width of the tire in percent.
Numbers of 55 or lower indicate a
low sidewall for improved steer-
ing response and better overall
handling on dry pavement.
Bead
means the part of the tire that is
made of steel wires, wrapped or
reinforced by ply cords and that is
shaped to fit the rim.
Bead separation
means a breakdown of the bond
between components in the bead.
Cord
means the strands forming the
plies in the tire.
Cold tire inflation pressure
means the tire pressure recom-
mended by the vehicle manufac-
turer for a tire of a designated
size that has not been driven for
more than a couple of miles (kilo-
meters) at low speeds in the three
hour period before the tire pres-
sure is measured or adjusted.
Curb weight
means the weight of a motor ve-
hicle with standard equipment in-
cluding the maximum capacity of
fuel, oil, and coolant, air condi-
tioning and additional weight of
optional equipment.
Extra load tire
means a tire designed to operate
at higher loads and at higher in-
flation pressures than the corre-
sponding standard tire. Extra load
tires may be identified as “XL”,
“xl”, “EXTRA LOAD”, or “RF” on
the sidewall.
Gross Axle Weight Rating
(“GAWR”)
means the load-carrying capacity
of a single axle system, measured
at the tire-ground interfaces.
Gross Vehicle Weight Rating
(“GVWR”)
means the maximum total loaded
weight of the vehicle.
Groove
means the space between two ad-
jacent tread ribs.
243
>
Page 254 of 304

Wheels
limits > page 252.
Tires and vehicle load limits
There
are limits to the amount of
load or weight that any vehicle
and any tire can carry. A vehicle
that is overloaded will not handle
well and is more difficult to stop.
Overloading can not only lead to
loss of vehicle control, but can al-
so damage important parts of the
vehicle and can lead to sudden
tire failure, including a blowout
and sudden deflation that can
cause the vehicle to crash.
Your safety and that of your pas-
sengers also depends on making
sure that load limits are not ex-
ceeded. Vehicle load includes ev-
erybody and everything in and on
252
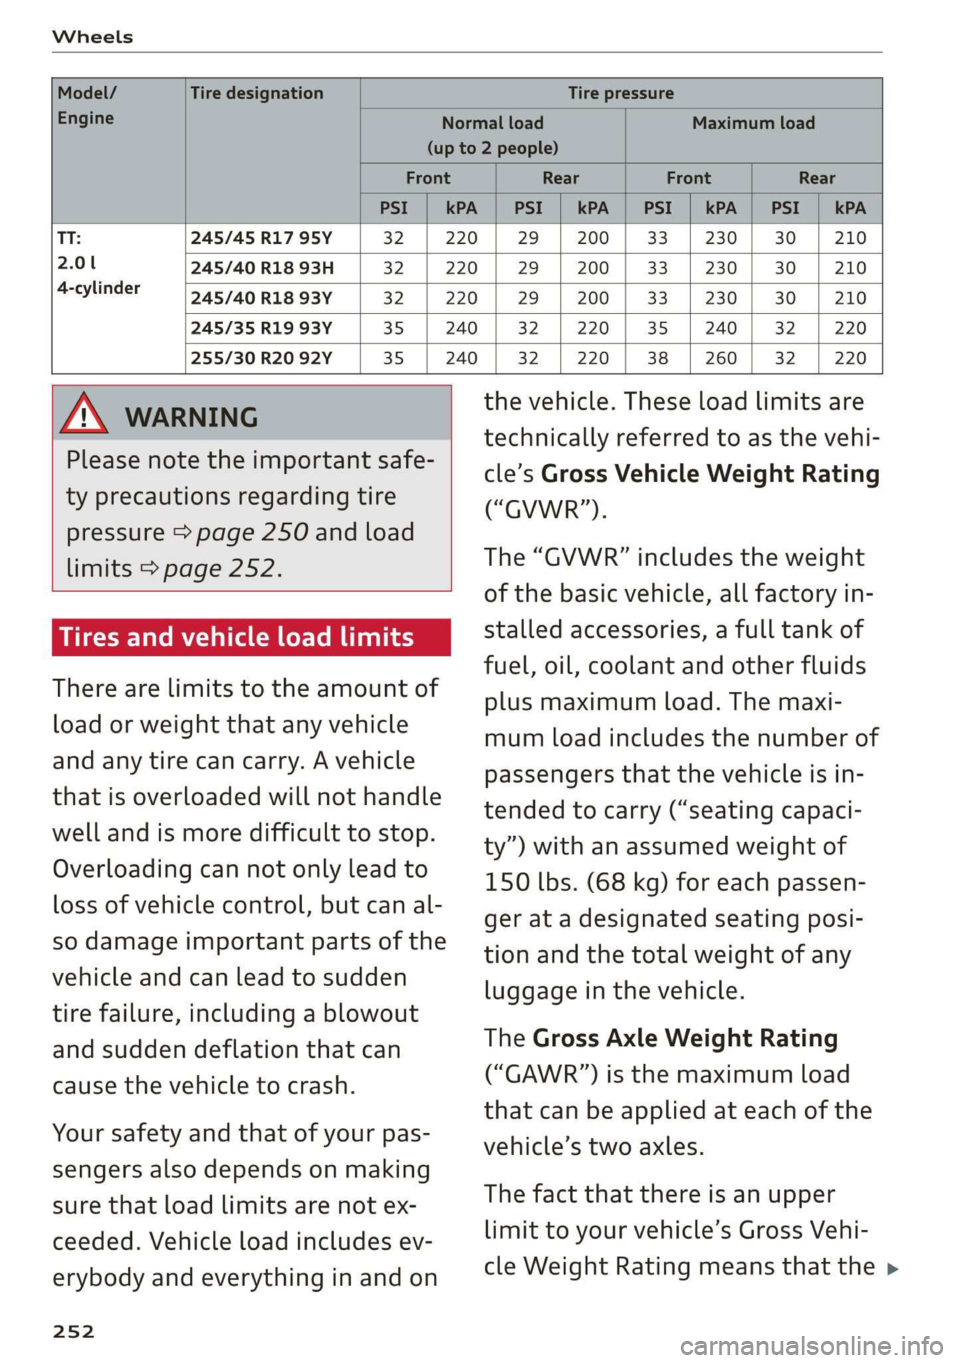
Model/ Tire designation Tire pressure
Engine Normal load Maximum load
(up to 2 people)
Front Rear Front Rear
PSI | kPA | PSI | kPA | PSI | kPA | PSI | kPA
TT: 245/45 R17 95Y 32. | 220 | 29 | 200 | 33 | 230] 30 | 210
2.01 245/40 R18 93H 32 220 | 29 | 200 | 33 | 230 | 30 | 210
4-cylinder — [>45/aorig93y | 32 | 220 | 29 | 200 | 33 | 230 | 30 | 210
245/35 R19 93Y 35 | 240 | 32 | 220 | 35 | 240 | 32 | 220
255/30 R20 92Y 35 | 240 | 32 | 220 | 38 | 260/] 32 | 220
/\ WARNING the vehicle. These load limits are
7 7 ; technically referred to as the vehi-
ease note the important safe- , 7 3 :
rt cle’s Gross Vehicle Weight Rating
ty precautions regarding tire ii ‘i
¥P garang (“GVWR”).
pressure > page 250 and load
The “GVWR” includes the weight
of the basic vehicle, all factory in-
stalled accessories, a full tank of
fuel, oil, coolant and other fluids
plus maximum load. The maxi-
mum load includes the number of
passengers that the vehicle is in-
tended to carry (“seating capaci-
ty”) with an assumed weight of
150 lbs. (68 kg) for each passen-
ger at a designated seating posi-
tion and the total weight of any
luggage in the vehicle.
The Gross Axle Weight Rating
(“GAWR’”) is the maximum load
that can be applied at each of the
vehicle’s two axles.
The fact that there is an upper
limit to your vehicle’s Gross Vehi-
cle Weight Rating means that the >
Page 265 of 304

8S8012721BA
Care and cleaning
—To reduce the risk of cuts, protect yourself
from sharp metal components when wash-
ing the underbody or the inside of the wheel
housings.
— After washing the vehicle, the braking effect
may be delayed due to moisture on the
brake rotors or ice in the winter. This in-
creases the risk of an accident. The brakes
must be dried with a few careful brake appli-
cations.
@) Note
— If you wash the vehicle in an automatic car
wash, you must retract the extendable rear
spoiler* if necessary, and fold the exterior
mirrors in to reduce the risk of damage.
Power folding exterior mirrors* must only
be folded in and out using the power folding
function.
—To reduce the risk of paint damage, do not
wash the vehicle in direct sunlight.
—To reduce the risk of damage, do not wash —To
reduce the risk of damage, do not wash
the power top with a pressure washer.
—To reduce the risk of damage to the surface,
do not use insect removing sponges, kitchen
sponges, or similar items.
— When washing matte finish painted vehicle
components:
— To reduce the risk of damage to the sur-
face, do not use polishing agents or hard
wax.
— Never use protective wax. It can destroy
the matte finish effect.
— Do not place any stickers or magnetic
signs on vehicle components painted with
matte finish paint. The paint could be
damaged when the stickers or magnets
are removed.
@) For the sake of the environment
Only wash the vehicle in facilities specially de-
signed for that purpose. This will reduce the
risk of dirty water contaminated with oil from
decorative decals* with a pressure washer.
Cleaning and care information
When cleaning and caring for individual vehicle
components, refer to the following tables. The
information contained there is simply recommen-
dations. For questions or for components that
Exterior cleaning
entering the sewer system.
are not listed, consult an authorized Audi dealer
or authorized Audi Service Facility. Also follow
the information found in > A.
Component Situation Solution
Windshield wiper | Deposits Soft cloth with glass cleaner, > page 43
blades
Headlights/ Deposits Soft sponge with a mild soap solution®
Tail lights
Sensors/ Deposits Sensors: soft cloth with solvent-free cleaning solution
Camera lenses Camera lenses: soft cloth with alcohol-free cleaning solu-
tion
Snow/ice Hand brush/solvent-free de-icing spray
Wheels Road salt Water
Brake dust Acid-free special cleaning solution
Exhaust tail pipes | Road salt Water, cleaning solution suitable for stainless steel, if nec-
essary
263