2019 AUDI TT ROADSTER brakes
[x] Cancel search: brakesPage 18 of 304
![AUDI TT ROADSTER 2019 Owners Manual Instrument cluster
Accessing the sport displays in the central
area
> Open the first Vehicle tab (trip computer) using
the [<>] button on the multifunction steering
wheel.
> Select on the mul AUDI TT ROADSTER 2019 Owners Manual Instrument cluster
Accessing the sport displays in the central
area
> Open the first Vehicle tab (trip computer) using
the [<>] button on the multifunction steering
wheel.
> Select on the mul](/manual-img/6/57667/w960_57667-17.png)
Instrument cluster
Accessing the sport displays in the central
area
> Open the first Vehicle tab (trip computer) using
the [<>] button on the multifunction steering
wheel.
> Select on the multifunction steering wheel: left
control button > Sport displays.
> Turn the left thumbwheel on the multifunction
steering wheel until the desired sport display
appears in the instrument cluster.
Accessing the sport displays in the additional
display
> Select on the multifunction steering wheel:
right control button > Additional display.
> Select the desired additional display.
G meter*
The G meter displays the longitudinal and lateral
acceleration. The maximum values that are
reached are stored and displayed when the vehi-
cle is stationary.
> To reset the stored values, select on the multi-
function steering wheel: right control button >
Reset values.
Engine data*
The engine data displays the current power and
torque.
Tire Pressure Monitoring System*
The tire pressure monitoring system displays the
current tire pressures and temperature. Also see
=> page 258, Tire pressure monitoring system.
Messages
BRAKE/@)/‘C} Brake system
If this indicator light turns on, there is a malfunc-
tion in the brake system.
GG © Brakes: stop vehicle and check brake
fluid level
Stop the vehicle and check the brake fluid level.
See an authorized Audi dealer or authorized Audi
Service Facility for assistance.
Ga / © Warning! No brake booster function
16
If the brake booster is not working, you have to
use much more force when braking the vehicle.
See an authorized Audi dealer or authorized Audi
Service Facility for assistance.
EG / @ Brakes: malfunction! Safely stop ve-
hicle
If the indicator light turns on and this message
appears, there is a malfunction in the brake sys-
tem
1f 9 / Gana B also turn on, there is a mal-
function in the ABS, ESC, and braking distribu-
tion.
Do not continue driving. See an authorized Audi
dealer or authorized Audi Service Facility for as-
sistance > A\.
EG / o Parking brake: malfunction! Safely
stop vehicle. See owner's manual
— If the indicator light and the message appear
when the vehicle is stationary or after switch-
ing the ignition on, check if you can release the
parking brake. If you cannot release the parking
brake, see an authorized Audi dealer or author-
ized Audi Service Facility. If you can release the
parking brake and the message still appears,
see an authorized Audi dealer or authorized Au-
di Service Facility immediately to have the mal-
function corrected.
— If the indicator light and message appear while
driving, the hill start assist or emergency brak-
ing function may be malfunctioning. It may not
be possible to set the parking brake or release
it once it has been set. Do not park your vehicle
on hills. See an authorized Audi dealer or au-
thorized Audi Service Facility for assistance.
The KO] indicator light turns on when the brake
pads are worn. Drive to an authorized Audi dealer
or authorized Audi Service Facility immediately to
have the brake pads checked.
Applies to: USA models: The fa] indicator light
turns on together with the EG indicator light.
ZX WARNING
— Read and follow the warnings in
= page 227, General information before >
Page 19 of 304

8S8012721BA
Instrument cluster
opening the hood and checking the brake
fluid level.
— If the brake fluid level is below the MIN
marking, it can impair the braking effect and
driving safety, which increase the risk of an
accident. Do not continue driving. See an au-
thorized Audi dealer or authorized Audi
Service Facility for assistance.
— If the brake system indicator light turns on
together with the ABS and ESC indicator
lights, the ABS/ESC regulating function may
be malfunctioning. Functions that stabilize
the vehicle are no longer available. This
could cause the rear of the vehicle to
swerve, which increases the risk that the ve-
hicle will slide. Drive carefully to the nearest
authorized Audi dealer or authorized Audi
Service Facility and have the malfunction
corrected.
PARK/(@)/‘@i, Electromechanical parking
brake
If the Zin i © indicator light turns on, the
parking brake has been set.
Zi if oa Parking brake: warning! Vehicle
parked too steep
If the indicator light blinks and the message ap-
pears, there is not enough braking power to se-
cure the vehicle. The brakes have overheated. The
vehicle could roll away, even on a small incline.
ww Parking brake: malfunction! Please contact
Service
There is a malfunction in the parking brake. Drive
to an authorized Audi dealer or authorized Audi
Service Facility immediately to have the malfunc-
tion corrected.
HL@t3 / {@) Parking brake: warning! Vehicle
parked too steep
There is not enough braking force to hold the ve-
hicle in place. The brakes have overheated. The
vehicle could roll away, even on a small incline.
(9 / (@) Parking brake: applied
If this message appears, press the brake pedal
first and then release the parking brake if neces-
sary.
(i) Tips
For additional information on the parking
brake, see > page 59.
meer ee
|| Turn off engine and check coolant level. See
owner's manual
The coolant level is too low.
Stop driving and switch the engine off. Check the
coolant level > page 234.
— If the coolant level is too low, add coolant
=> page 234. Only continue driving once the in-
dicator light turns off.
|_| Coolant temperature: too high. Let engine
run while vehicle is stationary
Let the engine run at idle for a few minutes to
cool off, until the indicator light turns off.
— If the indicator light does not turn off, do not
continue driving the vehicle. See an authorized
Audi dealer or authorized Audi Service Facility
for assistance.
ZA\ WARNING
— Never open the hood if you can see or hear
steam or coolant escaping from the engine
compartment. This increases the risk of
burns. When you no longer see or hear
steam or coolant escaping, you may open
the engine compartment with caution.
— The engine compartment in any vehicle can
be a dangerous area. Stop the engine and al-
low it to cool before working in the engine
compartment. Always follow the informa-
tion found in > page 227, General informa-
tion.
() Note
Do not continue driving if the Bg indicator
light turns on as this increases the risk of en-
gine damage.
17
Page 21 of 304

8S8012721BA
Instrument cluster
1
8/8 Electronic Stabilization Control (ESC)
If the B indicator light blinks while driving, the
ESC or ASR (Anti-Slip Regulation) is actively regu-
lating.
If the BB indicator light turns on, the system has
switched the ESC off. In this case, you can switch
the ignition off and then on to switch the ESC on
again. The indicator light turns off when the sys-
tem is fully functional.
If the B indicator light turns on, ESC was
switched off using the |£*| button > page 87.
Stabilization control (ESC/ABS): malfunction!
See owner's manual
If the B indicator lamp and the fs / &) ABS in-
dicator lamp turn on and the driver message ap-
pears, the ABS or electronic differential lock is
malfunctioning. This also causes the ESC to mal-
function. The brakes still function with their nor-
mal power, but ABS is not active.
Drive to an authorized Audi dealer or authorized
Audi Service Facility immediately to have the
malfunction corrected.
@) Tips
For additional information on ESC and ABS,
see > page 86.
<5 Engine control
If the B indicator light turns on if there is a mal-
function in the engine control. Drive slowly to an
authorized Audi dealer or authorized Audi Service
Facility to have the engine checked.
ON eae
If the A or indicator light turns on, check
the message in the instrument cluster.
— Tank system
AD} Please refuel
If the indicator light turns on for the first time
and the message appears, there are about 1.9 gal
(7 L) of fuel left in the tank.
la Please refuel immediately
If the indicator light turns on and this message
appears, the fuel tank is almost empty. Refuel
the vehicle immediately.
AN} Tank system: malfunction! Please contact
Service
If the indicator light turns on and this message
appears, there is a malfunction in the tank sys-
tem. Drive to an authorized Audi dealer or au-
thorized Audi Service Facility immediately to have
the malfunction corrected.
(@) For the sake of the environment
Fuel should never enter the sewer system or
come into contact with the ground.
G) Tips
For more information on fueling, see
=> page 224.
CCTM CU
If the 3 indicator light turns on, the washer flu-
id is almost out. Fill the washer fluid for the
windshield washer system and the headlight
washer system* when the ignition is switched off
=> page 238.
7! Windshield wipers
If the ke indicator light turns on, then there is a
windshield wiper malfunction. Drive to an au-
thorized Audi dealer or authorized Audi Service
Facility immediately to have the malfunction cor-
rected.
& Bulb failure indicator
If the ka indicator light turns on, a bulb has
failed. The message indicates the location of the
bulb.
Replace the bulb immediately.
Vehicle lights: malfunction! Please contact
Service
There is a malfunction in the headlights or the
light switch. Drive to an authorized Audi dealer or >
19
Page 58 of 304
Driving
Driving
General information
A new vehicle must be broken in within the first
1,000 miles (1,500 km) so that all moving parts
work smoothly together, which helps to increase
the service life of the engine.
Do not drive higher than two-thirds of the maxi-
mum permitted engine RPM during the first 600
miles (1,000 km) and do not use full accelera-
tion. The engine can be increased RPM gradually
during the next 300 miles (500 km).
rela ire ma Mae aoa Cle (
@) Note
When driving on poor roads, over curbs, and
on steep ramps, make sure that components
that hang below the vehicle, such as the spoil-
er and exhaust system, are not struck because
they could be damaged. This especially ap-
plies to vehicles with low ground clearance
and vehicles that are heavily loaded.
Driving through water on roads
Note the following to reduce the risk of vehicle
damage when driving through water, for example
on flooded roads:
— The water must not be any higher than the bot-
tom of the vehicle body.
— Do not drive faster than walking speed.
ZA\ WARNING
After driving through water or mud, the effec-
tiveness of the brakes may be reduced due to
moisture on the brake rotors and brake pads.
A few careful brake applications should dry off
the brakes and restore the full braking effect.
@) Note
Vehicle components such as the engine,
transmission, suspension, or electrical sys-
56
tem, can be severely damaged by driving
through water.
G) Tips
— Determine the depth before driving through
water.
— Do not stop the vehicle, drive in reverse, or
switch the engine off when driving through
water.
— Keep in mind that oncoming vehicles may
create waves that raise the water level and
make it too deep for your vehicle to drive
through safely.
— Avoid driving through salt water, because
this can cause corrosion.
Efficient and environmentally-conscious
The amount of fuel consumption, the environ-
mental impact, and the wear to the engine,
brakes, and tires depends mostly on your driving
style. Note the following information for efficient
and environmentally-conscious driving:
— Do not let the engine run while the vehicle
parked.
— Turn off electrical equipment that is not need-
ed, for example seat heating*.
— Anticipate upcoming traffic situations while
driving to avoid unnecessary acceleration and
braking.
— Utilize the engine braking effect.
— Avoid driving short distances or at high speeds
when possible.
— Avoid adding extra weight to the vehicle if pos-
sible, for example by not leaving roof racks or
bike racks installed when they are not needed.
— Have maintenance performed regularly on the
vehicle.
— Do not drive with winter tires during the summ-
ef,
— Make sure the tire pressure is correct
=> page 250.
G@) Tips
The amount of noise produced by the vehicle
can increase significantly when driving with a >
Page 62 of 304
Driving
Setting/manually releasing the parking
brake
> Pull the ©) switch to set the parking brake. The
LED in the switch turns on. The PARK (USA mod-
els) (Canada models) indicator light also
turns on in the instrument cluster display.
> To release the parking brake manually, press
the brake or accelerator pedal while the igni-
tion is switched on and press the ©) switch at
the same time. The LED in the button and the
indicator light in the display turn off.
Releasing the parking brake automatically
Requirement: the driver's door must be closed.
> To start driving and release the parking brake
automatically, press the accelerator pedal as
usual.
In addition to releasing the parking brake auto-
matically, other convenience and safety functions
are available when you start driving > page 61,
Starting to drive.
Emergency braking function
You can use the emergency braking function in an
emergency situation, or if the standard brakes
are malfunctioning or the pedal is obstructed.
> Pull and hold the ©) switch.
> As soon as you release the ©) switch or acceler-
ate, the braking stops.
Pulling
and holding the ©) switch while driving
the vehicle activates the emergency braking func-
tion. The hydraulic brake system will brake all
four wheels. The braking effect is similar to heavy
braking > A\.
To reduce the risk of activating the emergency
braking by mistake, a warning tone (buzzer)
sounds when the ©) switch is pulled. Emergency
braking stops as soon as the ©) switch is released
or the accelerator pedal is pressed.
Parking
> Press the brake pedal to stop the vehicle.
> Pull the © switch to set the parking brake.
>» Place the selector lever in the “P” position.
> Turn the engine off > A\.
60
> Turn the steering wheel when parking on in-
clines so that the wheels will roll into the curb
if the vehicle starts moving.
ZA WARNING
— Ifa gear is engaged while the vehicle is sta-
tionary and the engine is running, do not
press the accelerator pedal inadvertently.
Otherwise, the vehicle will start to move im-
mediately and this could result in an acci-
dent.
— Emergency braking should only be used in
an emergency, when the when the standard
brake pedal is malfunctioning or obstructed.
During emergency braking, your vehicle will
brake similar to heavy braking. ESC and the
associated components (ABS, ASR, EDL) can-
not overcome the laws of physics. In corners
and when road or weather conditions are
bad, a full brake application can cause the
vehicle to skid or the rear end to swerve,
which increases the risk of an accident.
— If the power supply fails, you cannot set the
parking brake once it is released. In this
case, park the vehicle on level ground and
secure it by placing the selector lever in the
P position. See an authorized Audi dealer or
authorized Audi Service Facility for assis-
tance.
— If you leave the vehicle, switch the ignition
off and take the vehicle key with you. This
applies particularly when children remain in
the vehicle. Otherwise children could start
the engine, release the parking brake or op-
erate electrical equipment such as power
windows, which increases the risk of an acci-
dent.
— No one should remain in the vehicle when it
is locked - especially children. Locked doors
make it more difficult for emergency work-
ers to get into the vehicle, which puts lives
at risk.
C) Note
Do not leave your vehicle unattended while
the engine is running, because this increases
the risk of an accident.
Page 67 of 304
8S8012721BA
Driving
— Power is still transferred to the wheels when
the engine is running at idle. To prevent the
vehicle from “creeping”, you must keep your
foot on the brake when the engine is run-
ning and the selector lever is in the "D", "S"
or "R" position or “tiptronic” mode is select-
ed.
— Do not inadvertently press the accelerator
pedal when the vehicle is stationary. Other-
wise the vehicle will start to move immedi-
ately, even if the parking brake is set. This
could result in a crash.
— Do not press the accelerator pedal when
changing the selector lever position while
the vehicle is stationary and the engine is
running.
— Never engage the R or P selector level posi-
tions while driving. It could cause a crash.
— Before driving down a steep slope, reduce
your speed and shift into a lower gear with
“tiptronic”.
— Do not ride the brakes or press the brake
pedal
too often or too long when driving
downhill. Constant braking causes the
brakes to overheat and can substantially re-
duce braking performance, increase braking
distance, or cause complete failure of the
brake system.
— If you must stop on an incline, always hold
the vehicle in place with the foot brake or
parking brake to prevent it from rolling
back.
— Never hold the vehicle on an incline with a
slipping clutch. The clutch opens automati-
cally when it becomes too hot from the over-
load. The | indicator light turns on and a
message appears > page 67 when the
clutch is overloaded.
— If the engine must run while you are work-
ing in the engine compartment with the
hood open, make sure a gear is not engaged.
The selector lever must be firmly in the
P position and locked in place and the park-
ing brake must be set > page 227. Other-
wise, the vehicle could begin moving when
increasing the engine speed, even with the
parking brake set.
CG) Note
— When stopping on an incline, do not try to
hold the vehicle in place by pressing the ac-
celerator pedal while a driving gear is se-
lected. This can cause the automatic trans-
mission to overheat and can damage it. Set
the parking brake or press the brake pedal
to prevent the vehicle from rolling.
— Allowing the vehicle to roll when the engine
is stopped and the selector lever is in the N
position will damage the automatic trans-
mission because it is not lubricated under
those circumstances.
— The transmission can overheat and be dam-
aged under certain driving and traffic condi-
tions such as frequent starts, creeping for a
long time, or stop-and-go traffic. When the
fs} or & indicator light turns on, stop the
vehicle at the next opportunity and let the
transmission cool > page 67.
— Allowing the vehicle to roll when the engine
is stopped will damage the S tronic trans-
mission because it is not lubricated
=> page 274, Towing.
@) Tips
For safety reasons, the parking brake is re-
leased automatically only when the driver's
safety belt is fastened.
Hill descent control
The hill descent control system assists the driver
when driving down hills.
Hill descent control is activated when the selec-
tor lever is in the "D" or "S" position and you
press the brake pedal. The transmission automat-
ically selects a gear that is suitable for the hill.
Hill descent control tries to maintain the speed
that was selected at the time of braking, within
physical and technical limitations. If may still be
necessary to adjust the speed with the brakes.
Because hill descent control cannot shift down
farther than 3rd gear, it may be necessary to shift
into tiptronic mode in very steep areas. In this
65
>
Page 68 of 304
Driving
case, shift manually into 1st or 2nd gear in tip-
tronic mode to use the engine's braking force to
relieve the brakes.
Hill descent control switches off once the hill lev-
els out or if you press the accelerator pedal.
On vehicles with a cruise control system*
= page 70, hill descent control is also activated
when the speed is set.
Z\ WARNING
Hill descent control may not be able to main-
tain a constant speed under all conditions. Al-
ways be ready to apply the brakes.
Shifting manually (tiptronic mode)
The tiptronic mode allows the driver to shift the
gears manually.
= g
i 5
BFV-0104
paddles*
Shifting with the selector lever
You can shift into tiptronic mode while the vehi-
cle is stationary or while driving.
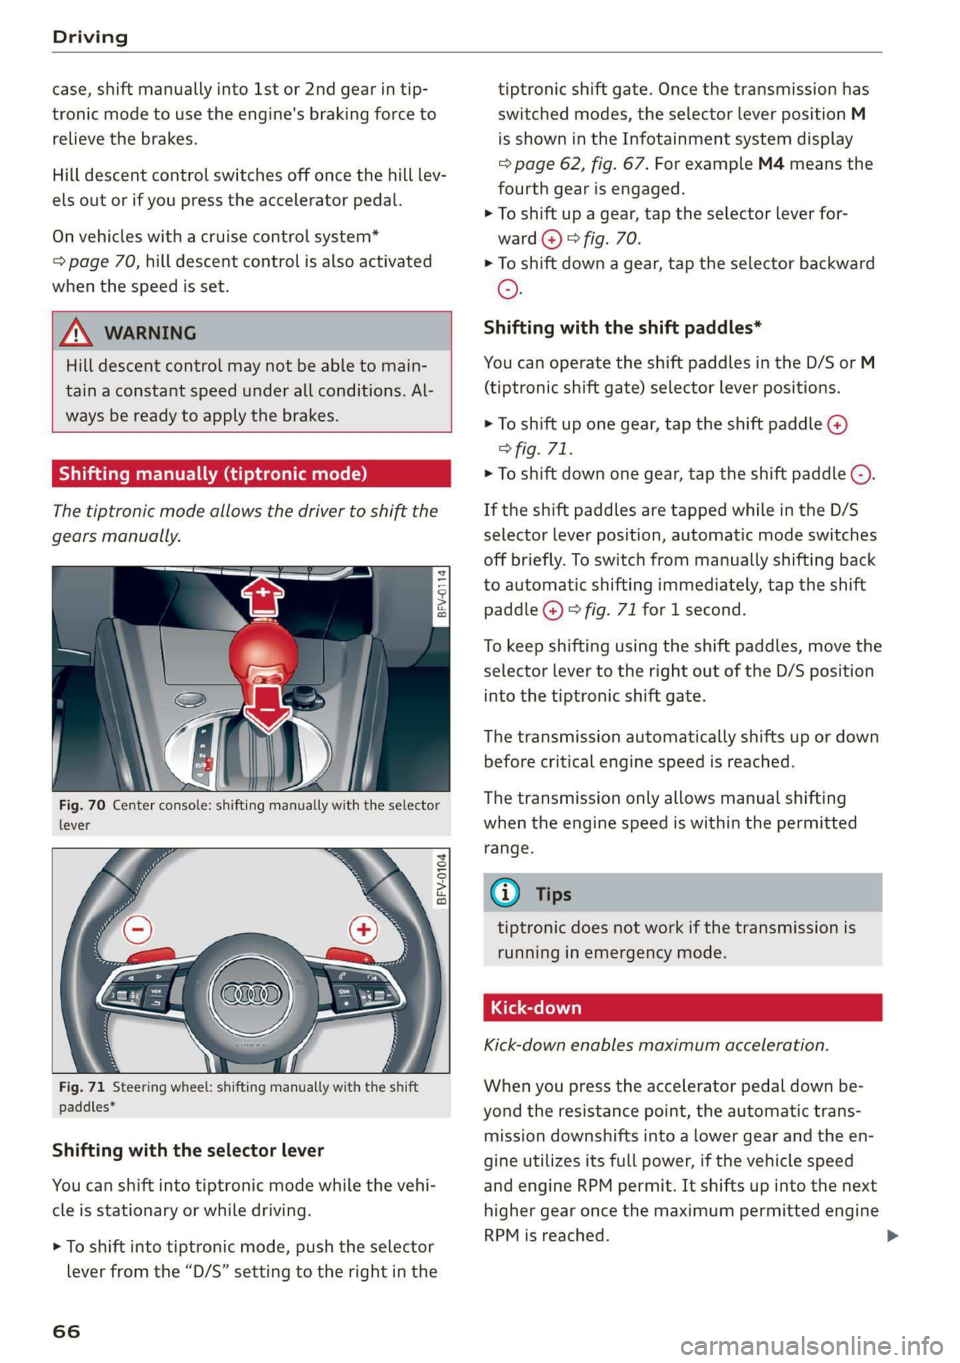
> To shift into tiptronic mode, push the selector
lever from the “D/S” setting to the right in the
66
tiptronic shift gate. Once the transmission has
switched modes, the selector lever position M
is shown in the Infotainment system display
=> page 62, fig. 67. For example M4 means the
fourth gear is engaged.
> To shift up a gear, tap the selector lever for-
ward @) © fig. 70.
> To shift down a gear, tap the selector backward
©.
Shifting with the shift paddles*
You can operate the shift paddles in the D/S or M
(tiptronic shift gate) selector lever positions.
> To shift up one gear, tap the shift paddle @)
> fig. 71.
> To shift down one gear, tap the shift paddle ©).
If the shift paddles are tapped while in the D/S
selector lever position, automatic mode switches
off briefly. To switch from manually shifting back
to automatic shifting immediately, tap the shift
paddle @) © fig. 71 for 1 second.
To keep shifting using the shift paddles, move the
selector lever to the right out of the D/S position
into the tiptronic shift gate.
The transmission automatically shifts up or down
before critical engine speed is reached.
The transmission only allows manual shifting
when the engine speed is within the permitted
range.
@) Tips
tiptronic does not work if the transmission is
running in emergency mode.
Kick-down enables maximum acceleration.
When you press the accelerator pedal down be-
yond the resistance point, the automatic trans-
mission downshifts into a lower gear and the en-
gine utilizes its full power, if the vehicle speed
and engine RPM permit. It shifts up into the next
higher gear once the maximum permitted engine
RPM is reached.
Page 72 of 304
Assist systems
Assist systems
Speed warning system
Applies to: vehicles with speed warning system
The speed warning system helps you to stay be-
low a specified maximum speed that can be set,
changed or deleted in the Infotainment system.
The speed warning system warns you if you are
exceeding the maximum speed that you have set.
A warning tone will sound as soon as your speed
exceeds the stored value slightly. The oe) in-
dicator light and a message will appear in the in-
strument cluster display at the same time. The
owe indicator light and the message turn off if
the speed falls back below the stored maximum
speed.
Setting a threshold is recommended if you would
like to be reminded when you reach a certain
maximum speed. Situations where you may want
to do so include driving in a country with a gener-
al speed limit or if there is a specified maximum
speed for winter tires.
Setting the warning threshold
> Select in the Infotainment system: MENU but-
ton > Vehicle > left control button > Driver as-
sistance > Speed warning > Manual.
G) Tips
Regardless of the speed warning system, you
should always monitor your speed using the
speedometer and make sure you are following
the legal speed limit.
Cruise control system
Applies to: vehicles with cruise control system
The cruise control system assists the driver in
maintaining a constant speed above approxi-
mately 15 mph (20 km/h). The system maintains
the desired speed by braking and accelerating.
70
Z\ WARNING
— Always pay attention to the traffic around
your vehicle when the cruise control system
is in operation. As the driver, you are always
responsible for controlling your vehicle
speed and the distance between your vehicle
and
other vehicles.
— For safety reasons, cruise control should not
be used in the city, in stop-and-go traffic, on
winding roads, and when road conditions are
poor (such as ice, fog, gravel, heavy rain,
and conditions that could lead to hydroplan-
ing), because this increases the risk of an ac-
cident.
— Switch the cruise control off temporarily
when driving in turning lanes, highway exits,
or in construction zones.
—To reduce the risk of an accident, you should
only resume the stored speed if it is suitable
for the current traffic conditions.
() Note
Before driving downhill a long distance on a
steep hill, decrease your speed and select a
lower gear. This makes use of the engine brak-
ing effect and reduces the load placed on the
brakes.
G) Tips
The brake lights turn on when the brakes are
applied automatically.
Switching the system on
Applies to: vehicles with cruise control system
@ g
©
f ©
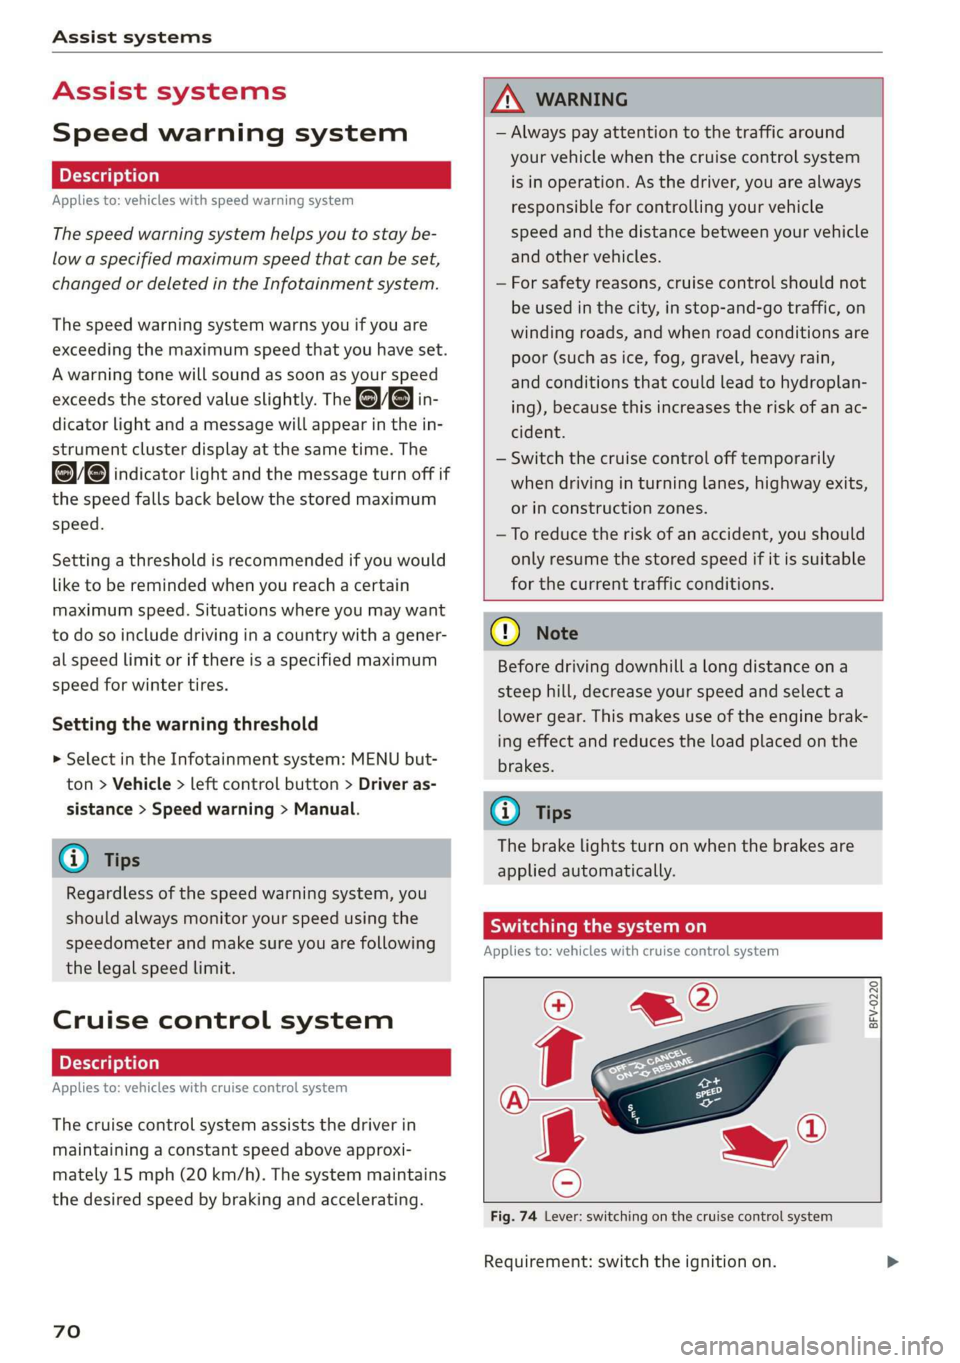
Fig. 74 Lever: switching on the cruise control system
Requirement: switch the ignition on.