2019 AUDI TT ROADSTER length
[x] Cancel search: lengthPage 48 of 304
Seats
Seats
General information
Z\ WARNING
See = page 177, Safe driving for important
information, tips, suggestions and warnings
that you should read and follow for your own
safety and the safety of your passengers.
Front seats
Power seat adjustment
Applies to: vehicles with power adjustable seats
2 & Sn Kd
z a
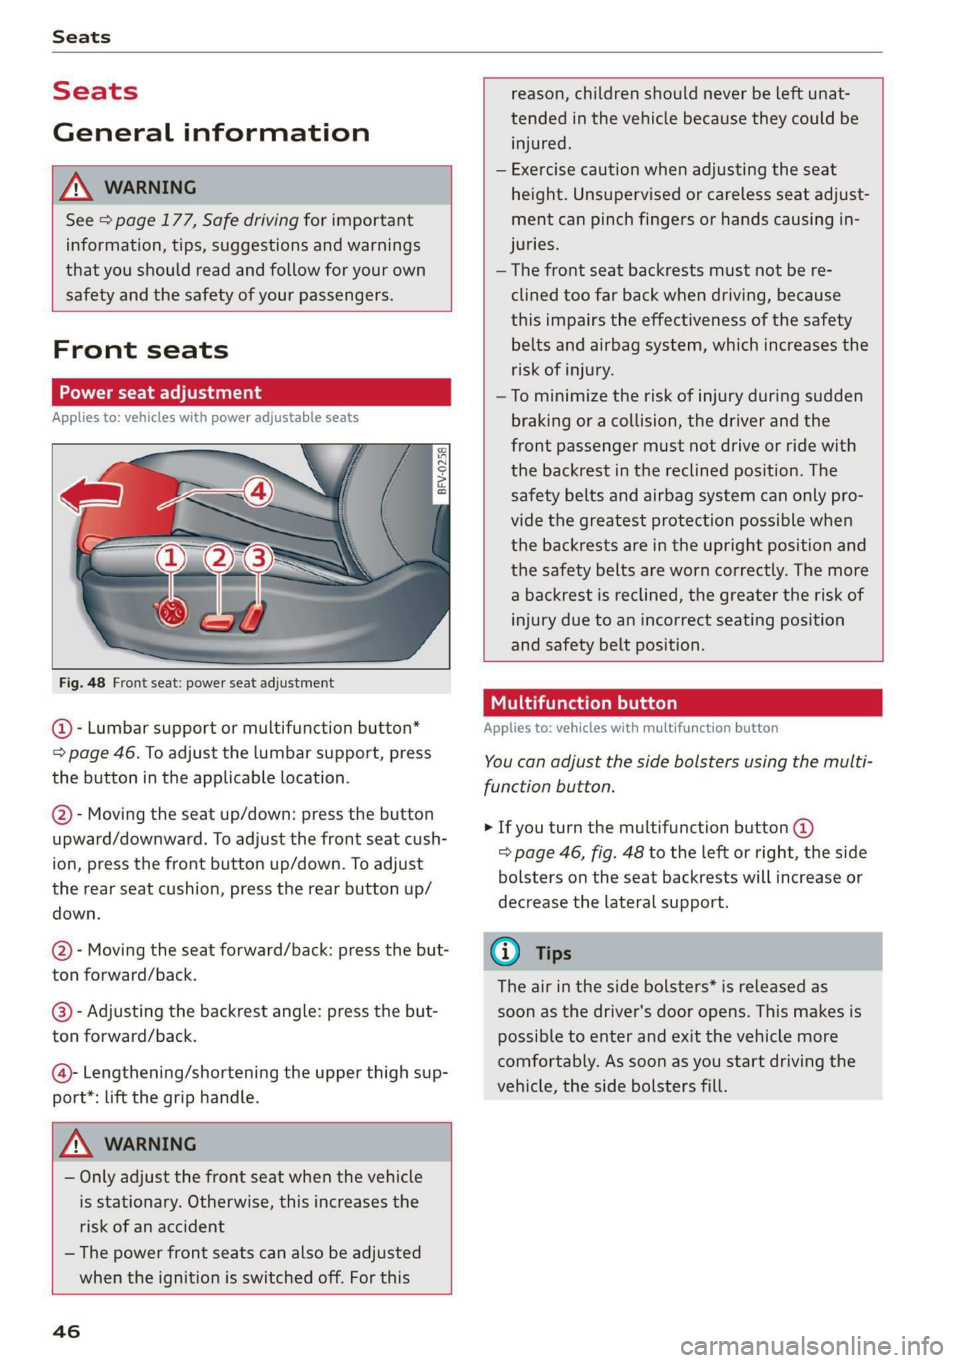
Fig. 48 Front seat: power seat adjustment
@ - Lumbar support or multifunction button*
= page 46. To adjust the lumbar support, press
the button in the applicable location.
@- Moving the seat up/down: press the button
upward/downward. To adjust the front seat cush-
ion, press the front button up/down. To adjust
the rear seat cushion, press the rear button up/
down.
@- Moving the seat forward/back: press the but-
ton forward/back.
@®)- Adjusting the backrest angle: press the but-
ton forward/back.
@- Lengthening/shortening the upper thigh sup-
port*: lift the grip handle.
Z\ WARNING
— Only adjust the front seat when the vehicle
is stationary. Otherwise, this increases the
risk of an accident
— The power front seats can also be adjusted
when the ignition is switched off. For this
46
reason, children should never be left unat-
tended in the vehicle because they could be
injured.
— Exercise caution when adjusting the seat
height. Unsupervised or careless seat adjust-
ment can pinch fingers or hands causing in-
juries.
— The front seat backrests must not be re-
clined too far back when driving, because
this impairs the effectiveness of the safety
belts and airbag system, which increases the
risk of injury.
—To minimize the risk of injury during sudden
braking or a collision, the driver and the
front passenger must not drive or ride with
the backrest in the reclined position. The
safety belts and airbag system can only pro-
vide the greatest protection possible when
the backrests are in the upright position and
the safety belts are worn correctly. The more
a backrest is reclined, the greater the risk of
injury due to an incorrect seating position
and safety belt position.
Multifunction button
Applies to: vehicles with multifunction button
You can adjust the side bolsters using the multi-
function button.
> If you turn the multifunction button @
=> page 46, fig. 48 to the left or right, the side
bolsters on the seat backrests will increase or
decrease the lateral support.
G) Tips
The air in the side bolsters* is released as
soon as the driver's door opens. This makes is
possible to enter and exit the vehicle more
comfortably. As soon as you start driving the
vehicle, the side bolsters fill.
Page 138 of 304
Navigation
that were found is not resorted when this
happens.
— There may be entries in the list that cannot
be displayed completely due to their length.
If you select these list entries using the con-
trol knob, detailed information about the
selected list entry will be shown automati-
cally after several seconds.
Online point of interest sear
search)
Applies to: vehicles with navigation system and Audi connect
(online
You can search for points of interest on the Inter-
net.
Requirement: the requirements for Audi connect
services must be met > page 125.
> Press the LNAV/MAP] button repeatedly until
the Enter destination menu is displayed
=> page 132, fig. 118.
> Select: left control button > Online search. The
search area last set is shown in the input field.
— Changing the search area: select and confirm
Search area > a search area from the list.
— Searching for online destinations in the se-
lected search area: enter a new city if necessa-
ry. Enter a search term such as restaurant. Se-
lect and confirm an online destination. Select
and confirm Start route guidance.
— Searching for an online destination in a specif-
ic category: select: Select category > desired
category, such as Hotels.
Find which search areas are available under
=> page 135, Point of interest search.
You can search for online destinations using the
voice recognition system = table on page 107.
G) Tips
Always read the chapter > page 125.
136
OXee Te Melee el mA e |
account
Applies to: vehicles with navigation system and Audi connect
Import destinations from your myAudi account
into the MMI.
Requirement: you must have created a myAudi
account at www.audiusa.com/myaudi. You must
have a vehicle stored in your myAudi account and
you must have a destination stored.
> Press the [NAV/MAP] button repeatedly until
the Enter destination menu is displayed
=> page 132, fig. 118.
> Select: left control button > myAudi contacts.
> If necessary, enter your myAudi user data or
your myAudi PIN. The contacts stored in myAu-
di are displayed.
— Select and confirm a contact > desired destina-
tion.
— Select and confirm Start route guidance.
(i) Tips
— You only need to enter the myAudi user data
one time.
— You can receive your myAudi PIN if you have
set up a myAudi account.
— For additional information, see www.
audiusa.com/myaudi.
Entering a destination using geo
coordinates
Applies to: vehicles with navigation system
> Press the [NAV/MAP] button repeatedly until
the Enter destination menu is displayed
=> page 132, fig. 118.
> Select: left control button > Geographical coor-
dinates.
— Select and confirm either Latitude or Longi-
tude.
— Turn the control knob to change the latitude/
longitude.
— Press the control knob to confirm your input.
— Select and confirm Start route guidance.
Page 143 of 304
8S58012721BA
Navigation
— Switching the crosshairs on: press the control
knob in the map view.
— Switching the crosshairs off: press the [BACK
button.
When the crosshairs are switched on > fig. 123:
@ Orientation: the map is either displayed as a
2D north-up map or a 2D heading-up map.
@) Scale: turn the control knob to the left or
right to decrease or increase the scale.
@ Zoom: when the Automatic zoom function is
switched on, an “A” for “Automatic” is dis-
played in the magnifying glass.
@ Crosshairs: move the crosshairs in the desired
direction using the MMI touch control pad
and set a point on the map as the destination
or have information about the focal point dis-
played.
© Map content (points of interest, favorites): if
there are multiple POIs in the immediate vi-
cinity, they will be shown stacked on the
map.
© Additional information on the crosshairs po-
sition: if you move the crosshairs to a loca-
tion on the map, available information for
the current crosshairs position is displayed.
Press the control knob to open destination
details or to start route guidance. When the
crosshairs are turned off, the road being cur-
rently driven on is shown.
@ Display of an upcoming maneuver. If there is
no upcoming maneuver, the distance and cal-
culated arrival time to the destination/stop-
over is displayed in this location.
Display of a better route. See > page 145.
When the crosshairs are switched off > fig. 124:
@) Ifa turn arrow is displayed, a bar graph turns
on. The fewer the bars that are shown, the
shorter the distance is until the turn.
Speed limit display): display of the maxi-
mum permitted speed on the expressways
and highways.
D_ Only applies to vehicles without camera-based speed limit
display.
@ Road currently being driven on. When the ve-
hicle is stationary, “offroad” is displayed
here.
Vehicle location (@)
Display of active traffic information
ONLINE} or [TMC
Altitude display (2)
Route information: various information will
be displayed during active route guidance
(for example, the upcoming maneuver in-
cluding calculated distance and street
names). The display also provides traffic in-
formation or points of interest on the current
route.
Applies to: vehicles with navigation system
®® O®
> Press the [NAV/MAP] button repeatedly until
the map is displayed > page 140, fig. 124.
> Select: left control button > desired function.
Switch to destination input
The Enter destination menu is displayed
=> page 132, fig. 118.
Traffic reports
Current traffic information is displayed in the In-
fotainment system display. See > page 143.
Route list
The route list can only be displayed when route
guidance is active and contains information re-
garding the route, the names of the streets and
the length of the route sections. When traveling
on highways, possible parking lots and rest areas
are shown, which you can select as a stopover.
POIs along the route
Requirement: route guidance must be active.
Searching for points of interest along your cur-
rent route See > page 135.
141
Page 144 of 304
![AUDI TT ROADSTER 2019 Owners Manual Navigation
Additional options on the map
Applies to: vehicles with navigation system
> Press the LNAV/MAP] button repeatedly until
the map is displayed > page 140, fig. 124.
> Press AUDI TT ROADSTER 2019 Owners Manual Navigation
Additional options on the map
Applies to: vehicles with navigation system
> Press the LNAV/MAP] button repeatedly until
the map is displayed > page 140, fig. 124.
> Press](/manual-img/6/57667/w960_57667-143.png)
Navigation
Additional options on the map
Applies to: vehicles with navigation system
> Press the LNAV/MAP] button repeatedly until
the map is displayed > page 140, fig. 124.
> Press the right control button.
Depending on the function selected, the follow-
ing options can also be selected under the Map
menu:
Cancel route guidance: see > page 137.
Map settings: see > page 142.
Route criteria: see > page 139.
Voice guidance: see > page 139.
Navigation settings: see > page 138.
Online traffic data*: see > page 143.
Show alternative routes: see > page 139.
Parking along the route: parking options near
the vehicle are displayed.
Save current position: you can save your current
vehicle position as a favorite > page 138 or save
it as a contact in the directory > page 138.
Audi connect at this location*: allows you to
search for City Events or Weather at the entered
location.
Country information: you can display the appli-
cable urban and rural speed limits for any coun-
try/state. This information will be automatically
shown to you in the route information @)
=> page 140, fig. 124 when the speed limit is ex-
ceeded, if this function is activated > page 142.
Avoid route*: when route guidance is active, the
calculated route will avoid the area you have
specified (maximum: 12 mi (20 km)), if possible.
The navigation system calculates an alternative
route. The route to be avoided that you have en-
tered applies only to the current route and must
be set again, if needed. The areas you have se-
lected to avoid will appear with red and white
shading on the map.
2) AUDI AG provides access to services from third party pro-
viders. Permanent availability cannot be guaranteed, be-
cause that depends on the third party provider.
142
Map settings
Applies to: vehicles with navigation system
> Press the [NAV/MAP] button repeatedly until
the map is displayed > page 140, fig. 124.
> Select: right control button > Map settings.
Depending on the selected function, the follow-
ing settings can be selected:
Map colors
Day/Night: the map is displayed with a light/
dark background.
Automatic: when the lights switch on, the map
colors switch from day to night.
Map display
Standard > page 140, fig. 123.
Satellite map*)) > page 143, fig. 125.
Traffic > page 143.
Map orientation
Destination map: the map indicates the destina-
tion and is oriented to the north.
2D heading-up map/2D north-up map: the cur-
rent vehicle position is displayed. The map is ori-
ented in the direction of travel or to the north.
3D heading-up map: when this function is
switched on, the current vehicle position is
shown on a three-dimensional map and oriented
in the direction of travel. At a scale of 62 mi
(100 km) and larger, the map orientation is to
the north.
Overview map: the entire route from the vehicle
position to the destination or the next stopover is
displayed on the map. The map scale depends on
the length of the route and adapts automatically.
The map is oriented to the north.
Route information
The display of route information such as the cur-
rent road being driven on, upcoming maneuvers, >
Page 146 of 304
Navigation
Online traffic information
Applies to: vehicles with navigation system and Audi connect
The MMI can receive real-time online traffic information about congestion, accidents, road construc-
tion, and other incidents.
[RAH-8613]
Ky Ricca better route is available. —@
along the route O min
Nogales St, Northbound
Northbound
Northbound
eeu
.
Cerys
@
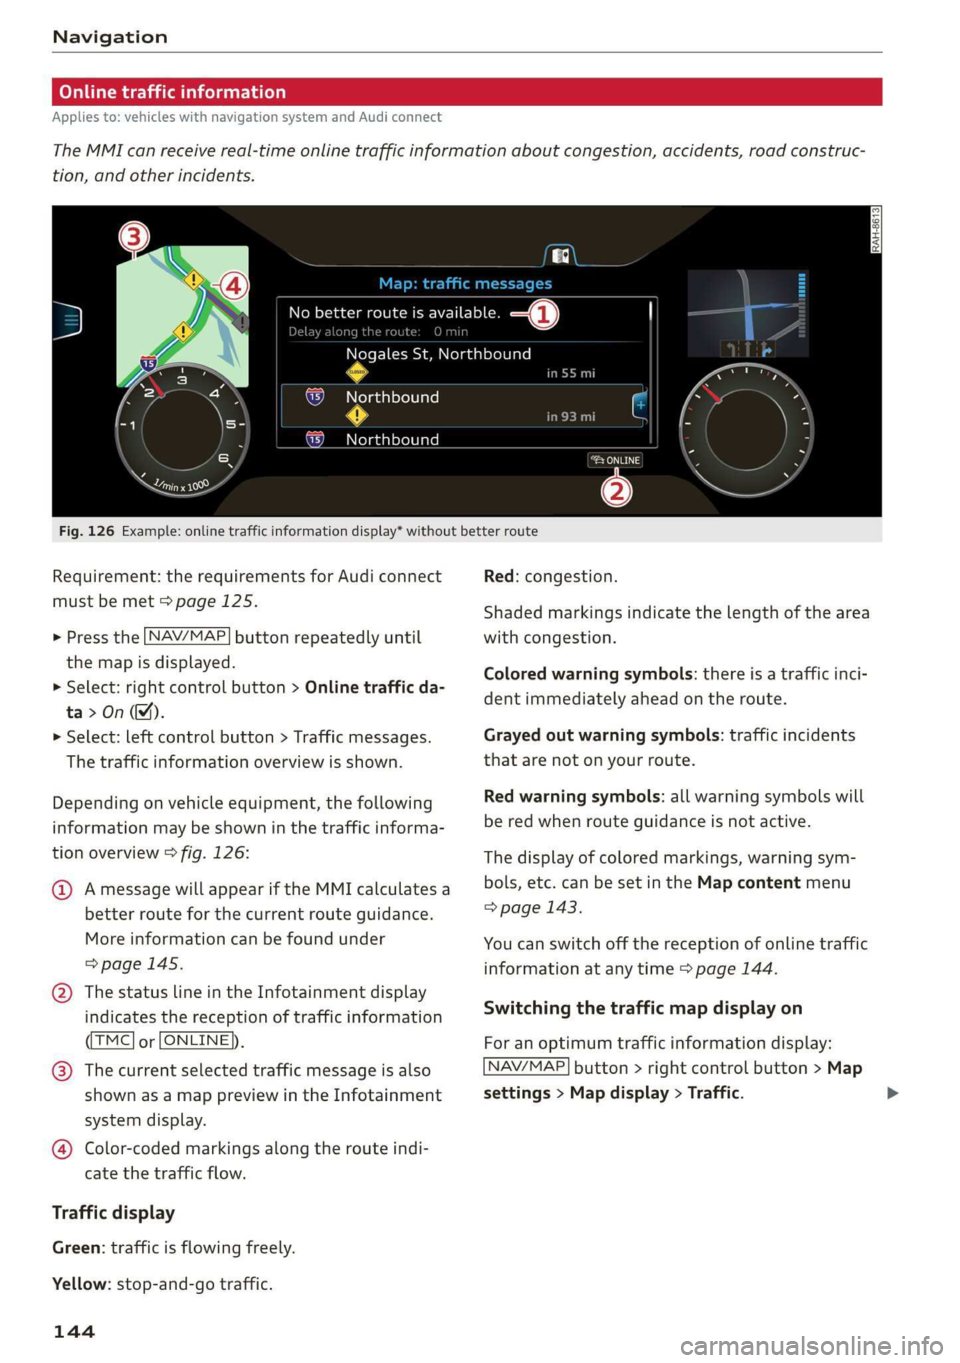
Fig. 126 Example: online traffic information display* without better route
Requirement: the requirements for Audi connect
must be met > page 125.
> Press the [NAV/MAP
the map is displayed.
> Select: right control button > Online traffic da-
ta>On(M).
> Select: left control button > Traffic messages.
The traffic information overview is shown.
button repeatedly until
Depending on vehicle equipment, the following
information may be shown in the traffic informa-
tion overview > fig. 126:
@ Amessage will appear if the MMI calculates a
better route for the current route guidance.
More
information can be found under
=> page 145.
@ The status line in the Infotainment display
indicates the reception of traffic information
TMC] or [ONLINE]).
@® The current selected traffic message is also
shown as a map preview in the Infotainment
system display.
@ Color-coded markings along the route indi-
cate the traffic flow.
Traffic display
Green: traffic is flowing freely.
Yellow: stop-and-go traffic.
144
Red: congestion.
Shaded markings indicate the length of the area
with congestion.
Colored warning symbols: there is a traffic inci-
dent immediately ahead on the route.
Grayed out warning symbols: traffic incidents
that are not on your route.
Red warning symbols: all warning symbols will
be red when route guidance is not active.
The display of colored markings, warning sym-
bols, etc. can be set in the Map content menu
> page 143.
You can switch off the reception of online traffic
information at any time > page 144.
Switching the traffic map display on
For an optimum traffic information display:
NAV/MAP] button > right control button > Map
settings > Map display > Traffic.
Page 147 of 304
8S8012721BA
Navigation
You can also display the online traffic informa-
tion in the satellite map*») > page 143 or the
standard map > page 140, fig. 123
G) Tips
— Online traffic information is not available in
Canada.
— Always read the chapter > page 125, Audi
connect.
— Having the Online traffic data function
switched on provides the most accurate re-
ports of traffic situations as well as traffic
forecasting. Your vehicle transmits and
processes its anonymous, encrypted posi-
tion information at regular intervals to the
traffic data provider. If you do not want to
use this, you can switch off the online traf-
fic information function at any time.
— The online traffic information network is
currently not available in all countries, and
the coverage is not nationwide. For addi-
tional information, visit www.audiusa.com.
Traffic information (TMC)
Applies to: vehicles with navigation system
> Press the LNAV/MAP| button repeatedly until
the map is displayed.
> Select: left control button > Traffic messages.
TMC traffic messages are switched on at the fac-
tory.
Multiple traffic messages are summarized in the
overview under the corresponding street names
or highway names.
— Displaying all traffic messages for a street/
highway: select and confirm the |¢ symbol. A
list of all the traffic messages for the selected
street/highway is displayed.
— Opening the detailed view of a traffic mes-
sage: if you select an entry from the list, the
traffic information will be shown as a map pre-
view @) > page 144, fig. 126. Select and con-
2) AUDI AG provides access to services from third party pro-
viders. Permanent availability cannot be guaranteed, be-
cause that depends on the third party provider.
firm a traffic message to display the details for
that message.
— Displaying the selected traffic message on the
map: select the right control button > Show on
map.
— Displaying the next traffic message on the
map: press the control knob.
Traffic information display
Colored warning symbols: traffic incidents on
your route are shown in the upper section of the
list and are sorted according to distance.
Warning symbols with +: avoided traffic inci-
dents.
Grayed out warning symbols: traffic incidents
that are not on your route. They are sorted ac-
cording to road type (expressway, highway, other
road), country and name.
Shaded markings indicate the length of the area
with congestion.
G@) Tips
Critical traffic information, such as warnings
about wrong-way drivers, is automatically dis-
played. To hide the traffic information, press
the [BACK] button or the control knob.
— TMC traffic reports are not available in Can-
ada. For more information, please contact
Sirius Canada.
12{oh ea col th a)
Applies to: vehicles with navigation system
By receiving traffic information through TMC,
your MMI calculates a better route if available
and the possible time saved compared to the
current route. You can decide which route you
would like to use.
NAV/MAP > Press the
the
map is displayed.
button repeatedly until
Requirement: route guidance must be active.
145
>
Page 177 of 304
8S8012721BA
System settings
Start update. The length of the process de-
pends on the size of the update.
— Reset driver installation: the selected media
driver package is reset to the settings at the
time of delivery.
— Version information: information on the MMI
software version and the navigation database*
software version is displayed. The Software in-
formation function also provides information
on the software contained in the MMI and the
licensing agreement.
Sound settings
The sound distribution and volume of the MMI
can be adjusted individually. The settings depend
on the vehicle equipment.
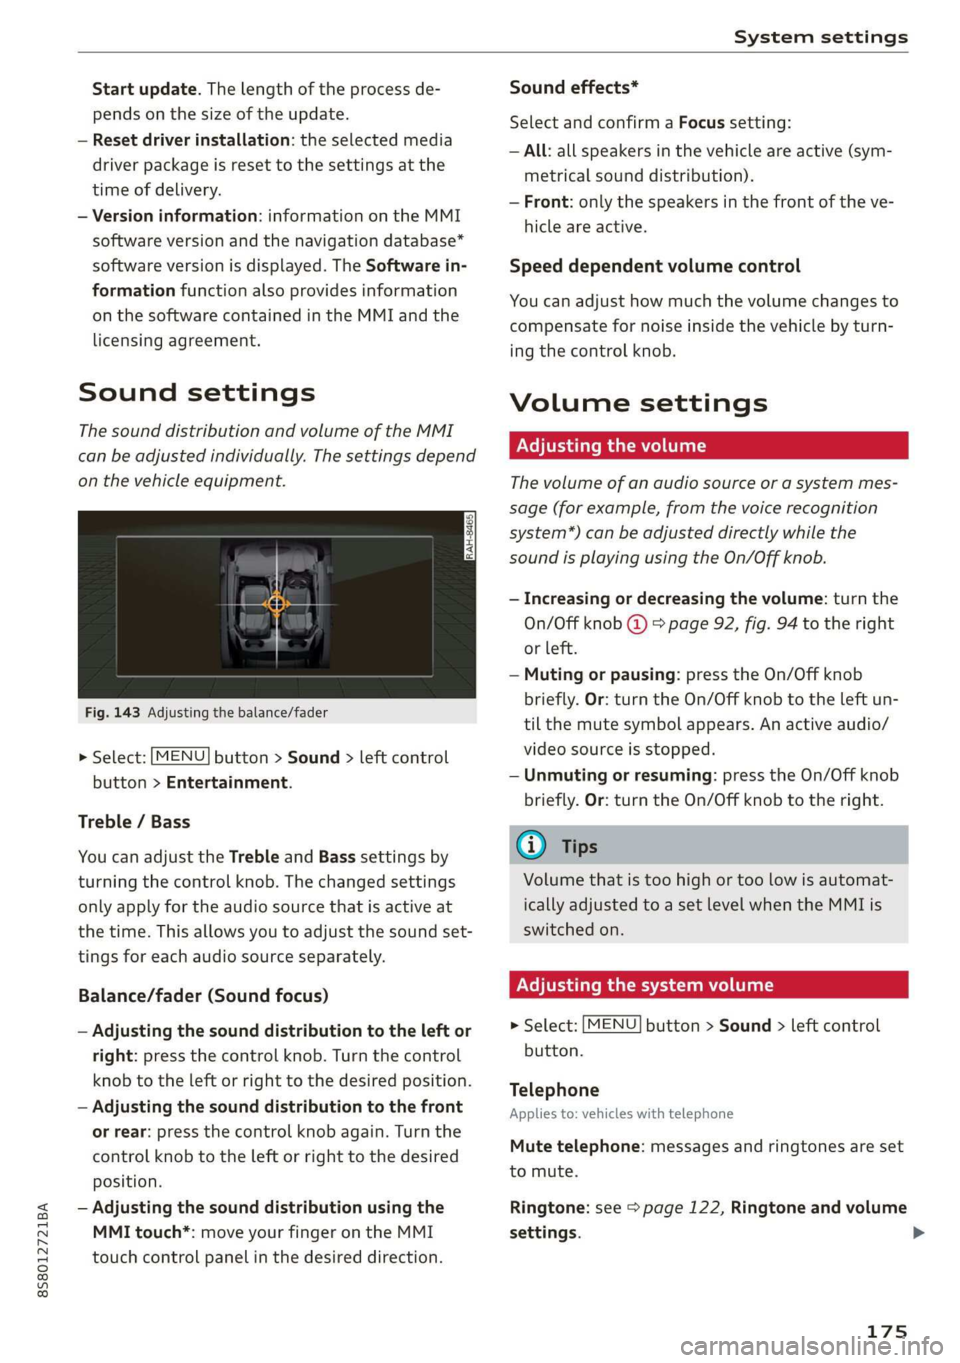
Fig. 143 Adjusting the balance/fader
> Select: [MENU] button > Sound > left control
button > Entertainment.
Treble / Bass
You can adjust the Treble and Bass settings by
turning the control knob. The changed settings
only apply for the audio source that is active at
the time. This allows you to adjust the sound set-
tings for each audio source separately.
Balance/fader (Sound focus)
— Adjusting the sound distribution to the left or
right: press the control knob. Turn the control
knob to the left or right to the desired position.
— Adjusting the sound distribution to the front
or rear: press the control knob again. Turn the
control knob to the left or right to the desired
position.
— Adjusting the sound distribution using the
MMI touch*: move your finger on the MMI
touch control panel in the desired direction.
Sound effects*
Select and confirm a Focus setting:
— All: all speakers in the vehicle are active (sym-
metrical sound distribution).
— Front: only the speakers in the front of the ve-
hicle are active.
Speed dependent volume control
You can adjust how much the volume changes to
compensate for noise inside the vehicle by turn-
ing the control knob.
Volume settings
Adjusting the volume
The volume of an audio source or a system mes-
sage (for example, from the voice recognition
system*) can be adjusted directly while the
sound is playing using the On/Off knob.
— Increasing or decreasing the volume: turn the
On/Off knob @) 9 page 92, fig. 94 to the right
or left.
—Muting or pausing: press the On/Off knob
briefly. Or: turn the On/Off knob to the left un-
til the mute symbol appears. An active audio/
video source is stopped.
—Unmuting or resuming: press the On/Off knob
briefly. Or: turn the On/Off knob to the right.
G@) Tips
Volume that is too high or too low is automat-
ically adjusted to a set level when the MMI is
switched on.
Adjusting the system volume
> Select: [MENU] button > Sound > left control
button.
Telephone
Applies to: vehicles with telephone
Mute telephone: messages and ringtones are set
to mute.
Ringtone: see => page 122, Ringtone and volume
settings.
175
Page 251 of 304
8S8012721BA
Wheels
Tire wear
Check the tires regularly for wear.
—Inflation pressure that is too low
or high can increase tire wear
considerably.
—Driving quickly through curves,
rapid acceleration, and heavy
braking increase tire wear.
—Have an authorized Audi dealer
or authorized Audi Service Facili-
ty check the wheel alignment if
there is unusual wear.
—Have the wheels rebalanced if an
imbalance is causing noticeable
vibration in the steering wheel.
If you do not, the tires and other
vehicle components could wear
more quickly.
Treadwear indicator
Original equipment tires contain
treadwear indicators in the tread
pattern, which are bars that are
1/16 in (1.6 mm) high and are
spaced evenly around the tire per-
pendicular to the running direc-
tion > fig. 182. The letters “TWI”
or triangles on the tire sidewall
indicate the location of the tread-
wear indicators.
D Obey any applicable regulations in the
country where the vehicle is being oper-
ated.
The tires have reached the mini-
mum tread depth ) when they
have worn down to the treadwear
indicators. Replace the tires with
new ones > A.
Tire rotation
Rotating the tires regularly is rec-
ommended to ensure the tires
wear evenly. To rotate the tires,
install the tires from the rear axle
on the front axle and vice versa.
This will allow the tires to have
approximately the same length of
service life.
For unidirectional tires, make sure
the tires are installed according to
the running direction indicated on
the tire sidewall > page 273.
Hidden damage
Damage to tires and rims can of-
ten occur in locations that are hid-
den. Unusual vibrations in the ve-
hicle or pulling to one side may
indicate that there is tire damage.
Reduce your speed immediately.
Check the tires for damage. If no
damage is visible from the out-
side, drive slowly and carefully to >
249