2019 AUDI TT ROADSTER mirror controls
[x] Cancel search: mirror controlsPage 9 of 304

8S8012721BA
Quick access
OOOO
©
OOOOGOOOO
©
O
®OOO®
Side assist display ..............
Door handle
Central locking switch ...........
Air vent with seat heating controls
Lever for:
—Turn signals and high beams ....
— Active lane assist .............
Multifunction steering wheel with:
— Horn Pe
— Driver's airbag ...............
— Buttons for the virtual instrument
cluster, including the driver infor-
mation system, audio/video, tele-
phone, navigation and voice rec-
ognition system
—Shift paddles ................
Audi virtual cockpit (instrument
cluster) 22... 0... eee eee eee
Windshield washer system lever . .
Starting the engine if there is a
malfunction ..............00 00
Adjustable steering column ......
Cruise control lever .............
Instrument illumination .........
Hood release! » « wae ¢ s eae vs setee
Headlight control switch ........
Power exterior mirror adjustment .
Power windows ............005-
Air vent including climate control
system controls ................
Lockable glove compartment
Drives for CD, DVD, SIM/SD cards .
Front passenger's airbag ........
Rear window defogger button
Depending on equipment, buttons
for:
sdriverselect oc. seins 6 + cgies oo neve
— Electronic Stabilization Control
(ESC) «5 « cows ss owen 4 ¢ ee a8 i vee
—Emergency flashers ...........
— Retractable rear spoiler ........
Depending on equipment, center
console with:
— Multimedia compartment for cell
PNONG aces cs ees s Ree se BER es
75 25
39
72
193
66
10
42
59 57 70
Al
227
38
Al
28
52
153,
193
TT
86
40
90
159
= Audi phone box sessie ss owe oo cee 113
@) Infotainment system on/off button . 92
@5) Infotainment system unit ....... 92
@8 Wind deflector button .......... 35
@) Depending on equipment:
— Storage compartment
—Ashtray 0.2... 00. eee eee eee 48
—CUPHGIDES wis 5 2 wens s x eee 5 2: 49
Power top button .............. 33
@ Parking’ brake: « + cs ss wows so sors 59
G0 Depending on equipment:
—[START ENGINE STOP] button ... 57
— Sound button for exhaust door
control
@) Selector lever (S tronic).......... 62
@) Tips
Some the equipment listed here is only instal-
led in certain models or is available as an op-
tion.
Indicator lights overview
The indicator lights in the instrument cluster
blink or turn on. They indicate functions or mal-
functions.
With some indicator lights, messages may ap-
pear and warning signals may sound. The indica-
tor lights and messages may be covered by other
displays. To show them again, select the second
tab for messages with the multifunction steering
wheel © page 12.
Some indicator lights in the display can display in
several colors.
Some indicator lights turn on briefly as a function
check when you switch the ignition on. These sys-
tems are marked with a V in the following tables.
If one of these indicator lights does not turn on,
there is a malfunction in that system.
The following indicator lights may be available,
depending on the vehicle equipment:
Page 46 of 304

Lights and Vision
Replacing windshield wiper blades
he
B8R-0379
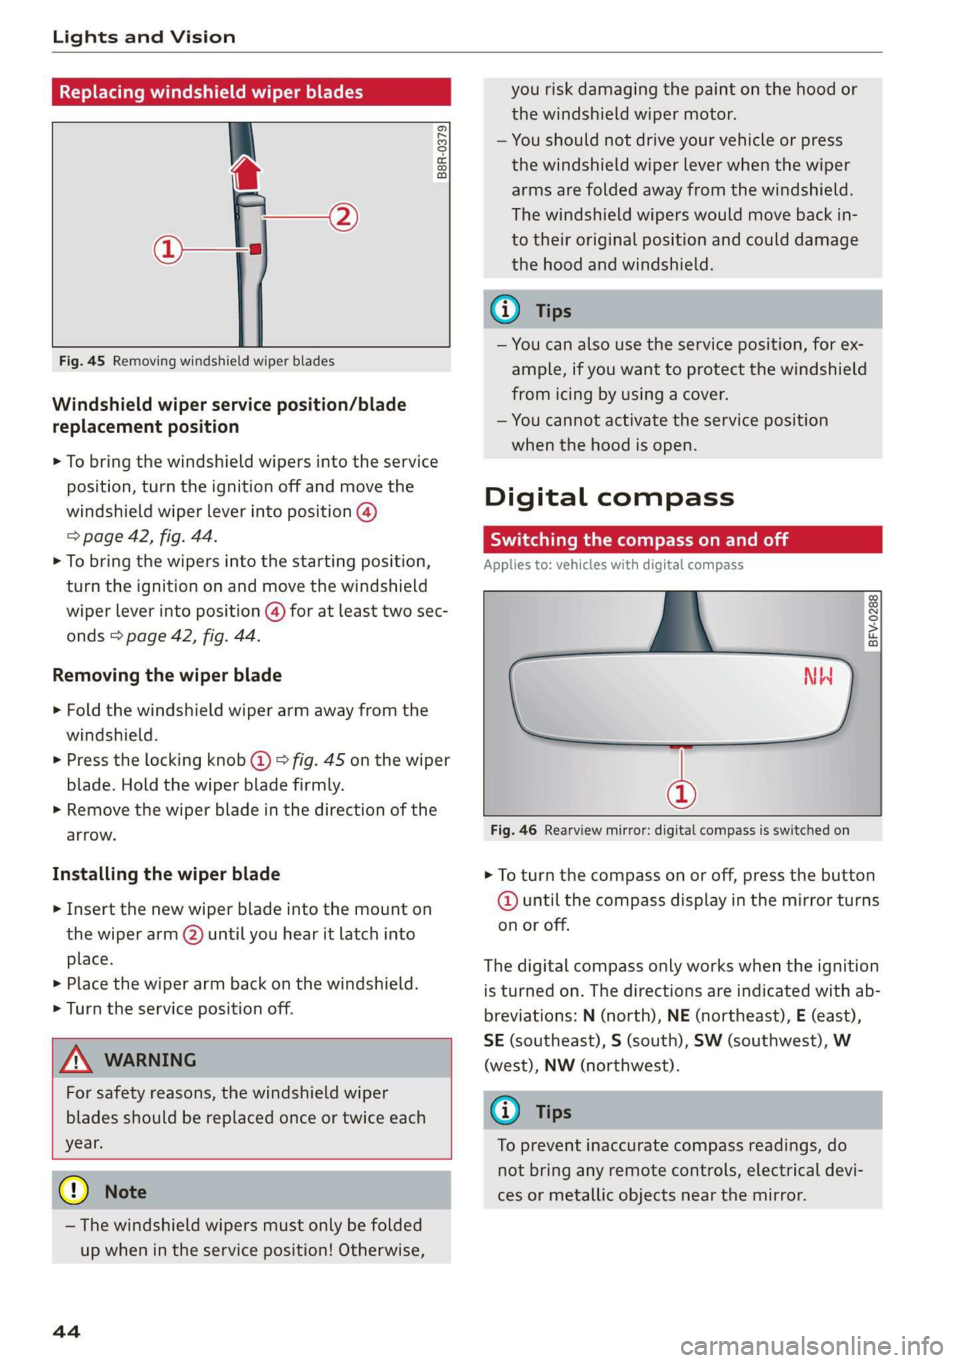
Fig. 45 Removing windshield wiper blades
Windshield wiper service position/blade
replacement position
> To bring the windshield wipers into the service
position, turn the ignition off and move the
windshield wiper lever into position @)
> page 42, fig. 44.
> To bring the wipers into the starting position,
turn the ignition on and move the windshield
wiper lever into position (@) for at least two sec-
onds > page 42, fig. 44.
Removing the wiper blade
> Fold the windshield wiper arm away from the
windshield.
> Press the locking knob (@) > fig. 45 on the wiper
blade. Hold the wiper blade firmly.
> Remove the wiper blade in the direction of the
arrow.
Installing the wiper blade
> Insert the new wiper blade into the mount on
the wiper arm (2) until you hear it latch into
place.
» Place the wiper arm back on the windshield.
> Turn the service position off.
Z\ WARNING
For safety reasons, the windshield wiper
blades should be replaced once or twice each
year.
@) Note
— The windshield wipers must only be folded
up when in the service position! Otherwise,
44
you risk damaging the paint on the hood or
the windshield wiper motor.
— You should not drive your vehicle or press
the windshield wiper lever when the wiper
arms are folded away from the windshield.
The windshield wipers would move back in-
to their original position and could damage
the hood and windshield.
G) Tips
— You can also use the service position, for ex-
ample, if you want to protect the windshield
from icing by using a cover.
— You cannot activate the service position
when the hood is open.
Digital compass
Scale ma meel eR meme a
Applies to: vehicles with digital compass
BFV-0288
NW
@
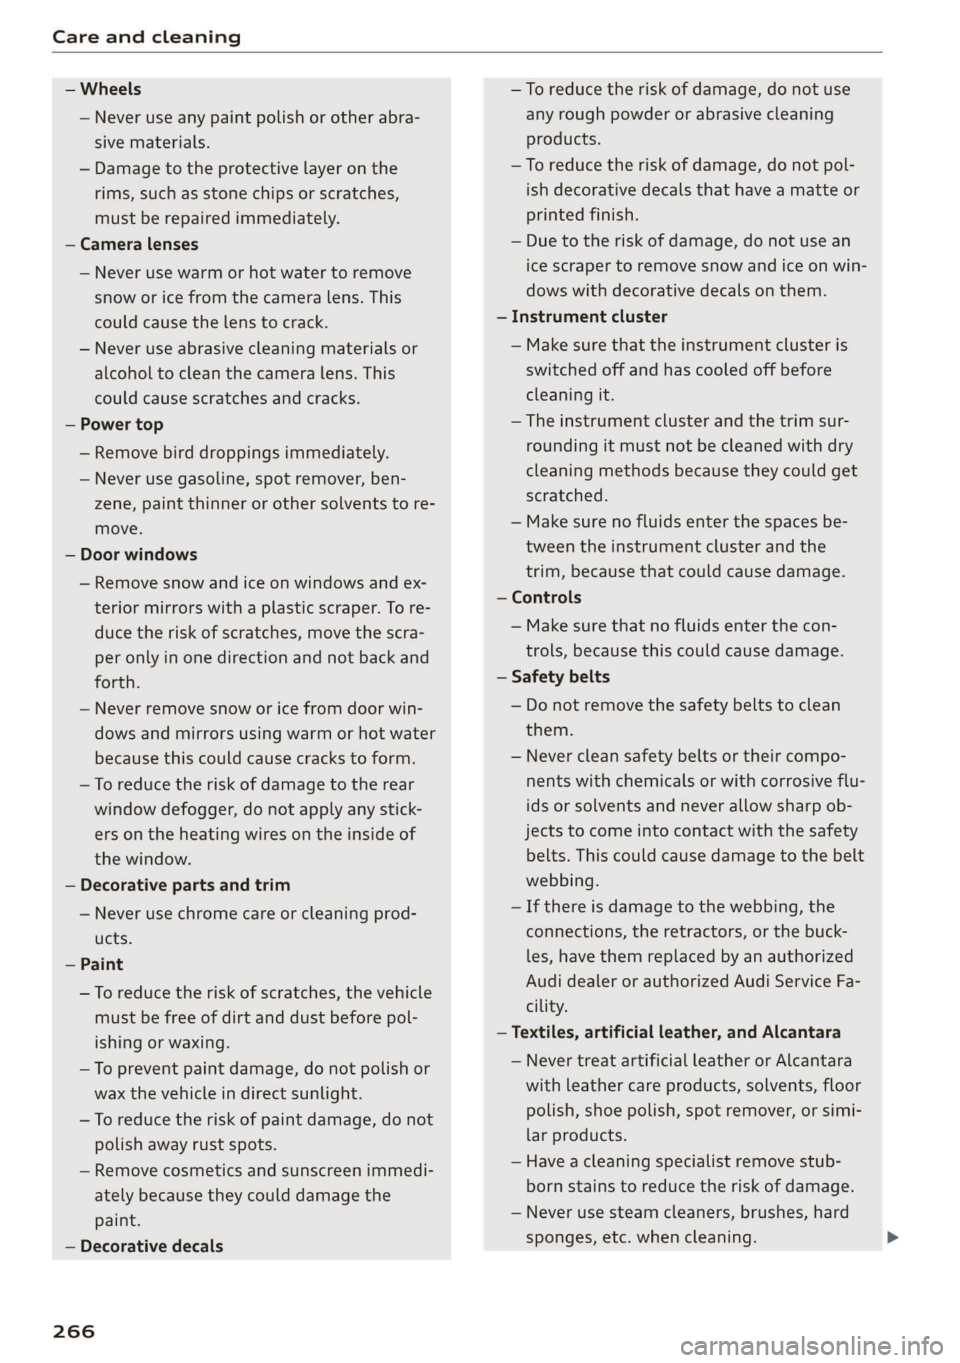
Fig. 46 Rearview mirror: digital compass is switched on
> To turn the compass on or off, press the button
@ until the compass display in the mirror turns
on or off.
The digital compass only works when the ignition
is turned on. The directions are indicated with ab-
breviations: N (north), NE (northeast), E (east),
SE (southeast), S (south), SW (southwest), W
(west), NW (northwest).
(i) Tips
To prevent inaccurate compass readings, do
not bring any remote controls, electrical devi-
ces or metallic objects near the mirror.
Page 268 of 304

Care and cleaning
— Wheels
— Never use any paint polish or other abra-
sive materials.
— Damage to the protective layer on the
rims, such as stone chips or scratches,
must be repaired immediately.
— Camera lenses
— Never use warm or hot water to remove
snow or ice from the camera lens. This
could cause the lens to crack.
— Never use abrasive cleaning materials or
alcohol to clean the camera lens. This
could cause scratches and cracks.
— Power top
— Remove bird droppings immediately.
— Never use gasoline, spot remover, ben-
zene, paint thinner or other solvents to re-
move.
— Door windows
— Remove snow and ice on windows and ex-
terior mirrors with a plastic scraper. To re-
duce the risk of scratches, move the scra-
per only in one direction and not back and
forth.
— Never remove snow or ice from door win-
dows and mirrors using warm or hot water
because this could cause cracks to form.
—To reduce the risk of damage to the rear
window defogger, do not apply any stick-
ers on the heating wires on the inside of
the window.
— Decorative parts and trim
— Never use chrome care or cleaning prod-
ucts.
— Paint
— To reduce the risk of scratches, the vehicle
must be free of dirt and dust before pol-
ishing or waxing.
—To prevent paint damage, do not polish or
wax the vehicle in direct sunlight.
—To reduce the risk of paint damage, do not
polish away rust spots.
— Remove cosmetics and sunscreen immedi-
ately because they could damage the
paint.
— Decorative decals
266
— To reduce the risk of damage, do not use
any rough powder or abrasive cleaning
products.
— To reduce the risk of damage, do not pol-
ish decorative decals that have a matte or
printed finish.
— Due to the risk of damage, do not use an
ice scraper to remove snow and ice on win-
dows with decorative decals on them.
— Instrument cluster
— Make sure that the instrument cluster is
switched off and has cooled off before
cleaning it.
— The instrument cluster and the trim sur-
rounding it must not be cleaned with dry
cleaning methods because they could get
scratched.
— Make sure no fluids enter the spaces be-
tween the instrument cluster and the
trim, because that could cause damage.
— Controls
— Make sure that no fluids enter the con-
trols, because this could cause damage.
— Safety belts
— Do not remove the safety belts to clean
them.
— Never clean safety belts or their compo-
nents with chemicals or with corrosive flu-
ids or solvents and never allow sharp ob-
jects to come into contact with the safety
belts. This could cause damage to the belt
webbing.
— If there is damage to the webbing, the
connections, the retractors, or the buck-
les, have them replaced by an authorized
Audi dealer or authorized Audi Service Fa-
cility.
— Textiles, artificial leather, and Alcantara
— Never treat artificial leather or Alcantara
with leather care products, solvents, floor
polish, shoe polish, spot remover, or simi-
lar products.
— Have a cleaning specialist remove stub-
born stains to reduce the risk of damage.
— Never use steam cleaners, brushes, hard
sponges, etc. when cleaning.
Page 280 of 304
![AUDI TT ROADSTER 2019 Owners Manual Fuses and bulbs
Interior fuse assignment
ft
pl Bel Fe
» BEBE ERED
Poo
ns
[24] 25) rao) 27) Fe Ra
23 |
Fsacsomeemr STE 42)
eases eres] b
ro Wa a i ee
1F52) FOL
Re
B8V-0217
AUDI TT ROADSTER 2019 Owners Manual Fuses and bulbs
Interior fuse assignment
ft
pl Bel Fe
» BEBE ERED
Poo
ns
[24] 25) rao) 27) Fe Ra
23 |
Fsacsomeemr STE 42)
eases eres] b
ro Wa a i ee
1F52) FOL
Re
B8V-0217](/manual-img/6/57667/w960_57667-279.png)
Fuses and bulbs
Interior fuse assignment
ft
pl Bel Fe
» BEBE ERED
Poo
ns
[24] 25) rao) 27) Fe Ra
23 |
Fsacsomeemr STE 42)
eases eres] b
ro Wa a i ee
1F52) FOL
Re
B8V-0217
No. | Equipment
F20 | Power lumbar support adjustment
Front passenger's side neck heating (Road-
F22
ster)
Right vehicle electrical system control
F24
module
F25 | Driver side door
F26 | Seat heating
Vehicle electrical system control module
Fae (terminal 30)
F28 | AMI High media port
F29 | Vehicle electrical system control module
F32 | Driver assistance systems
F33 | Airbag
Sockets, interior sound, tail light switch,
F34 | temperature sensor, oil level sensor, neck
heating, garage door opener
Fig. 202 Vehicle interior: fuse assignment
No. Equipment
Diagnosis, headlight range control, air
quality sensor, automatic dimming rear-
view mirror, center instrument panel
switch module
F35
F4 Central computer processor (MIB-2) F36 | Right cornering light / right LED headlight
FS Gateway (diagnostics) F37 | Left cornering light / left LED headlight
Fo Selector lever (automatic transmission)
F7
Climate control system controls, rear win-
dow defogger, tire pressure monitoring
Engine control module, ESC control mod-
F38
ule
F39 | Front passenger side door
F8
Switch for the electromechanical parking
brake, light switch, rain/light sensor, inte-
rior lighting, diagnostic connector, roof
electronics F40
| Cigarette lighter, sockets
F41 | Fuel tank diagnosis
F42 | Central locking area
FQ Steering column switch module
F44 | All wheel drive clutch control module
F10 Vehicle positioning
F45 | Power adjustable driver's side seat
Fll
All wheel drive clutch, left vehicle electri-
cal system control module
F46 | Driver's side neck heating (Roadster)
F49 | Engine start, clutch sensor
F12 Infotainment components
F52 | Control module for suspension control
F1l4 Climate control system blower fan
F53 | Rear window defogger
Fis Electronic steering column lock
F16
Infotainment system components, safety
belt microphone
F17 Instrument cluster
F18 Rearview camera
F19
Convenience access control module
278
The power seats* are protected via circuit break-
ers that automatically switch on after a few sec-
onds after the overload has been reduced.
Page 291 of 304

8S58012721BA
Remote control key............---0 eee 24
Setting... 2... cece eee 26
Central locking switch..............00-0. 25
Ceramic brakes......... 00020-00002 eae 88
Gertifications: = + ccs 2 waver « cece =o anesees 3 283
Changing light bulbs................... 279
Charging
refer to Power sourceS.........2--0000-- 48
Charging the battery (mobile devices). 113, 159
Child restraint
Danger of using child restraints in the front
Child restraints
Where can I get additional information
about child restraints and their use?..... 222
Child:safety:s + & scvis ss ows 2 2 reson oe vem vo 210
Important safety instructions for using child
SAfetySGats s wacas x x sees go eeeE so eR YY 213
Child safety seats... 0.00... cece eee eee 215
Booster Seats... + «isu ss ews ev paws soe 217
Convertible child seats.............0.0. 216
How do I properly install a child safety seat
in my vehicle? s = sees « ¢ sews so ees so es 213
Tinfantiseatsis i osseous a x cviaina a o canams ao xaos 215
Safety instructions.............-..00. 213
SOCUFING & exis x o ees xe eis xe dew ee oH 219
Cigarette lighter a: < s eens + 8 ees ose 5 oe 48
Classic view
Cleaning......... 02.
Cleaning/removing ice from windows...... 264
Cleaning Alcantara...............00000. 265
Cleaning artificial leather............... 265
Cleaning carbon components........ 264, 265
Cleaning controls ........0..scceeeeeees 265
Cleaning decorative parts andtrim........ 264
Cleaning displays «os i esas si eee ot ve ws 265
Cleaning exhaust tail pipes.............. 263
Cleaning plastic parts..............000. 265
Cleaning rims..............0 02.20 e ee eee 263
Cleaning seat covers.............000005 265
Cleaning taillights « ice <2 cece 6 a emacs xe oe 263
Cleaning textiles ove. ss sccan vs evn oe eves 265
Cleaning the Audi virtual cockpit.......... 265
Cleaning the instrument cluster.......... 265
Cleaning the wind deflector............. 264
Climate control system (automatic)........ 53
Drive select... 0... cece eee eee 78
Clock... eee eee eee eee L71
Closing
Convenience closing. ..........ese eres 29
HOG « 2 wey + y seus: 8 5 ees ¢ 9 eee es wR 229
Luggage compartment lid............... 27
Windows ..... 0.0.0.0 c cece eee eee eee 28
Cockpit (overview) ...... 6.0.0 c cece eee ee 6
GolommUMBer a. « siasnse sv cvavane ew ogsuwre + o oxesnse 285
GOMING HOME aici 2 6 sensi av eymree w H arwere a + anave 40
Commands (voice recognition system) ..... 104
Compartments: as ss ssw sv sews sv eaves y 6 eae 49
Compass inthe mirror...............0005 44
Complianicé:: = » eece x x sews 5 s wees 5 v eee os 283
Conference call...................20005 116
CONNECE. 2... eee eee 125
Data Privacy ews < ¢ ces se nes & ¢ pete 5 ¥ eee 130
Infotainmenticn 2 = ciao a 2 cxivaus « eoeseas 6 2 we 125
Infotainment services............00005 127
Connection manager................... 172
Connections
referto Media..............e eee 152, 160
Connection settings .................00. 172
Consumer information................55 280
Consumption (Fuel) . . srerice o ccasese wo yess « 6 ave 15
Contacts
Additional directory.......... 0.0 eevee 173
Importing/exporting.................. 122
Memiory:capacityisicca: asc ss sesese © evans 123
Searching.......... 02. see eee eee eee 121
SHOWiniG UStailS!: « aeas x 2 eames ¢ 5 seem Ee 121
Storing
as destination................. 138
Control BUTCONSio08 x s mews 2 x gow = qamey o 9 we 13
Control buttons (operating the MMI)....... 93
Control knob with joystick function......... 97
Convenience key...... 0.02.00 ee eee eee 22
Indicator light ; sacs se ceca ss pees ee reese 58
Unlocking and locking..............0005 24
Convenience opening and closing
Setting... 0.0... c eee 29
WIRKOWS% = zur: ¢ 2 were x x ces go ee sox 29
Convertible child safety seats............ 216
289