2019 AUDI TT ROADSTER instrument cluster
[x] Cancel search: instrument clusterPage 178 of 304

System settings
Ringtone volume: you can adjust the volume of
the selected ringtone by turning the control
knob.
Message volume: you can adjust the volume of
the notification for an incoming text message by
turning the control knob.
Microphone input level: you can adjust the vol-
ume during a phone call by turning the control
knob.
Navigation
Applies to: vehicles with navigation system
Voice guidance: see > page 139, Voice guidance.
Voice guidance during phone call: see
=> page 139, Voice guidance.
Voice guidance volume: you can adjust the voice
guidance volume during active route guidance by
turning the control knob.
Entertainment fader: the volume of audio play-
back can be temporarily lowered when the park-
ing system or voice guidance is active.
Voice recognition system
Applies to: vehicles with voice recognition system
Short dialog: prompts in a shorter format can be
switched on or off.
Speech dialog system volume: you can adjust
the volume of the prompts by turning the control
knob.
Parking aid*
You can adjust the signal tone volume by turning
the control knob.
— Adjusting the Front volume: select and con-
firm High, Medium, or Low.
— Adjusting the Rear volume: select and confirm
High, Medium, or Low.
MMI touch volume*
You can adjust the volume of the prompts for the
MMI touch* by turning the control knob.
Audi Heartbeat
You can adjust the volume of Audi Heartbeat by
turning the control knob.
176
G) Tips
Please note that the voice recognition sys-
tem* is not available in Cabriolets that do not
have a factory-installed safety belt micro-
phone.
Restarting the MMI
(reset)
RAH-8611
g
=
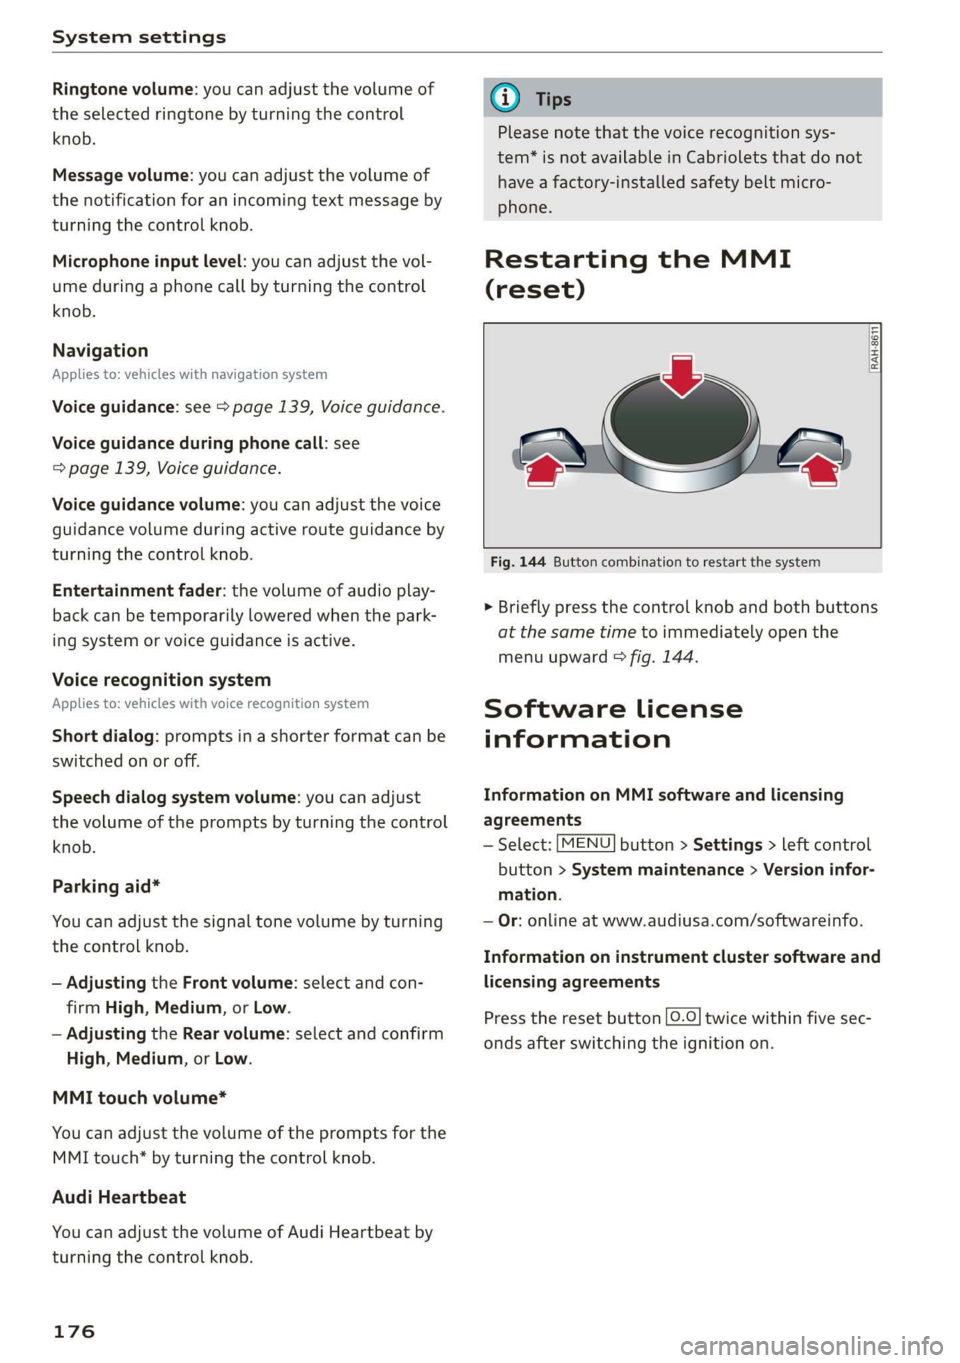
Fig. 144 Button combination to restart the system
> Briefly press the control knob and both buttons
at the same time to immediately open the
menu upward > fig. 144.
Software License
information
Information on MMI software and licensing
agreements
— Select: [MENU] button > Settings > left control
button > System maintenance > Version infor-
mation.
— Or: online at www.audiusa.com/softwareinfo.
Information on instrument cluster software and
licensing agreements
Press the reset button [0.0] twice within five sec-
onds after switching the ignition on.
Page 184 of 304

Safety belts
Safety belts
General notes
Always wear safety belts!
Wearing safety belts correctly saves lives!
This chapter explains why safety belts are neces-
sary, how they work and how to adjust and wear
them correctly.
> Read all the information that follows and heed
all of the instructions and WARNINGS.
ZA\ WARNING
Not wearing safety belts or wearing them im-
properly increases the risk of serious personal
injury and death.
— Safety belts are the single most effective
means available to reduce the risk of serious
injury and death in automobile accidents.
For your protection and that of your passen-
gers, always correctly wear safety belts
when the vehicle is moving.
— Pregnant women, injured, or physically im-
paired persons must also use safety belts.
Like all vehicle occupants, they are more
likely to be seriously injured if they do not
wear Safety belts. The best way to protect a
fetus is to protect the mother - throughout
the entire pregnancy.
NT tet)
Your vehicle has two seating positions. Each seat-
ing position has a safety belt.
ZA\ WARNING
Not wearing safety belts or wearing them im-
properly increases the risk of serious personal
injury and death.
— Never strap more than one person, including
small children, into any belt. It is especially
dangerous to place a safety belt over a child
sitting on your lap.
— Never let more people ride in the vehicle
than there are safety belts available.
182
— Be sure everyone riding in the vehicle is
properly restrained with a separate safety
belt or child restraint.
yr ae Caen Chi
Your vehicle has a warning system for the driver
and front seat passenger to remind you about
the importance of buckling-up.
BFV-0297
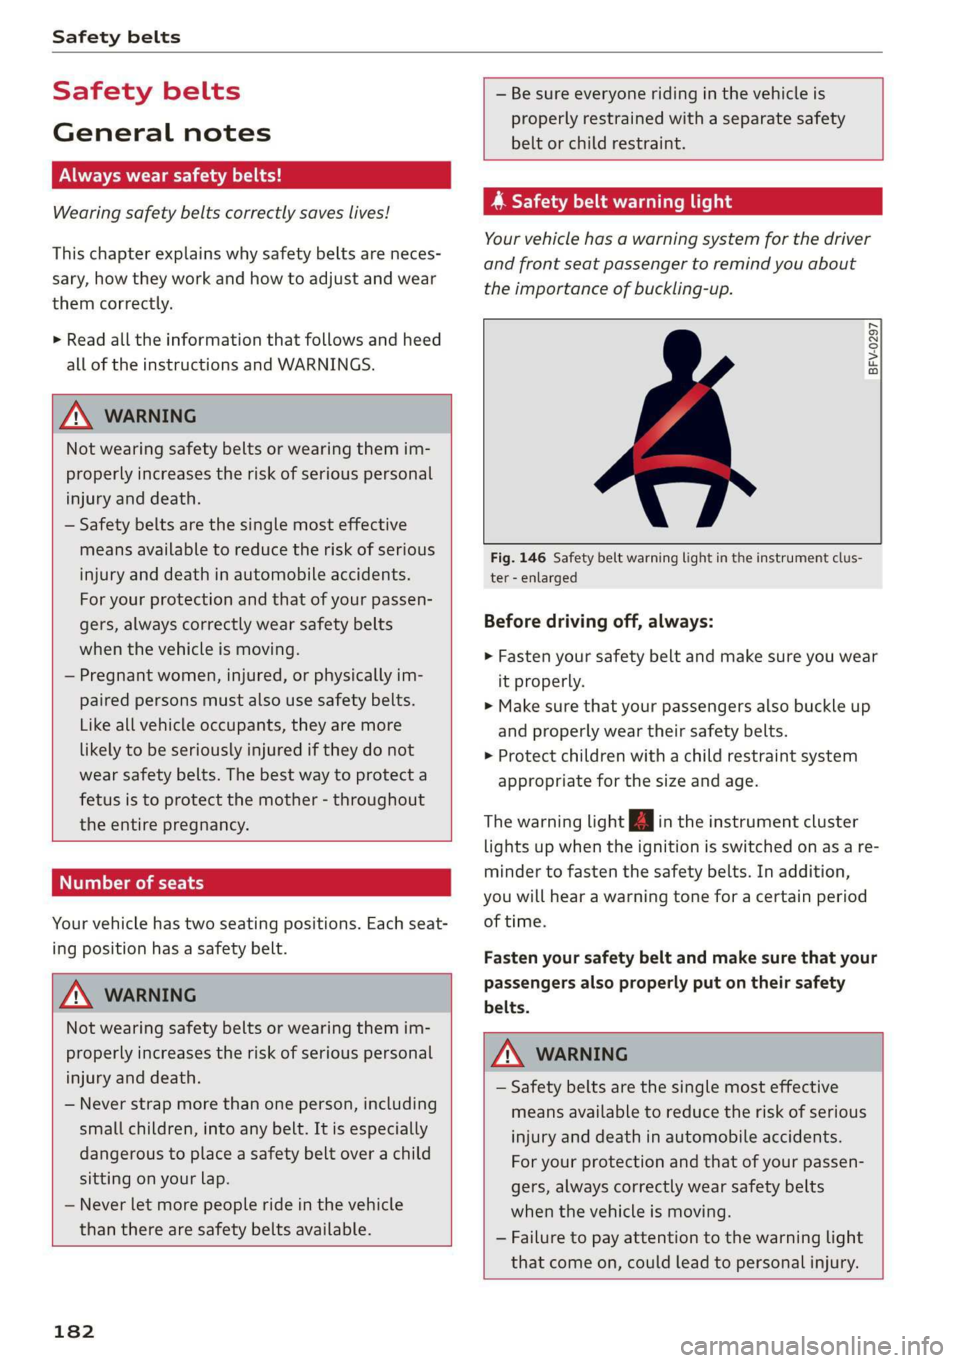
Fig. 146 Safety belt warning light in the instrument clus-
ter - enlarged
Before driving off, always:
> Fasten your safety belt and make sure you wear
it properly.
> Make sure that your passengers also buckle up
and properly wear their safety belts.
> Protect children with a child restraint system
appropriate for the size and age.
The warning light in the instrument cluster
lights up when the ignition is switched on as a re-
minder to fasten the safety belts. In addition,
you will hear a warning tone for a certain period
of time.
Fasten your safety belt and make sure that your
passengers also properly put on their safety
belts.
Z\ WARNING
— Safety belts are the single most effective
means available to reduce the risk of serious
injury and death in automobile accidents.
For your protection and that of your passen-
gers, always correctly wear safety belts
when the vehicle is moving.
— Failure to pay attention to the warning light
that come on, could lead to personal injury.
Page 198 of 304

Airbag system
— Always make sure that the safety belt upper
anchorage is behind the child restraint and
not next to or in front of the child restraint
so that the safety belt will be properly posi-
tioned.
— Always make sure that there is nothing on
the front passenger seat that will cause the
capacitive passenger detection system in
the seat to signal to the Airbag System that
the
seat is occupied by a person when it is
not, or to signal that it is occupied by some-
one who is heavier than the person actually
sitting on the seat. The presence of addi-
tional objects could cause the passenger
front airbag to be turned on when it should
be off, or could cause the airbag to work ina
way that is different from the way it would
have worked without the object on the seat.
— Make sure that the PASSENGER AIR BAG
OFF 7%; light comes on and stays on all the
time whenever the ignition is switched on.
PET ew elem me eae
The front passenger seat in your vehicle has a lot
of very important parts of the Advanced Airbag
System in it. These parts include the capacitive
passenger detection system, wiring, brackets,
and more. The control unit monitors the system
on the front passenger seat when the ignition is
switched on and turns the airbag indicator light
on when a malfunction in the one of the system
components is detected > page 200. Because the
front passenger seat contains important parts of
the Advanced Airbag System, you must take care
to prevent it from being damaged. Damage to
the seat may prevent the Advanced Airbag Sys-
tem for the front passenger seat from doing its
job ina crash.
The front Advanced Airbag System consists
of the following:
— Crash sensors in the front of the vehicle that
measure vehicle acceleration/deceleration to
provide information to the Advanced Airbag
System about the severity of the crash.
— An electronic control unit, with integrated
crash sensors for front and side impacts. The
196
control unit “decides” whether to fire the front
airbags based on the information received from
the crash sensors. The control unit also “de-
cides” whether the safety belt pretensioners
should be activated.
— An Advanced Airbag with gas generator for the
driver inside the steering wheel hub.
— An Advanced Airbag with gas generator inside
the instrument panel for the front passenger.
— A capacitive passenger detection system under-
neath the front passenger seat cover. This sys-
tem measures the electrical capacitance of the
person in the seat. The information registered
is sent continuously to the electronic control
unit to regulate deployment of the front Ad-
vanced Airbag on the passenger side.
— An airbag monitoring system and indicator
light Ea in the instrument cluster.
—Asensor in each front seat registers the dis-
tance between the respective seat and the
steering wheel or instrument panel. The infor-
mation registered is sent continuously to the
electronic control unit to regulate deployment
of the front Advanced Airbags.
— The PASSENGER AIR BAG OFF #%; light comes
on and stays on in the headliner > page 200,
fig. 158 and tells you when the front Advanced
Airbag on the passenger side has been turned
off.
—Asensor in the safety belt latch for the driver
and for the front seat passenger that senses
whether that safety belt is latched or not and
transmits this information to the electronic
control unit.
ZA WARNING
Damage to the front passenger seat can pre-
vent the front airbag from working properly.
— Improper repair or disassembly of the front
passenger and driver seat will prevent the
Advanced Airbag System from functioning
properly.
— Repairs to the front passenger seat must be
performed by qualified and properly trained
workshop personnel.
— Never remove the front passenger or driver
seat from the vehicle. >
Page 259 of 304

8S8012721BA
Wheels
overheat and can lead to tire failure. Under-infla-
tion also reduces fuel efficiency and tire tread
life, and may affect the vehicle's handling and
stopping ability.
Please note that the TPMS is not a substitute for
proper tire maintenance, and it is the driver's re-
sponsibility to maintain correct tire pressure,
even if under-inflation has not reached the level
to trigger illumination of the TPMS low tire pres-
sure telltale.
Your vehicle has also been equipped with a TPMS
malfunction indicator to indicate when the sys-
tem is not operating properly. The TPMS mal-
function indicator is combined with the low tire
pressure telltale. When the system detects a
malfunction, the telltale will flash for approxi-
mately one minute and then remain continuously
illuminated. This sequence will continue upon
subsequent vehicle start-ups as long as the mal-
function exists.
When the malfunction indicator is illuminated,
the system may not be able to detect or signal
low tire pressure as intended. TPMS malfunctions
may occur for a variety of reasons, including the
installation of replacement or alternate tires or
wheels on the vehicle that prevent the TPMS
from functioning properly. Always check the
TPMS malfunction telltale after replacing one or
more tires or wheels on your vehicle to ensure
that the replacement or alternate tires and
wheels allow the TPMS to continue to function
properly.
If the Tire Pressure Monitoring System
indicator appears
Applies to: vehicles with Tire Pressure Monitoring System in-
dicator
The tire pressure indicator in the instrument
cluster informs you if the tire pressure is too low
or if there is a system malfunction.
Using the ABS sensors, the tire pressure monitor-
ing system compares the tire tread circumference
and vibration characteristics of the individual
tires. If the pressure changes in one or more
tires, this is indicated in the Infotainment system
display with an indicator light @ and a message.
If only one tire is affected, the location of that
tire will be indicated.
The tire pressures must be stored in the Infotain-
ment system again each time the pressures
change (switching between partial and full load
pressure) or after changing or replacing a tire on
your vehicle > page 258. The tire pressure moni-
toring system only monitors the tire pressure you
have stored. Refer to the tire pressure label for
the recommended tire pressure for your vehicle
=> page 250, fig. 184.
Tire tread circumference and vibration character-
istics can change and cause a tire pressure warn-
ing if:
— The tire pressure in one or more tires is too low
— The tire has structural damage
— The tire was replaced or the tire pressure was
changed and it was not stored > page 258
— The spare tire* is installed
Indicator lights
@® - Loss of pressure in at least one tire > A\.
Check the tires and replace or repair if necessary.
Check/correct the pressures of all four tires and
store the pressure again in the Infotainment sys-
tem > page 258.
ia (Tire Pressure Monitoring System) Tire pres-
sure: malfunction! See owner's manual - if io
appears after switching on the ignition or while
driving and then the @) indicator light in the in-
strument cluster also starts to blink for about
one minute and then stays on permanently, there
is a system malfunction. Try to store the correct
tire pressures > page 258. If the indicator light
does turn off or turns on again after a short peri-
od of time, drive to an authorized Audi dealer or
authorized Audi Service Facility immediately to
have the malfunction corrected.
ZA WARNING
— If the tire pressure indicator appears in the
display, reduce your speed immediately and
avoid any hard steering or braking maneu-
vers. Stop as soon as possible and check the
tires and their pressure.
257
Page 263 of 304

8S58012721BA
Wheels
instrument cluster display along with the mes-
sage Tire pressure: malfunction! See owner's
manual.
If the is indicator light appears after switching
the ignition on or while driving and the @ indi-
cator light also blinks for approximately one mi-
nute and then stays on, there is system malfunc-
tion. The following are examples of situations
that could cause a malfunction:
— If the message appears at the end of the adap-
tation phase, the system may not detect one or
several of the wheel sensors necessary for pres-
sure monitoring. This may result from one or
more wheels without wheel sensors or with in-
compatible wheel sensors being installed.
—Awheel sensor or another component has
failed.
— Using snow chains can affect the function of
the system because of the shielding effect of
the chains.
— The tire pressure monitoring system is not
available due to a malfunction.
— Transmitters with the same frequency, such as
headphones or remote-controlled devices, may
cause a temporary system malfunction due to
the strong electromagnetic field.
The iis indicator light and the message turn off
once the tire pressure monitoring system is avail-
able again. If you cannot correct the malfunction
and the ia indicator light stays on, drive imme-
diately to an authorized Audi dealer or author-
ized Audi Service Facility to have the malfunction
repaired.
261
Page 267 of 304

8S58012721BA
Care and cleaning
Component Situation Solution
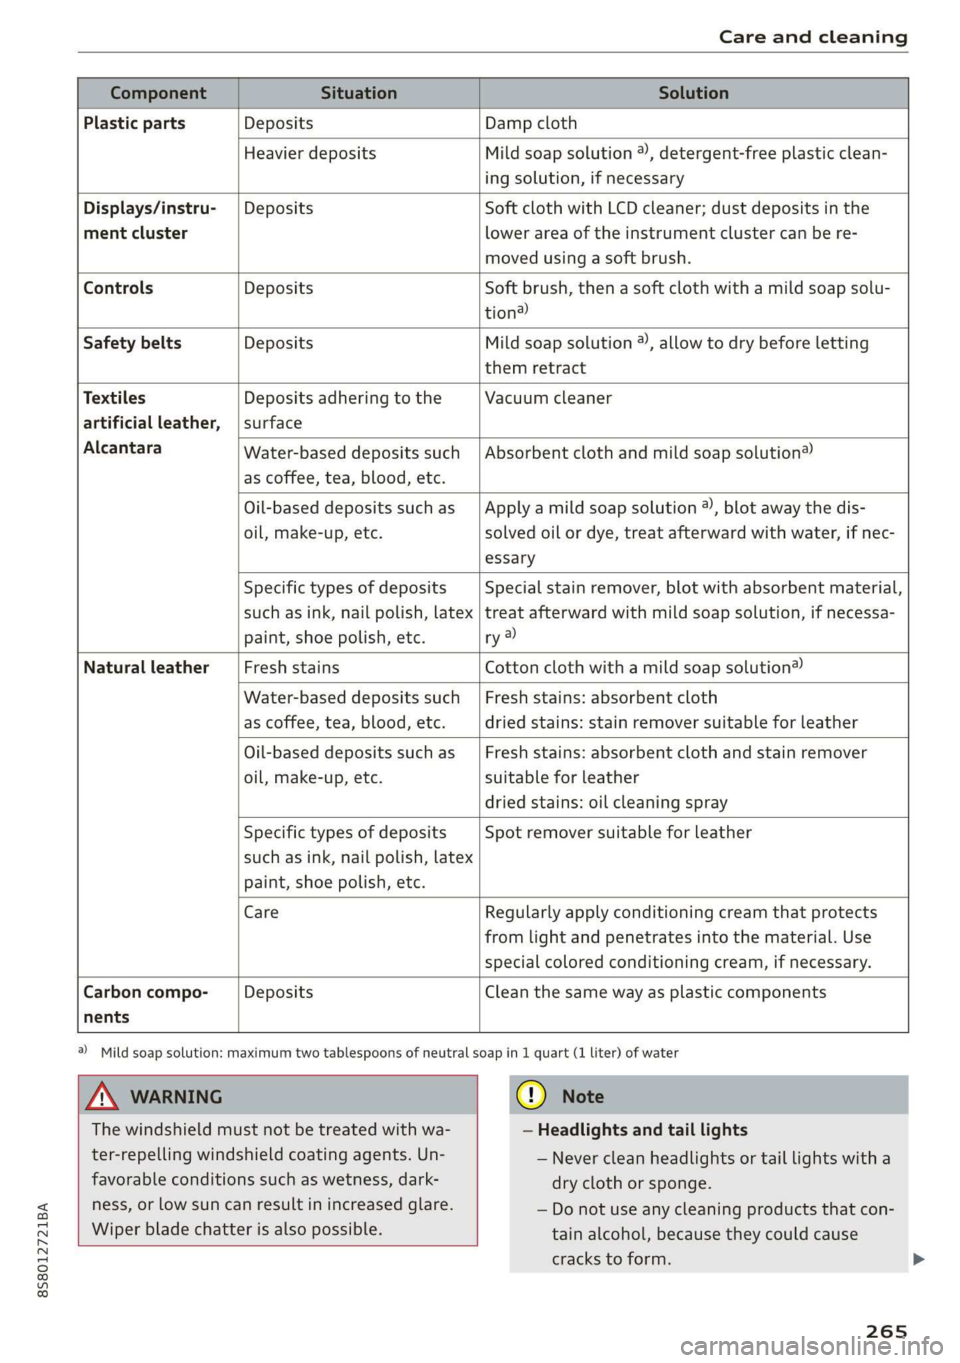
Plastic parts Deposits Damp cloth
Heavier deposits Mild soap solution ®), detergent-free plastic clean-
ing solution, if necessary
Displays/instru- | Deposits Soft cloth with LCD cleaner; dust deposits in the
ment cluster lower area of the instrument cluster can be re-
moved using a soft brush.
Controls Deposits Soft brush, then a soft cloth with a mild soap solu-
tion)
Safety belts Deposits Mild soap solution ®, allow to dry before letting
them retract
Textiles Deposits adhering to the Vacuum cleaner
artificial leather, | surface
Alcantara Absorbent cloth and mild soap solution® Water-based deposits such
as coffee, tea, blood, etc.
Oil-based deposits such as
oil, make-up, etc.
Apply a mild soap solution ®), blot away the dis-
solved oil or dye, treat afterward with water, if nec-
essary
Specific types of deposits
such as ink, nail polish, latex
paint, shoe polish, etc.
Special stain remover, blot with absorbent material,
treat afterward with mild soap solution, if necessa-
ry a)
Natural leather Fresh stains Cotton cloth with a mild soap solution®
Water-based deposits such
as coffee, tea, blood, etc.
Fresh stains: absorbent cloth
dried stains: stain remover suitable for leather
Oil-based deposits such as
oil, make-up, etc.
Fresh stains: absorbent cloth and stain remover
suitable for leather
dried stains: oil cleaning spray
Specific types of deposits
such as ink, nail polish, latex
paint, shoe polish, etc.
Spot remover suitable for leather
nents
Care Regularly apply conditioning cream that protects
from light and penetrates into the material. Use
special colored conditioning cream, if necessary.
Carbon compo- Deposits Clean the same way as plastic components
A WARNING
The windshield must not be treated with wa-
ter-repelling windshield coating agents. Un-
favorable conditions such as wetness, dark-
ness, or low sun can result in increased glare.
Wiper blade chatter is also possible.
a) Mild soap solution: maximum two tablespoons of neutral soap in 1 quart (1 liter) of water
(@) Note
— Headlights and tail lights
— Never clean headlights or tail lights with a
dry cloth or sponge.
— Do not use any cleaning products that con-
tain alcohol, because they could cause
cracks to form.
265
Page 268 of 304

Care and cleaning
— Wheels
— Never use any paint polish or other abra-
sive materials.
— Damage to the protective layer on the
rims, such as stone chips or scratches,
must be repaired immediately.
— Camera lenses
— Never use warm or hot water to remove
snow or ice from the camera lens. This
could cause the lens to crack.
— Never use abrasive cleaning materials or
alcohol to clean the camera lens. This
could cause scratches and cracks.
— Power top
— Remove bird droppings immediately.
— Never use gasoline, spot remover, ben-
zene, paint thinner or other solvents to re-
move.
— Door windows
— Remove snow and ice on windows and ex-
terior mirrors with a plastic scraper. To re-
duce the risk of scratches, move the scra-
per only in one direction and not back and
forth.
— Never remove snow or ice from door win-
dows and mirrors using warm or hot water
because this could cause cracks to form.
—To reduce the risk of damage to the rear
window defogger, do not apply any stick-
ers on the heating wires on the inside of
the window.
— Decorative parts and trim
— Never use chrome care or cleaning prod-
ucts.
— Paint
— To reduce the risk of scratches, the vehicle
must be free of dirt and dust before pol-
ishing or waxing.
—To prevent paint damage, do not polish or
wax the vehicle in direct sunlight.
—To reduce the risk of paint damage, do not
polish away rust spots.
— Remove cosmetics and sunscreen immedi-
ately because they could damage the
paint.
— Decorative decals
266
— To reduce the risk of damage, do not use
any rough powder or abrasive cleaning
products.
— To reduce the risk of damage, do not pol-
ish decorative decals that have a matte or
printed finish.
— Due to the risk of damage, do not use an
ice scraper to remove snow and ice on win-
dows with decorative decals on them.
— Instrument cluster
— Make sure that the instrument cluster is
switched off and has cooled off before
cleaning it.
— The instrument cluster and the trim sur-
rounding it must not be cleaned with dry
cleaning methods because they could get
scratched.
— Make sure no fluids enter the spaces be-
tween the instrument cluster and the
trim, because that could cause damage.
— Controls
— Make sure that no fluids enter the con-
trols, because this could cause damage.
— Safety belts
— Do not remove the safety belts to clean
them.
— Never clean safety belts or their compo-
nents with chemicals or with corrosive flu-
ids or solvents and never allow sharp ob-
jects to come into contact with the safety
belts. This could cause damage to the belt
webbing.
— If there is damage to the webbing, the
connections, the retractors, or the buck-
les, have them replaced by an authorized
Audi dealer or authorized Audi Service Fa-
cility.
— Textiles, artificial leather, and Alcantara
— Never treat artificial leather or Alcantara
with leather care products, solvents, floor
polish, shoe polish, spot remover, or simi-
lar products.
— Have a cleaning specialist remove stub-
born stains to reduce the risk of damage.
— Never use steam cleaners, brushes, hard
sponges, etc. when cleaning.
Page 280 of 304
![AUDI TT ROADSTER 2019 Owners Manual Fuses and bulbs
Interior fuse assignment
ft
pl Bel Fe
» BEBE ERED
Poo
ns
[24] 25) rao) 27) Fe Ra
23 |
Fsacsomeemr STE 42)
eases eres] b
ro Wa a i ee
1F52) FOL
Re
B8V-0217
AUDI TT ROADSTER 2019 Owners Manual Fuses and bulbs
Interior fuse assignment
ft
pl Bel Fe
» BEBE ERED
Poo
ns
[24] 25) rao) 27) Fe Ra
23 |
Fsacsomeemr STE 42)
eases eres] b
ro Wa a i ee
1F52) FOL
Re
B8V-0217](/manual-img/6/57667/w960_57667-279.png)
Fuses and bulbs
Interior fuse assignment
ft
pl Bel Fe
» BEBE ERED
Poo
ns
[24] 25) rao) 27) Fe Ra
23 |
Fsacsomeemr STE 42)
eases eres] b
ro Wa a i ee
1F52) FOL
Re
B8V-0217
No. | Equipment
F20 | Power lumbar support adjustment
Front passenger's side neck heating (Road-
F22
ster)
Right vehicle electrical system control
F24
module
F25 | Driver side door
F26 | Seat heating
Vehicle electrical system control module
Fae (terminal 30)
F28 | AMI High media port
F29 | Vehicle electrical system control module
F32 | Driver assistance systems
F33 | Airbag
Sockets, interior sound, tail light switch,
F34 | temperature sensor, oil level sensor, neck
heating, garage door opener
Fig. 202 Vehicle interior: fuse assignment
No. Equipment
Diagnosis, headlight range control, air
quality sensor, automatic dimming rear-
view mirror, center instrument panel
switch module
F35
F4 Central computer processor (MIB-2) F36 | Right cornering light / right LED headlight
FS Gateway (diagnostics) F37 | Left cornering light / left LED headlight
Fo Selector lever (automatic transmission)
F7
Climate control system controls, rear win-
dow defogger, tire pressure monitoring
Engine control module, ESC control mod-
F38
ule
F39 | Front passenger side door
F8
Switch for the electromechanical parking
brake, light switch, rain/light sensor, inte-
rior lighting, diagnostic connector, roof
electronics F40
| Cigarette lighter, sockets
F41 | Fuel tank diagnosis
F42 | Central locking area
FQ Steering column switch module
F44 | All wheel drive clutch control module
F10 Vehicle positioning
F45 | Power adjustable driver's side seat
Fll
All wheel drive clutch, left vehicle electri-
cal system control module
F46 | Driver's side neck heating (Roadster)
F49 | Engine start, clutch sensor
F12 Infotainment components
F52 | Control module for suspension control
F1l4 Climate control system blower fan
F53 | Rear window defogger
Fis Electronic steering column lock
F16
Infotainment system components, safety
belt microphone
F17 Instrument cluster
F18 Rearview camera
F19
Convenience access control module
278
The power seats* are protected via circuit break-
ers that automatically switch on after a few sec-
onds after the overload has been reduced.