2019 AUDI TT ROADSTER climate control
[x] Cancel search: climate controlPage 4 of 304

Table of contents
About this Owner's Manual......
SUMIMALY: ; « ss6% : osen ss sean cs poe s
QC CCeS Skis: si esis a 6 ores os ewe
Cockpit overview.............-000005
Indicator lights overview...........0.
Display and operation............
Instrument cluster...............
Instrument cluster overview...........
Coolant temperature indicator.........
Tachometer.......... 0.0 eee eee eee
Odometer as = s eee = seen ge zee a tows e
Outside temperature display...........
Fuellevel.......... 0. cece eee eee eee
Multifunction steering wheel..........
Vehicle functions « se-0 2. ese ve eee ees
MessageS ... 0... eee eee eee
Starting and driving.............
Opening and closing.............
Central locking 2.2% ieee seven a eevee
Luggage compartment lid.............
Power windows.............0.00 0005
Garage door opener...............0..
POWER EOPE: « «cece 0 csv « o semiens 6 0 eens
Automatic power top.................
Wind deflector ecax « x came + 5 yom 2 4 ews
Power top emergency operation........
Lights and Vision.................
Exterior lighting ssivses + « ssa 3s inane 9 & sou
Interior lighting. ................000.
VISION s « s saas ss sees Fo Hees Eo ee ee
Windshield wipers..............00005
Digital compass................0000.
Storage... eee eee eee
Luggage compartment...............
NOD
OO
11 il 12 12 15
16
21 21 21
27
28
30
3.
33 35 35
38 38
40
Al 42
44
46 46
46
48
48
48 48 49
50
Warm and cold...
Climate control system............00.
DRIVING: & tacos 6 2 maemo e eae 0 x iano 4
General information .
Steering.........6.
Starting and stopping
Electromechanical par
Starting to drive.....
theengine.......
king brake.......
Automatic transmission..............
Trailer towing.......
Driver assistance.
Assist systems...
Speed warning system...............-
Cruise control system
Audi active lane assist
Audi side assist
Audi drive select (drive settings) ........
Parking aid.......
Introduction........
Rear parking system .
Parking system plus.............-.00.
Rearview camera
Intelligent Technology...........
Electronic stabilization control (ESC) ....
StEOKing © esse we wssuse
All wheel drive (quattro) ..............
Rear spoiler........
Energy management .
Information about data recorded by
vehicle control modules...............
Infotainment system............
Multi Media Interface............
Traffic safety information.............
Introduction........
MMI On/Off knob with joystick function . .
MMI operation......
MMT OU CPi ccm. » 6 camere
Control knob with joys
Letter/number speller
tick function. ....
52
56 56 57 57 59
61
61
69 70 70 70
70
72
75
77
80
80
81
81
82
84
84
86
86
88
89
89 90
91
91 92
92
92
92
92
93
94
97
98
Page 9 of 304

8S8012721BA
Quick access
OOOO
©
OOOOGOOOO
©
O
®OOO®
Side assist display ..............
Door handle
Central locking switch ...........
Air vent with seat heating controls
Lever for:
—Turn signals and high beams ....
— Active lane assist .............
Multifunction steering wheel with:
— Horn Pe
— Driver's airbag ...............
— Buttons for the virtual instrument
cluster, including the driver infor-
mation system, audio/video, tele-
phone, navigation and voice rec-
ognition system
—Shift paddles ................
Audi virtual cockpit (instrument
cluster) 22... 0... eee eee eee
Windshield washer system lever . .
Starting the engine if there is a
malfunction ..............00 00
Adjustable steering column ......
Cruise control lever .............
Instrument illumination .........
Hood release! » « wae ¢ s eae vs setee
Headlight control switch ........
Power exterior mirror adjustment .
Power windows ............005-
Air vent including climate control
system controls ................
Lockable glove compartment
Drives for CD, DVD, SIM/SD cards .
Front passenger's airbag ........
Rear window defogger button
Depending on equipment, buttons
for:
sdriverselect oc. seins 6 + cgies oo neve
— Electronic Stabilization Control
(ESC) «5 « cows ss owen 4 ¢ ee a8 i vee
—Emergency flashers ...........
— Retractable rear spoiler ........
Depending on equipment, center
console with:
— Multimedia compartment for cell
PNONG aces cs ees s Ree se BER es
75 25
39
72
193
66
10
42
59 57 70
Al
227
38
Al
28
52
153,
193
TT
86
40
90
159
= Audi phone box sessie ss owe oo cee 113
@) Infotainment system on/off button . 92
@5) Infotainment system unit ....... 92
@8 Wind deflector button .......... 35
@) Depending on equipment:
— Storage compartment
—Ashtray 0.2... 00. eee eee eee 48
—CUPHGIDES wis 5 2 wens s x eee 5 2: 49
Power top button .............. 33
@ Parking’ brake: « + cs ss wows so sors 59
G0 Depending on equipment:
—[START ENGINE STOP] button ... 57
— Sound button for exhaust door
control
@) Selector lever (S tronic).......... 62
@) Tips
Some the equipment listed here is only instal-
led in certain models or is available as an op-
tion.
Indicator lights overview
The indicator lights in the instrument cluster
blink or turn on. They indicate functions or mal-
functions.
With some indicator lights, messages may ap-
pear and warning signals may sound. The indica-
tor lights and messages may be covered by other
displays. To show them again, select the second
tab for messages with the multifunction steering
wheel © page 12.
Some indicator lights in the display can display in
several colors.
Some indicator lights turn on briefly as a function
check when you switch the ignition on. These sys-
tems are marked with a V in the following tables.
If one of these indicator lights does not turn on,
there is a malfunction in that system.
The following indicator lights may be available,
depending on the vehicle equipment:
Page 24 of 304

Opening and closing
BFV-0278
Fig. 11 Your vehicle key set
@ Remote or convenience key*
The convenience key* is a remote control key with
special functions > page 24 and > page 57.
You can unlock/lock your vehicle with the remote
control key. A mechanical key is integrated in the
remote control key > page 23.
@ Key tag with vehicle code*
The vehicle code* on the key tag can be rubbed
off. It does not have a function.
Replacing a key
If a key is lost, see an authorized Audi dealer or
authorized Audi Service Facility. Have this key de-
activated. It is important to bring all keys with
you. If a key is lost, you should report it to your
insurance company.
Number of keys
You can check the number of keys assigned to
your vehicle in the Infotainment system. To do
this, select the [MENU] button > Vehicle > left
control button > Service & checks > Vehicle in-
formation. This way, you can make sure that you
have all the keys when purchasing a used vehicle.
Electronic immobilizer
The immobilizer prevents unauthorized use of
the vehicle.
Under certain circumstances, the vehicle may not
be able to start if there is a remote control key
from a different vehicle manufacturer on the key
chain.
22
Data in the master key
When driving, service and maintenance-relevant
data is continuously stored in your remote con-
trol key. Your Audi service advisor can read out
this data and tell you about the work your vehicle
needs. This applies also to vehicles with a con-
venience key*.
Personal convenience settings
If two people use one vehicle, it is recommended
that each person always uses “their own” master
key. When the ignition is turned off or when the
vehicle is locked, personal convenience settings
for the following systems are stored and as-
signed to the remote master key.
— Climate control system
— Parking aid*
— Active lane assist*
— Side assist*
— Drive select
The stored settings are automatically recalled
when you unlock the vehicle, open the doors or
turn on the ignition.
ZA WARNING
If you leave the vehicle, switch the ignition off
and take the vehicle key with you. This applies
particularly when children remain in the vehi-
cle. Otherwise the children could start the en-
gine or operate electrical equipment such as
power windows.
() Note
Protect the remote control key against high
temperatures and direct sunlight.
@) For the sake of the environment
XX Do not dispose of remote control keys in
household trash. They contain materials that
can be recycled. Contact an authorized Audi
dealer or authorized Audi Service Facility for
more information.
G) Tips
— The operation of the remote control key can
be temporarily disrupted by interference >
Page 54 of 304

Warm and cold
Warm and cold
Climate control system
The climate control system warms, cools and re-
moves humidity from the air in the vehicle interi-
or. It functions most effectively when the win-
dows are closed. If there is a build-up of heat in-
side the vehicle, ventilation can help to speed up
the cooling process.
Pollutant filter
The pollutant filter removes pollutants such as
dust and pollen from the air.
Key recognition
Certain settings are automatically stored and as-
signed to the remote control key being used.
ZA WARNING
Poor visibility can lead to accidents.
— For safer driving, keep all windows free of
ice, snow and fog.
— Become familiar as quickly as possible with
the correct use and function of the climate
control system, especially with the defrost-
ing and defogging function.
— When the temperature is below freezing,
only use the windshield washer system after
the
windshield has been warmed by the cli-
mate control system. The washer fluid could
freeze on the windshield and impair visibili-
ty.
@) Note
— If you suspect that the climate control sys-
tem is damaged, switch the system off to
52
prevent further damage and have it checked
by an authorized Audi dealer or authorized
Audi Service Facility.
— Repairs to the Audi climate control system
require special technical knowledge and
special tools. Have it inspected by an au-
thorized Audi dealership or a qualified elec-
tronics store.
(@) For the sake of the environment
Reducing the amount of fuel used also re-
duces the amount of pollutants that enter the
alr.
G) Tips
—To prevent interference with the heating
and cooling output and to prevent the win-
dows from fogging over, the air intake in
front of the windshield must be free of ice,
snow, or leaves.
— Condensation from the cooling system can
drip and form a puddle of water under the
vehicle. This is normal and does not mean
there is a leak.
— The energy management system may tem-
porarily switch off certain functions, such as
the seat heating* or rear window defogger.
These systems are available again as soon as
the energy supply has been restored.
— The flows through the vents under the rear
window. Make sure the openings are not
covered when placing clothing on the lug-
gage compartment cover.
Page 55 of 304

8S58012721BA
Warm and cold
PNT erates elem icel eT)
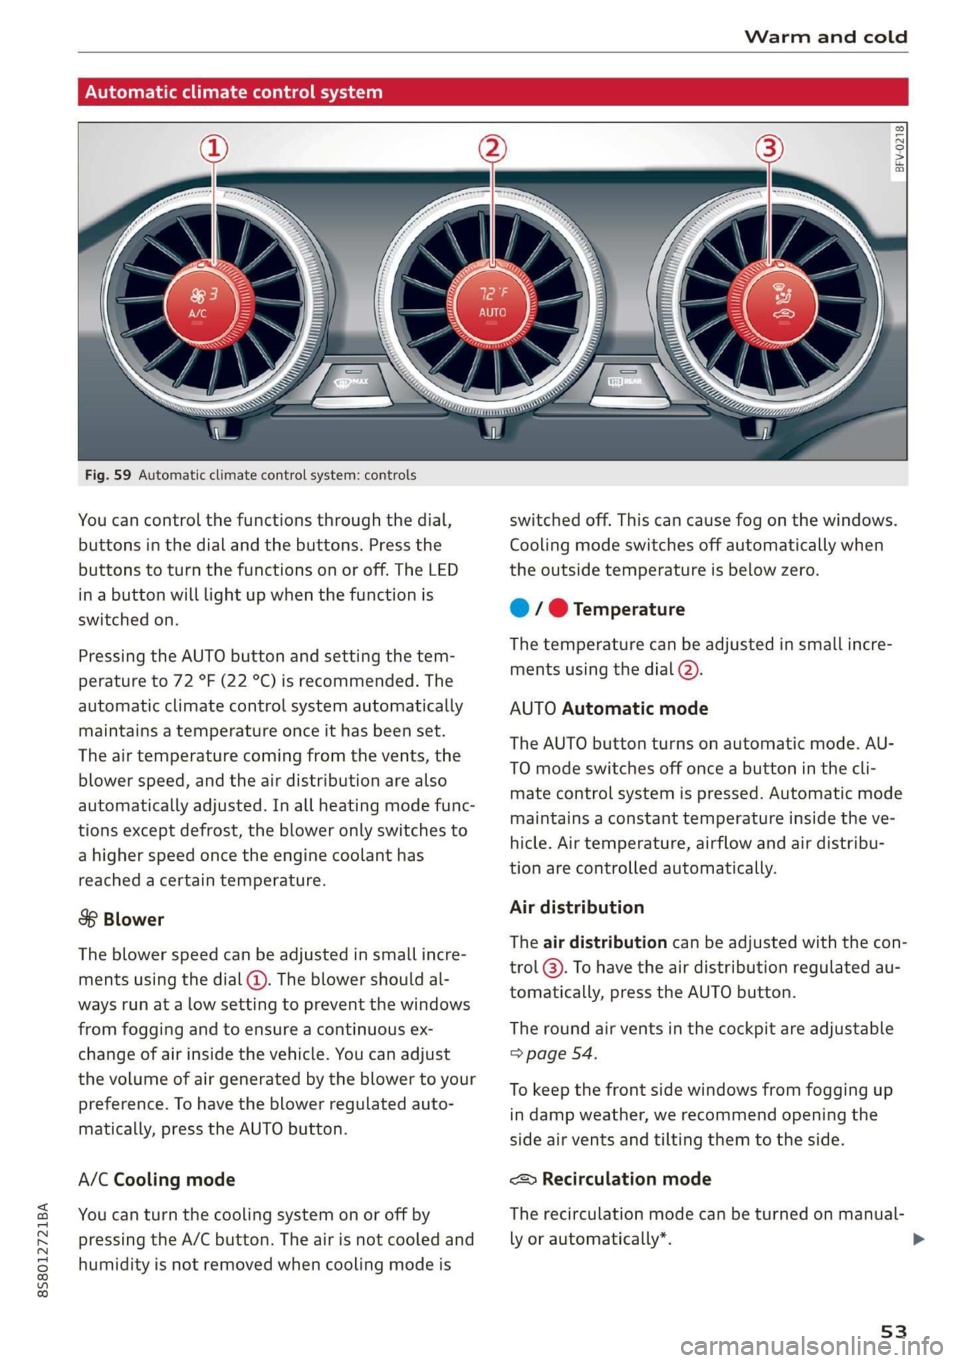
Fig. 59 Automatic climate control system: controls
You can control the functions through the dial,
buttons in the dial and the buttons. Press the
buttons to turn the functions on or off. The LED
in a button will light up when the function is
switched on.
Pressing the AUTO button and setting the tem-
perature to 72 °F (22 °C) is recommended. The
automatic climate control system automatically
maintains a temperature once it has been set.
The air temperature coming from the vents, the
blower speed, and the air distribution are also
automatically adjusted. In all heating mode func-
tions except defrost, the blower only switches to
a higher speed once the engine coolant has
reached a certain temperature.
8 Blower
The blower speed can be adjusted in small incre-
ments using the dial (@). The blower should al-
ways run at a low setting to prevent the windows
from fogging and to ensure a continuous ex-
change of air inside the vehicle. You can adjust
the volume of air generated by the blower to your
preference. To have the blower regulated auto-
matically, press the AUTO button.
A/C Cooling mode
You can turn the cooling system on or off by
pressing the A/C button. The air is not cooled and
humidity is not removed when cooling mode is
BFV-0218
switched off. This can cause fog on the windows.
Cooling mode switches off automatically when
the outside temperature is below zero.
@ / @ Temperature
The temperature can be adjusted in small incre-
ments using the dial (2).
AUTO Automatic mode
The AUTO button turns on automatic mode. AU-
TO mode switches off once a button in the cli-
mate control system is pressed. Automatic mode
maintains a constant temperature inside the ve-
hicle. Air temperature, airflow and air distribu-
tion are controlled automatically.
Air distribution
The air distribution can be adjusted with the con-
trol @). To have the air distribution regulated au-
tomatically, press the AUTO button.
The round air vents in the cockpit are adjustable
=> page 54.
To keep the front side windows from fogging up
in damp weather, we recommend opening the
side air vents and tilting them to the side.
<> Recirculation mode
The recirculation mode can be turned on manual-
ly or automatically*.
53
>
Page 241 of 304

8S8012721BA
Checking and Filling
@) Note
— The concentration of anti-freezing agent
must be adjusted to the vehicle operating
conditions and the climate. A concentration
that is too high can lead to vehicle damage.
— Never add radiator anti-freeze or other addi-
tives to the washer fluid.
— Do not use a glass cleaner that contains
paint solvents, because this could damage
the paint.
Service interval display
The service interval display detects when your ve-
hicle is due for service.
The service interval display works in two stages:
— Inspection or oil change reminder: after a cer-
tain distance driven, a message appears in the
Infotainment system display each time the ig-
nition is switched on or off. The remaining dis-
tance or time is displayed briefly.
— Inspection or oil change due: if your vehicle
has reached an inspection or oil change interval
or both intervals at the same time, the mes-
sage Inspection due! or Oil change due! or Oil
change and inspection due! appears briefly af-
ter switching the ignition on/off.
Checking service intervals
You can check the remaining distance or time un-
til the next oil change or next inspection. Select
in the Infotainment system: the [MENU] button >
Vehicle > left control button > Service & checks >
Service intervals.
Resetting the indicator
An authorized Audi dealer or authorized Audi
Service Facility will reset the service interval dis-
play after performing service.
If you have changed the oil yourself, you must re-
set the oil change interval.
To reset the display, select in the Infotainment
system: the [MENU] button > Vehicle > left con-
trol button > Service & checks > Service intervals
> Reset oil change interval.
CG) Note
— Only reset the oil change indicator if the oil
was changed.
— Following the service intervals is critical to
maintaining the service life and value of
your vehicle, especially the engine. Even if
the mileage on the vehicle is low, do not ex-
ceed the time for the next service.
239
Page 258 of 304

Wheels
— Temperature ABC
Quality grades can be found where applicable on
the tire side wall between tread shoulder and
maximum section width > page 241, fig. 181.
For example: Tread wear 200, Traction AA, Tem-
perature A.
All passenger car tires must conform to Federal
Safety Requirements in addition to these grades.
Tread wear
The tread wear grade is a comparative rating
based on the wear rate of the tire when tested
under controlled conditions on a specified gov-
ernment test course.
For example, a tire graded 150 would wear one
and one half (1 1/2) times as well on the govern-
ment course as a tire graded 100.
The relative performance of tires depends upon
the actual conditions of their use, however, and
may depart significantly from the norm due to
variations in driving habits, service practices and
differences in road characteristics and climate.
Traction
The traction grades, from highest to lowest, are
AA, A, B and C. Those grades represent the tire's
ability to stop on wet pavement as measured un-
der controlled conditions on specified govern-
ment test surfaces of asphalt and concrete. A tire
marked C may have poor traction performance
>A.
Temperature
The temperature grades are A (the highest), B,
and C, representing the tire's resistance to the
generation of heat and its ability to dissipate
heat when tested under controlled conditions on
a specified indoor laboratory test wheel.
Sustained high temperature can cause the mate-
rial of the tire to degenerate and reduce tire life,
and excessive temperature can lead to sudden
tire failure > A.
The grade C corresponds to a level of perform-
ance which all passenger car tires must meet un-
der the Federal Motor Vehicle Safety Standard
256
No. 109. Grades B and A represent higher levels
of performance on the laboratory test wheel than
the minimum required by law.
Z\ WARNING
The traction grade assigned to this tire is
based on straight-ahead braking traction
tests, and does not include acceleration, cor-
nering, hydroplaning or peak traction charac-
teristics.
ZA WARNING
The temperature grade for this tire is estab-
lished for a tire that is properly inflated and
not overloaded. Excessive speed, underinfla-
tion, or excessive loading, either separately or
in combination, can cause heat buildup and
possible tire failure.
ZA WARNING
Temperature grades apply to tires that are
properly inflated and not over or underinflat-
ed.
Tire pressure monitoring
system
(1) General notes
Each tire, including the spare (if provided),
should be checked monthly when cold and inflat-
ed to the inflation pressure recommended by the
vehicle manufacturer on the vehicle placard or
tire inflation pressure label. (If your vehicle has
tires of a different size than the size indicated on
the vehicle placard or tire inflation pressure la-
bel, you should determine the proper tire infla-
tion pressure for those tires).
As an added safety feature, your vehicle has been
equipped with a tire pressure monitoring system
(TPMS) that illuminates a low tire pressure tell-
tale when one or more of your tires is significant-
ly under-inflated. Accordingly, when the low tire
pressure telltale illuminates, you should stop and
check your tires as soon as possible, and inflate
them to the proper pressure. Driving ona signifi-
cantly under-inflated tire causes the tire to >
Page 280 of 304
![AUDI TT ROADSTER 2019 Owners Manual Fuses and bulbs
Interior fuse assignment
ft
pl Bel Fe
» BEBE ERED
Poo
ns
[24] 25) rao) 27) Fe Ra
23 |
Fsacsomeemr STE 42)
eases eres] b
ro Wa a i ee
1F52) FOL
Re
B8V-0217
AUDI TT ROADSTER 2019 Owners Manual Fuses and bulbs
Interior fuse assignment
ft
pl Bel Fe
» BEBE ERED
Poo
ns
[24] 25) rao) 27) Fe Ra
23 |
Fsacsomeemr STE 42)
eases eres] b
ro Wa a i ee
1F52) FOL
Re
B8V-0217](/manual-img/6/57667/w960_57667-279.png)
Fuses and bulbs
Interior fuse assignment
ft
pl Bel Fe
» BEBE ERED
Poo
ns
[24] 25) rao) 27) Fe Ra
23 |
Fsacsomeemr STE 42)
eases eres] b
ro Wa a i ee
1F52) FOL
Re
B8V-0217
No. | Equipment
F20 | Power lumbar support adjustment
Front passenger's side neck heating (Road-
F22
ster)
Right vehicle electrical system control
F24
module
F25 | Driver side door
F26 | Seat heating
Vehicle electrical system control module
Fae (terminal 30)
F28 | AMI High media port
F29 | Vehicle electrical system control module
F32 | Driver assistance systems
F33 | Airbag
Sockets, interior sound, tail light switch,
F34 | temperature sensor, oil level sensor, neck
heating, garage door opener
Fig. 202 Vehicle interior: fuse assignment
No. Equipment
Diagnosis, headlight range control, air
quality sensor, automatic dimming rear-
view mirror, center instrument panel
switch module
F35
F4 Central computer processor (MIB-2) F36 | Right cornering light / right LED headlight
FS Gateway (diagnostics) F37 | Left cornering light / left LED headlight
Fo Selector lever (automatic transmission)
F7
Climate control system controls, rear win-
dow defogger, tire pressure monitoring
Engine control module, ESC control mod-
F38
ule
F39 | Front passenger side door
F8
Switch for the electromechanical parking
brake, light switch, rain/light sensor, inte-
rior lighting, diagnostic connector, roof
electronics F40
| Cigarette lighter, sockets
F41 | Fuel tank diagnosis
F42 | Central locking area
FQ Steering column switch module
F44 | All wheel drive clutch control module
F10 Vehicle positioning
F45 | Power adjustable driver's side seat
Fll
All wheel drive clutch, left vehicle electri-
cal system control module
F46 | Driver's side neck heating (Roadster)
F49 | Engine start, clutch sensor
F12 Infotainment components
F52 | Control module for suspension control
F1l4 Climate control system blower fan
F53 | Rear window defogger
Fis Electronic steering column lock
F16
Infotainment system components, safety
belt microphone
F17 Instrument cluster
F18 Rearview camera
F19
Convenience access control module
278
The power seats* are protected via circuit break-
ers that automatically switch on after a few sec-
onds after the overload has been reduced.