Page 275 of 416

273
Halogen bulbs must be replaced with
the headlamps having been off for a few
minutes (risk of severe burns). Do not
touch the bulb directly, use a lint-free
cloth.
Ty p e E
When each operation has been
completed, check the operation of the
lighting.
Front lamps
Halogen headlamps
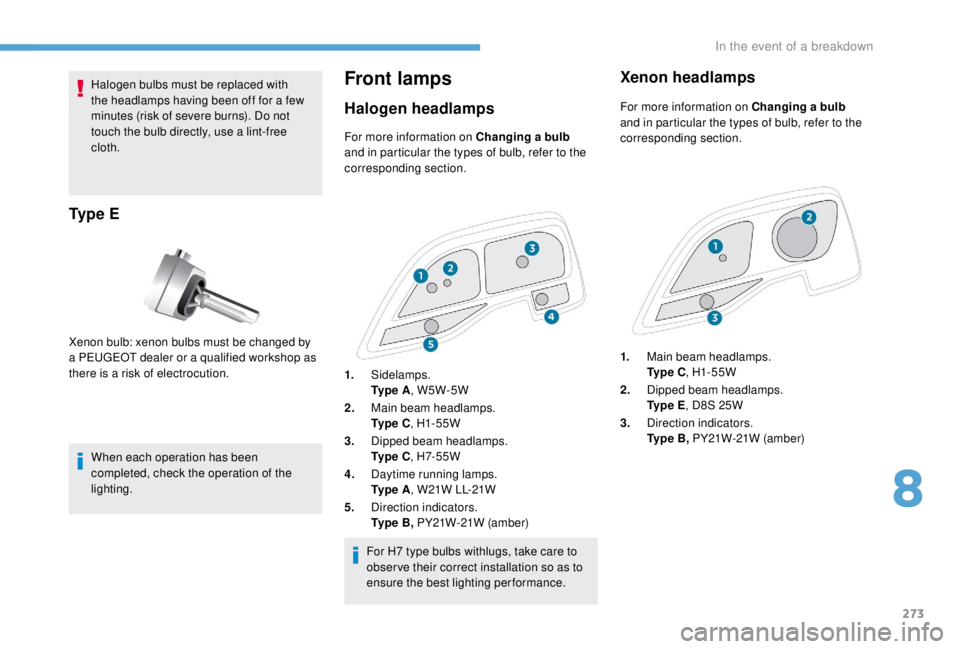
Xenon bulb: xenon bulbs must be changed by
a PEUGEOT dealer or a qualified workshop as
there is a risk of electrocution.For more information on Changing a bulb
and in particular the types of bulb, refer to the
corresponding section.
For H7 type bulbs withlugs, take care to
obser ve their correct installation so as to
ensure the best lighting performance.
Xenon headlamps
For more information on Changing a bulb
and in particular the types of bulb, refer to the
corresponding section.
1. Main beam headlamps.
Ty p e C , H1- 55W
2. Dipped beam headlamps.
Ty p e E , D8S 25W
3. Direction indicators.
Ty p e B , PY21W-21W (amber)
1.
Sidelamps.
Ty p e A , W5W-5W
2. Main beam headlamps.
Ty p e C , H1- 55W
3. Dipped beam headlamps.
Ty p e C , H7- 5 5 W
4. Daytime running lamps.
Ty p e A , W21W LL-21W
5. Direction indicators.
Ty p e B , PY21W-21W (amber)
8
In the event of a breakdown
Page 280 of 416

278
For more information on Changing a bulb and
in particular, the types of bulbs, refer to the
corresponding section.
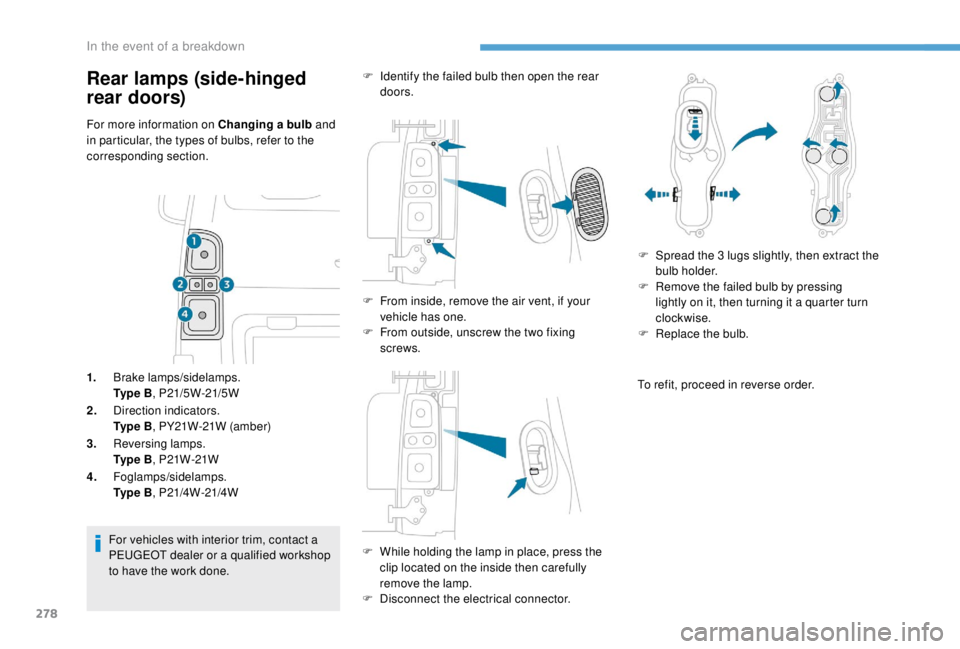
1. Brake lamps/sidelamps.
Ty p e B , P21/5W-21/5W
2. Direction indicators.
Ty p e B , PY21W-21W (amber)
3. Reversing lamps.
Ty p e B , P21W-21W
4. Foglamps/sidelamps.
Ty p e B , P21/4W-21/4W
For vehicles with interior trim, contact a
PEUGEOT dealer or a qualified workshop
to have the work done. F
I
dentify the failed bulb then open the rear
doors.
F
F
rom inside, remove the air vent, if your
vehicle has one.
F
F
rom outside, unscrew the two fixing
screws.
F
W
hile holding the lamp in place, press the
clip located on the inside then carefully
remove the lamp.
F
D
isconnect the electrical connector.F
S
pread the 3 lugs slightly, then extract the
bulb holder.
F
R
emove the failed bulb by pressing
lightly on it, then turning it a quarter turn
clockwise.
F
R
eplace the bulb.
To refit, proceed in reverse order.
Rear lamps (side-hinged
rear doors)
In the event of a breakdown
Page 282 of 416

280
Rear lamps (tailgate)
For more information on Changing a bulb and
in particular, the types of bulbs, refer to the
corresponding section.
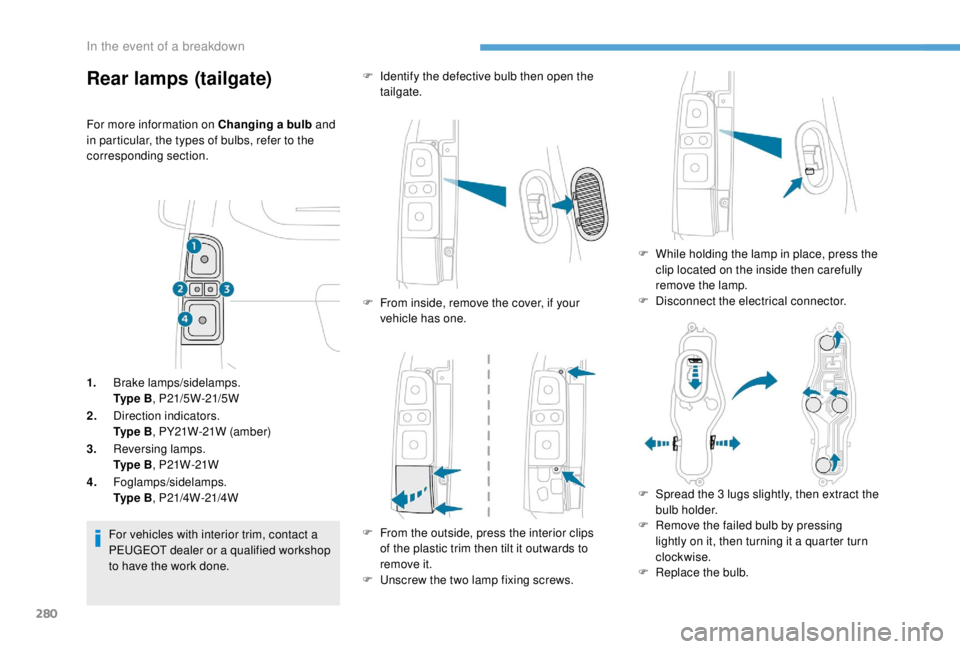
1. Brake lamps/sidelamps.
Ty p e B , P21/5W-21/5W
2. Direction indicators.
Ty p e B , PY21W-21W (amber)
3. Reversing lamps.
Ty p e B , P21W-21W
4. Foglamps/sidelamps.
Ty p e B , P21/4W-21/4W
For vehicles with interior trim, contact a
PEUGEOT dealer or a qualified workshop
to have the work done. F
I
dentify the defective bulb then open the
tailgate.
F
F
rom inside, remove the cover, if your
vehicle has one.
F
F
rom the outside, press the interior clips
of the plastic trim then tilt it outwards to
remove it.
F
U
nscrew the two lamp fixing screws.F
W
hile holding the lamp in place, press the
clip located on the inside then carefully
remove the lamp.
F
D
isconnect the electrical connector.
F
S
pread the 3 lugs slightly, then extract the
bulb holder.
F
R
emove the failed bulb by pressing
lightly on it, then turning it a quarter turn
clockwise.
F
R
eplace the bulb.
In the event of a breakdown
Page 284 of 416
282
For the replacement of this type of LED lamp
and light guides, contact a PEUGEOT dealer or
a qualified workshop.
A replacement kit for the LEDs is available from
PEUGEOT dealers.
Cab floor
Rear lamps
For more information on Changing a bulb and
in particular, the types of bulbs, refer to the
corresponding section.
1. Direction indicators.
Ty p e B , P21W-21W
2. Brake lamps.
Ty p e B , P21W-21W
3. Sidelamps.
Ty p e B , R10W-10W
4. Reversing lamps.
Ty p e B , P21W-21W
5. Foglamps.
Ty p e B , P21W-21W F
I
dentify the defective bulb.
F
R
emove the four lamp unit fixing screws.
F
P
ull the lamp unit out towards you.
F
R
emove the failed bulb by pressing
lightly on it, then turning it a quarter turn
clockwise.
F
C
hange the bulb.
To refit, proceed in reverse order.
Courtesy lamps (front and
rear)
In the event of a breakdown
Page 286 of 416
284
Installing electrical accessories
Your vehicle's electrical system is
designed to operate with standard or
optional equipment.
Before installing other electrical
equipment or accessories on your vehicle,
contact a PEUGEOT dealer or a qualified
workshop.
PEUGEOT will not accept responsibility for
the cost incurred in repairing your vehicle
or for rectifying malfunctions resulting
from the installation of accessories
not supplied and not recommended by
PEUGEOT and not installed in accordance
with its instructions, in particular when
the combined consumption of all of the
additional equipment connected exceeds
10
milliamperes.
For more information on installing a
towbar or equipment of the TA XI type,
contact a PEUGEOT dealer.Passenger compartment
fuses
Access to the fuses
F Unclip the cover by pulling at the top left, then right.
In the event of a breakdown
Page 290 of 416

288
12 V battery
Procedure for starting the engine using another
battery or charging a discharged battery.
Lead-acid starter batteries Access to the battery
The battery is located under the bonnet.
F
O pen the bonnet using the interior release
lever, then the exterior safety catch.
F
S
ecure the bonnet stay.
For more information on the Bonnet
and Engine , refer to the corresponding
section.
Starting using another
battery
When your vehicle's battery is discharged, the
engine can be started using a back-up battery
(external or from another vehicle) and jump
leads or a battery booster.
Never try to start the engine by connecting
a battery charger.
Never use a 24
V or higher battery
b o o s t e r.
Check beforehand that the back-up
battery has a nominal voltage of 12 V and
a capacity at least equal to that of the
discharged battery.
The two vehicles must not be in contact
with each other.
Switch off all the electrical consumers
on both vehicles (audio system, wipers,
lighting, etc.).
Make sure that the jump leads are not
close to moving parts of the engine (fan,
belts, etc.).
Do not disconnect the (+) terminal while
the engine is running.
F
R
emove the plastic cover to access the (+)
terminal, if your vehicle has one.
The battery (-) terminal is not accessible.
A remote earth point is provided at the front of
the vehicle.
Batteries contain harmful substances
such as sulphuric acid and lead.
They must be disposed of in
accordance with regulations and must
not, in any circumstances, be discarded
with household waste.
Take used remote control batteries and
vehicle batteries to a special collection
point.
Protect your eyes and face before
handling the battery.
All operations on the battery must be
carried out in a well ventilated area and
away from naked flames and sources of
sparks, so as to avoid the risk of explosion
or fire.
Wash your hands afterwards.
In the event of a breakdown
Page 293 of 416

291
Quick-release terminal clamp
Disconnecting the (+) terminalReconnecting the (+) terminal
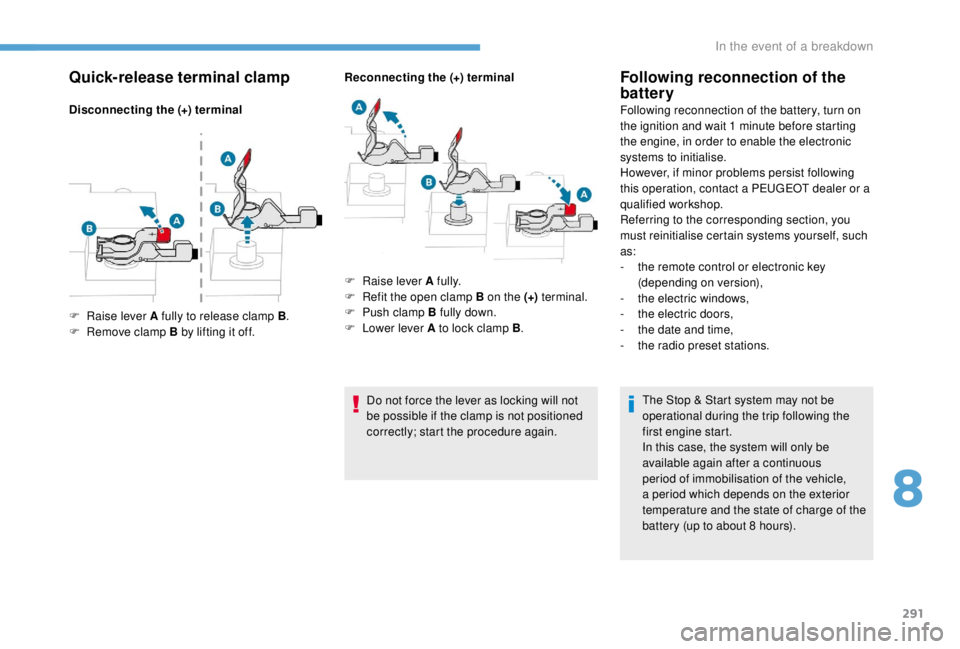
Do not force the lever as locking will not
be possible if the clamp is not positioned
correctly; start the procedure again.
Following reconnection of the
battery
Following reconnection of the battery, turn on
the ignition and wait 1 minute before starting
the engine, in order to enable the electronic
systems to initialise.
However, if minor problems persist following
this operation, contact a PEUGEOT dealer or a
qualified workshop.
Referring to the corresponding section, you
must reinitialise certain systems yourself, such
as:
-
t
he remote control or electronic key
(depending on version),
-
t
he electric windows,
-
t
he electric doors,
-
t
he date and time,
-
t
he radio preset stations.The Stop & Start system may not be
operational during the trip following the
first engine start.
In this case, the system will only be
available again after a continuous
period of immobilisation of the vehicle,
a period which depends on the exterior
temperature and the state of charge of the
battery (up to about 8
hours).
F
Ra
ise lever A fully to release clamp B .
F
R
emove clamp B by lifting it off. F
Ra
ise lever A fully.
F
R
efit the open clamp B on the (+) terminal.
F
P
ush clamp B fully down.
F
L
ower lever A to lock clamp B .
8
In the event of a breakdown
Page 294 of 416
292
Battery capacity
Vehicle lengthRating in Ah
(Ampere hours)
Compact 480
Standard 640
Long 720
/ 800
Always replace the battery with one of
equivalent specification.
To w i n g
Procedure for having your vehicle towed or
for towing another vehicle using a removable
towing eye.
Access to the tools
For more information on the Tool box ,
refer to the corresponding section.
With a manual gearbox, move the gear
lever into neutral.
With an automatic or electronic gearbox,
place the gear selector into position N .
Failure to adhere to this specification
may lead to damage to braking system
components and the lack of braking
assistance on restarting the engine.
The towing eye is stowed in the tool box.
In the event of a breakdown