Page 255 of 416

253
Once the AdBlue® tank is empty, a system
required by regulations prevents starting
of the engine.
If the SCR system is defective, the level of
emissions from your vehicle will no longer
meet the Euro 6
standard: your vehicle
becomes polluting.
In the event of a confirmed fault with the
SCR system, you must go to a PEUGEOT
dealer or a qualified workshop as soon as
possible: after travelling the distance of
685
miles (1,100
km), a system preventing
the engine starting will be triggered
automatically.
In either case, a range indicator gives you
the distance you can travel before the
vehicle is immobilised.
For more information on the Warning
lamps and the associated alerts, refer to
the corresponding section.
Topping up AdBlue®
Given the capacity of the tank, it may be
necessary to top up the fluid between ser vices,
more particularly if an alert (warning lamps and
a message) signals the requirement.
You can go to a PEUGEOT dealer or a qualified
workshop.
If you envisage topping up yourself, please
read the following warnings carefully. Important
If your vehicle's AdBlue
® tank is
completely empty (which is confirmed by
the alert messages and the impossibility
of starting the engine) you must add at
least 3.8
litres (so two 1.89 litre bottles).
Freezing of the AdBlue
®
AdBlue® freezes at temperatures below
around -11°C.
The SCR system includes a heater for the
AdBlue
® tank, allowing you to continue
driving in all weather conditions.
Precautions for use
AdBlue® is a urea-based solution. This liquid is
non-flammable, colourless and odourless (kept
in a cool area).
In the event of contact with the skin, wash the
affected area with soap and water. In the event
of contact with the eyes, wash (irrigate) the
eyes with large amounts of water or with an eye
wash solution for at least 15
minutes. If you feel
a persistent burning sensation or irritation, get
medical attention.
If swallowed, immediately wash out the mouth
with clean water and then drink plenty of water.
In certain conditions (high exterior temperature,
for example), the risk of release of ammonia
cannot be excluded: do not inhale the fluid.
Ammonia vapour has an irritant effect on
mucous membranes (eyes, nose and throat).
Keep AdBlue
® out of the reach of children,
in its original container or bottle.
Never transfer AdBlue
® to another
container: it would lose its purity.
7
Practical information
Page 259 of 416

257
Warning triangle
This safety equipment should be used in
addition to the hazard warning lamps.
Its presence in the vehicle may be mandatory.
Placing the triangle on the
road
Before leaving your vehicle to set up and install
the triangle, switch on the hazard warning
lamps and put on your high visibility vest.Refer to the manufacturer's instructions on
unfolding and assembly supplied with the
triangle.
The triangle is available as an accessory;
contact a PEUGEOT dealer or a qualified
workshop.
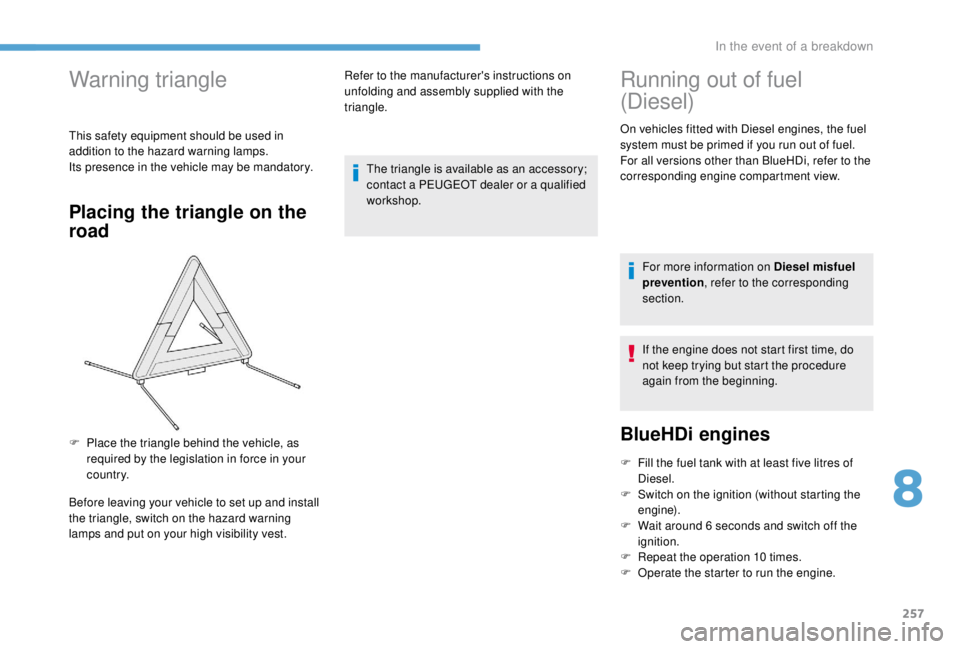
F
P
lace the triangle behind the vehicle, as
required by the legislation in force in your
c o u nt r y.
Running out of fuel
(Diesel)
On vehicles fitted with Diesel engines, the fuel
system must be primed if you run out of fuel.
For all versions other than BlueHDi, refer to the
corresponding engine compartment view.
For more information on Diesel misfuel
prevention , refer to the corresponding
section.
If the engine does not start first time, do
not keep trying but start the procedure
again from the beginning.
BlueHDi engines
F Fill the fuel tank with at least five litres of Diesel.
F
S
witch on the ignition (without starting the
engine).
F
W
ait around 6 seconds and switch off the
ignition.
F
R
epeat the operation 10
times.
F
O
perate the starter to run the engine.
8
In the event of a breakdown
Page 262 of 416

260
These tools are specific to your vehicle
and may vary according to its equipment.
Do not use them for any other purpose.
Temporary puncture
repair kit
This kit comprises a compressor and a sealant
cartridge.
It allows the temporary repair of a tyre.
You are then able to go to the nearest garage.
It is designed to repair most punctures which
could affect the tyre, located on the tyre tread
or shoulder.
Its compressor can be used to check and
adjust the pressure of the tyre.
Access to the kit
For more information on the Tool box ,
refer to the corresponding section.
List of tools
These tools are specific to your vehicle and
may vary according to the level of equipment.
Do not use them for any other purposes.
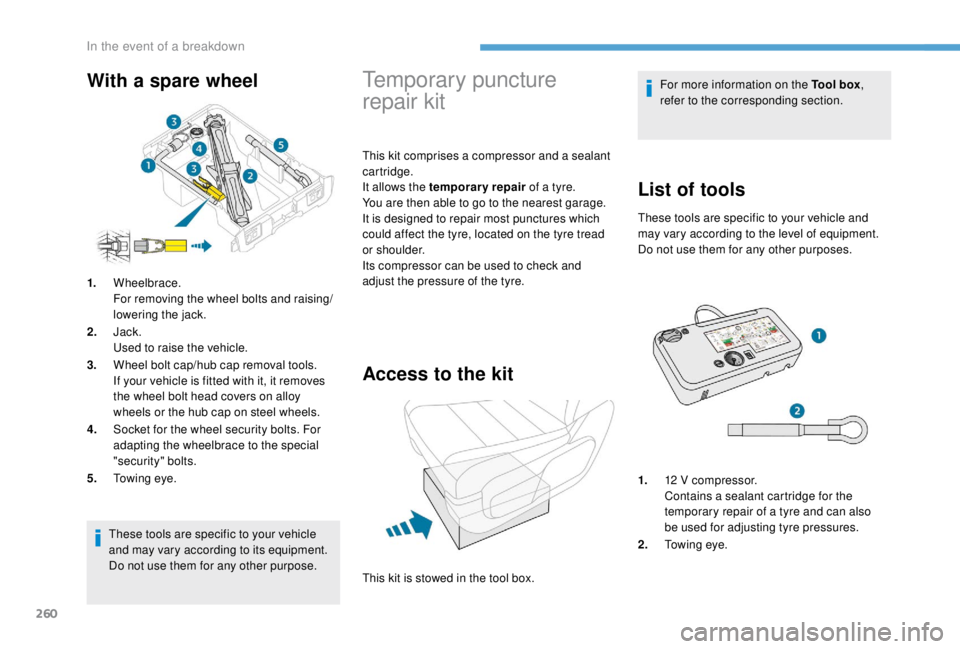
1. 12
V compressor.
Contains a sealant cartridge for the
temporary repair of a tyre and can also
be used for adjusting tyre pressures.
2. Towing eye.
With a spare wheel
1.Wheelbrace.
For removing the wheel bolts and raising/
lowering the jack.
2. Jack.
Used to raise the vehicle.
3. Wheel bolt cap/hub cap removal tools.
If your vehicle is fitted with it, it removes
the wheel bolt head covers on alloy
wheels or the hub cap on steel wheels.
4. Socket for the wheel security bolts. For
adapting the wheelbrace to the special
"security" bolts.
5. Towing eye.
This kit is stowed in the tool box.
In the event of a breakdown
Page 263 of 416
261
For more information on To w i n g, refer to
the corresponding section.
The tyre inflation pressures are given on
this label.
The vehicle's electric system allows the
connection of the compressor for long
enough to inflate a tyre after a puncture
repair.
Only use the two 12
V sockets, located at
the front , to connect your compressor.Kit content description
A."Sealant" or "Air" position selector.
B. On I/off O switch.
C. Deflation button.
D. Pressure gauge (in bar and psi). E.
Compartment housing a cable with an
adaptor for a 12 V socket.
F. Sealant cartridge.
G. White pipe with cap for repair and
inflation.
H. Speed limit sticker.
The speed limit sticker must be affixed to
the vehicle's steering wheel to remind you
that a wheel is in temporary use.
Do not exceed a speed of 50
mph
(80
km/h) when driving with a tyre repaired
using this type of kit.
8
In the event of a breakdown
Page 267 of 416
265
Checking/adjusting tyre
pressures
F Turn selector A to the "air" position.
F
U
ncoil the white pipe G fully.
F
C
onnect the pipe to the tyre
valve.
You can also use the compressor, without
injecting sealant, to check and, if necessary,
adjust the tyre pressures.
F
C
onnect the compressor's electrical
connector to the vehicle's 12 V socket.
F
S
tart the vehicle and leave the engine
running.
F
A
djust the pressure using the compressor
(to inflate: switch B in position I; to deflate:
switch B in position O and press button C ),
according to the vehicle's tyre pressure
label.
F R emove the kit then stow it. Should the pressure of one or more tyres
be adjusted, it is necessary to reinitialise
the under-inflation detection system.
For more information on Under-inflation
detection
, refer to the corresponding
section.
8
In the event of a breakdown
Page 268 of 416

266
Spare wheel
Access to the tools
For more information on the Tool box,
refer to the corresponding section.
List of toolsFor more information on To w i n g , refer to
the corresponding section.
All of these tools are specific to your
vehicle and may vary depending on the
level of equipment.
Do not use them for any other purposes.
The jack must only be used to change
a wheel with a damaged or punctured tyre.
Do not use any jack other than the one
supplied with this vehicle.
If the vehicle does not have its original
jack, contact a PEUGEOT dealer or a
qualified workshop to obtain the correct
jack for it.
The jack meets European standards,
as defined in the Machinery Directive
2006/42/EC.
The jack does not require any
maintenance.
The tools are stowed in the tool box.
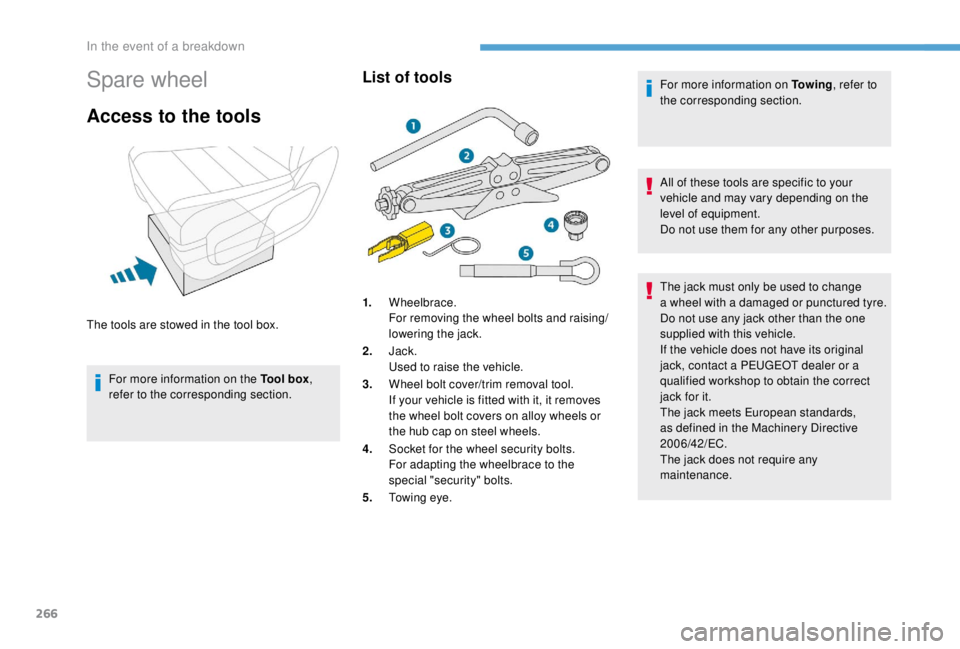
1.
Wheelbrace.
For removing the wheel bolts and raising/
lowering the jack.
2. Jack.
Used to raise the vehicle.
3. Wheel bolt cover/trim removal tool.
If your vehicle is fitted with it, it removes
the wheel bolt covers on alloy wheels or
the hub cap on steel wheels.
4. Socket for the wheel security bolts.
For adapting the wheelbrace to the
special "security" bolts.
5. Towing eye.
In the event of a breakdown
Page 269 of 416
267
Access to the spare wheel
F Access to the spare wheel is from the rear.
F O pen the side-hinged rear doors or the
tailgate, according to the configuration of
your vehicle.
To avoid any unwanted opening of the
electric side door(s), deactivate the
" Hands-Free Tailgate Access " function
in the vehicle configuration menu.
For more information on the Hands-
free sliding side door , refer to the
corresponding section. F
I
f your vehicle is fitted with a towbar, raise
the rear of the vehicle using the jack (must
be at jacking point B ) to allow sufficient
space to remove the spare wheel.
Removing
F Access the carrier bolt, located on the rear door sill. F
T
urn the bolt anti-clockwise using the
wheelbrace (about 14 turns) until the carrier
is low enough to allow the carrier hook to be
disengaged.
F
R
elease the carrier from the hook, take the
spare wheel and place it next to the wheel
to be changed.
8
In the event of a breakdown
Page 273 of 416

271
F Lower the vehicle again fully.
F F old jack 2 and detach it.
F
I
f your vehicle is so equipped, tighten the
security bolt using the wheelbrace 1
fitted
with the security socket 4 .
F
T
ighten the other bolts using wheelbrace
1
o n l y.
F
S
tow the tools in the tool box. Tyre under-inflation detection
The steel spare wheel does not have a
sensor.
After changing a wheel
Stow the punctured wheel in the carrier.
Go to a PEUGEOT dealer or a qualified
workshop as soon as possible.
Have the punctured wheel checked. After
inspection, the technician will let you know
if the tyre can be repaired or if it must be
replaced.
Some driving aid functions should be
disabled, e.g. the Active Safety Brake.
If your vehicle has tyre under-inflation
detection, check the tyre pressures and
reinitialise the system.
For more information on Under-inflation
detection
, refer to the corresponding
section. Wheel with hub cap
When refitting the wheel
, refit the hub
cap starting by placing its notch facing the
valve and press around its edge with the
palm of your hand.
Fastening the steel wheel
If your vehicle is fitted with alloy wheels,
when tightening the bolts on fitting, it is
normal to notice that the washers do not
come into contact with the spare wheel.
The wheel is secured by the conical
contact of each bolt.
The tyre inflation pressures are given on
this label.
8
In the event of a breakdown