2018 PEUGEOT 5008 tow
[x] Cancel search: towPage 218 of 364
216
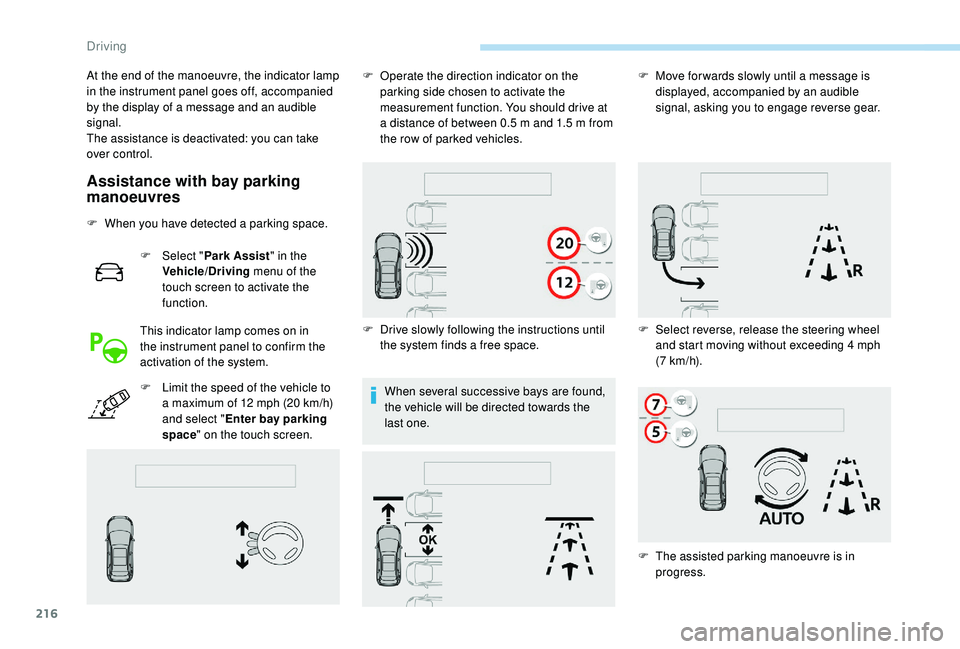
Assistance with bay parking
manoeuvres
F When you have detected a parking space.
F
Sel
ect "Park Assist " in the
Vehicle/Driving menu of the
touch screen to activate the
function.
This indicator lamp comes on in
the instrument panel to confirm the
activation of the system.
F
L
imit the speed of the vehicle to
a
maximum of 12 mph (20 km/h)
and select " Enter bay parking
space " on the touch screen. When several successive bays are found,
the vehicle will be directed towards the
last one.
At the end of the manoeuvre, the indicator lamp
in the instrument panel goes off, accompanied
by the display of a
message and an audible
signal.
The assistance is deactivated: you can take
over control. F
O
perate the direction indicator on the
parking side chosen to activate the
measurement function. You should drive at
a distance of between 0.5 m and 1.5 m from
the row of parked vehicles.
F
D
rive slowly following the instructions until
the system finds a
free space.F
M
ove for wards slowly until a message is
displayed, accompanied by an audible
signal, asking you to engage reverse gear.
F
S
elect reverse, release the steering wheel
and start moving without exceeding 4
mph
(7
km/h).
F
T
he assisted parking manoeuvre is in
progress.
Driving
Page 219 of 364
217
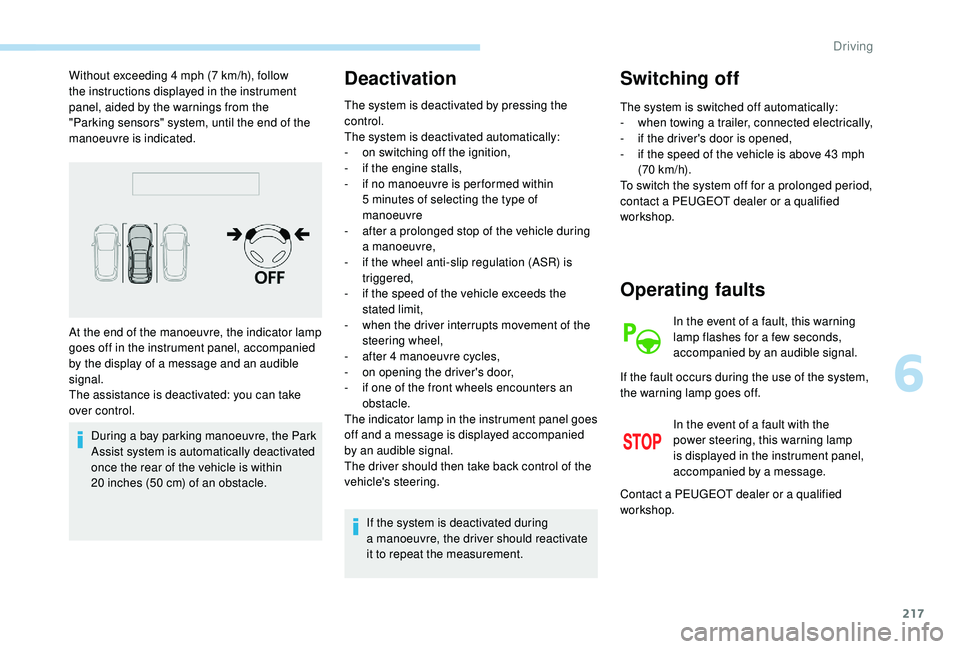
Without exceeding 4 mph (7 km/h), follow
t he instructions displayed in the instrument
panel, aided by the warnings from the
"Parking sensors" system, until the end of the
manoeuvre is indicated.
During a
bay parking manoeuvre, the Park
Assist system is automatically deactivated
once the rear of the vehicle is within
20
inches (50 cm) of an obstacle.Deactivation
The system is deactivated by pressing the
control.
The system is deactivated automatically:
-
o
n switching off the ignition,
-
i
f the engine stalls,
-
i
f no manoeuvre is per formed within
5
minutes of selecting the type of
manoeuvre
-
a
fter a prolonged stop of the vehicle during
a
manoeuvre,
-
i
f the wheel anti-slip regulation (ASR) is
triggered,
-
i
f the speed of the vehicle exceeds the
stated limit,
-
w
hen the driver interrupts movement of the
steering wheel,
-
a
fter 4 manoeuvre cycles,
-
o
n opening the driver's door,
-
i
f one of the front wheels encounters an
obstacle.
The indicator lamp in the instrument panel goes
off and a
message is displayed accompanied
by an audible signal.
The driver should then take back control of the
vehicle's steering.
If the system is deactivated during
a
manoeuvre, the driver should reactivate
it to repeat the measurement.
Switching off
The system is switched off automatically:
- w hen towing a trailer, connected electrically,
-
i
f the driver's door is opened,
-
i
f the speed of the vehicle is above 43 mph
(70
km/h).
To switch the system off for a
prolonged period,
contact a
PEUGEOT dealer or a qualified
workshop.
At the end of the manoeuvre, the indicator lamp
goes off in the instrument panel, accompanied
by the display of a
message and an audible
signal.
The assistance is deactivated: you can take
over control.
Operating faults
In the event of a fault, this warning
l amp flashes for a few seconds,
accompanied by an audible signal.
In the event of a
fault with the
power steering, this warning lamp
is displayed in the instrument panel,
accompanied by a
message.
If the fault occurs during the use of the system,
the warning lamp goes off.
Contact a
PEUGEOT dealer or a qualified
workshop.
6
Driving
Page 220 of 364
218
In bad weather or in winter, ensure that
the sensors are not covered by dirt, ice or
snow.
In the event of a fault, have the system
checked by a
PEUGEOT dealer or
a
qualified workshop.
High pressure jet washing
When washing your vehicle, keep the lance at
least 12
inches (30 cm) away from the sensors.
If the lateral distance between your vehicle
and the space is too great, the system may
not be able to measure the space.
Any object projecting beyond the
dimensions of the vehicle (e.g. a ladder on
the roof or a
towball) will not be taken into
account by the Park Assist system during
a
manoeuvre.
Driving
Page 222 of 364
220
Fuel
Fuel tank capacity: approximately 56 litres.
R eser ve level: 6 litres.
Low fuel level
If your vehicle is fitted with Stop & Start,
never refuel with the engine in STOP
mode; you must switch off the ignition
using the key, or the START/STOP button
if your vehicle has
K
eyless Entry and
Starting.
Refuelling
If you have put in the wrong fuel for your
vehicle, you must have the fuel tank
drained and filled with the correct fuel
before starting the engine.
When the low fuel level is reached
in the fuel tank, this warning lamp
comes on in the instrument panel,
accompanied by the display of
a
message and an audible signal.
When it first comes on, about
6
litres of fuel is left in the tank.
Until sufficient fuel is added, this warning lamp
appears every time the ignition is switched on,
accompanied by the display of a
message and
an audible signal. When driving, this message
and audible signal are repeated with increasing
frequency as the fuel level drops towards 0 .
Refuel as soon as possible to avoid running out
of fuel.
For more information on Running out of fuel
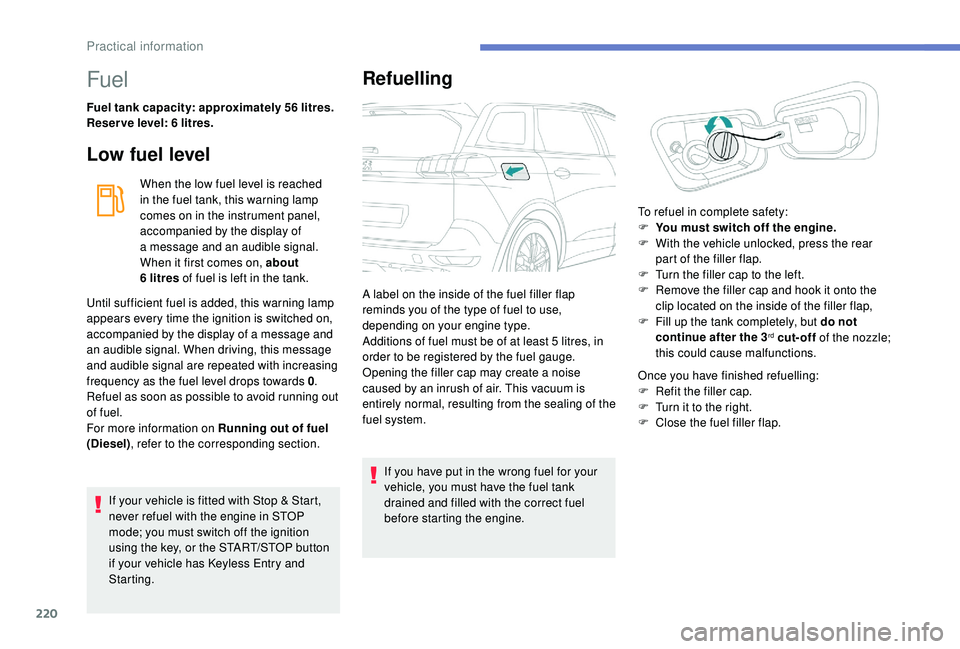
(Diesel) , refer to the corresponding section. A label on the inside of the fuel filler flap
reminds you of the type of fuel to use,
depending on your engine type.
Additions of fuel must be of at least 5
litres, in
order to be registered by the fuel gauge.
Opening the filler cap may create a noise
caused by an inrush of air. This vacuum is
entirely normal, resulting from the sealing of the
fuel system. Once you have finished refuelling:
F
R
efit the filler cap.
F
T
urn it to the right.
F
C
lose the fuel filler flap.
To refuel in complete safety:
F
Y
ou must switch off the engine.
F
W
ith the vehicle unlocked, press the rear
part of the filler flap.
F
T
urn the filler cap to the left.
F
R
emove the filler cap and hook it onto the
clip located on the inside of the filler flap,
F
F
ill up the tank completely, but do not
continue after the 3
rd cut-off of the nozzle;
this could cause malfunctions.
Practical information
Page 225 of 364
223
Travelling abroad
Cer tain fuels could damage the engine of
your vehicle.
In cer tain countries, the use of a par ticular
fuel may be required (specific octane
rating, specific trade name, etc.) to ensure
correct operation of the engine.
For any additional information, contact a
dealer.
Towing device
Load distribution
F D istribute the load in the trailer so that the
heaviest items are as close as possible to
the axle and the nose weight approaches
the maximum permitted without exceeding
it.
Air density decreases with altitude, thus
reducing engine performance. The maximum
towed load must be reduced by 10% for every
1,000
metres of altitude. Use towing devices and their genuine
harnesses approved by PEUGEOT. It
is recommended that the installation
be per formed by a
PEUGEOT dealer or
a
qualified workshop.
If the towbar is not fitted by a PEUGEOT
dealer, it must still be fitted in accordance
with the vehicle manufacturer's
instructions.
Important: for versions equipped with
the motorised tailgate with Hands-Free
Tailgate Access function, if a towing
device other than a genuine PEUGEOT
one is installed, it is imperative to visit
a
PEUGEOT dealer or a qualified
workshop to recalibrate the detection
system: risk of Hands-Free Tailgate
Access function failure.
Certain driving assistance or manoeuvring
assistance functions are automatically
disabled if an approved towbar is used. Obser ve the maximum authorised towable
weight, indicated on your vehicle's
registration certificate, the manufacturer's
label as well as in the Technical data
section of this guide.
Complying with the maximum
authorised nose weight (ball joint)
also includes the use of accessories
(bicycle carriers, tow boxes, etc.).
Obser ve the legislation in force in the
country in which you are driving.
Vehicle equipped with motorised tailgate
with "Hands-Free Tailgate Access "
function
To avoid unwanted opening of the tailgate
when using the towing device:
-
d
eactivate the Hands-Free Tailgate
Access function in advance in your
vehicle's configuration menu,
-
o
r remove the electronic key from the
recognition zone, with the tailgate closed.
7
Practical information
Page 226 of 364
224
Towbar with quickly
detachable towball
No tools are required to install or remove the
towball on this genuine towbar system.
Presentation
Trailers with LED lamps are not
compatible with the wiring harness of this
device.
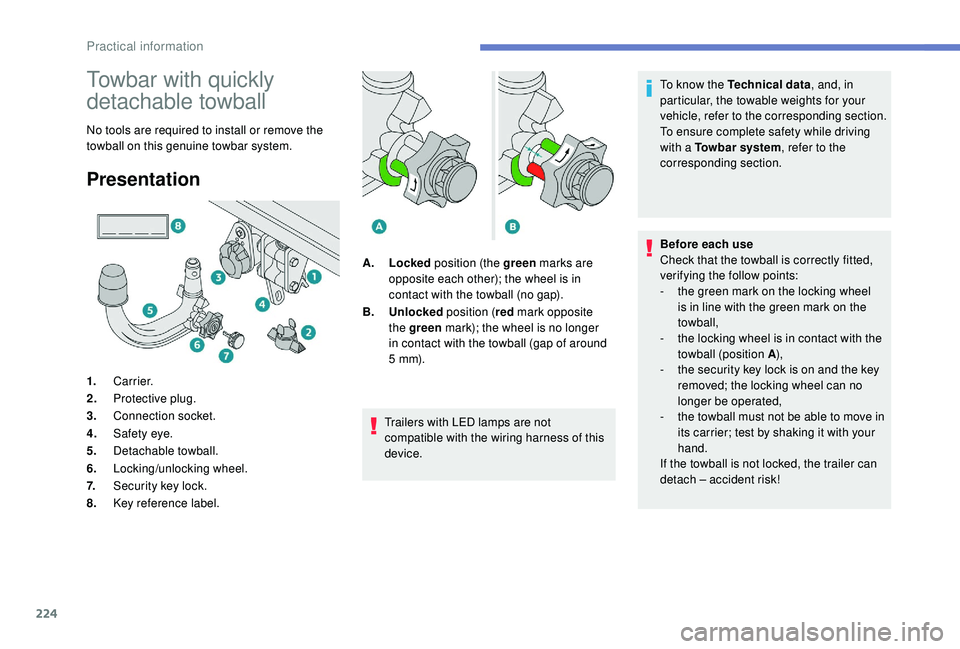
1.
Carrier.
2. Protective plug.
3. Connection socket.
4. Safety eye.
5. Detachable towball.
6. Locking/unlocking wheel.
7. Security key lock.
8. Key reference label. A.
Locked position (the green marks are
opposite each other); the wheel is in
contact with the towball (no gap).
B. Unlocked position (red mark opposite
the green mark); the wheel is no longer
in contact with the towball (gap of around
5
m m). To know the Technical data
, and, in
particular, the towable weights for your
vehicle, refer to the corresponding section.
To ensure complete safety while driving
with a Towbar system
, refer to the
corresponding section.
Before each use
Check that the towball is correctly fitted,
verifying the follow points:
-
t
he green mark on the locking wheel
is in line with the green mark on the
towball,
-
t
he locking wheel is in contact with the
towball (position A ),
-
t
he security key lock is on and the key
removed; the locking wheel can no
longer be operated,
- t he towball must not be able to move in
its carrier; test by shaking it with your
hand.
If the towball is not locked, the trailer can
detach – accident risk!
Practical information
Page 227 of 364

225
Following use
When travelling without a trailer or load
on a
towbar-mounted carrier, the towball
must be removed and the protective plug
inserted in the carrier. This measure
applies particularly where the towball
might obscure visibility of the number
plate or its lighting.
Fitting the towballDuring use
Never release the locking system with
a
trailer or load carrier on the towball.
Never exceed the maximum authorised
weight for the vehicle – the Gross Train
Weight or GTW.
It is essential that the maximum
authorised load be complied with on the
towing device: if it is exceeded, this device
may detach from the vehicle, which is
a
serious accident risk.
Check that the trailer lamps work
c o r r e c t l y.
Before setting off, check the adjustment of
the headlamp beam height.
For more information on Headlamp
adjustment , refer to the corresponding
section. F
B
elow the rear bumper, remove the
protective plug 2
from the towball carrier 1.
F
I
nsert the end of towball 5 into carrier 1 and
push it upwards; the locking will take place
automatically. F
T
he locking wheel 6 turns a quarter of
a
turn anti-clockwise; take care to keep your
hands clear!
F
C
heck that the mechanism has correctly
locked in to place (position A ).
F
C
lose the lock 7 using the key.
7
Practical information
Page 228 of 364
226
Removing the towball
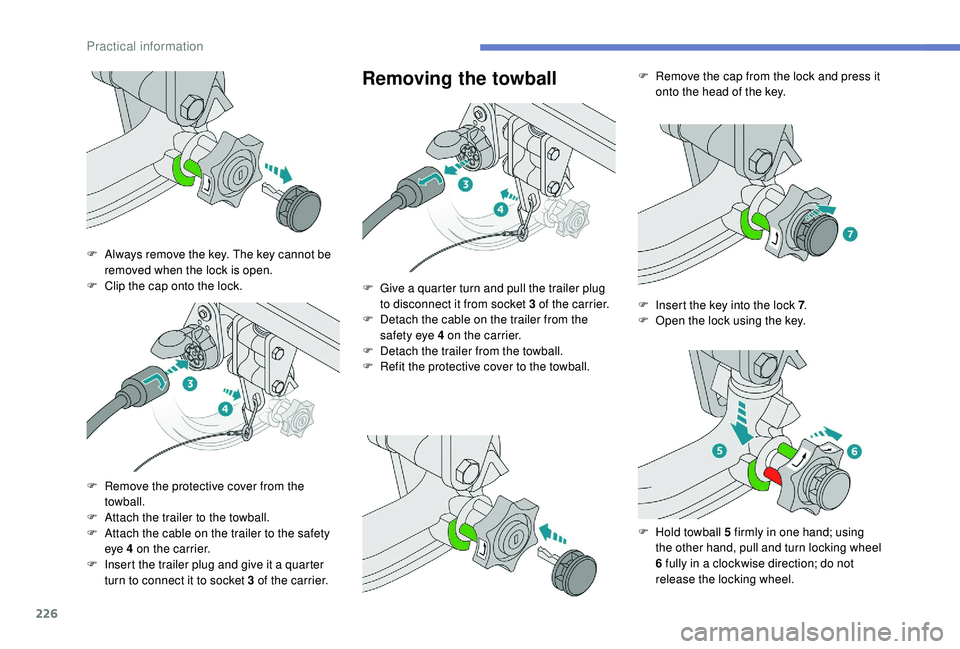
F Always remove the key. The key cannot be removed when the lock is open.
F
C
lip the cap onto the lock.
F
R
emove the protective cover from the
towball.
F
A
ttach the trailer to the towball.
F
A
ttach the cable on the trailer to the safety
eye 4
on the carrier.
F
I
nsert the trailer plug and give it a quarter
turn to connect it to socket 3
of the carrier.F
G
ive a quarter turn and pull the trailer plug
to disconnect it from socket 3
of the carrier.
F
D
etach the cable on the trailer from the
safety eye 4
on the carrier.
F
D
etach the trailer from the towball.
F
R
efit the protective cover to the towball.F
R
emove the cap from the lock and press it
onto the head of the key.
F
I
nsert the key into the lock 7.
F
O
pen the lock using the key.
F
H
old towball 5 firmly in one hand; using
the other hand, pull and turn locking wheel
6
fully in a clockwise direction; do not
release the locking wheel.
Practical information