2018 PEUGEOT 5008 tow
[x] Cancel search: towPage 73 of 364
71
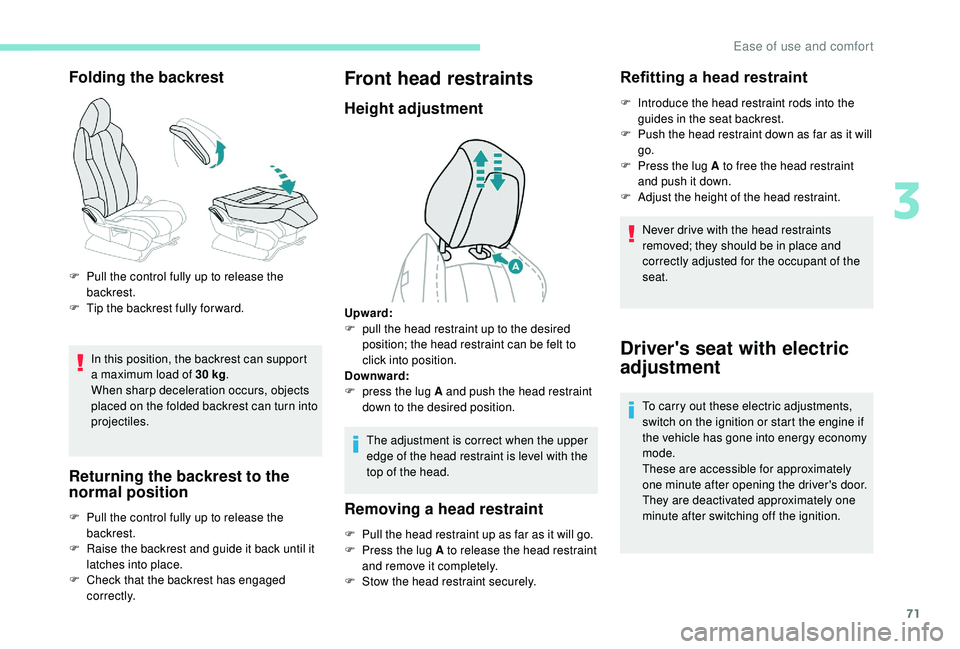
Folding the backrest
In this position, the backrest can support
a maximum load of 30 kg.
When sharp deceleration occurs, objects
placed on the folded backrest can turn into
projectiles.
Returning the backrest to the
normal position
F Pull the control fully up to release the backrest.
F
T
ip the backrest fully for ward.
F
P
ull the control fully up to release the
backrest.
F
R
aise the backrest and guide it back until it
latches into place.
F
C
heck that the backrest has engaged
c o r r e c t l y.
Front head restraints
Height adjustment
The adjustment is correct when the upper
edge of the head restraint is level with the
top of the head.
Removing a head restraint
F Pull the head restraint up as far as it will go.
F P ress the lug A to release the head restraint
and remove it completely.
F
S
tow the head restraint securely.
Refitting a head restraint
F Introduce the head restraint rods into the guides in the seat backrest.
F
P
ush the head restraint down as far as it will
go.
F
P
ress the lug A to free the head restraint
and push it down.
F
A
djust the height of the head restraint.
Never drive with the head restraints
removed; they should be in place and
correctly adjusted for the occupant of the
seat.
Driver's seat with electric
adjustment
To carry out these electric adjustments,
switch on the ignition or start the engine if
the vehicle has gone into energy economy
mode.
These are accessible for approximately
one minute after opening the driver's door.
They are deactivated approximately one
minute after switching off the ignition.
Upward:
F
p
ull the head restraint up to the desired
position; the head restraint can be felt to
click into position.
Downward:
F
p
ress the lug A and push the head restraint
down to the desired position.
3
Ease of use and comfort
Page 78 of 364
76
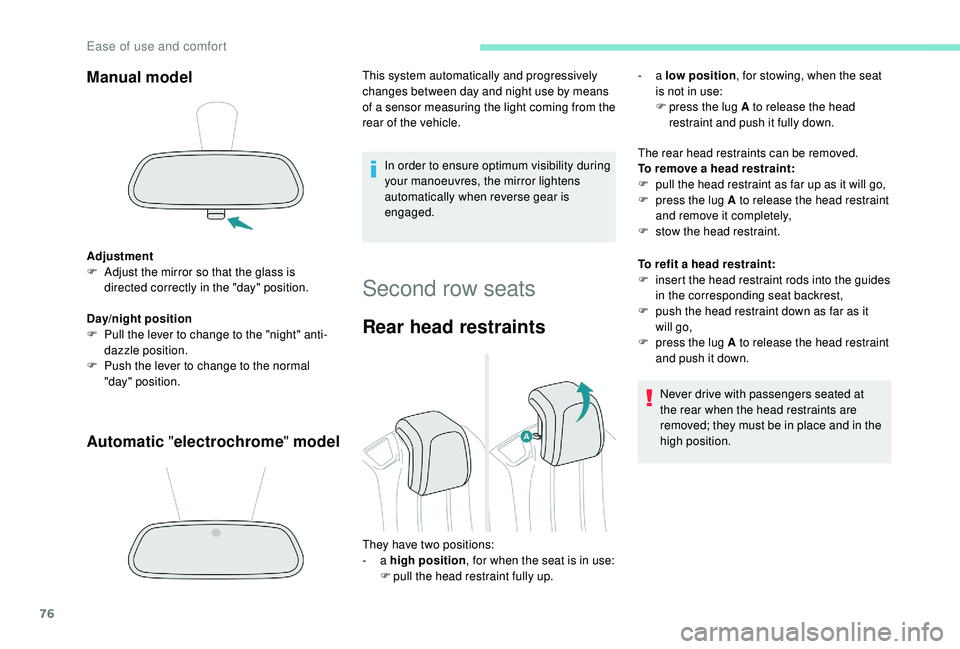
Manual model
Adjustment
F A djust the mirror so that the glass is
directed correctly in the "day" position.
Day/night position
F
P
ull the lever to change to the "night" anti-
dazzle position.
F
P
ush the lever to change to the normal
"day" position.
Automatic "electrochrome " model
In order to ensure optimum visibility during
your manoeuvres, the mirror lightens
automatically when reverse gear is
engaged.
This system automatically and progressively
changes between day and night use by means
of a
s
ensor measuring the light coming from the
rear of the vehicle.
Second row seats
Rear head restraints
The rear head restraints can be removed.
To remove a head restraint:
F
p
ull the head restraint as far up as it will go,
F
p
ress the lug A to release the head restraint
and remove it completely,
F
s
tow the head restraint.
To refit a
head restraint:
F
i
nsert the head restraint rods into the guides
in the corresponding seat backrest,
F
p
ush the head restraint down as far as it
will go,
F
p
ress the lug A to release the head restraint
and push it down.
Never drive with passengers seated at
the rear when the head restraints are
removed; they must be in place and in the
high position.
They have two positions:
-
a high position , for when the seat is in use:
F
p
ull the head restraint fully up. -
a
low position , for stowing, when the seat
is not in use:
F
p
ress the lug A to release the head
restraint and push it fully down.
Ease of use and comfort
Page 83 of 364
81
Rear head restraints
Before doing anything to the seats in the
3rd row, straighten the continuity panels of
the seats in the 2nd row.
Do not try to fold a
seat in the 3rd row
without having opened it until the backrest
is fully locked.
Do not leave anything on or underneath
the seats in the 3
rd row when they are
being folded.
Do not guide strap F when storing the
seat – your fingers may get jammed!
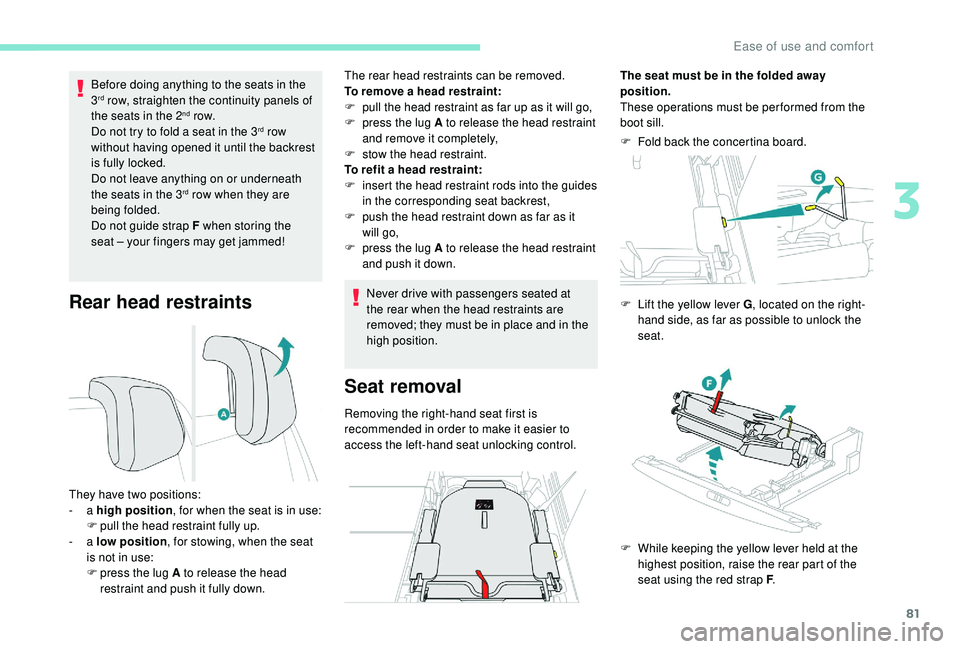
They have two positions:
-
a high position , for when the seat is in use:
F
p
ull the head restraint fully up.
-
a low position , for stowing, when the seat
is not in use:
F
p
ress the lug A to release the head
restraint and push it fully down. The rear head restraints can be removed.
To remove a
head restraint:
F
p
ull the head restraint as far up as it will go,
F
p
ress the lug A to release the head restraint
and remove it completely,
F
s
tow the head restraint.
To refit a head restraint:
F i nsert the head restraint rods into the guides
in the corresponding seat backrest,
F
p
ush the head restraint down as far as it
will go,
F
p
ress the lug A to release the head restraint
and push it down.
Never drive with passengers seated at
the rear when the head restraints are
removed; they must be in place and in the
high position.
Seat removal
Removing the right-hand seat first is
recommended in order to make it easier to
access the left-hand seat unlocking control. F
F
old back the concertina board.
The seat must be in the folded away
position.
These operations must be performed from the
boot sill.
F
L
ift the yellow lever G
, located on the right-
hand side, as far as possible to unlock the
seat.
F
W
hile keeping the yellow lever held at the
highest position, raise the rear part of the
seat using the red strap F .
3
Ease of use and comfort
Page 84 of 364
82
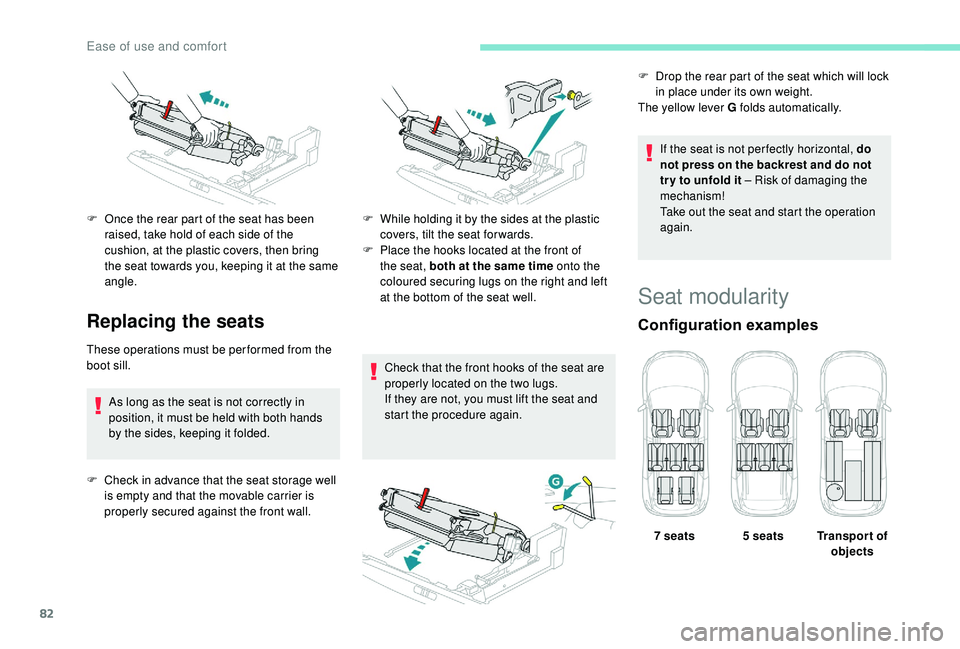
Replacing the seats
These operations must be performed from the
boot sill.As long as the seat is not correctly in
position, it must be held with both hands
by the sides, keeping it folded.
F
C
heck in advance that the seat storage well
is empty and that the movable carrier is
properly secured against the front wall. Check that the front hooks of the seat are
properly located on the two lugs.
If they are not, you must lift the seat and
start the procedure again.If the seat is not per fectly horizontal, do
not press on the backrest and do not
tr y to unfold it – Risk of damaging the
mechanism!
Take out the seat and start the operation
again.
Seat modularity
Configuration examples
F Once the rear part of the seat has been
raised, take hold of each side of the
cushion, at the plastic covers, then bring
the seat towards you, keeping it at the same
angle. F
W hile holding it by the sides at the plastic
covers, tilt the seat for wards.
F
P
lace the hooks located at the front of
the seat, both at the same time onto the
coloured securing lugs on the right and left
at the bottom of the seat well. F
D
rop the rear part of the seat which will lock
in place under its own weight.
The yellow lever G folds automatically.
7 seats 5 seats Transpor t of objects
Ease of use and comfort
Page 87 of 364

85
To close the air vents:
F s ide vents; place the slider in the central
position, then move it sideways towards the
d o o r.
F
c
entral vents; place the slider in the central
position, then move it sideways towards
you. Recommendations for ventilation and
air conditioning
In order for these systems to be fully
effective, follow the operation and
maintenance guidelines below:
F
T
o ensure that the air is distributed
evenly, keep the external air intake
grilles at the base of the windscreen,
the nozzles, the vents, the air outlets
and the air extractor in the boot free
from obstructions.
F
D
o not cover the sunshine sensor,
located on the dashboard; this is used
for regulation of the automatic air
conditioning system.
F
O
perate the air conditioning system for
at least 5
to 10 minutes once or twice
a
month to keep it in per fect working
o r d e r.
F
E
nsure that the passenger
compartment filter is in good condition
and have the filter elements replaced
regularly. We recommend the use of
a
combined passenger compartment
filter. Thanks to its special active
additive, it contributes to the purification
of the air breathed by the occupants
and the cleanliness of the passenger
compartment (reduction of allergic
symptoms, bad odours and greasy
deposits). F
T
o ensure correct operation of the
air conditioning system, you are also
advised to have it checked regularly
as recommended in the Warranty and
Maintenance Record.
F
I
f the system does not produce cold air,
switch it off and contact a
PEUGEOT
dealer or a
qualified workshop.
When towing the maximum load on a
steep
gradient in high temperatures, switching off
the air conditioning increases the available
engine power and so improves the towing
ability.
6.
Air outlets to the rear footwells.
7. Adjustable air vents with blower.
3
Ease of use and comfort
Page 90 of 364
88
Air conditioning On/Off
The air conditioning is designed to operate
effectively in all seasons, with the windows
closed.
It enables you to:
-
l
ower the temperature, in summer,
-
i
ncrease the effectiveness of the demisting
in winter, above 3°C.
Switching on
F Press this button, its indicator lamp comes on. The air conditioning does not operate
when the air flow adjustment is set to off.
To obtain cool air more quickly, you can
use recirculation of the interior air for
a
few moments. Then return to the intake
of exterior air.
Switching off
F Press this button again, its indicator lamp goes off.
Switching off the air conditioning may result in
some discomfort (humidity, condensation).
Maximum air conditioning
This function allows faster cooling of the air in
the passenger compartment.
The system automatically adjusts the
temperature setting to the lowest possible, air
distribution towards the centre and outer vents,
air flow to maximum and activates recirculation
of interior air.
F
P
ress this button to activate
the function; its indicator lamp
comes on.
Automatic visibility
programme
For more information on Front demist -
defrost , refer to the corresponding section.
Switching off the system
F Press this button; its indicator
lamp comes on and all other
indicator lamps of the system
go of f.
Avoid driving for too long with the system
switched off – Risk of condensation and
deterioration of air quality!
Pressing any button reactivates the
system with the settings that were
previously in use.
Footwells.
The air distribution can be adapted by using
several buttons: illumination of the indicator
lamp confirms the presence of fan boosted air
in the direction indicated, the indicator lamp off
indicates the absence of fan boosted air in the
direction indicated.
For a
uniform distribution of air in the
passenger compartment, the three buttons can
be activated simultaneously.
F
P
ress this button again to deactivate the
function and return to the previous settings;
its indicator lamp goes off. This action deactivates all functions of the air
conditioning system.
Temperature is no longer regulated. However,
a slight flow of air can still be felt, resulting from
the for ward movement of the vehicle.
Ease of use and comfort
Page 93 of 364
91
Air flow adjustment
F Press one of these buttons to increase or decrease the speed
of the booster fan.
By reducing the air flow to minimum, you are
stopping ventilation.
" OFF " is displayed alongside the fan.
Avoid driving too long without ventilation –
Risk of condensation and deterioration of
air quality!
Air distribution adjustment
You can vary the distribution of air in the
passenger compartment using these three
buttons. Windscreen and side windows.
Central and side vents.
The air flow symbol (a fan) is filled in
progressively as the speed of the fan is
increased.
Footwells. Each press on a
button activates or deactivates
the function. The indicator lamp is on when the
button is activated. For a uniform distribution
of air in the passenger compartment, the three
buttons can be activated simultaneously.
In AUTO mode, the indicator lamps in all three
buttons are off.
Air conditioning On/Off
The air conditioning is designed to operate
effectively in all seasons, with the windows
closed.
It enables you to:
-
l
ower the temperature, in summer,
-
i
ncrease the effectiveness of the demisting
in winter, above 3°C.
Switching on
F Press this button, its indicator lamp comes on.
The air conditioning does not operate
when the air flow adjustment is set to off.
Switching off
F Press this button again, its indicator lamp goes off.
Switching off the air conditioning may result in
some discomfort (humidity, condensation).
Maximum air conditioning
This function allows faster cooling of the air in
the passenger compartment.
The system automatically adjusts the
temperature setting to the lowest possible, air
distribution towards the centre and outer vents,
air flow to maximum and activates recirculation
of interior air. F
P
ress this button to activate
the function; its indicator lamp
comes on.
F
P
ress this button again to deactivate the
function and return to the previous settings;
its indicator lamp goes off.
Mono-zone/Dual-zone
The passenger temperature setting can be
linked to the driver's setting (mono-zone
function).
It is available in the secondary page by
pressing the " OPTIONS" button.
F
P
ress this button to activate
the " MONO " function; its " ON"
status is displayed.
The function is automatically deactivated if the
passenger uses their temperature adjustment
buttons (dual-zone function).
3
Ease of use and comfort
Page 95 of 364
93
The system activates automatically when
reverse gear is engaged.
Front demist – defrost
With manual air
conditioning
F Adjust the temperature to maximum (red).
F A djust the air flow to maximum; all of the
orange indicator lamps come on.
F
A
djust the air distribution to the
" Windscreen" position; its associated
orange indicator lamp comes on.
F
C
heck that the recirculation of interior air is
deactivated; its indicator lamp must be off.
F
S
witch on the air conditioning by pressing
the " A/C" button; its orange indicator lamp
comes on.
With Stop & Start, when the demisting,
air conditioning and air flow functions are
activated, STOP mode is not available.
With semi-automatic and
automatic air conditioning
Automatic visibility programme
F Press this button to demist or defrost the windscreen and
side windows more quickly; its
orange indicator lamp comes on.
The system automatically manages the air
conditioning (depending on version), air
flow and air intake, and provides optimum
distribution towards the windscreen and side
windows.
F
T
o switch it off, press this button; its
indicator lamp goes off.
The system allows the manual modification of
air flow without causing automatic deactivation
of the automatic visibility programme.
With Stop & Start, when demisting –
defrosting has been activated, STOP
mode is not available. In wintry conditions, remove all snow or
ice on the camera on the windscreen
before moving off.
Other wise, this can affect the function
of the equipment associated with the
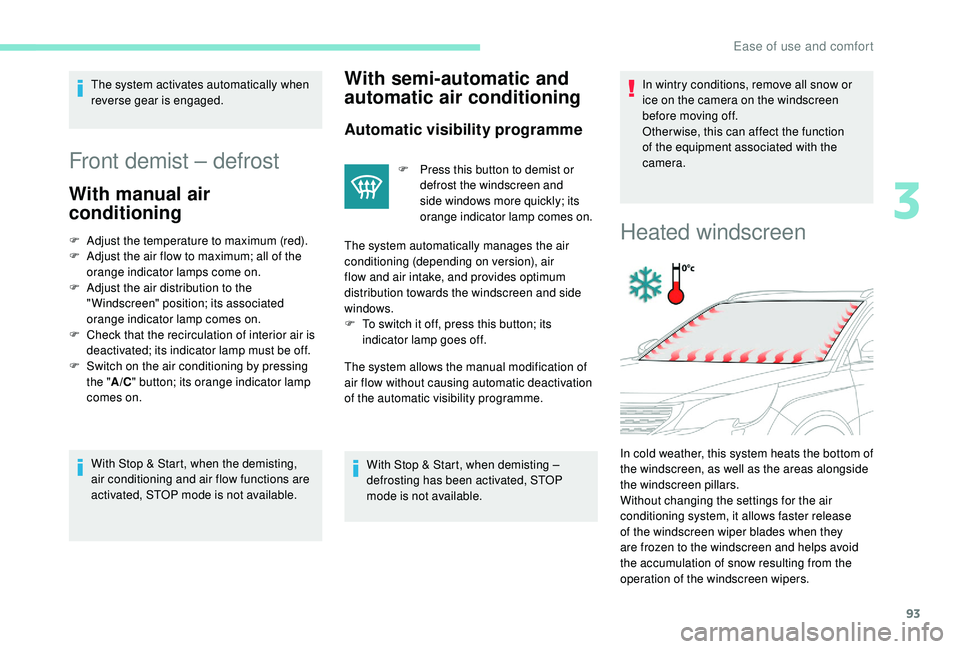
camera.Heated windscreen
In cold weather, this system heats the bottom of
the windscreen, as well as the areas alongside
the windscreen pillars.
Without changing the settings for the air
conditioning system, it allows faster release
of the windscreen wiper blades when they
are frozen to the windscreen and helps avoid
the accumulation of snow resulting from the
operation of the windscreen wipers.
3
Ease of use and comfort