Page 79 of 364

77
Seat adjustments
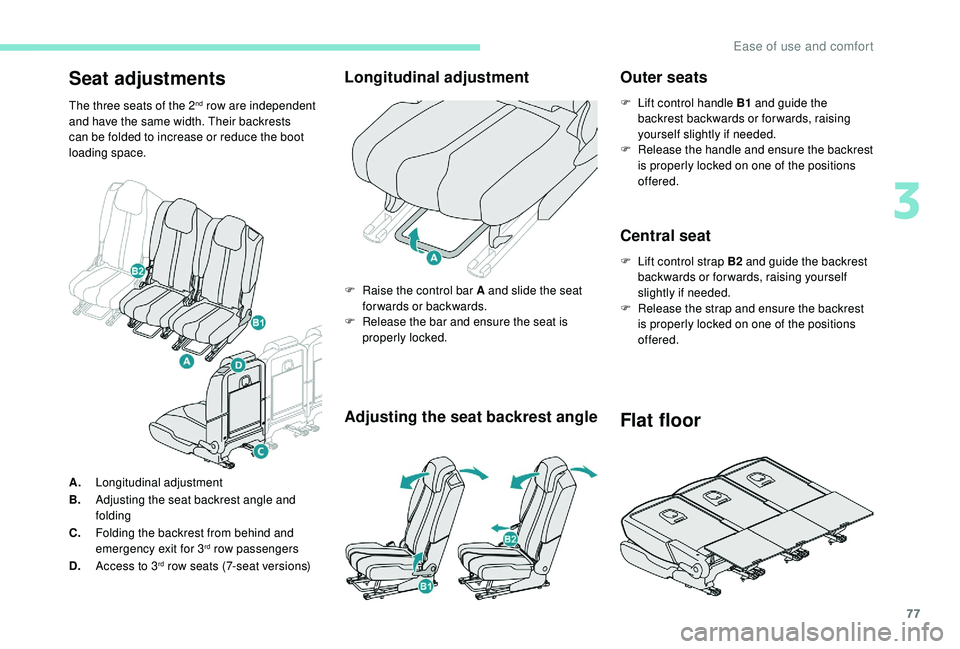
The three seats of the 2nd row are independent
and have the same width. Their backrests
can be folded to increase or reduce the boot
loading space.
Longitudinal adjustment
A. Longitudinal adjustment
B. Adjusting the seat backrest angle and
folding
C. Folding the backrest from behind and
emergency exit for 3
rd row passengers
D. Access to 3rd row seats (7-seat versions)
Adjusting the seat backrest angle Outer seats
F Lift control handle B1
and guide the
backrest backwards or for wards, raising
yourself slightly if needed.
F
R
elease the handle and ensure the backrest
is properly locked on one of the positions
offered.
Central seat
F Lift control strap B2 and guide the backrest
backwards or for wards, raising yourself
slightly if needed.
F
R
elease the strap and ensure the backrest
is properly locked on one of the positions
offered.
F
R
aise the control bar A and slide the seat
forwards or backwards.
F
R
elease the bar and ensure the seat is
properly locked.
Flat floor
3
Ease of use and comfort
Page 210 of 364

208
The display is immediately updated with the
type of view selected.
The state of the system is not kept in memory
when the ignition is switched off.
Principle of operation
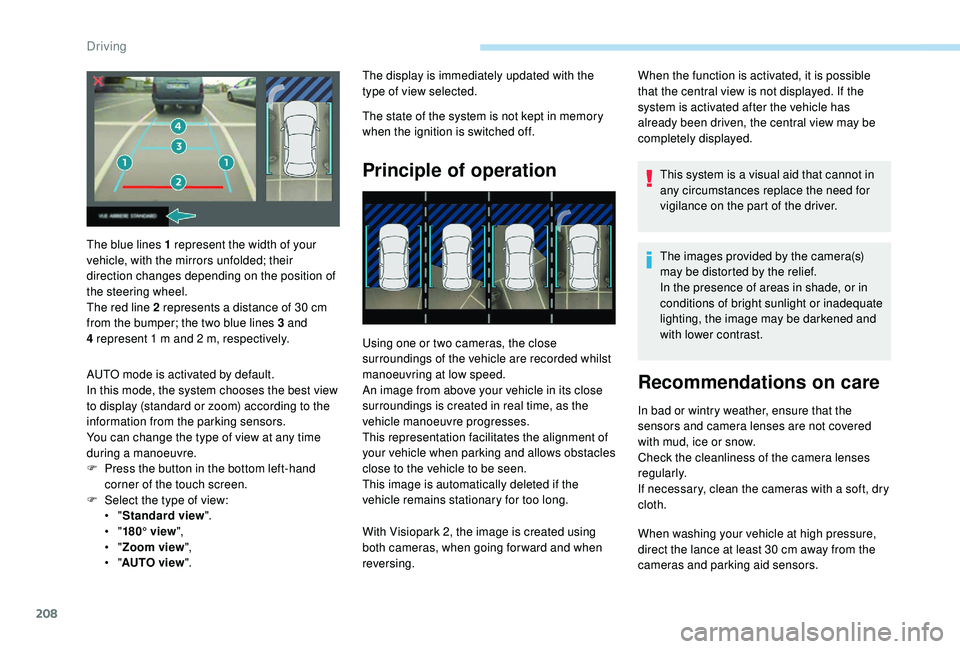
Using one or two cameras, the close
surroundings of the vehicle are recorded whilst
manoeuvring at low speed.
An image from above your vehicle in its close
surroundings is created in real time, as the
vehicle manoeuvre progresses.
This representation facilitates the alignment of
your vehicle when parking and allows obstacles
close to the vehicle to be seen.
This image is automatically deleted if the
vehicle remains stationary for too long.When the function is activated, it is possible
that the central view is not displayed. If the
system is activated after the vehicle has
already been driven, the central view may be
completely displayed.
This system is a visual aid that cannot in
any circumstances replace the need for
vigilance on the part of the driver.
The images provided by the camera(s)
may be distorted by the relief.
In the presence of areas in shade, or in
conditions of bright sunlight or inadequate
lighting, the image may be darkened and
with lower contrast.
Recommendations on care
In bad or wintry weather, ensure that the
sensors and camera lenses are not covered
with mud, ice or snow.
Check the cleanliness of the camera lenses
regularly.
If necessary, clean the cameras with a
soft, dry
cloth.
When washing your vehicle at high pressure,
direct the lance at least 30
cm away from the
cameras and parking aid sensors.
The blue lines 1
represent the width of your
vehicle, with the mirrors unfolded; their
direction changes depending on the position of
the steering wheel.
The red line 2
represents a
distance of 30
cm
from the bumper; the two blue lines 3
and
4
represent 1
m and 2
m, respectively.
AUTO mode is activated by default.
In this mode, the system chooses the best view
to display (standard or zoom) according to the
information from the parking sensors.
You can change the type of view at any time
during a
manoeuvre.
F
P
ress the button in the bottom left-hand
corner of the touch screen.
F
Sel
ect the type of view:
•
" Standard view ".
•
" 180° view ",
•
" Zoom view ",
•
" AUTO view ". With Visiopark 2, the image is created using
both cameras, when going for ward and when
reversing.
Driving
Page 211 of 364

209
AUTO modeStandard view Zoom viewVisiopark 1
Rear vision
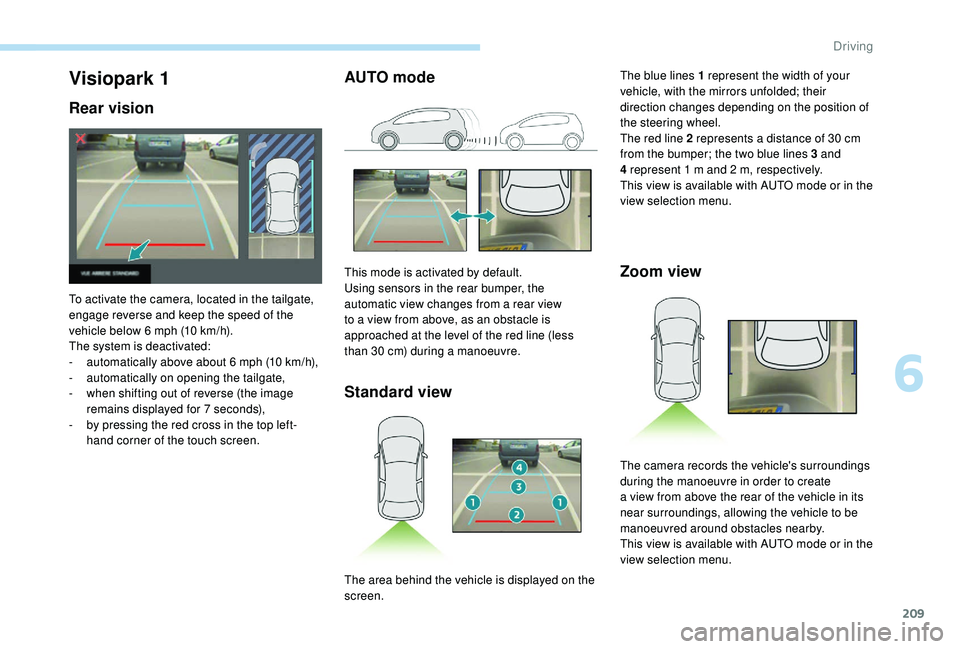
To activate the camera, located in the tailgate,
engage reverse and keep the speed of the
vehicle below 6
mph (10 km/h).
The system is deactivated:
-
a
utomatically above about 6 mph (10 km/h),
-
a
utomatically on opening the tailgate,
-
w
hen shifting out of reverse (the image
remains displayed for 7
seconds),
-
b
y pressing the red cross in the top left-
hand corner of the touch screen. This mode is activated by default.
Using sensors in the rear bumper, the
automatic view changes from a
rear view
to a
view from above, as an obstacle is
approached at the level of the red line (less
than 30
cm) during a manoeuvre.The blue lines 1
represent the width of your
vehicle, with the mirrors unfolded; their
direction changes depending on the position of
the steering wheel.
The red line 2 represents a distance of 30 cm
from the bumper; the two blue lines 3 and
4 represent 1 m and 2 m, respectively.
This view is available with AUTO mode or in the
view selection menu.
The area behind the vehicle is displayed on the
screen. The camera records the vehicle's surroundings
during the manoeuvre in order to create
a
view from above the rear of the vehicle in its
near surroundings, allowing the vehicle to be
manoeuvred around obstacles nearby.
This view is available with AUTO mode or in the
view selection menu.
6
Driving
Page 213 of 364

211
With the engine running and the
speed below 12 mph (20 km/h), the
system is activated via the Vehicle/
Driving menu of the touch screen:
The system is deactivated:
-
a
utomatically above about 19 mph (30 km/h)
(the image disappears temporarily from
12
mph (20 km/h)),
-
b
y pressing the red cross in the top left-
hand corner of the touch screen.
AUTO mode Standard view
F Select "
Panoramic visual aid ".
AUTO mode is displayed by default, with front
vision, if the gearbox is in neutral or with a
gear
engaged, or with rear vision, if reverse is
engaged.
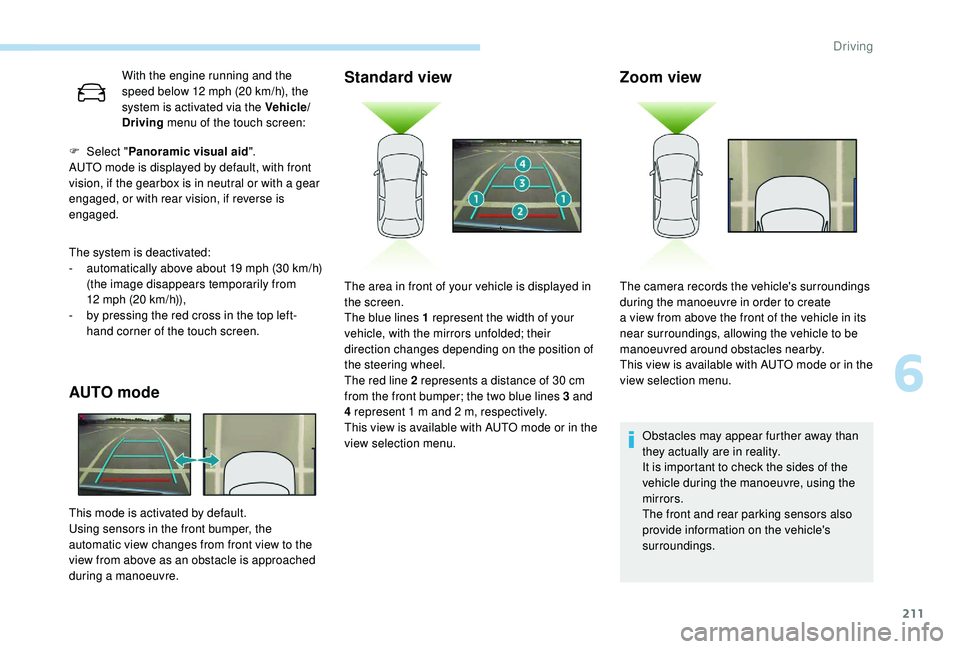
This mode is activated by default.
Using sensors in the front bumper, the
automatic view changes from front view to the
view from above as an obstacle is approached
during a
manoeuvre.
Zoom view
Obstacles may appear further away than
they actually are in reality.
It is important to check the sides of the
vehicle during the manoeuvre, using the
mirrors.
The front and rear parking sensors also
provide information on the vehicle's
surroundings.
The area in front of your vehicle is displayed in
the screen.
The blue lines 1
represent the width of your
vehicle, with the mirrors unfolded; their
direction changes depending on the position of
the steering wheel.
The red line 2
represents a
distance of 30
cm
from the front bumper; the two blue lines 3
and
4
represent 1
m and 2
m, respectively.
This view is available with AUTO mode or in the
view selection menu. The camera records the vehicle's surroundings
during the manoeuvre in order to create
a
view from above the front of the vehicle in its
near surroundings, allowing the vehicle to be
manoeuvred around obstacles nearby.
This view is available with AUTO mode or in the
view selection menu.
6
Driving