2018 PEUGEOT 5008 rear view mirror
[x] Cancel search: rear view mirrorPage 6 of 364
4
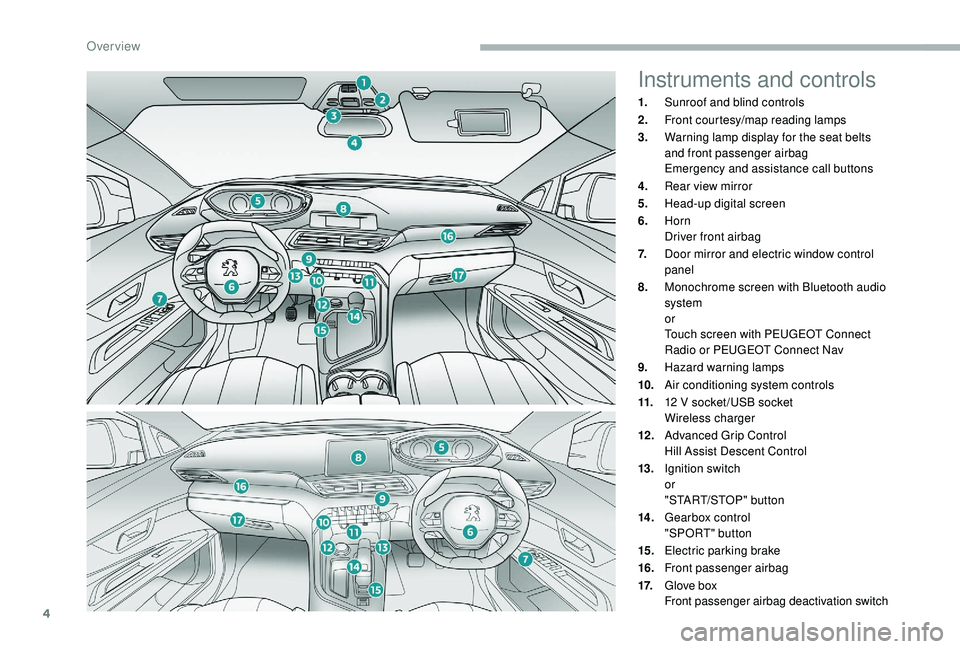
Instruments and controls
1.Sunroof and blind controls
2. Front courtesy/map reading lamps
3. Warning lamp display for the seat belts
and front passenger airbag
Emergency and assistance call buttons
4. Rear view mirror
5. Head-up digital screen
6. Horn
Driver front airbag
7. Door mirror and electric window control
panel
8. Monochrome screen with Bluetooth audio
system
or
Touch screen with PEUGEOT Connect
Radio or PEUGEOT Connect Nav
9. Hazard warning lamps
10. Air conditioning system controls
11. 12
V socket /USB socket
Wireless charger
12 . Advanced Grip Control
Hill Assist Descent Control
13. Ignition switch
or
"START/STOP" button
14 . Gearbox control
"SPORT" button
15. Electric parking brake
16. Front passenger airbag
17. Glove box
Front passenger airbag deactivation switch
Over view
Page 77 of 364
75
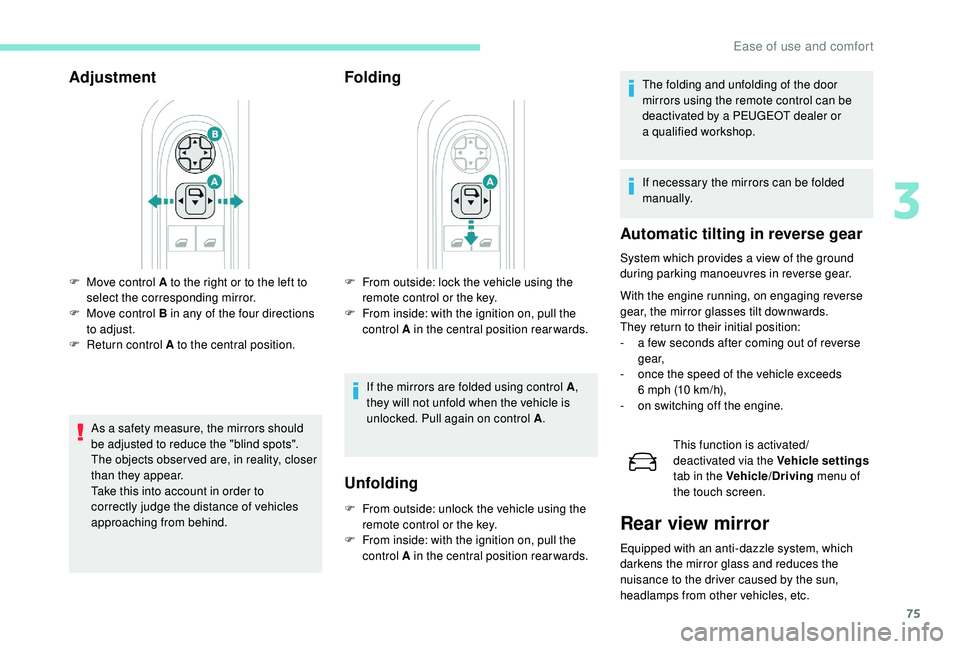
Adjustment
As a safety measure, the mirrors should
b e adjusted to reduce the "blind spots".
The objects obser ved are, in reality, closer
than they appear.
Take this into account in order to
correctly judge the distance of vehicles
approaching from behind.
Folding
F From outside: lock the vehicle using the remote control or the key.
F
F
rom inside: with the ignition on, pull the
control A in the central position rearwards.
If the mirrors are folded using control A ,
they will not unfold when the vehicle is
unlocked. Pull again on control A .
F
M
ove control A to the right or to the left to
select the corresponding mirror.
F
M
ove control B in any of the four directions
to adjust.
F
R
eturn control A to the central position.
Unfolding
F From outside: unlock the vehicle using the remote control or the key.
F
F
rom inside: with the ignition on, pull the
control A in the central position rearwards. The folding and unfolding of the door
mirrors using the remote control can be
deactivated by a
PEUGEOT dealer or
a
qualified workshop.
If necessary the mirrors can be folded
manually.
Automatic tilting in reverse gear
System which provides a view of the ground
d uring parking manoeuvres in reverse gear.
With the engine running, on engaging reverse
gear, the mirror glasses tilt downwards.
They return to their initial position:
-
a f
ew seconds after coming out of reverse
g e a r,
-
o
nce the speed of the vehicle exceeds
6
mph (10 km/h),
-
o
n switching off the engine. This function is activated/
deactivated via the Vehicle settings
tab in the Vehicle/Driving menu of
the touch screen.
Rear view mirror
Equipped with an anti-dazzle system, which
darkens the mirror glass and reduces the
nuisance to the driver caused by the sun,
headlamps from other vehicles, etc.
3
Ease of use and comfort
Page 117 of 364
115
Switching off
F Turn the ring to another position.
Deactivation of the function is accompanied by
the display of a
message.
Operating fault
In the event of a malfunction of the
s unshine sensor, the lighting comes
on, this warning lamp is displayed in
the instrument panel accompanied
by an audible signal and/or
a
message.
Contact a
PEUGEOT dealer or
a
qualified workshop.
Do not cover the sunshine sensor,
combined with the rain sensor and located
at the top centre of the windscreen behind
the rear view mirror; the associated
functions would no longer be controlled.
In fog or snow, the sunshine sensor may
detect sufficient light. In this case, the
lighting will not come on automatically.
Automatic guide-me-home
lighting
With the "Automatic illumination of headlamps"
function activated, under low ambient light, the
sidelamps, dipped beam headlamps and door
mirror spotlamps come on automatically when
the ignition is switched off.
Activation, deactivation and the duration of the
guide-me-home lighting are set in the vehicle
parameters menu in the screen.
Manual guide-me-home
lighting
The temporary illumination of the dipped beam
headlamps after the vehicle's ignition has been
switched off makes the driver's exit easier
when the light is poor.
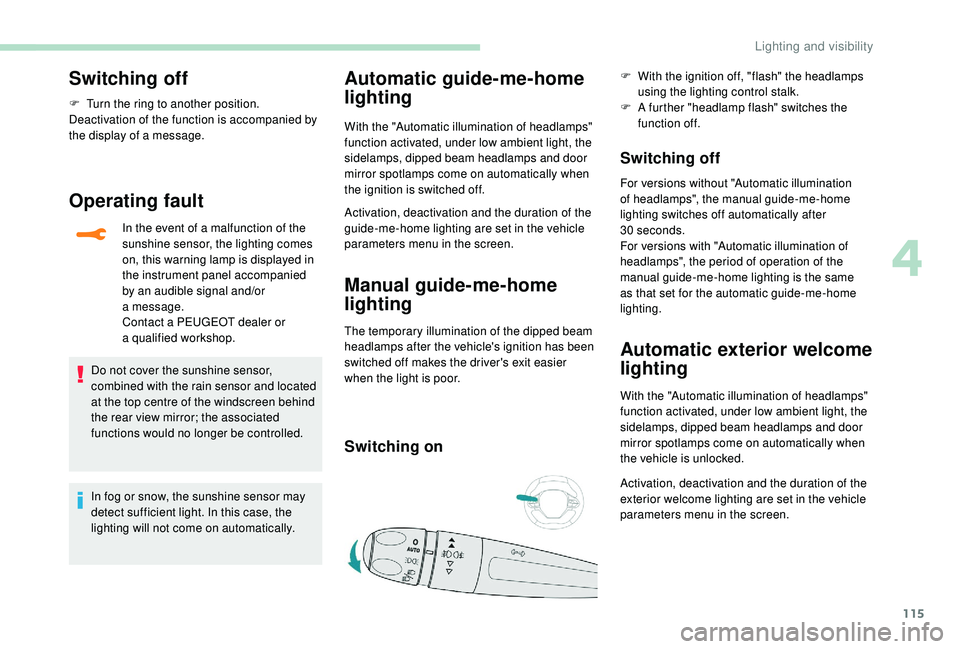
Switching on
F With the ignition off, "flash" the headlamps using the lighting control stalk.
F
A f
urther "headlamp flash" switches the
function off.
Switching off
For versions without "Automatic illumination
of headlamps", the manual guide-me-home
lighting switches off automatically after
30
seconds.
For versions with "Automatic illumination of
headlamps", the period of operation of the
manual guide-me-home lighting is the same
as that set for the automatic guide-me-home
lighting.
Automatic exterior welcome
lighting
With the "Automatic illumination of headlamps"
function activated, under low ambient light, the
sidelamps, dipped beam headlamps and door
mirror spotlamps come on automatically when
the vehicle is unlocked.
Activation, deactivation and the duration of the
exterior welcome lighting are set in the vehicle
parameters menu in the screen.
4
Lighting and visibility
Page 123 of 364
121
To maintain the effectiveness of the wiper
blades, it is advisable to:
-
h
andle them with care,
-
c
lean them regularly using soapy
water,
-
a
void using them to retain cardboard
on the windscreen,
-
r
eplace them at the first signs of wear.
F
I
n the minute following ignition switch-off,
any operation of the wiper control stalk will
position the wiper blades vertically.
F
T
o park the wiper blades again, switch on
the ignition and operate the wiper stalk.
Automatic windscreen
wipers
The windscreen wipers operate automatically,
adapting their speed to the intensity of the
rainfall without any action on the part of the
driver.
Detection of rainfall is by means of a
sensor at
the top centre of the windscreen, behind the
rear view mirror.
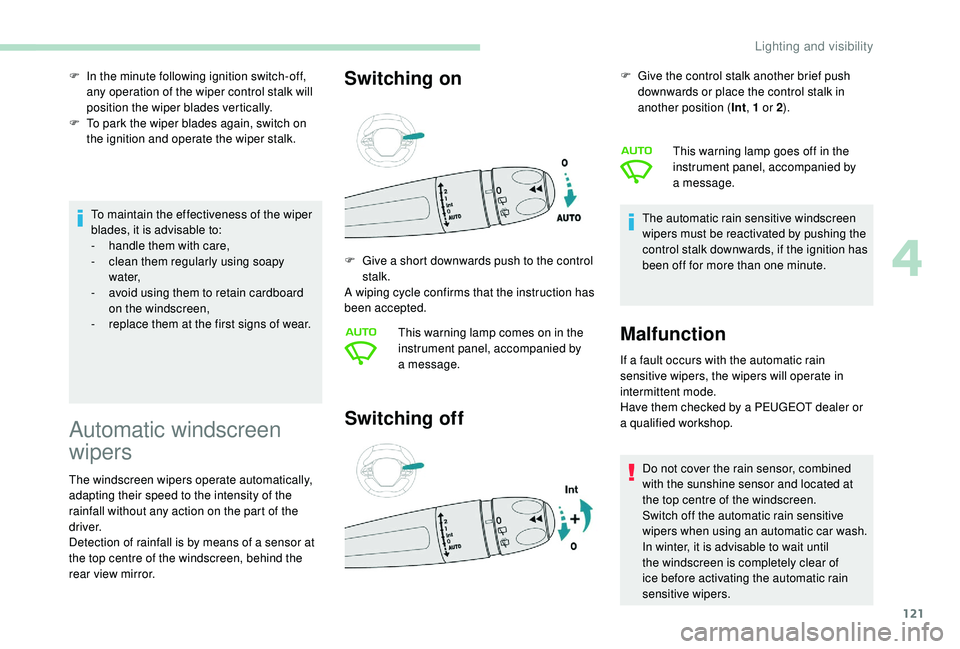
Switching on
Switching off
If a fault occurs with the automatic rain
s ensitive wipers, the wipers will operate in
intermittent mode.
Have them checked by a
PEUGEOT dealer or
a
qualified workshop. Do not cover the rain sensor, combined
with the sunshine sensor and located at
the top centre of the windscreen.
Switch off the automatic rain sensitive
wipers when using an automatic car wash.
In winter, it is advisable to wait until
the windscreen is completely clear of
ice before activating the automatic rain
sensitive wipers.
F
G
ive a
short downwards push to the control
stalk.
A wiping cycle confirms that the instruction has
been accepted.
This warning lamp comes on in the
instrument panel, accompanied by
a
message. F
G
ive the control stalk another brief push
downwards or place the control stalk in
another position ( Int, 1 or 2
).
The automatic rain sensitive windscreen
wipers must be reactivated by pushing the
control stalk downwards, if the ignition has
been off for more than one minute. This warning lamp goes off in the
instrument panel, accompanied by
a
message.
Malfunction
4
Lighting and visibility
Page 205 of 364
203
Blind Spot Monitoring
System
This driving aid system is designed to
improve safety when driving and is in no
circumstances a substitute for the use
of the interior rear view mirror and door
mirrors. It is the driver's responsibility to
constantly check the traffic, to assess the
distances and relative speeds of other
vehicles and to predict their movements
before deciding whether to change lane.
This system is a
driving aid which cannot,
in any circumstances, replace the need for
vigilance on the part of the driver.
Activation/Deactivation
Activation and deactivation of the
system is done in the Vehicle/
Driving menu of the touch screen.
Select the " Driving functions " then the "Blind
spot sensors " tab.
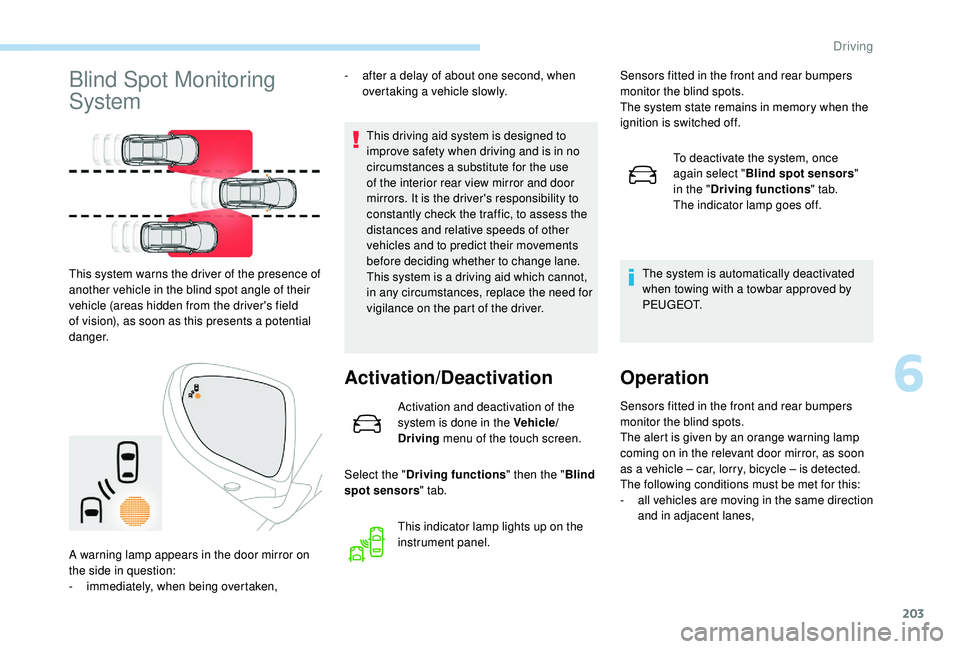
This system warns the driver of the presence of
another vehicle in the blind spot angle of their
vehicle (areas hidden from the driver's field
of vision), as soon as this presents a
potential
danger. -
a
fter a
delay of about one second, when
overtaking a vehicle slowly.
This indicator lamp lights up on the
instrument panel.
A warning lamp appears in the door mirror on
the side in question:
-
i
mmediately, when being overtaken, Sensors fitted in the front and rear bumpers
monitor the blind spots.
The system state remains in memory when the
ignition is switched off.
To deactivate the system, once
again select " Blind spot sensors "
in the " Driving functions " tab.
The indicator lamp goes off.
The system is automatically deactivated
when towing with a towbar approved by
P E U G E O T.
Operation
Sensors fitted in the front and rear bumpers
monitor the blind spots.
The alert is given by an orange warning lamp
coming on in the relevant door mirror, as soon
as a
vehicle – car, lorry, bicycle – is detected.
The following conditions must be met for this:
-
a
ll vehicles are moving in the same direction
and in adjacent lanes,
6
Driving
Page 211 of 364
209
AUTO modeStandard view Zoom viewVisiopark 1
Rear vision
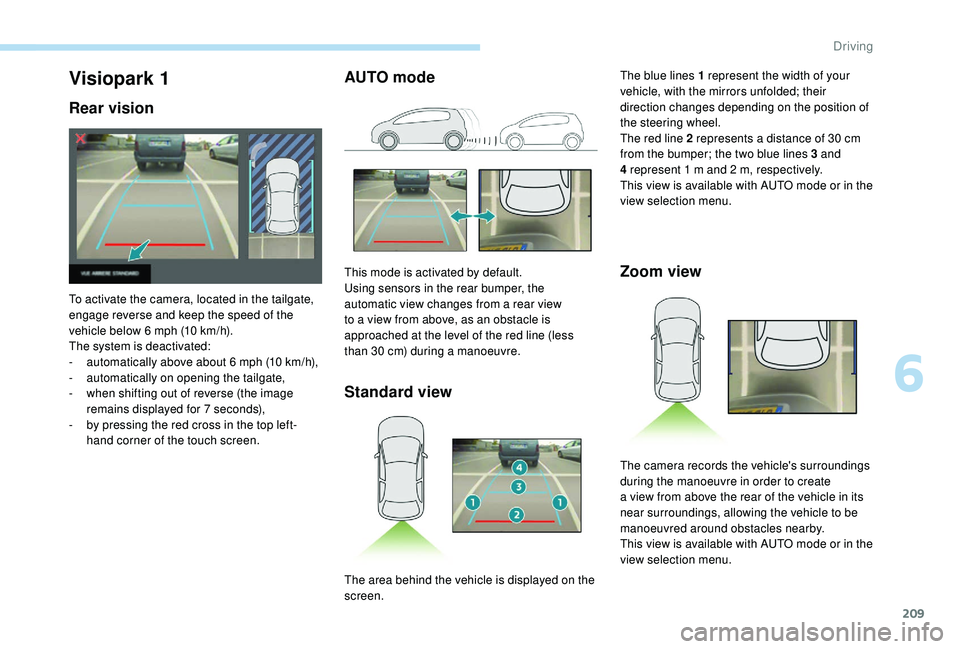
To activate the camera, located in the tailgate,
engage reverse and keep the speed of the
vehicle below 6
mph (10 km/h).
The system is deactivated:
-
a
utomatically above about 6 mph (10 km/h),
-
a
utomatically on opening the tailgate,
-
w
hen shifting out of reverse (the image
remains displayed for 7
seconds),
-
b
y pressing the red cross in the top left-
hand corner of the touch screen. This mode is activated by default.
Using sensors in the rear bumper, the
automatic view changes from a
rear view
to a
view from above, as an obstacle is
approached at the level of the red line (less
than 30
cm) during a manoeuvre.The blue lines 1
represent the width of your
vehicle, with the mirrors unfolded; their
direction changes depending on the position of
the steering wheel.
The red line 2 represents a distance of 30 cm
from the bumper; the two blue lines 3 and
4 represent 1 m and 2 m, respectively.
This view is available with AUTO mode or in the
view selection menu.
The area behind the vehicle is displayed on the
screen. The camera records the vehicle's surroundings
during the manoeuvre in order to create
a
view from above the rear of the vehicle in its
near surroundings, allowing the vehicle to be
manoeuvred around obstacles nearby.
This view is available with AUTO mode or in the
view selection menu.
6
Driving
Page 212 of 364
210
180° view
Visiopark 2
The vehicle has a camera at the front, fitted
i n the grille, and a camera at the rear, located
close to the tailgate opening control.
Using these cameras, the system displays
the vehicle's near surroundings in the touch
screen, offering views from the rear of the
vehicle (rear vision), when reverse gear is
engaged and views from the front of the vehicle
(front vision), when the gearbox is in neutral or
a
gear is engaged.
Rear vision
If a trailer or a bicycle carrier is fitted to
t he towball, the zone behind the vehicle on
the top view goes dark.
The surroundings are reconstructed by the
front camera only.
The rear vision views are similar to those for
the Visiopark 1.
For more information on Visiopark 1 , refer to
the corresponding section.
Front and rear vision
Obstacles may appear further away than
they actually are in reality.
It is important to check the sides of the
vehicle during the manoeuvre, using the
mirrors.
The rear parking sensors also provide
information on the vehicle's surroundings.
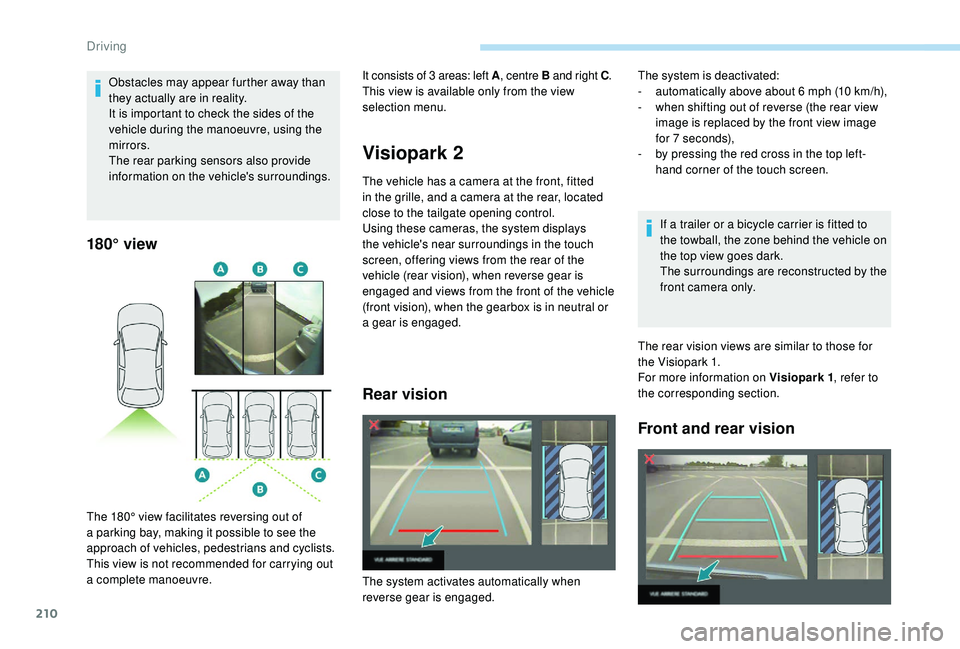
The 180° view facilitates reversing out of
a
parking bay, making it possible to see the
approach of vehicles, pedestrians and cyclists.
This view is not recommended for carrying out
a
complete manoeuvre. It consists of 3
areas: left A
, centre B and right C .
This view is available only from the view
selection menu. The system is deactivated:
-
a utomatically above about 6 mph (10 km/h),
-
w
hen shifting out of reverse (the rear view
image is replaced by the front view image
for 7
seconds),
-
b
y pressing the red cross in the top left-
hand corner of the touch screen.
The system activates automatically when
reverse gear is engaged.
Driving
Page 213 of 364
211
With the engine running and the
speed below 12 mph (20 km/h), the
system is activated via the Vehicle/
Driving menu of the touch screen:
The system is deactivated:
-
a
utomatically above about 19 mph (30 km/h)
(the image disappears temporarily from
12
mph (20 km/h)),
-
b
y pressing the red cross in the top left-
hand corner of the touch screen.
AUTO mode Standard view
F Select "
Panoramic visual aid ".
AUTO mode is displayed by default, with front
vision, if the gearbox is in neutral or with a
gear
engaged, or with rear vision, if reverse is
engaged.
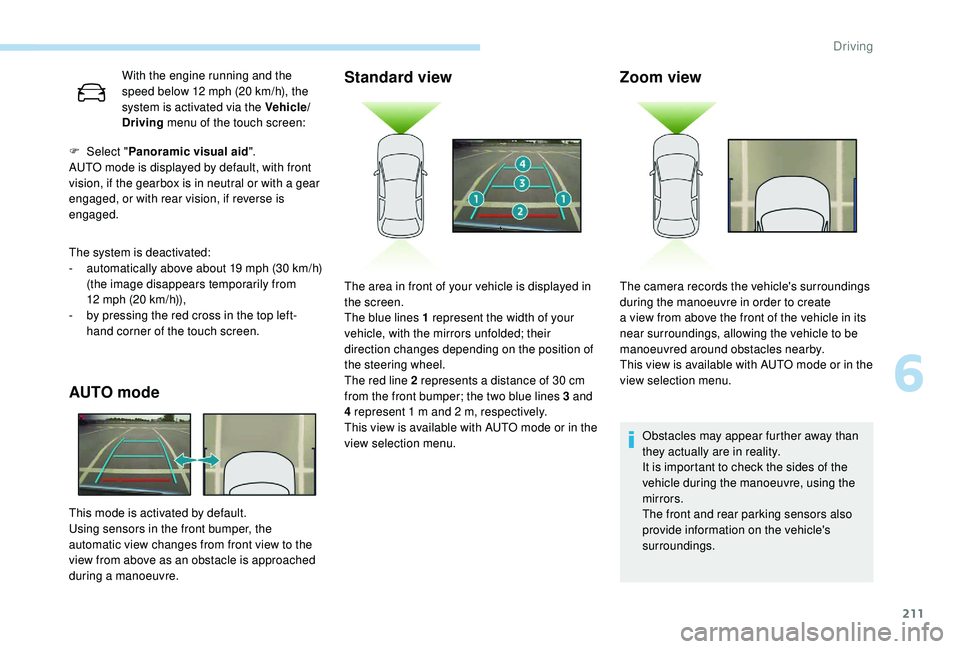
This mode is activated by default.
Using sensors in the front bumper, the
automatic view changes from front view to the
view from above as an obstacle is approached
during a
manoeuvre.
Zoom view
Obstacles may appear further away than
they actually are in reality.
It is important to check the sides of the
vehicle during the manoeuvre, using the
mirrors.
The front and rear parking sensors also
provide information on the vehicle's
surroundings.
The area in front of your vehicle is displayed in
the screen.
The blue lines 1
represent the width of your
vehicle, with the mirrors unfolded; their
direction changes depending on the position of
the steering wheel.
The red line 2
represents a
distance of 30
cm
from the front bumper; the two blue lines 3
and
4
represent 1
m and 2
m, respectively.
This view is available with AUTO mode or in the
view selection menu. The camera records the vehicle's surroundings
during the manoeuvre in order to create
a
view from above the front of the vehicle in its
near surroundings, allowing the vehicle to be
manoeuvred around obstacles nearby.
This view is available with AUTO mode or in the
view selection menu.
6
Driving