2018 PEUGEOT 108 ECU
[x] Cancel search: ECUPage 67 of 180
65
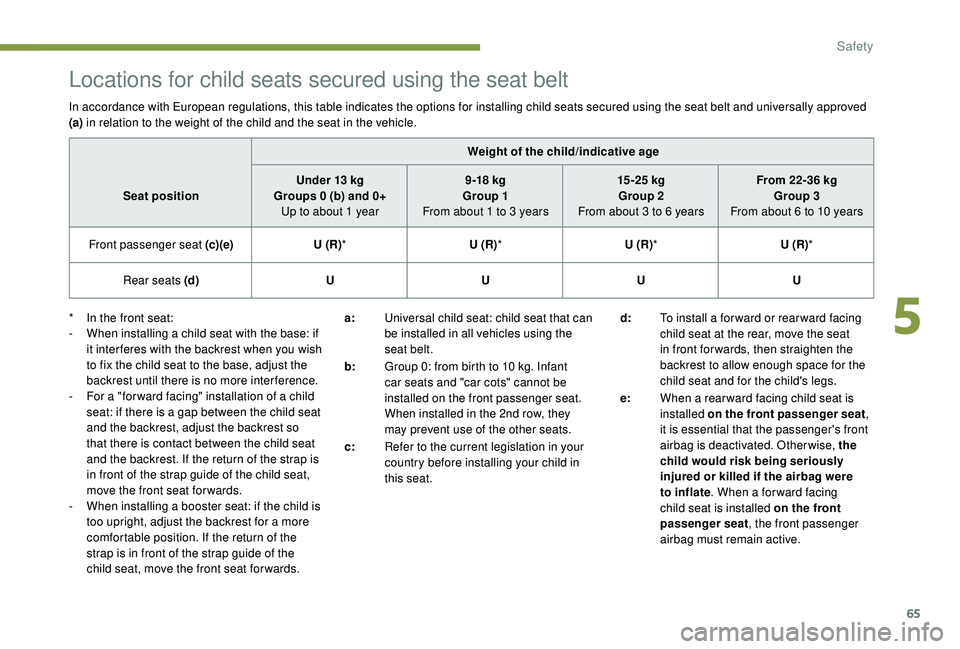
Locations for child seats secured using the seat belt
In accordance with European regulations, this table indicates the options for installing child seats secured using the seat belt and universally approved
(a) in relation to the weight of the child and the seat in the vehicle.
Weight of the child/indicative age
Seat position Under 13
kg
Groups 0 (b) and 0+ Up to about 1
year9 -18
kg
Group 1
From about 1
to 3 years15 -25
kg
Group 2
From about 3
to 6 yearsFrom 22-36
kg
Group 3
From about 6
to 10 years
Front passenger seat (c) (e)U (R)* U (R)* U (R)* U (R)*
Rear seats (d) UUUU
d: To install a
forward or rearward facing
child seat at the rear, move the seat
in front for wards, then straighten the
backrest to allow enough space for the
child seat and for the child's legs.
e: When a
rear ward facing child seat is
installed on the front passenger seat ,
it is essential that the passenger's front
airbag is deactivated. Otherwise, the
child would risk being seriously
injured or killed if the airbag were
to inflate . When a
for ward facing
child seat is installed on the front
passenger seat , the front passenger
airbag must remain active.
*
I
n the front seat:
-
W
hen installing a child seat with the base: if
it inter feres with the backrest when you wish
to fix the child seat to the base, adjust the
backrest until there is no more inter ference.
-
F
or a "for ward facing" installation of a child
seat: if there is a
gap between the child seat
and the backrest, adjust the backrest so
that there is contact between the child seat
and the backrest. If the return of the strap is
in front of the strap guide of the child seat,
move the front seat for wards.
-
W
hen installing a booster seat: if the child is
too upright, adjust the backrest for a
more
comfortable position. If the return of the
strap is in front of the strap guide of the
child seat, move the front seat for wards. a:
Universal child seat: child seat that can
be installed in all vehicles using the
seat belt.
b: Group 0: from birth to 10
kg. Infant
car seats and "car cots" cannot be
installed on the front passenger seat.
When installed in the 2nd row, they
may prevent use of the other seats.
c: Refer to the current legislation in your
country before installing your child in
this seat.
5
Safety
Page 68 of 180
66
U:Seat suitable for the installation of
a
child seat secured using a seat belt
and universally approved, rearward
and/or for ward facing, with the front
seat adjusted in the middle longitudinal
position.
U (R): same as U , with the vehicle seat which
must be adjusted in the rearmost
longitudinal position, backrest
straightened.
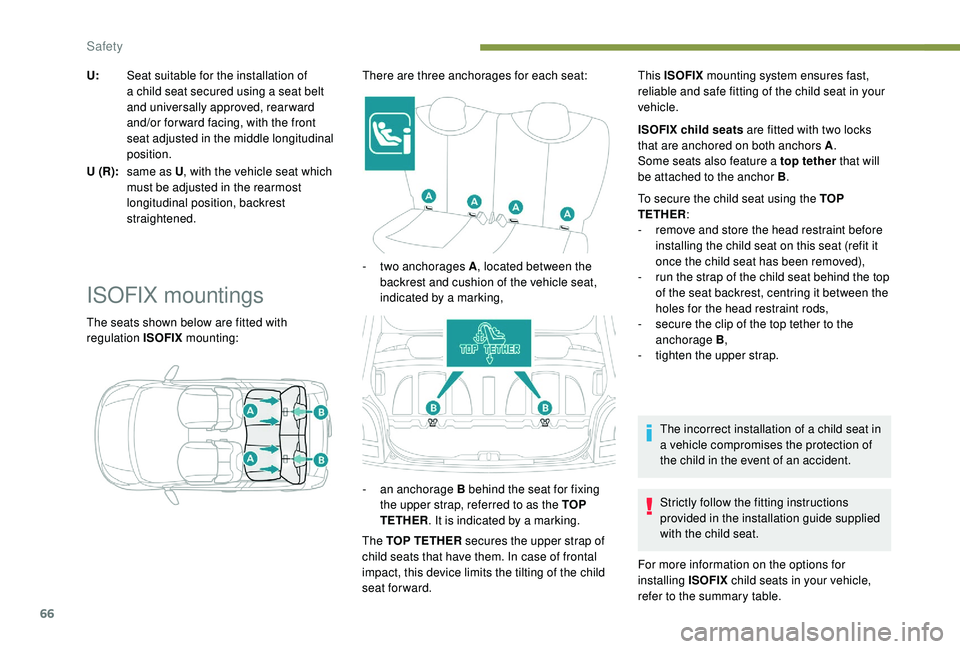
ISOFIX mountings
The seats shown below are fitted with
regulation ISOFIX mounting: There are three anchorages for each seat:
-
t
wo anchorages A
, located between the
backrest and cushion of the vehicle seat,
indicated by a marking,
-
an
anchorage B behind the seat for fixing
the upper strap, referred to as the TOP
TETHER . It is indicated by a
marking.
The TOP TETHER secures the upper strap of
child seats that have them. In case of frontal
impact, this device limits the tilting of the child
seat forward. This ISOFIX
mounting system ensures fast,
reliable and safe fitting of the child seat in your
vehicle.
ISOFIX child seats are fitted with two locks
that are anchored on both anchors A .
Some seats also feature a top tether
that will
be attached to the anchor B .
To secure the child seat using the TOP
TETHER :
-
r
emove and store the head restraint before
installing the child seat on this seat (refit it
once the child seat has been removed),
-
r
un the strap of the child seat behind the top
of the seat backrest, centring it between the
holes for the head restraint rods,
- s ecure the clip of the top tether to the
anchorage B ,
-
t
ighten the upper strap.
The incorrect installation of a
child seat in
a
vehicle compromises the protection of
the child in the event of an accident.
Strictly follow the fitting instructions
provided in the installation guide supplied
with the child seat.
For more information on the options for
installing ISOFIX child seats in your vehicle,
refer to the summary table.
Safety
Page 69 of 180
67
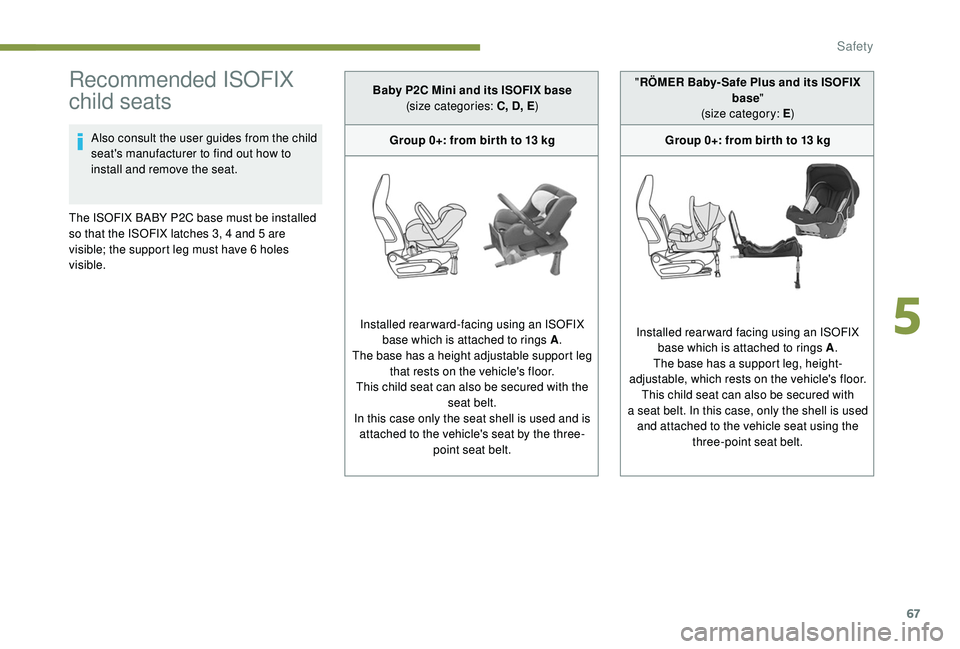
Recommended ISOFIX
child seats
Also consult the user guides from the child
seat's manufacturer to find out how to
install and remove the seat.
The ISOFIX BABY P2C base must be installed
so that the ISOFIX latches 3, 4
and 5 are
visible; the support leg must have 6
holes
visible. Baby P2C Mini and its ISOFIX base
(size categories: C, D, E )
Group 0+: from bir th to 13 kg
Installed rearward-facing using an ISOFIX base which is attached to rings A .
The base has a
height adjustable support leg
that rests on the vehicle's floor.
This child seat can also be secured with the seat belt.
In this case only the seat shell is used and is attached to the vehicle's seat by the three- point seat belt. "
RÖMER Baby- Safe Plus and its ISOFIX
base"
(size category: E )
Group 0+: from bir th to 13 kg
Installed rearward facing using an ISOFIX base which is attached to rings A .
The base has a
support leg, height-
adjustable, which rests on the vehicle's floor. This child seat can also be secured with
a
seat belt. In this case, only the shell is used
and attached to the vehicle seat using the three-point seat belt.
5
Safety
Page 70 of 180
68
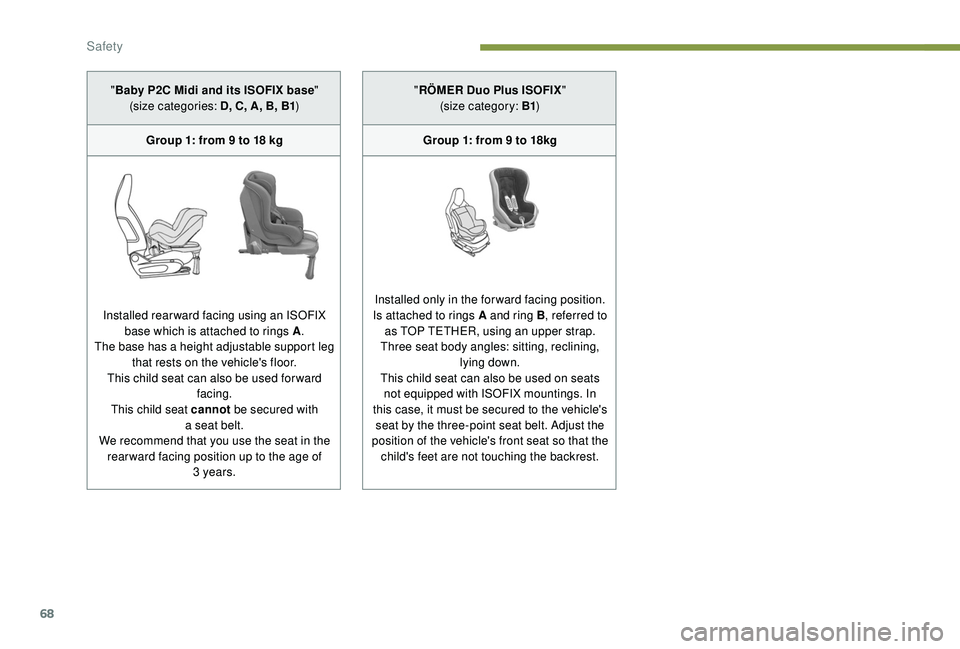
"Baby P2C Midi and its ISOFIX base "
(size categories: D, C, A, B, B1 )
Group 1: from 9
to 18 kg
Installed rearward facing using an ISOFIX base which is attached to rings A .
The base has a
height adjustable support leg
that rests on the vehicle's floor.
This child seat can also be used for ward facing.
This child seat cannot be secured with
a
seat belt.
We recommend that you use the seat in the rear ward facing position up to the age of 3
years. "
RÖMER Duo Plus ISOFIX "
(size category: B1 )
Group 1: from 9
to 18kg
Installed only in the forward facing position.
Is attached to rings A and ring B , referred to
as TOP TETHER, using an upper strap.
Three seat body angles: sitting, reclining, lying down.
This child seat can also be used on seats not equipped with ISOFIX mountings. In
this case, it must be secured to the vehicle's seat by the three-point seat belt. Adjust the
position of the vehicle's front seat so that the child's feet are not touching the backrest.
Safety
Page 71 of 180
69
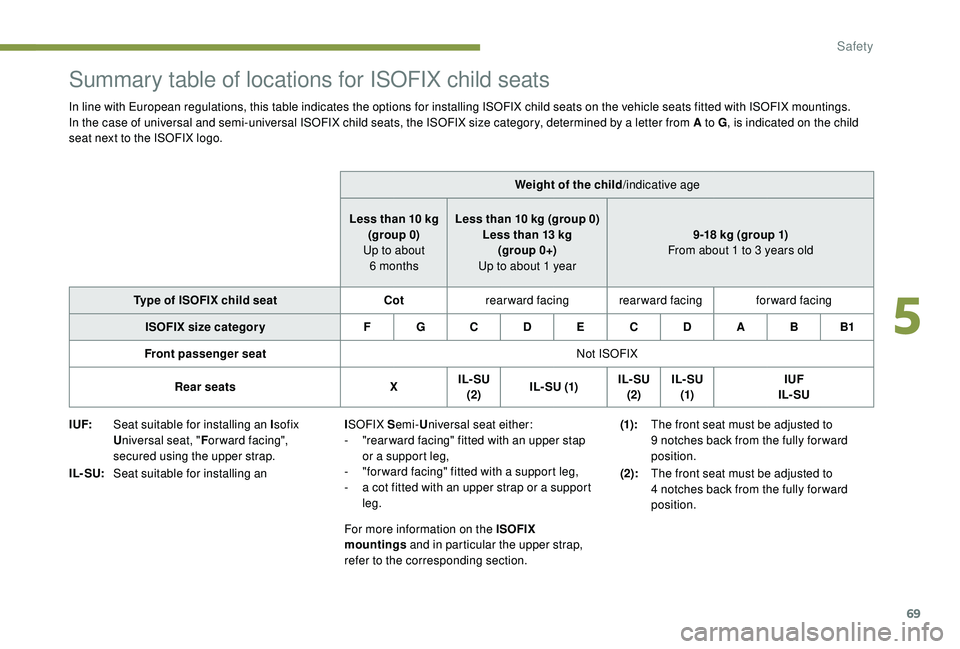
Summary table of locations for ISOFIX child seats
In line with European regulations, this table indicates the options for installing ISOFIX child seats on the vehicle seats fitted with ISOFIX mountings.
In the case of universal and semi-universal ISOFIX child seats, the ISOFIX size category, determined by a letter from A to G, is indicated on the child
seat next to the ISOFIX logo.
Weight of the child/indicative age
Less than 10
kg
(group 0)
Up to about 6
monthsLess than 10
kg (group 0)
Less than 13
kg
(group 0+)
Up to about 1
year9-18
kg (group 1)
From about 1
to 3 years old
Type of ISOFIX child seat Cotrearward facing rearward facing forward facing
ISOFIX size categor y F G C D E C D A B B1
Front passenger seat Not ISOFIX
Rear seats XIL- SU
(2) I L- SU (1) IL- SU
(2) IL- SU
(1) IUF
IL- SU
I UF: Seat suitable for installing an I sofix
U niversal seat, " For ward facing",
secured using the upper strap.
IL- SU: Seat suitable for installing an I
SOFIX S emi-Universal seat either:
-
"
rear ward facing" fitted with an upper stap
or a
support leg,
-
"
for ward facing" fitted with a support leg,
-
a c
ot fitted with an upper strap or a support
leg.
For more information on the ISOFIX
mountings and in particular the upper strap,
refer to the corresponding section. (1):
The front seat must be adjusted to
9
notches back from the fully for ward
position.
(2): The front seat must be adjusted to
4
notches back from the fully for ward
position.
5
Safety
Page 72 of 180
70
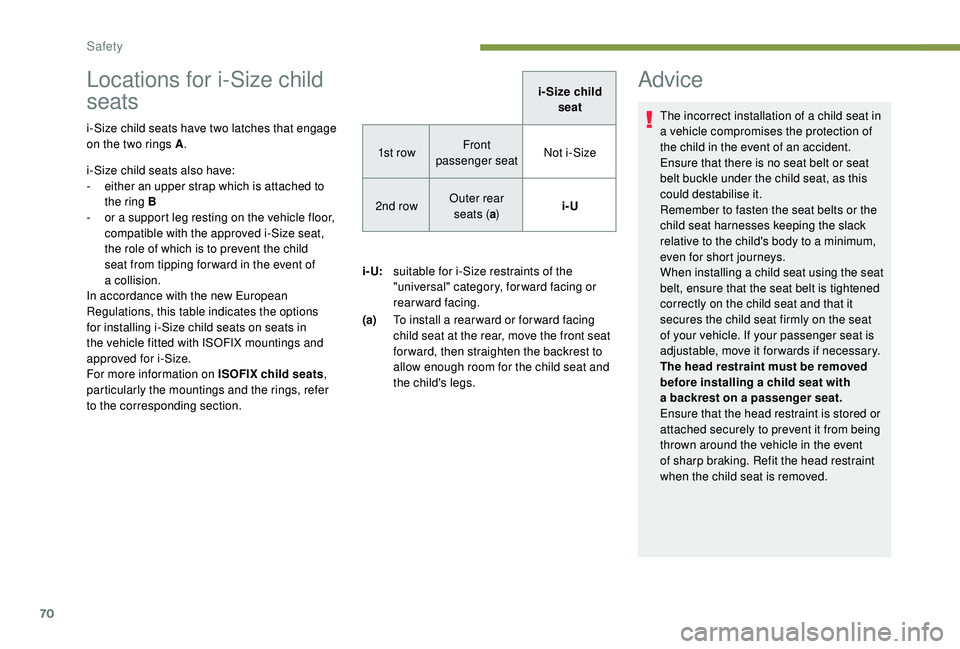
Locations for i-Size child
seats
i-Size child seats have two latches that engage
on the two rings A.
i-Size child seats also have:
-
e
ither an upper strap which is attached to
the ring B
-
o
r a support leg resting on the vehicle floor,
compatible with the approved i-Size seat,
the role of which is to prevent the child
seat from tipping for ward in the event of
a
collision.
In accordance with the new European
Regulations, this table indicates the options
for installing i-Size child seats on seats in
the vehicle fitted with ISOFIX mountings and
approved for i-Size.
For more information on ISOFIX child seats ,
particularly the mountings and the rings, refer
to the corresponding section. i-Size child
seat
1st row Front
passenger seat Not i-Size
2nd row Outer rear
seats ( a) i-U
i- U: suitable for i-Size restraints of the
"universal" category, forward facing or
rearward facing.
(a) To install a
rearward or forward facing
child seat at the rear, move the front seat
for ward, then straighten the backrest to
allow enough room for the child seat and
the child's legs.
Advice
The incorrect installation of a child seat in
a vehicle compromises the protection of
the child in the event of an accident.
Ensure that there is no seat belt or seat
belt buckle under the child seat, as this
could destabilise it.
Remember to fasten the seat belts or the
child seat harnesses keeping the slack
relative to the child's body to a
minimum,
even for short journeys.
When installing a
child seat using the seat
belt, ensure that the seat belt is tightened
correctly on the child seat and that it
secures the child seat firmly on the seat
of your vehicle. If your passenger seat is
adjustable, move it forwards if necessary.
The head restraint must be removed
before installing a
child seat with
a
backrest on a passenger seat.
Ensure that the head restraint is stored or
attached securely to prevent it from being
thrown around the vehicle in the event
of sharp braking. Refit the head restraint
when the child seat is removed.
Safety
Page 88 of 180

86
Temporarily exceeding the
speed setting
F Press firmly on the accelerator pedal,
going beyond the point of resistance, to
exceed the programmed speed limit.
The speed limiter is deactivated temporarily
and the displayed programmed speed flashes.
An audible signal accompanies the
flashing of the programmed speed when
exceeding the speed is not due to an
action by the driver (steep hill…).
As soon as the vehicle's speed returns to the
programmed value, the limiter operates again:
the display of the programmed speed becomes
steady again.
Switching off
F Press the end of the control: the display of information on the speed limiter disappears.
Operating fault
If this warning lamp comes on in
the instrument panel it signals
a
malfunction of the limiter. Have it checked by a
PEUGEOT dealer or
a
qualified workshop.
The use of mats not approved by
PEUGEOT may inter fere with the
operation of the speed limiter.
To avoid any risk of jamming of the pedals:
-
e
nsure that mats are secured correctly,
-
n
ever place one mat on top of another.
Active City Brake
Active City Brake is a driving assistance
s ystem that aims to avoid a frontal collision or
to reduce the speed of an impact if the driver
does not react or reacts too late (brake applied
too late).
This system has been designed to improve driving
safety.
It remains the driver's responsibility to continuously
monitor the state of the traffic and to assess the
distances and relative speeds of other vehicles.
Active City Brake cannot in any circumstances
replace the need for vigilance on the part of the
driver.
Never look at the laser sensor through
an optical instrument (magnifying glass,
microscope…) at a
distance of less than
10
centimetres: risk of eye injury.
Principle
Using a laser sensor and a camera located at
t he top of the windscreen, this system detects
a
vehicle moving in the same direction or
stationary ahead of your vehicle.
When necessary, the vehicle's braking system
is operated automatically to reduce the speed
of impact or to help avoid a
collision with the
vehicle ahead.
Automatic braking occurs later than if
done by the driver, so as to inter vene only
when there is a
high risk of collision.
Driving
Page 106 of 180
104
Temporary puncture
repair kit
Scan the QR code on page 3 to view
e xplanatory videos.
Comprising a
compressor and a sealant
cartridge, it allows the temporary repair of
a
tyre so that you can drive to the nearest
garage.
It is designed to repair most punctures which
could affect the tyre, located on the tyre tread
or shoulder.
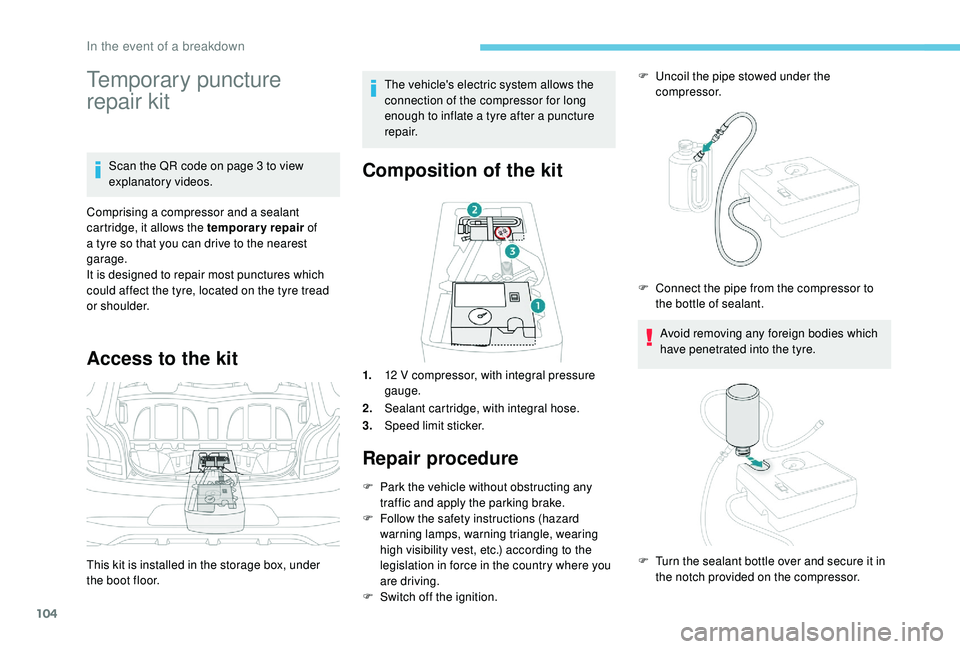
Access to the kit
This kit is installed in the storage box, under
the boot floor. The vehicle's electric system allows the
connection of the compressor for long
enough to inflate a
tyre after a puncture
repair.
Composition of the kit
1. 12 V compressor, with integral pressure
gauge.
2. Sealant cartridge, with integral hose.
3. Speed limit sticker.
Repair procedure
F Park the vehicle without obstructing any
traffic and apply the parking brake.
F
F
ollow the safety instructions (hazard
warning lamps, warning triangle, wearing
high visibility vest, etc.) according to the
legislation in force in the country where you
are driving.
F
S
witch off the ignition. F
U
ncoil the pipe stowed under the
compressor.
Avoid removing any foreign bodies which
have penetrated into the tyre.
F
C
onnect the pipe from the compressor to
the bottle of sealant.
F
T
urn the sealant bottle over and secure it in
the notch provided on the compressor.
In the event of a breakdown