2018 PEUGEOT 108 ECU
[x] Cancel search: ECUPage 25 of 180

23
If you find that a door is not properly
c losed after locking, close it again and
then relock the vehicle.
Unlocking
F Press this button to unlock the vehicle.
The direction indicators flash twice.
Locating your vehicle
F Press this button to locate your locked vehicle in a car park.
This is signalled by the lighting up of the
direction indicators for a
few seconds.
Changing the remote
control battery
Battery type: CR 2016/3 volts.
F U nclip the cover by inserting a small
screwdriver in the slot.
F
R
emove the cover.
F
R
emove the dead battery from its
compartment.
F
F
it the new battery into its compartment
observing the original fitting direction.
F
C
lip the cover into place.Do not throw remote control batteries
away, they contain metals which are
harmful to the environment.
Take them to a
PEUGEOT dealer or to
any other approved collection point.
" Keyless Entry and
Starting" system
System that allows the unlocking, locking
and starting of the vehicle while keeping the
electronic key on your person.
Electronic key
For security, the detection zones in which
the electronic key is operational have
a
radius of about 70 cm around each
opening button.
This electronic key can also be used as
a
remote control.
It includes a built-in emergency key.
For more information on the remote control ,
refer to the corresponding section.
2
Access
Page 31 of 180
29
Quarter windows
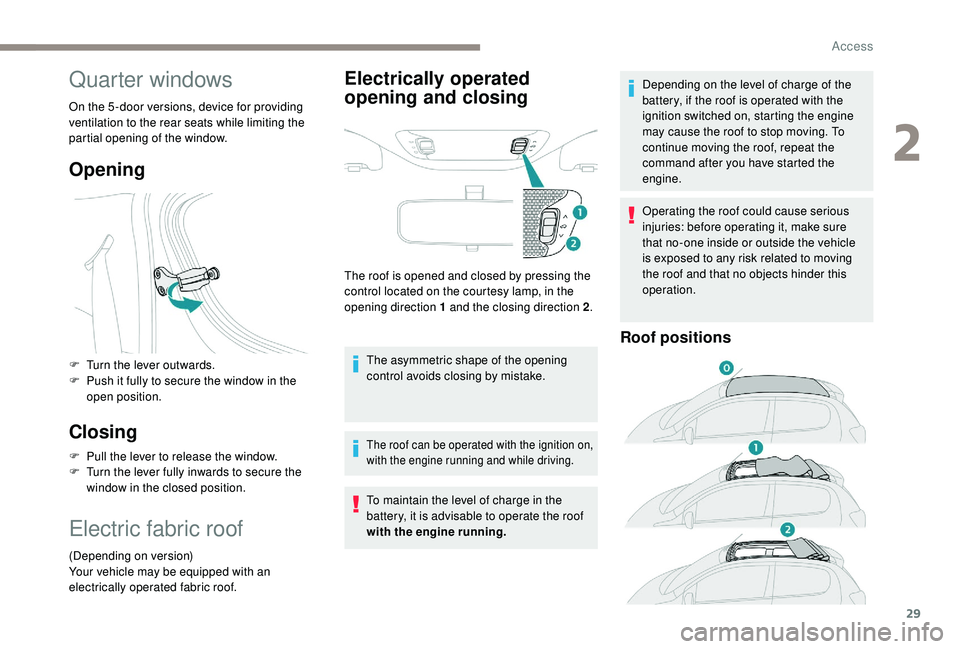
On the 5 -door versions, device for providing
ventilation to the rear seats while limiting the
partial opening of the window.
Opening
F Turn the lever outwards.
F P ush it fully to secure the window in the
open position.
Closing
F Pull the lever to release the window.
F T urn the lever fully inwards to secure the
window in the closed position.
Electric fabric roof
(Depending on version)
Your vehicle may be equipped with an
electrically operated fabric roof.
Electrically operated
opening and closing
The roof is opened and closed by pressing the
control located on the courtesy lamp, in the
opening direction 1
and the closing direction 2.
The asymmetric shape of the opening
control avoids closing by mistake.
The roof can be operated with the ignition on,
with the engine running and while driving.
To maintain the level of charge in the
battery, it is advisable to operate the roof
with the engine running. Depending on the level of charge of the
battery, if the roof is operated with the
ignition switched on, starting the engine
may cause the roof to stop moving. To
continue moving the roof, repeat the
command after you have started the
engine.
Operating the roof could cause serious
injuries: before operating it, make sure
that no-one inside or outside the vehicle
is exposed to any risk related to moving
the roof and that no objects hinder this
operation.
Roof positions
2
Access
Page 46 of 180
44
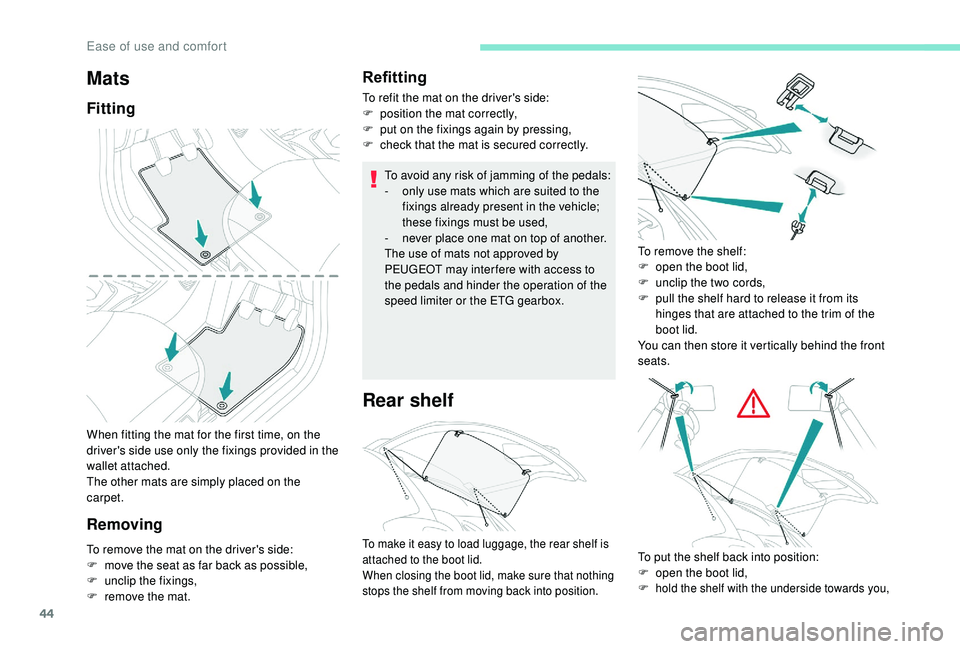
When fitting the mat for the first time, on the
driver's side use only the fixings provided in the
wallet attached.
The other mats are simply placed on the
carpet.
RemovingRefitting
To refit the mat on the driver's side:
F
p osition the mat correctly,
F
p
ut on the fixings again by pressing,
F
c
heck that the mat is secured correctly.
To avoid any risk of jamming of the pedals:
-
o
nly use mats which are suited to the
fixings already present in the vehicle;
these fixings must be used,
-
n
ever place one mat on top of another.
The use of mats not approved by
PEUGEOT may inter fere with access to
the pedals and hinder the operation of the
speed limiter or the ETG gearbox.
Rear shelf
Mats
Fitting
To remove the mat on the driver's side:
F
m ove the seat as far back as possible,
F
un
clip the fixings,
F
r
emove the mat. To remove the shelf:
F
o
pen the boot lid,
F
u
nclip the two cords,
F
p
ull the shelf hard to release it from its
hinges that are attached to the trim of the
boot lid.
You can then store it vertically behind the front
seats.To make it easy to load luggage, the rear shelf is
attached to the boot lid.
When closing the boot lid, make sure that nothing
stops the shelf from moving back into position.To put the shelf back into position:
F o pen the boot lid,
F
hold the shelf with the underside towards you,
Ease of use and comfort
Page 47 of 180
45
Do not place heavy objects on the shelf,
this may cause it to become unclipped.
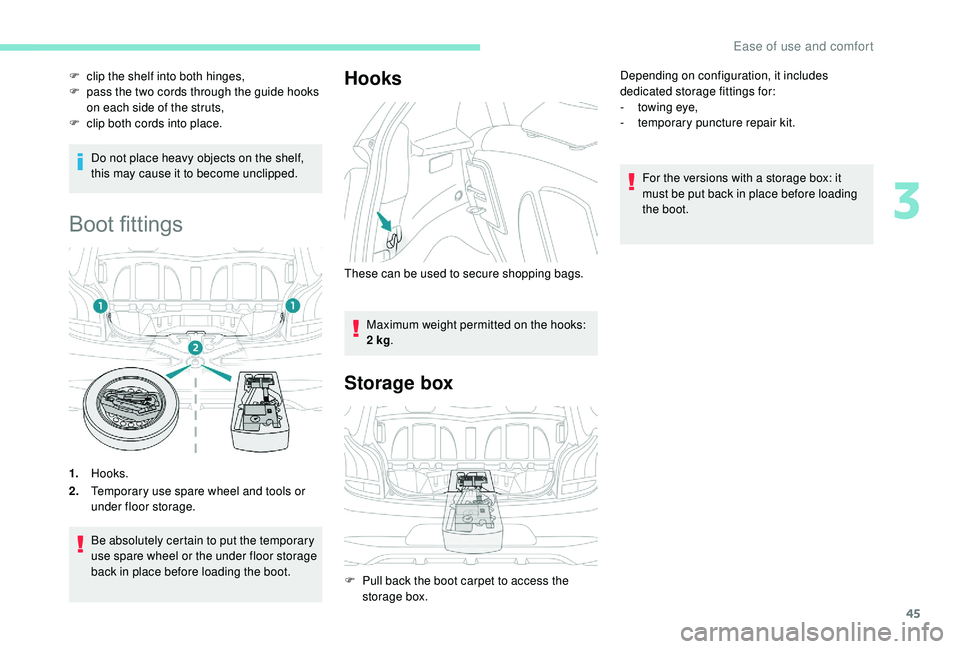
Boot fittings
1.Hooks.
2. Temporary use spare wheel and tools or
under floor storage.
Be absolutely certain to put the temporary
use spare wheel or the under floor storage
back in place before loading the boot.
Hooks
Maximum weight permitted on the hooks:
2
kg .
Storage box
Depending on configuration, it includes
dedicated storage fittings for:
-
t
owing eye,
-
t
emporary puncture repair kit.
For the versions with a
storage box: it
must be put back in place before loading
the boot.
F
c
lip the shelf into both hinges,
F
p
ass the two cords through the guide hooks
on each side of the struts,
F
c
lip both cords into place.
These can be used to secure shopping bags.
F
P
ull back the boot carpet to access the
storage box.
3
Ease of use and comfort
Page 52 of 180
50
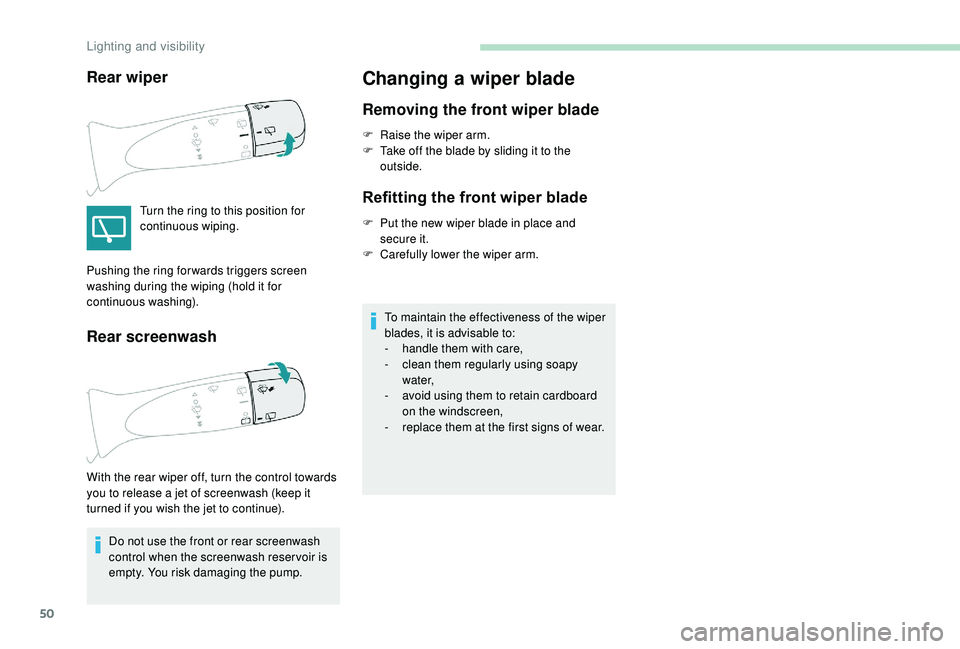
Rear wiper
Turn the ring to this position for
continuous wiping.
Rear screenwash
Do not use the front or rear screenwash
control when the screenwash reser voir is
empty. You risk damaging the pump.
Changing a wiper blade
Removing the front wiper blade
F Raise the wiper arm.
F T ake off the blade by sliding it to the
outside.
Refitting the front wiper blade
F Put the new wiper blade in place and secure it.
F
C
arefully lower the wiper arm.
To maintain the effectiveness of the wiper
blades, it is advisable to:
-
h
andle them with care,
-
c
lean them regularly using soapy
water,
-
a
void using them to retain cardboard
on the windscreen,
-
r
eplace them at the first signs of wear.
Pushing the ring for wards triggers screen
washing during the wiping (hold it for
continuous washing).
With the rear wiper off, turn the control towards
you to release a
jet of screenwash (keep it
turned if you wish the jet to continue).
Lighting and visibility
Page 58 of 180
56
Advice
In order to be effective, a seat belt must:
-
b
e tightened as close to the body as
possible,
-
b
e pulled in front of you with a smooth
movement, checking that it does not
twist,
-
b
e used to restrain only one person,
-
n
ot show any signs of cuts or fraying,
-
n
ot be converted or modified to avoid
affecting its performance.
In accordance with current safety
regulations, for all repairs on your
vehicle's seat belts, go to a
qualified
workshop with the skills and equipment
needed, which a
PEUGEOT dealer is able
to provide.
Have your seat belts checked regularly
by a
PEUGEOT dealer or a qualified
workshop, particularly if the straps show
signs of damage.
Clean the seat belt straps with soapy
water or a
textile cleaning product, sold by
PEUGEOT dealers.
After folding or moving a
seat or rear
bench seat, ensure that the seat belt is
positioned and reeled in correctly. Instructions for children
Use a
suitable child seat, if the passenger
is less than 12
years old or shorter than
one and a
half metres.
Never use the same seat belt to secure
more than one person.
Never allow a
child to travel on your lap.
For more information on Child seats , refer
to the corresponding section.
In case of impact
Depending on the nature and
seriousness of the impact , the
pyrotechnic system may be deployed
before and independent of the airbags.
Deployment of the pretensioners is
accompanied by a
slight discharge of
harmless smoke and a
noise, due to the
activation of the pyrotechnic cartridge
incorporated in the system.
In all cases, the airbag warning lamp is lit.
After an impact, get the seat belt system
checked and if necessary have it replaced
by a
PEUGEOT dealer or a qualified
workshop.Airbags
Designed to contribute to the safety of the
occupants in case of violent collisions. The
airbags supplement the action of the force-
limiting seat belts.
If a
collision occurs, the electronic detectors
record and analyse the front and side impacts
sustained in the impact detection zones:
-
I
n the event of violent impact, the
airbags are deployed instantly and help
better protect occupants of the vehicle;
immediately after the impact, the airbags
deflate rapidly in order not to hinder
the visibility or the possible exit of the
occupants.
-
I
n the event of a slight impact, an impact
at the rear of the vehicle and under certain
conditions of rollover, the airbags may not
deploy; only the seat belt helps to protect
you in these situations.
The airbags do not operate when the
ignition is switched off.
This equipment will only deploy once. If
a
second impact occurs (during the same
or a
subsequent accident), the airbag will
not be deployed again.
Safety
Page 61 of 180

59
Front airbags
Do not drive holding the steering wheel
by its spokes or resting your hands on the
centre part of the wheel.
Passengers must not place their feet on
the dashboard.
Do not smoke as deployment of the
airbags can cause burns or the risk of
injury from a cigarette or pipe.
Never remove or pierce the steering wheel
or hit it violently.
Do not fit or attach anything to the steering
wheel or dashboard, this could cause
injuries with deployment of the airbags.
Curtain airbags
Do not attach anything or hang anything to
the roof, as this could cause head injuries
when the curtain airbag is deployed.
If fitted to your vehicle, do not remove the
grab handles installed on the roof, they
play a
part in securing the curtain airbags. Lateral airbags
Use only approved covers on the seats,
compatible with the deployment of the
lateral airbags. For information on the
product range of seat covers suitable for
your vehicle, contact a
PEUGEOT dealer.
Do not attach anything to or hang anything
from the seat backrests (clothes, etc.) as
this could cause injuries to the thorax or
arm when the lateral airbag is deployed.
Do not sit with the upper part of the body
any nearer to the door than necessary.
General points relating to
child seats
The regulations on carrying children are
specific to each country. Refer to the
legislation in force in your country. -
S
tatistically, the safest seats in your
vehicle for carr ying children are the rear
seats.
-
A c
hild weighing less than 9 kg must
travel in the rear ward-facing position
both in the front and in the rear.
It is recommended that children travel on
the rear seats of your vehicle:
- "
rearward facing " up to the age of 3,
- "
forward facing " over the age of 3.
Ensure that the seat belt is positioned and
tightened correctly.
For child seats with a support leg, ensure
that the latter is in firm and steady contact
with the floor.
In the front: if necessary, adjust the
passenger seat.
At the rear: if necessary, adjust the
relevant front seat.
For maximum safety, please obser ve the
following recommendations:
-
I
n accordance with European regulations,
all children under the age of 12
or less
than one and a
half metres tall must
travel in approved child seats suited to
their weight , on seats fitted with a
seat belt
or ISOFIX mountings.
5
Safety
Page 66 of 180
64
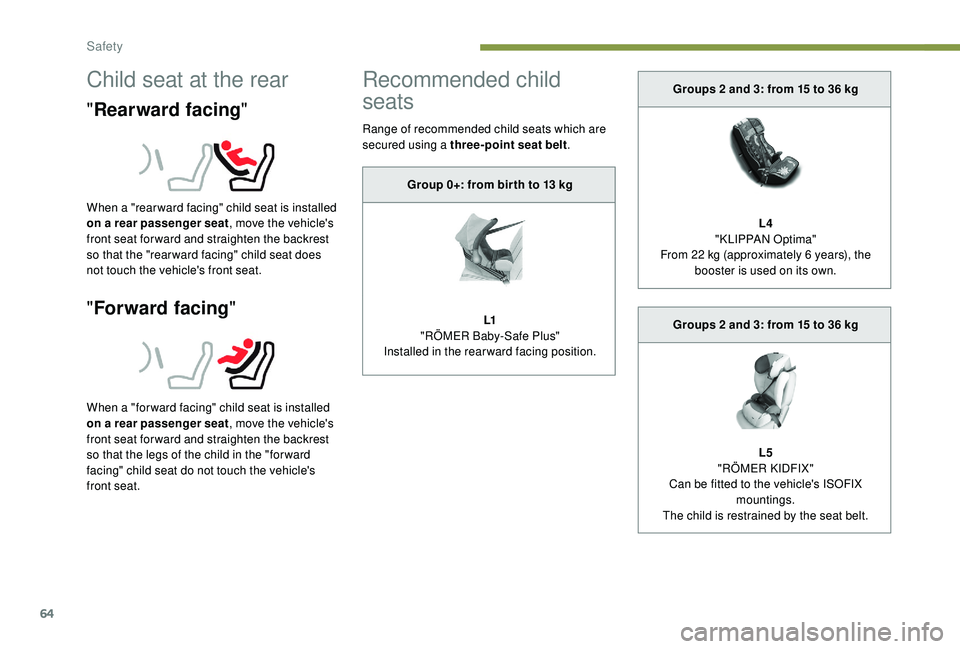
Child seat at the rear
"Rearward facing "
When a "rear ward facing" child seat is installed
on a
rear passenger seat , move the vehicle's
front seat for ward and straighten the backrest
so that the "rear ward facing" child seat does
not touch the vehicle's front seat.
" Forward facing "
When a "for ward facing" child seat is installed
on a
rear passenger seat , move the vehicle's
front seat for ward and straighten the backrest
so that the legs of the child in the "for ward
facing" child seat do not touch the vehicle's
front seat.
Recommended child
seats
Range of recommended child seats which are
secured using a three-point seat belt .
Group 0+: from bir th to 13
kg
L1
"RÖMER Baby-Safe Plus"
Installed in the rearward facing position. Groups 2
and 3: from 15 to 36 kg
L4
"KLIPPAN Optima"
From 22
kg (approximately 6 years), the
booster is used on its own.
Groups 2
and 3: from 15 to 36 kg
L5
"RÖMER KIDFIX"
Can be fitted to the vehicle's ISOFIX mountings.
The child is restrained by the seat belt.
Safety