2018 MERCEDES-BENZ S-CLASS SEDAN lock
[x] Cancel search: lockPage 385 of 562

#Follow the instructions in the service
inter val display rega rding the oil
ch ange.
* NO
TEDama gecaused bytopping up too
much engine oil
Ad ding too much engine oil can cause dam‐
age tothe engine or the catalytic con verter.
#Ha ve excess engine oil remo ved at a
qu alified specialist workshop.
#Tu rn cap 1counter-clockwise and remo ve
it.
#Ad d engine oil.
#Replace cap 1and turn it clockwise as far
as it will go.
#Check the oil le vel again (→page 381).
Checking coolant le vel
&
WARNING Risk of burn s from hot com‐
ponent parts in the engine compartment
Cer tain component parts in the engine com‐
partment can be very hot, e.g. the engine,
th e cooler and parts of theex haust sy stem.
#Let the engine cool down and only
to uch the component parts described
as follo ws .
&
WARNING Danger of burn s from hot
coolant
The engine cooling sy stem is pressurized,
particularly when the engine is warm. If you
open the cap, you could be scalded byhot
coolant spr aying out.
#Let the mo tor cool down before opening
th e cap.
#When opening the cap, wearglove s and
pr otective eyew ear.
#Slowly turn the cap half a turn toallow
pressure toescape.
Maintenance and care 383
Page 386 of 562

#Park theve hicle on a flat sur face.
#Check the coolant temp erature display in the
instrument clus ter.
The coolant temp erature must be below
15 8 °F (70 °C).
#Slowly turn cap 1counter-clockwise to
re lie ve ove rpressure.
#Continue turning cap 1counter-clockwise
and remo veit.
The coolant le vel is cor rect:
RIfth e engine is cold, up tomar ker bar 2
RIfth e engine is warm, up to0.6 in (1.5 cm)
ove r mar ker bar 2
#If necessar y,add coolant that has been
appr ovedby Mercedes-Benz.
RFurther information on coolant (→page 451)
Ad ding washer fluid tothe windshield
wa sher sy stem
&
WARNING Risk of burn s from hot com‐
ponent parts in the engine compartment
Cer tain component parts in the engine com‐
partment can be very hot, e.g. the engine,
th e cooler and parts of theex haust sy stem.
#Let the engine cool down and only
to uch the component parts described
as follo ws .
&
WARNING Danger of burn s when open‐
ing the hood
If yo u open the hood when the engine has
ove rheated or during a fire inthe engine
compartment, you could come into contact
with hot gases or other escaping operating
fl uids.
#Before opening the hood, allow the
engine tocool down.
#Intheeve nt of a fire inthe engine com‐
partment, keep the hood closed and
call thefire service.
&
WARNING ‑ Risk of fire and injury from
windshield washer concentrate
Wi ndshield washer concentrate is highly
fl ammable. It could ignite if it comes into
con tact wi thhot engine component parts or
th eex haust sy stem.
#Make sure that no windshield washer
concentrate spills out next tothefiller
opening.
384 Maintenance and care
Page 401 of 562
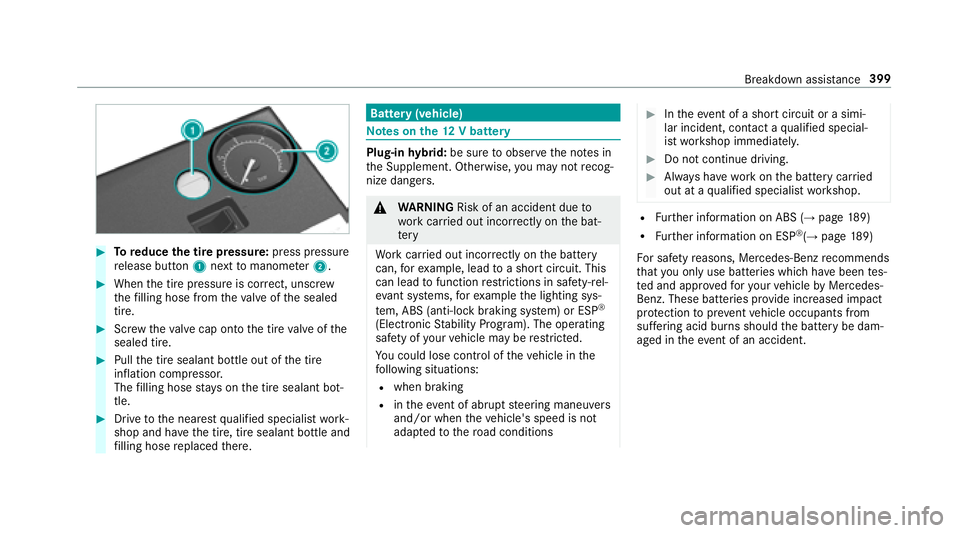
#Toreduce the tire pressure: press pressure
re lease button 1next tomanome ter2.
#When the tire pressure is cor rect, unscr ew
th efilling hose from theva lve of the sealed
tire.
#Scr ew theva lve cap onto the tire valve of the
sealed tire.
#Pull the tire sealant bottle out of the tire
inflation compressor.
The filling hose stay s on the tire sealant bot‐
tle.
#Drive tothe nearest qualified specialist work‐
shop and ha vethe tire, tire sealant bottle and
fi lling hose replaced there.
Bat tery (vehicle)
Note s onthe12 V battery
Plug-in hybrid: be sure toobser vethe no tes in
th e Supplement. Otherwise, you may not recog‐
nize dangers.
& WARNING Risk of an accident due to
wo rkcar ried out incor rectly on the bat‐
te ry
Wo rkcar ried out incor rectly on the battery
can, forex ample, lead toa short circuit. This
can lead tofunction restrictions in saf ety-re l‐
eva nt sy stems, forex ample the lighting sys‐
te m, ABS (anti-lock braking system) or ESP
®
(Elect ronic Stability Program). The operating
saf etyof your vehicle may be restricted.
Yo u could lose cont rol of theve hicle in the
fo llowing situations:
Rwhen braking
Rin theeve nt of ab rupt steering maneuvers
and/or when theve hicle's speed is not
adap tedto thero ad conditions
#In theeve nt of a short circuit or a simi‐
lar incident, contact a qualified special‐
ist workshop immediately.
#Do not continue driving.
#Alw ays ha vewo rkon the battery car ried
out at a qualified specialist workshop.
RFu rther information on ABS (→page 189)
RFurther information on ESP®(→page 189)
Fo r saf etyre asons, Mercedes-Benz recommends
th at you only use batte ries which ha vebeen tes‐
te d and appr ovedfo ryo ur vehicle byMercedes-
Benz. These batteries pr ovide inc reased impact
pr otection toprev ent vehicle occupants from
suf fering acid bu rns should the battery be dam‐
aged in theeve nt of an accident.
Breakdown assist ance399
Page 405 of 562
is connectedto the battery/jump-s tart con‐
nection point.
RThe jumper cable/charg ing cable must not
come into con tact wi thany parts which may
mo vewhen the engine is running.
RAlw ays make sure that nei ther you nor the
battery is elect rostatically charge d.
RKe ep away from fire and open flames.
RDo not lean overth e batter y.
RWhencharging: only use battery charge rs
te sted and appr ovedby Mercedes-Benz, and
please read the battery charge r's operating
instructions before charging the batter y.
Obser vethe additional following points during
st arting assis tance:
RSt arting assis tance may only be pr ovided
using batteries with a nominal voltage of 12
V.
RThe vehicles must not touch.
RGa soline engine: Onlyaccept starting assis‐
ta nce if the engine and exhaust sy stem are
cold.
#Secure theve hicle byapplying the electric
parking brake.
#Au tomatic transmission: Shiftthe trans‐
mission toposition B.
#Make sure that the ignition and all electrical
consumers are switched off.
#Open the hood.
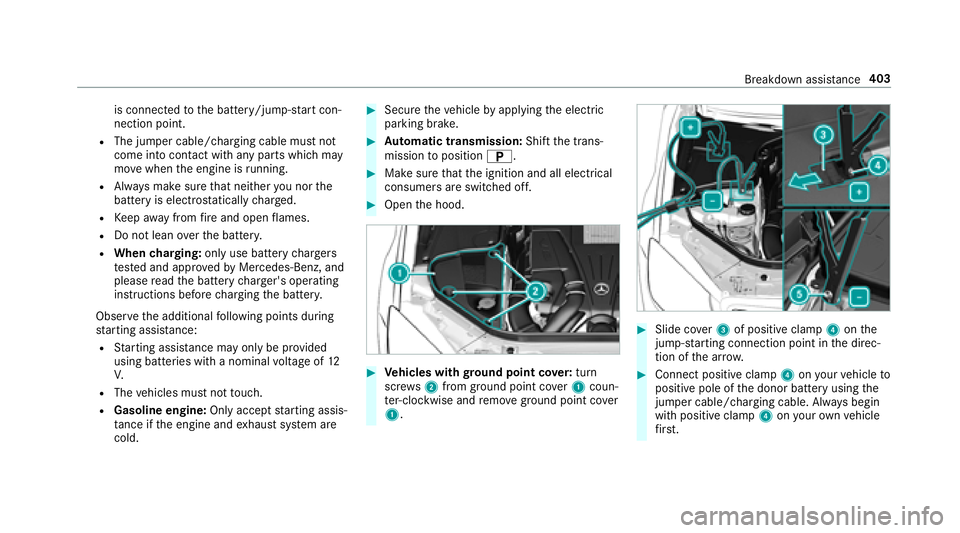
#Ve hicles with ground point co ver:tur n
sc rews 2 from ground point co ver1 coun‐
te r-clockwise and remo veground point co ver
1.
#Slide co ver3 of positive clamp 4onthe
jump-s tarting connection point in the direc‐
tion of the ar row.
#Connect positive clamp 4onyour vehicle to
positive pole of the donor battery using the
jumper cable/charging cable. Alw ays begin
with positive clamp 4onyour ow nve hicle
fi rs t.
Breakdown assist ance403
Page 406 of 562
#Duringthest arting assist ance proce‐
dure: start the engine of the donor vehicle
and run at idle speed.
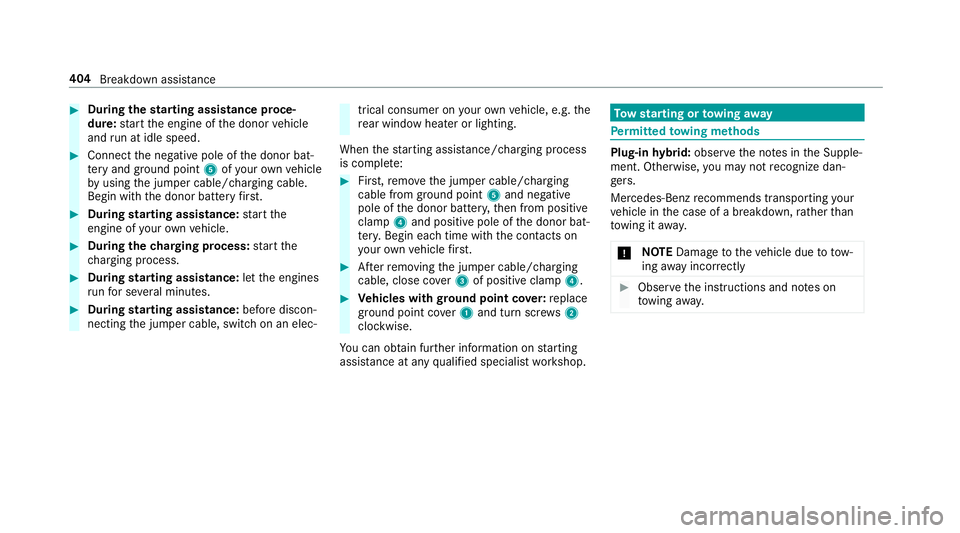
#Connect the negative pole of the donor bat‐
te ry and ground po int5 ofyour ow nve hicle
by using the jumper cable/charging cable.
Begin with the donor battery firs t.
#Du ring starting assist ance:start the
engine of your ow nve hicle.
#During thech arging process: start the
ch arging process.
#During starting assist ance:letthe engines
ru nfo r se veral minutes.
#During starting assist ance:before discon‐
necting the jumper cable, switch on an elec‐
trical consumer on your ow nve hicle, e.g. the
re ar wind owheater or lighting.
When thest arting assis tance/charging process
is compl ete:
#Fir st,re mo vethe jumper cable/charging
cable from ground point 5and negative
pole of the donor batter y,then from positive
clamp 4and positive pole of the donor bat‐
te ry. Begin each time with the conta cts on
yo ur ow nve hicle firs t.
#Af terre moving the jumper cable/charging
cable, close co ver3 of positive clamp 4.
#Vehicles with ground point co ver:replace
ground point co ver1 and turn scr ews2
clockwise.
Yo u can obtain fur ther information on starting
assis tance at any qualified specialist workshop.
To w starting or towing away
Perm itted towing me thods
Plug-in hybrid: obser vethe no tes in the Supple‐
ment. Otherwise, you may not recognize dan‐
ge rs.
Mercedes-Benz recommends transporting your
ve hicle in the case of a breakdown, rath er than
to wing it away.
* NO
TEDama getotheve hicle due to tow‐
ing away incor rectly
#Obser vethe instructions and no tes on
to wing away.
404
Breakdown assis tance
Page 408 of 562

#Atowing speed of 30 mph (50 km/h)
must not be exceeded.
#Atowing dis tance of 30 miles (50 km)
must not be exceeded.
&
WARNING Risk of accident when towing
a ve hicle which is too heavy
If th eve hicle being tow- star ted or towe d
aw ay is heavier than the permissible gross
mass of your vehicle, thefo llowing situations
can occur:
RThe towing eye may become de tach ed.
RThe vehicle/trailer combination may
swer veoreve nov erturn.
#If ano ther vehicle is tow- star ted or
to we daw ay, its weight must not exceed
th e permissible gross mass of your ow n
ve hicle.
If a vehicle must be tow- star ted or towe daw ay,
its weight must not exceed the permissible gross
mass of theto wing vehicle.
#Information on the permissible gross mass of
th eve hicle can be found on theve hicle iden‐
tification plate (
→page 445).
#Do not open the driver's door or front
passenger door, otherwise the automatic
transmission automatically shifts toposition
j.
#Ins tallth eto wing eye (→page 409).
#Attach theto w bar.
* NO
TEDama gedue toincor rect connec‐
tion
#Only connect theto w rope or tow bar to
th eto wing eyes.
#Deactivate the automatic locking mechanism
(→page 64).
#Do not activate the HOLD function.
#Deactivate Active Brake Assi st(→page 196).
#Shift the automatic transmission toposition
i.
#Re lease the electric parking brake.
&
WARNING Risk of accident due tolimi‐
te d saf ety-re lated functions during the
to wing process
Saf ety-re lated functions are limited or no lon‐
ge rav ailable in thefo llowing situations:
Rth e ignition is switched off.
Rthe brake sy stem or po werst eering sys‐
te m is malfunctioning.
Rth e energy supply or the on-board electri‐
cal sy stem is malfunctioning.
When your vehicle is then towe daw ay, signif‐
icantly more ef fort may be requ ired tosteer
and brake than is no rmally requ ired.
#Use a tow bar.
#Make sure that thesteering wheel can
mo vefreely, before towing theve hicle
aw ay.
406
Breakdown assis tance
Page 411 of 562
*NO
TEDama getothe driv etra in due to
incor rect positioning
#Do not position theve hicle abo vethe
connection point of the transport vehi‐
cle.
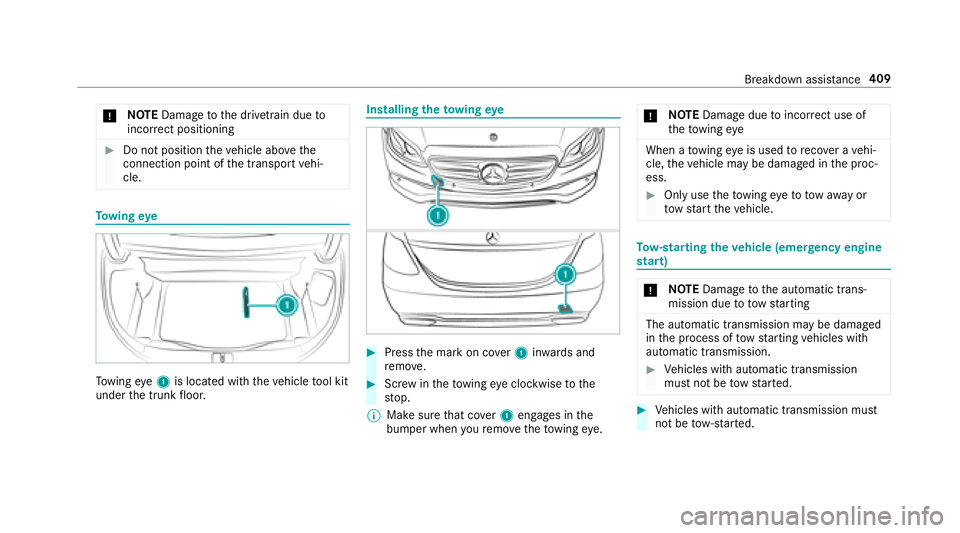
To wing eye
Towing eye1 is located with theve hicle tool kit
under the trunk floor.
Installing theto wing eye
#Press the mark on co ver1 inwa rds and
re mo ve.
#Scr ew intheto wing eyeclockwise tothe
st op.
% Make sure that co ver1 engages in the
bumper when youre mo vetheto wing eye. *
NO
TEDama gedue toincor rect use of
th eto wing eye
When a towing eye is used toreco ver a vehi‐
cle, theve hicle may be damaged in the proc‐
ess.
#Only use theto wing eyeto to waw ay or
to w start theve hicle.
To w- starting theve hicle (eme rgency engine
st art)
* NO
TEDama getothe automatic trans‐
mission due to towstarting
The automatic transmission may be damaged
in the process of tow starting vehicles with
automatic transmission.
#Ve hicles with automatic transmission
must not be tow star ted.
#Ve hicles with automatic transmission must
not be tow- star ted.
Breakdown assis tance 409
Page 439 of 562
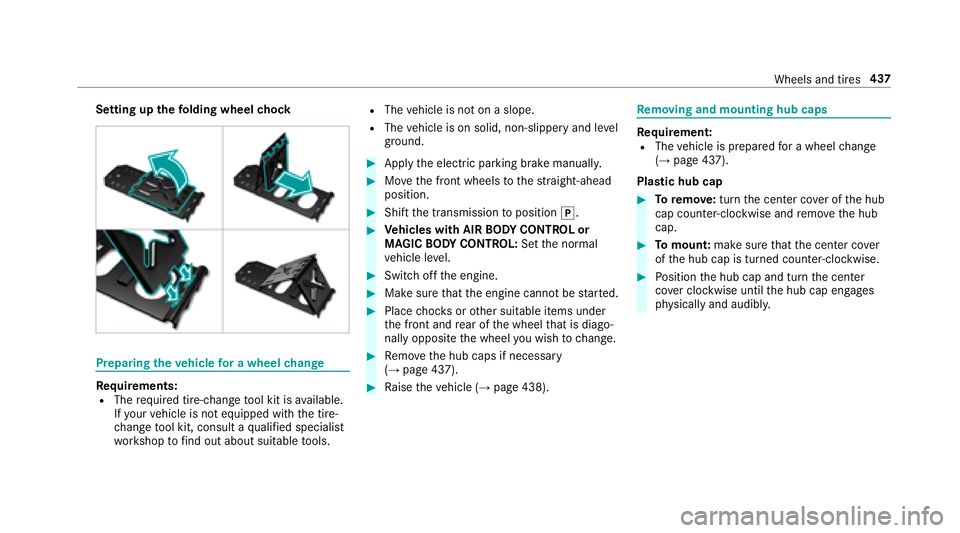
Setting upthefo lding wheel chock
Prepa ring theve hicle for a wheel change
Re quirements:RThe requ ired tire-change tool kit is available.
If yo ur vehicle is not equipped with the tire-
ch ange tool kit, consult a qualified specialist
wo rkshop tofind out about suitable tools.
RThe vehicle is not on a slope.
RThe vehicle is on solid, non-slippery and le vel
ground .
#Applythe electric parking brake manually.
#Mo vethe front wheels tothest ra ight-ahead
position.
#Shift the transmission toposition j.
#Vehicles with AIR BODY CONT ROL or
MAGIC BODY CONT ROL:Set the normal
ve hicle le vel.
#Swit choff the engine.
#Make sure that the engine cannot bestar ted.
#Place choc ks orother suitable items under
th e front and rear of the wheel that is diago‐
nally opposite the wheel youwish tochange.
#Re mo vethe hub caps if necessary
(→page 437).
#Ra ise theve hicle (→page 438).
Re moving and mounting hub caps
Requirement:RThe vehicle is prepared for a wheel change
(→page 437).
Plast ic hub cap
#Toremo ve:turn the center co ver of the hub
cap counter-clockwise and remo vethe hub
cap.
#To mount: makesurethat the center co ver
of the hub cap is turned counter-clockwise.
#Po sition the hub cap and turn the center
co ver clockwise until the hub cap engages
ph ysically and audibly.
Wheels and tires 437