Page 440 of 562

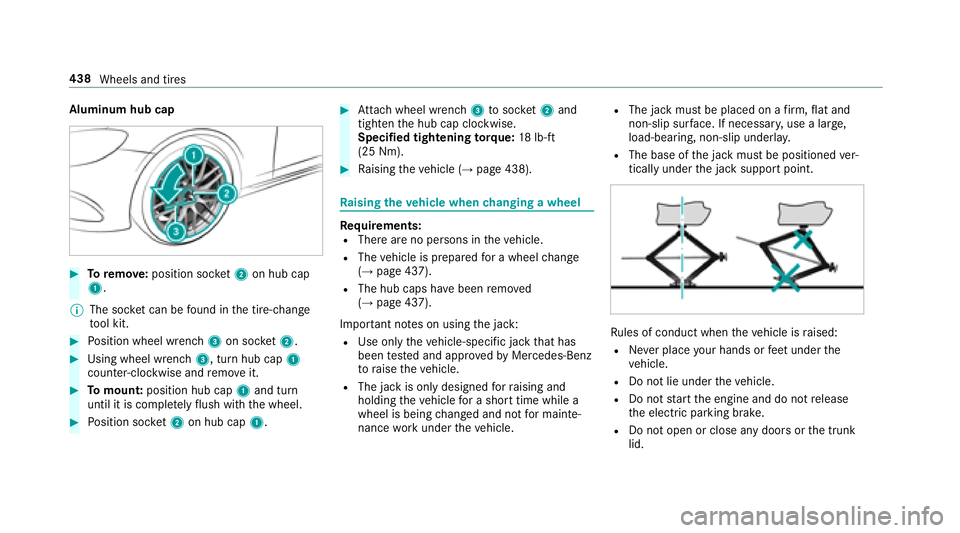
Aluminum hub cap
#Toremo ve:position soc ket2 on hub cap
1.
% The soc ket can be found inthe tire-change
to ol kit.
#Po sition wheel wrench 3on soc ket2.
#Using wheel wrench 3, turn hub cap1
counter-clo ckwise and remo veit.
#To mount: position hub cap 1and turn
until it is compl etely flush withth e wheel.
#Po sition soc ket2 on hub cap 1.
#Attach wheel wrench 3tosoc ket2 and
tighten the hub cap clockwise.
Specified tightening torq ue: 18lb-ft
(25 Nm).
#Ra ising theve hicle (→page 438).
Ra ising theve hicle when changing a wheel
Re quirements:RThere are no persons in theve hicle.
RThe vehicle is prepared for a wheel change
(→page 437).
RThe hub caps ha vebeen remo ved
(→page 437).
Impor tant no tes on using the jack:
RUse only theve hicle-specific jack that has
been tested and appr oved byMercedes-Benz
to raise theve hicle.
RThe jack is only designed forra ising and
holding theve hicle for a short time while a
wheel is being changed and not for mainte‐
nance workunder theve hicle.
RThe jack must be placed on a firm ,fl at and
non-slip sur face. If necessar y,use a lar ge,
load-bearing, non-slip underla y.
RThe base ofthe jack must be positioned ver‐
tically under the jack support point.
Ru les of conduct when theve hicle is raised:
RNe ver place your hands or feet under the
ve hicle.
RDo not lie under theve hicle.
RDo not start the engine and do not release
th e electric parking brake.
RDo not open or close any doors or the trunk
lid.
438 Wheels and tires
Page 442 of 562
#Position jack 2at jack support point 1.
#Turn box wrench 3clockwise until jack 2
sits comple tely on jack support point 1and
th e base of the jack lies evenly on the
ground .
#Continue toturn box wrench 3until the tire
is raised a maximum of 1.2 in (3 cm) off the
ground .
#Loosen andremo vethe wheel (→page 440).
Re moving a wheel
Requirement:RThe vehicle is raised (→page 438).
When changing a wheel, avoid applying any forc e
to the brake discs, since this could impair the
le ve l of com fort when braking.
* NO
TEDama getothre ading from dirt on
wheel bolts
#Do not place wheel bolts in sand or on
a dirty sur face.
#Un scr ew the uppermost wheel bolt com‐
ple tely.
#Scr ew centering pin 1instead of the wheel
bolt into theth re ading.
#Un scr ew there maining wheel bolts fully.
#Re mo vethe wheel.
#Mount the new wheel (→page 440).
Moun ting a new wheel
Requirement:RThe wheel is remo ved (→page 440).
44 0
Wheels and tires
Page 443 of 562

&WARNING Risk of accident from losing a
wheel
Oiled, greased or damaged wheel bolt/wheel
nut thre ads or wheel hub/wheel mounting
bolt thre ads can cause the wheel bolts/
wheel nuts tocome loose.
As a result, you could lose a wheel while driv‐
ing.
#Ne ver oil or grease theth re ads.
#In theeve nt of damage totheth re ads,
con tact a qualified specialist workshop
immediatel y.
#Have the damaged wheel bolts or dam‐
aged hub thre ads replaced.
#Do not continue driving.
#Obser vethe information on thech oice of
tires (→page 433).
Fo r tires with a specified direction of rotation, an
ar row onthe side wall of the tire indicates the
cor rect dire ction of rotation. Observ eth e direc‐
tion of rotation when ins talling.
#Slide the wheel tobe mounted onto the cen‐
te ring pin and push it on.
&
WARNING Risk of injury from tightening
wheel bolts and nuts
If yo u tighten the wheel bolts or wheel nuts
when theve hicle is raised, the jack could tip.
#Only tighten wheel bolts or wheel nuts
when theve hicle is on the ground.
#Fo r saf etyre asons, only use wheel bolts
which ha vebeen appr ovedfo r Mercedes-
Benz and the wheel in question.
* NO
TEDama getopaintwork of the wheel
ri m when scr ewing on thefirs t wheel bolt
If th e wheel has too much play when scr ew‐
ing in thefirs t wheel bolt, the wheel rim paint
can be dama ged.
#Press the wheel firm lyagainst the
wheel hub when scr ewing on thefirs t
wheel bolt.
#Ti ghten the wheel bolts until they are finger-
tight.
#Un scr ew the centering pin.
#Tighten the last wheel bolt until it is finger-
tight.
#Lo we rth eve hicle (→page 441).
Lo weri ngtheve hicle af ter a wheel change
Re quirements:RThe new wheel has been mounted
(→page 440).
#Plac eth era tchet wrench onto the he xagon
nut of the jack so that the letters "AB" are
visible.
#To lowe r the vehicle: turnthera tchet
wrench of the jack counter-clockwise.
Wheels and tires 44
1
Page 454 of 562

#Always use coolant appr ovedby
Mercedes-Benz.
#Obser vethe instructions in the
Mercedes-Benz Specifications for Oper‐
ating Fluids 310.1.
Ha ve the coolant regularly changed at a qualified
specialist workshop.
The proportion of cor rosion inhibitor/ antifreeze
concentrate in the engine cooling sy stem should
be:
RA minimum of 50% (antifreeze pr otection
down toappr oximately -35 °F (-37 °C)).
RA maximum of 55% (antifreeze pr otection
down to-49 °F (-45 °C)).
Coolant filling capacity
Seda nC apacity
S 450 4MATIC 13.9 US qt (13.2 l)
S 560 4MATIC 15.0 US qt (14.2 l)
Long wheelbase
vehicles Capacity
S 450 4MATIC
S 450 13
.9 US qt (13.2 l)
S 600 16.9 US qt (16.0 l)
All other models 15.0 US qt (14.2 l)
Mercedes‑Maybac hCapacity
S 650 Mercedes-May‐
bach 16
.9 US qt (16.0 l)
S 560 4MATIC
Mercedes-Maybach 15
.0 US qt (14.2 l)
Note s on windshield washer fluid
Obser vethe no tes on operating fluids
(→page 447).
&
WARNING ‑ Risk of fire and injury from
windshield washer concentrate
Wi ndshield washer concentrate is highly
fl ammable. It could ignite if it comes into
con tact wi thhot engine component parts or
th eex haust sy stem.
#Make sure that no windshield washer
concentrate spills out next tothefiller
opening.
* NO
TEBlocked spr aynozzles caused by
mixing windshield washer fluids
#Do not mix MB SummerFit and MB Win‐
te rFit with other windshield washer flu‐
ids.
Do not use distilled or de-ionized water asthefill
le ve l sensor may be triggered er roneously.
Re commended windshield washer fluid:
RAbo vefreezing point: e.g. MB SummerFit
RBelow freezing point: e.g. MB WinterFit
452
Tech nical da ta
Page 460 of 562
Safety sy stems
Display messages
Possible causes/consequences and MSolutions
!
÷
�,�Q�R�S�H�U�D�W�L�Y�H �6�H�H �2�S�H�U�D�W�R�U�
�V
�0�D�Q�X�D�O*
ABS and ESP
®are malfunctioning.
Other driving sy stems and driving saf etysy stems may also malfunction.
&
WARNING Risk of skidding if ABS and ESP®are malfunctioning
If ABS and ESP
®are malfunctioning, the wheels could lock when braking and ESP®cannot carryout vehicle
st abilization.
The steering capability and braking characteristics are thus se verely impaired .Th ebr aking dis tance in an emer‐
ge ncy braking situation can increase. In addition, other driving saf etysy stems are switched off.
#Drive on carefull y.
#Have ABS and ESP®checked immediately at a qualified specialist workshop.
#Drive on carefully.
#Visit a qualified specialist workshop immediatel y.
458
Display messages and warning/indicator lamps
Page 461 of 562

Displaymessages
Possible causes/consequences and MSolutions
!
÷
�&�X�U�U�H�Q�W�O�\ �8�Q�D�Y�D�L�O�D�E�O�H �6�H�H
�2�S�H�U�D�W�R�U�
�V �0�D�Q�X�D�O*
ABS and ESP
®are temp orarily una vailable.
Other driving sy stems and driving saf etysy stems may also malfunction.
&
WARNING Risk of skidding if ABS and ESP®are malfunctioning
If ABS and ESP
®are malfunctioning, the wheels could lock when braking and ESP®cannot carryout vehicle
st abilization.
The steering capability and braking characteristics are thus se verely impaired .Th ebr aking dis tance in an emer‐
ge ncy braking situation can increase. In addition, other driving saf etysy stems are switched off.
#Drive on carefull y.
#Have ABS and ESP®checked immediately at a qualified specialist workshop.
#Carefully drive on a suitable stre tch of road, making slight steering mo vements at a speed abo ve19 mp h
(30 km/h).
#If th e display message does not disappear, consult a qualified specialist workshop immediately. Drive carefully.
Display messages and warning/indicator lamps 459
Page 464 of 562
Displaymessages
Possible causes/consequences and MSolutions
T
!
÷
�,�Q�R�S�H�U�D�W�L�Y�H �6�H�H �2�S�H�U�D�W�R�U�
�V
�0�D�Q�X�D�O*
EBD, ABS and ESP
®are malfunctioning.
Other driving sy stems and driving saf etysy stems may also malfunction.
&
WARNING Risk of skidding if EBD, ABS and ESP®are malfunctioning
If EBD, ABS and ESP
®are malfunctioning, the wheels can lock when braking and ESP®cannot carryout vehicle
st abilization.
The steering capability and braking characteristics are thus se verely impaired .Th ebr aking dis tance in an emer‐
ge ncy braking situation can increase. In addition, other driving saf etysy stems are switched off.
#Drive on carefull y.
#Have the brake sy stem checked immediately at a qualified specialist workshop.
#Drive on carefully.
#Vi sit a qualified specialist workshop immediatel y.
462
Display messages and warning/indicator lamps
Page 493 of 562

Displaymessages
Possible causes/consequences and MSolutions
Â
�.�H�\ �1�R�W �'�H�W�H�F�W�H�G(red dis‐
play message) *T
he SmartK eycannot be de tected and may no longer be in theve hicle.
The SmartK eyis no longer in theve hicle and youswit choff the engine:RYo u can no longe rst art the engine.
Ryo u cannot centrally lock theve hicle
#Ensure that the SmartK eyis in theve hicle.
If th e SmartK eydetection function has a malfunction due toast ro ng radio signal source:
#Pull over and stop theve hicle safely as soon as possible, paying attention toroad and traf fic conditions.
#Place the SmartK eyinthestow age compartment forst arting the engine with the SmartK ey.
Â
�'�R�Q�
�W �)�R�U�J�H�W �<�R�X�U �.�H�\ *A
warning tone also sounds. This message reminds youto take your Sm artK eywith youwhen you lea vetheve hicle.
Â
�3�O�D�F�H �W�K�H �.�H�\ �L�Q �W�K�H
�0�D�U�N�H�G �6�S�D�F�H �6�H�H �2�S�H�U�D��
�W�R�U�
�V �0�D�Q�X�D�O *T
he SmartK eydetection function is malfunctioning.
#Change the location of the SmartK eyintheve hicle.
#Start theve hicle with the SmartK eyinthestow age compartment .
Display messages and warning/indicator lamps 491