2018 MERCEDES-BENZ S-CLASS SEDAN wiper blades
[x] Cancel search: wiper bladesPage 152 of 562
#3Å Intermittent wiping, frequent
#4° Continuous wiping, slow
#5¯ Continuous wiping, fast
Movingthe wiper arms toave rtical position
(service position)
& WARNING Risk of becoming trapped if
th e windshield wipers are switched on
while wiper blades are being replaced
If th e windshield wipers begin tomo vewhile
yo u are changing the wiper blades, you can
be trapped bythe wiper arm.
#Alw ays switch off the windshield wipers
and the ignition before changing the
wiper blades.
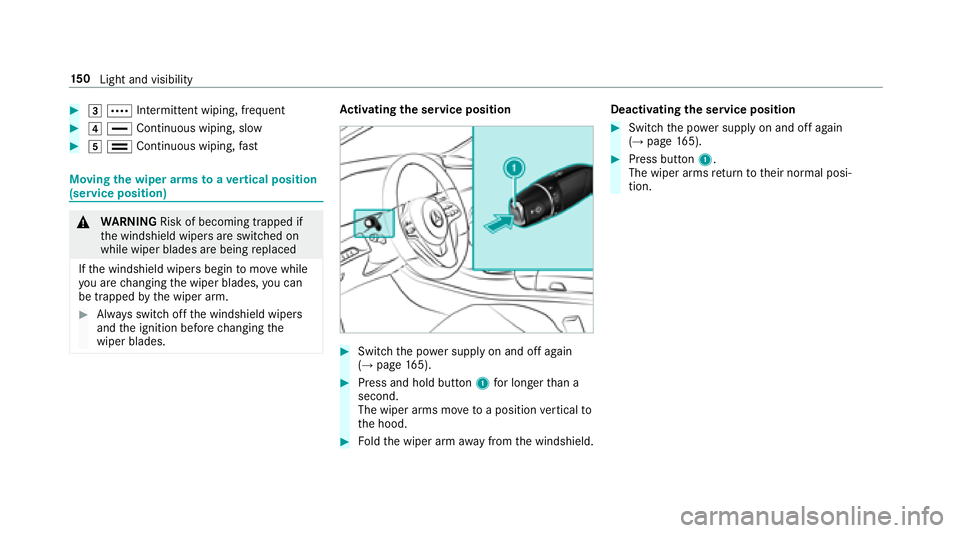
Ac tivating the se rvice position
#Swit chthe po wer supp lyon and off again
(→page 165).
#Press and hold button 1for longer than a
second.
The wiper arms mo vetoa position vertical to
th e hood.
#Fo ldthe wiper arm away from the windshield. Deactivating the service position
#Switch
the po wer supp lyon and off again
(→page 165).
#Press button 1.
The wiper arms return totheir normal posi‐
tion.
15 0
Light and visibility
Page 153 of 562
Changingthe windshield wiper blades
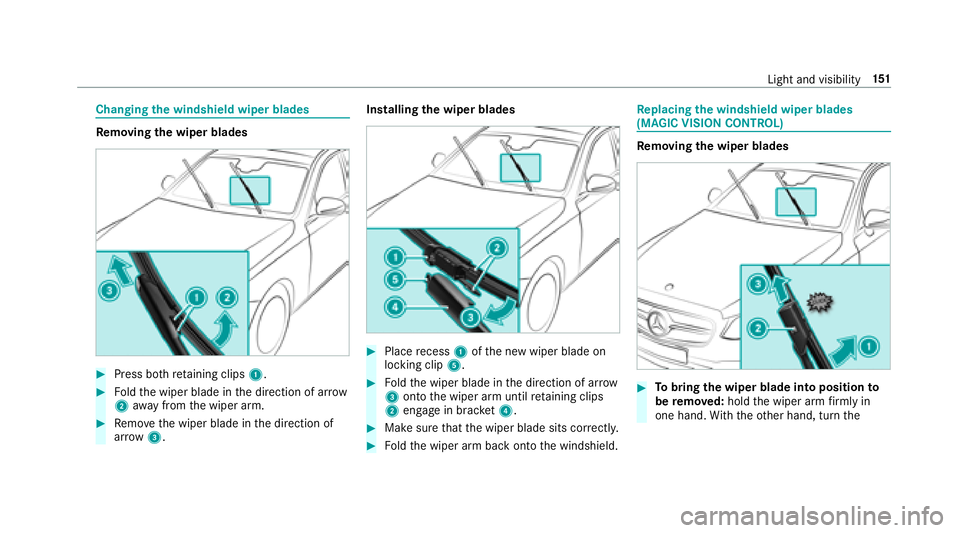
Re moving the wiper blades
#Press bo thretaining clips 1.
#Foldthe wiper blade in the direction of ar row
2 away from the wiper arm.
#Re mo vethe wiper blade in the direction of
ar row 3. Installing
the wiper blades
#Place recess 1ofthe new wiper blade on
locking clip 5.
#Foldthe wiper blade in the direction of ar row
3 onto the wiper arm until retaining clips
2 engage in brac ket4.
#Make surethat the wiper blade sits cor rectly.
#Fo ldthe wiper arm back onto the windshield.
Re placing the windshield wiper blades
(MAGIC VISION CONTROL)
Re moving the wiper blades
#To bring the wiper blade into position to
be remo ved: hold the wiper arm firm ly in
one hand .Wi th th eot her hand, turn the
Light and visibility 15
1
Page 154 of 562
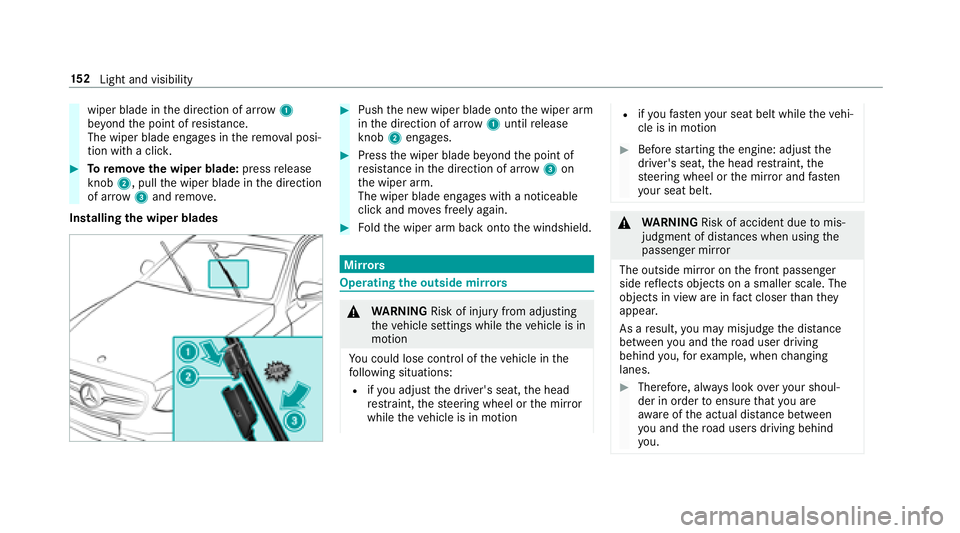
wiper blade inthe direction of ar row1
be yond the point of resis tance.
The wiper blade engages in there mo val posi‐
tion with a clic k.
#Toremo vethe wiper blade: pressrelease
knob 2, pull the wiper blade in the direction
of ar row3and remo ve.
Installing the wiper blades
#Push the new wiper blade onto the wiper arm
in the direction of ar row1untilre lease
knob 2engages.
#Press the wiper blade be yond the point of
re sis tance in the direction of ar row3on
th e wiper arm.
The wiper blade engages with a noticeable
click and mo ves freely again.
#Fo ldthe wiper arm back onto the windshield.
Mir rors
Operating the outside mir rors
&
WARNING Risk of injury from adjusting
th eve hicle settings while theve hicle is in
motion
Yo u could lose cont rol of theve hicle in the
fo llowing situations:
Rifyo u adjust the driver's seat, the head
re stra int, thesteering wheel or the mir ror
while theve hicle is in motion
Rifyo ufa sten your seat belt while theve hi‐
cle is in motion
#Before starting the engine: adjust the
driver's seat, the head restra int, the
st eering wheel or the mir ror and fasten
yo ur seat belt.
&
WARNING Risk of accident due tomis‐
judgment of dis tances when using the
passenger mir ror
The outside mir ror on the front passenger
side reflects objects on a smaller scale. The
objects in view are in fact closer than they
appear.
As a result, you may mis judgethe dis tance
between you and thero ad user driving
behind you, forex ample, when changing
lanes.
#Therefore, alw ays look over your shoul‐
der in order toensure that you are
aw are of the actual dis tance between
yo u and thero ad users driving behind
yo u.
15 2
Light and visibility
Page 391 of 562
Notes on care of vehicle parts
&
WARNING Risk of entrapment if the
windshield wipers are switch ed on while
th e windshield is being cleaned
If th e windshield wipers are set in motion
while you are cleaning the windshield or
wiper blades, you can betrapped bythe
wiper arm.
#Alw ays switch off the windshield wipers
and the ignition before cleaning the
windshield or wiper blades.
& WARNING Risk of burn s fromtailpipes
and tailpipe trim
The tailpipe and tailpipe trim can become
ve ry hot. If you come into contact withth ese
parts of theve hicle, you could burn yourself.
#Alw ays be particular lycareful around
th eta ilpipe and theta ilpipe trim.
#Allow theve hicle parts tocool down
before youto uch them.
Obser vethefo llowing information:
Information on cleaning and car eAvoiding vehicle damage
Wheels/rims Usewate r and acid-free wheel cleaners.
RDo not use acidic wheel cleaners toremo vebrake dust.
This could damage wheel bolts and brake components.
RTo avoid cor rosion of the brake discs and brake linings,
drive theve hicle for a few minutes af ter cleaning before
parking it. The brake discs and brake linings warm up and
dry out.
Wi ndo ws
Cleanthe windo wsonthe inside and outside using a damp
clo thand cleaning products recommended byMercedes-
Benz. Do not use dry clo
ths, abrasive products or cleaning agents
containing sol vents toclean the inside of the windo ws.
Maintenance and care 389
Page 392 of 562

Information on cleaning and careAvoiding vehicle damage
Wi per blades
Fold out the wiper blades and clean them using a damp clo th.D o not clean the wiper blades too of ten.
Ex terior lighting
Cleanthe lenses with a wet sponge and mild de terg ent, e.g.
car shampoo. Only use cleaning agents or cleaning clo
thsth at are suitable
fo r plast ic lenses.
Sensors Cleanthe sensors in the front and rear bumpers and in the
ra diator grill with a soft clo thand car shampoo. When using a high-pressure
water jet, maintain a minimum
dis tance of 11.8 in (30 cm).
Re ar view camera
and 360° Camera
ROpen the camera co ver with the multimedia sys‐
te m(→page 226) .
RUse clear water and a soft clo thtoclean the camera lens. Do not use a high-pressure
water jet.
Ta ilpipes
Clean with cleaning agents recommended byMercedes-Benz,
particular lyin the winter and af terwa shing theve hicle. Use acid-free cleaning agents.
Note
s on care of the interior
&
WARNING Risk of injury from plastic
parts breaking off af terth e use of sol‐
ve nt-based care products
Ca reand cleaning products con taining sol‐
ve nts can cause surf aces inthe cockpit to
become porous.
When the airbags are deplo yed, plastic parts
may break away.
#Do not use any care or cleaning prod‐
ucts containing sol vents toclean the
cockpit.
& WARNING Risk of injury or death from
bleached seat belts
Bleaching or dyeing seat belts can se verely
we aken them.
This can, forex ample, cause seat belts to
te ar or fail in an accident.
#Ne ver bleach or dye seat belts.
390
Maintenance and care
Page 558 of 562
Website
Calling up ............................................ 334
Showing/hiding thewe b br ows er
menu ................................................... 334
Wheel chock ............................................ 436
St orage location ..................................4 36
Wheel chock
see Wheel chock
Wheels Care ....................................................3 89
Changing hub caps .............................. 437
Che cking .............................................. 413
Checking the tire pressure (man‐
ually) ................................................... .417
Checking the tire pressure (tire pres‐
sure monitoring sy stem) ..................... .419
Definitions ........................................... 430
DO T,Tire Identification Number (TIN)
.............................................................4 26
Flat tire ................................................ 393
Inter changing ...................................... 435
Load ind ex........................................... 428
Load-bearing capacity ......................... 428
Maximum tire load .............................. 427
Maximum tire pressure ....................... 427 MOExtended tires ................................ 394
Mounting .............................................
440
No ise .................................................. .413
No tes on mounting .............................. 433
Overview of tire labeling ......................4
25
R
e moving ............................................ 440
Re placing .................................... 433, 437
Re starting the tire pressure monitor‐
ing sy stem .......................................... .420
Selection ............................................. 433
Snow chains ........................................ .414
Speed rating ........................................ 428
St oring ................................................ 436
Te mp erature grade .............................. 425
Ti re and Loading Info rmation placard
............................................................ .420
Ti re characteristics .............................. 428
Ti re pressure (no tes) ............................4 14
Ti re pressure monitoring sy stem
(function) ............................................. 418
Ti re pressure table .............................. .416
Ti re Quality Grading ............................. 425
Ti re size designation ............................4 28
TIREFIT kit ...........................................3 95
Tr action grade .................................... .425
Tr ead wear grade ................................ .425 Un
usual handlin gch arac
teristics ........
.413
Wi -Fi
Overview ............................................. 280
Setting .................................................2 80
Setting up a hotspot ............................ 281
Setting up an Internet connection ....... 331
Wi ndow air bag .......................................... 38
Wi ndow lif ter
see Side windo ws
Wi ndo ws
see Side windo ws
Wi ndo ws(Care) ...................................... .389
Wi ndshield ................................................ 151
Infrared reflective ................................ 155
Re placing the wiper blades .................. 151
Re placing wiper blades (MAGIC
VISION CONTROL) ............................... 151
Wi ndshield
see Windshield
Wi ndshield heater ................................... 162
Wi ndshield heating
see Windshield hea ter
556
Index
Page 559 of 562
Windshield washer fluid .........................4 52
No tes .................................................. 452
Wi ndshield washer sy stem
Re filling .............................................. .384
Wi ndshield wipers
Re placing the wiper blades .................. 151
Re placing wiper blades (MAGIC
VISION CONTROL) ............................... 151
Service position ................................... 150
Switching on/off ................................. 149
Wi nter operation
Snow chains ........................................ .414
Wi nter tires
Setting the permanent speed limit ...... 198
Wi per blades
Ac tivating/deactivating the service
position ............................................... 150
Care .................................................... 389
Re placing .............................................1 51
Re placing (MAGIC VISION CONTROL)
.............................................................1 51
Wire lesscharging
Fu nction/no tes ................................... 139
Mobile phone ....................................... 140 Mobile phone (rear passenger com‐
partment) ............................................
140
Wire lessvehicle co mponents
Declaration of con form ity ...................... 23
Wo rkout prog ram
Overview ...
.......................................... 106
Wo rkshop
see Qualified specialist workshop
Index 557