Page 25 of 228
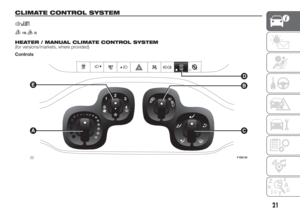
AUTOMATIC CLIMATE CONTROL SYSTEM
(for versions/markets, where provided)
Controls
.
A - Turns on the AUTO function (climate control system automatic operation).
B - Increases the air temperature.
C - Decreases the air temperature.
D - Selects manual air distribution.
By pressing the buttons, one of the five possible air flow distribution patterns can be selected:
air flow to the windscreen and front side window diffusers to demist or defrost them.
air flow to central and side dashboard vents to ventilate the chest and the face during the hot season.
23F1D0708
23
Page 26 of 228

towards the footwell diffusers. Due to the natural tendency of heat to spread upwards, this type of distribution warms the
passenger compartment up as quickly as possible, providing an immediate feeling of warmth.
+distribution between feet area diffusers (warmest air) and dashboard diffusers (coolest air).
+distribution between feet area diffusers and windscreen/front side window diffusers. This type of distribution achieves
effective heating of the passenger compartment and prevents the windows from misting up.
IMPORTANT In warm-humid weather conditions, using cold air on the windscreen may cause external condensation, which
could limit visibility.
E - Turns on/off the MAX-DEF function (fast front window defrosting/demisting).
F - Turns on/off the air conditioning compressor.
G - Turns on/off the internal air recirculation.
H - Climate control on/off.
F - Turns on/off the heated rear window and (for versions/markets, where available) the heated mirrors/heated windscreen.
L/M - Adjusts the fan speed.
The automatic climate control manages the Start&Stop function (engine off when the car speed is zero) to guarantee a suitable
comfort inside the passenger compartment.
NOTE In particularly severe climate conditions it is recommended to limit the use of the Start&Stop function to prevent the
compressor from continuously switching on and off, with consequent rapid misting of the windows and accumulation of
humidity with unpleasant smells in the passenger compartment.
.
WARNING
18)It is advisable not to use the air recirculation function when the outside temperature is low to prevent the windows from rapidly misting up.
WARNING
2)The system uses a coolant that is compatible with the laws in force in countries where the vehicle is sold, R134a or R1234yf. When
charging, only use the gas indicated on the dedicated plate in the engine compartment . The use of other coolants affects the efficiency and
condition of the system. The lubricant used for the compressor is also strictly linked to the type of cooling gas, please refer to a Fiat
Dealership.
24
KNOWING YOUR CAR
Page 27 of 228

ELECTRIC WINDOWS
ELECTRIC FRONT
WINDOWS
19) 20)
These operate when the ignition key is
turned to MAR and for about three
minutes after turning the ignition key to
STOP or removing it.
The electric window control buttons are
located beside the gear lever fig. 24
and activate:
A Opening/closing of the left window.
B Opening/closing of the right
window.
With the ignition key at MAR, a long
press activates the automatic operation
of the window: raising/lowering on the
driver's side and lowering only on
the passenger side.MANUAL REAR WINDOW
WINDERS
To open/close the window operate the
handle on the door panel.WARNING
19)Improper use of the electric windows
can be dangerous. Before and during
operation, always check that passengers
are not exposed to the risk of being injured
either directly by the moving windows or
through objects getting caught or struck by
them.
20)When leaving the vehicle, always
remove the ignition key to avoid the risk of
injury for people still on board due to
accidental operation of the electric
windows.
BONNET
OPENING
Proceed as follows:
pull lever A fig. 25 in the direction
indicated by the arrow;
move lever B fig. 26 to the left;
24F1D0031
25F1D0035
26F1D0036
25
Page 28 of 228

lift the bonnet and, at the same time,
release the supporting rod C fig. 27
from its catch D, then insert the end of
the rod into housing E in the bonnet
(large hole) and push to safety position
(small hole).
21) 22)
CLOSING
Proceed as follows:
keep the bonnet raised with one
hand and remove rod C fig. 27 from
housing E with the other, inverting the
opening motion, then fit it back into
its catch D;
lower the bonnet to approximately
20 centimetres from the engine
compartment and let it drop. Make sure
that the bonnet is completely closed
and not only fastened by the locking
device by trying to open it. If it is not
perfectly closed, do not try to press the
bonnet lid down but open it and repeat
the procedure.
23) 24)
IMPORTANT Always check that the
bonnet is closed correctly to prevent it
from opening while the vehicle is
travelling.
The following plate fig. 28 is applied
inside the engine compartment:
WARNING
21)Incorrect positioning of the supporting
rod may cause the bonnet to drop
suddenly.
22)Use both hands to lift the bonnet.
Before lifting, check that the windscreen
wiper arms are not raised from the
windscreen, that the vehicle is stationary
and that the handbrake is engaged.
23)Perform these operations only with
vehicle stationary.
24)For safety reasons, the bonnet must
always be properly closed while driving.
Therefore, make sure that the bonnet
is properly closed and that the lock
is engaged. If you discover that the bonnet
is not perfectly closed during travel, stop
immediately and close the bonnet in the
correct manner.
27F1D0037
28F1D1000
26
KNOWING YOUR CAR
Page 29 of 228

BOOT
The boot unlocking is electrically
operated and is deactivated when the
car is in motion.
OPENING
25)
By mechanical key
On versions with mechanical key, the
luggage compartment can be opened
from outside the vehicle, inserting
the metal insert of the key in the latch
on the tailgate handle and rotating.
With remote control
(for versions/markets, where provided)
The boot is unlocked by pressing the
button on the remote control.
The direction indicators will blink twice.
With electric handle (soft touch)
(for versions/markets, where provided)
For versions with soft touch electrical
handle, the tailgate (when unlocked)
can only be opened from outside the
car using the electric opening handle A
fig. 29 located under the handle until
a click is heard, which indicates
unlocking.The tailgate can be opened at any time,
if the doors are unlocked. To open it,
enable the handle, opening one of the
front doors or unlocking the doors
with the remote control or using the key
without remote control.
Emergency opening from the inside
Proceed as follows:remove the rear head restraints and
fully fold the seats;
remove the protective cap and
release the lock using a screwdriver or
the metal insert of the key fig. 30.CLOSING
26)
Pull the grab handle located inside the
tailgate.
IMPORTANT Before closing the
luggage compartment make sure that
you have the keys, since the luggage
compartment is automatically locked.
LUGGAGE
COMPARTMENT
INITIALISATION
IMPORTANT If the battery is
disconnected or the protection fuse
blows, the boot opening/closing
mechanism must be reinitialised as
follows: close all the doors and the
boot, press the
button on the remote
control, then press the
button.
27) 28) 29)
29F1D0032
30F1D0033
27
Page 30 of 228

WARNING
25)Be careful not to hit objects on the
storage shelf when you open the tailgate.
26)With the engine on, always make
sure that the tailgate is closed: exhaust
gases could be drawn inside the load
compartment.
27)Every attachment has a maximum load
capacity of 100 kg.
28)A heavy load that has not been
secured may cause serious injuries to
passengers in the event of an accident.
29)If you are travelling in an area with
limited opportunities for vehicle refuelling
and you wish to bring petrol with you in
a petrol can, you must do so in compliance
with current regulations and using an
approved can, appropriately secured to the
load securing attachments. Anyway, by
doing so, you increase the risk of fire in the
event of an accident with your vehicle.
USB PORT
(for versions/markets, where provided)
Depending on the trim level, the car
may be equipped with a USB port on
the dashboard for transferring data
from a USB Pen Drive, smartphone,
etc., or for slowly recharging an external
device fig. 31.
IMPORTANT After using a USB
recharging socket, we recommend
disconnecting the device (smartphone).
Always remove the cable from the
vehicle socket first, never from
the device . See fig. 32 for example.
Cables left flying or connected
incorrectly could compromise correct
recharging and/or the USB socket
condition.NOTE The USB port handles data
transmission from the Pen Drive/
Smartphone, etc. and slow recharging
of an external device, which is not
guaranteed as it depends on the device
type/brand.
31F1D1012
32F1D1013
28
KNOWING YOUR CAR
Page 31 of 228

SMARTPHONE
DOCKING
(for versions with Uconnect Mobile)
Depending on the trim level, the car
may be equipped with a smartphone
docking station to be installed on the
dashboard.
Installing/uninstalling
the station
Install the smartphone docking station
by inserting it in the specific seat on the
dashboard, illustrated in fig. 33 (click
fit).
To remove the docking station, press
both side buttons fig. 34simultaneously.
NOTE When the smartphone docking
station is not in use, it is recommended
to remove it from its seat to avoid
noise and/or vibrations.Inserting/removing the
smartphone
To insert the smartphone in the docking
station:
ensure that the ring nut A fig. 35 is
turned to position
;
insert the smartphone horizontally in
its seat, placing it on the base of the
docking station, and press to open the
gripping hand fig. 36;
lay the smartphone on the front
base and release it. The load on the
spring inside the docking station will
allow the gripping hand to close;
block the smartphone by turning the
ring A fig. 35 so that it clicks into
position
.
The rear knob B fig. 37 allows
possible adjustments depending on the
weight and geometry of the
smartphone.
33F1D1014
34F1D1015
35F1D0703
36F1D1016
37F1D1017
29
Page 32 of 228

To remove the smartphone from the
docking station:
turn the ring nut A fig. 35 so that it
clicks into position
;
take out the smartphone by pressing
it down to open the gripping hand;
remove the smartphone from the
docking station and release it. The load
on the spring inside the docking station
will allow the gripping hand to close
after the phone has been removed.
7) 8) 9)
WARNING
7)When the vehicle is moving, the
smartphone must be used in the docking
station only in a horizontal position and
without any inclination (see fig. 36). Any
other position of the docking station is
allowed only with the vehicle stopped, with
the sole purpose of facilitating the insertion
of the smartphone in the station.
8)The maximum dimensions of the usable
smartphones are: 67 mm (width) and 11
mm (depth).
9)The maximum weight of smartphone
that can be installed is 180 g.
VERSION WITH LPG
SYSTEM
30) 31) 14)10) 11) 12) 13)
INTRODUCTION
The LPG version features two fuel
supply systems: one for petrol and one
for LPG.
Although the LPG system has
numerous safety features, it is advisable
to proceed as follows every time the
vehicle is not in use for a long period or
moved in an emergency as a result of
a breakdown or accident:
unscrew the fixing devices A fig. 38,
then remove the cover B;
close the LPG cock by turning the
ring nut C fig. 39 clockwise;
refit the cover and retighten the
fastening devices.LPG TANK
14)
The car has a (pressurised) tank A fig.
40 for storing LPG in a liquid state.
It is toroidal and is located in the spare
wheel compartment with suitable
protection.
38F1D0111
39F1D0112
40F1D0113
30
KNOWING YOUR CAR