Page 193 of 228

GENERAL
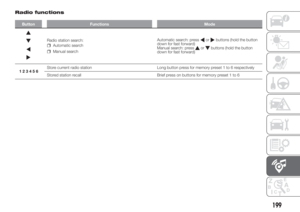
The radio has the following functions:
Radio section
PLL tuning with FM/AM/MW
frequency bands;
RDS (Radio Data System) with TA
(traffic alerts) function - TP (traffic
programmes) - EON (Enhanced Other
Network) - REG (regional programmes);
AF: search selection for alternative
frequencies in RDS mode;
provision for emergency alarm;
automatic/manual tuning into
stations;
FM Multipath detector;
manual storing of 30 stations: 18 on
FM band (6 on FM1, 6 on FM2, 6 on
FMT), 12 on MW band (6 on MW1,
6 on MW2);
automatic programming (Autostore
function) of 6 stations on dedicated
FM band
SPEED VOLUME function:
automatic volume adjustment
according to the vehicle speed;
automatic Stereo/Mono selection.
CD section
Direct selection of the disc;
Track selection (forward/back);
Fast advance (forward/back) through
tracks;
CD Display function: display of disc
name and time elapsed since the
start of the track
Playing of audio CDs, CD-Rs and
CD-RWs.
MP3 CD section
MP3-Info function (ID3-TAG);
Folder selection (previous/next);
Track selection (forward/back);
Fast advance (forward/back) through
tracks;
MP3 Display function: display of
name of folder, ID3-TAG information,
time elapsed since the start of the
track, name of the file
Playing of audio or data CD, CD-R
and CD-RW.
Audio section
Mute/Pause function;
Soft-Mute function;
Loudness function
7-band graphic equaliser
Separate bass/treble adjustment
Right/left channel balance.FUNCTIONS AND
ADJUSTMENTS
Turning On the Radio
The radio comes on when the
(ON/OFF) button/knob is pressed
briefly.
When the radio is switched on with the
key extracted from the ignition device,
it turns off automatically after about
20 minutes. After the radio has
switched itself off automatically, it can
be turned on for a further 20 minutes
by pressing the
(ON/OFF) button/
knob.
Turning Off the Radio
Briefly press the
(ON/OFF)
button/knob.
Volume adjustment
Turn the
(ON/OFF) button/knob to
adjust the volume.
If the volume level is changed during
the transmission of traffic news, the
new setting will only be maintained until
the news is finished.
MUTE/Pause function
(muting the volume)
Press the
button briefly to activate
the Mute function. The volume will
gradually decrease and the words
"RADIO Mute" will be displayed (in radio
mode) or "PAUSE" (in CD mode).
191
Page 194 of 228

Press thebutton again to deactivate
the Mute function. The volume will
gradually increase until it reaches the
level set previously.
Audio settings
The functions that can be selected from
the audio menu change depending on
the context: AM/FM/CD.
Press the
button briefly to change
the Audio functions.
After the
button is first pressed, the
display will show the bass level value
for the source activated at that time
(e.g. in FM mode the display will show
the wording "FM Bass +2").
Use the
orbuttons to scroll
through the menu functions. To change
the setting of the function selected
use the
orbuttons. The current
status of the selected function appears
on the display.
The functions managed by the Menu
are:
BASS: adjustment of bass tones;
TREBLE: adjustment of high tones;
BALANCE: right/left balance
adjustment;
FADER: front/back balance
adjustment (where provided).
LOUDNESS: activation/deactivation
of the increase of bass and high tones;
EQUALISER: activation and
selection of factory-set equaliser levels;
USER EQUALIZER: customised
equaliser setting.
MENU
MENU button function
Press the button MENU briefly to
activate the Menu function. The display
will show the first menu item that can
be adjusted (AF) ("AF Switching On" on
the display).
Use the
orbuttons to scroll
through the Menu functions. To change
the setting of the function selected
use the
orbuttons.
The current status of the selected
function appears on the display.
The functions managed by the Menu
are:
AF SWITCHING: automatic
activation/deactivation of the selection
of the station with the strongest signal
that transmits the same programme.
TRAFFIC INFORMATION:
activation/deactivation of traffic
information (only on FM band).
REGIONAL MODE: activation/
deactivation of regional programmes.
MP3 DISPLAY: CD MP3 display
setting.
SPEED VOLUME: speed-dependent
automatic volume control.
RADIO ON VOLUME: maximum
radio volume limit activation/
deactivation.
RADIO OFF: off mode selection.
SYSTEM RESET: reset of factory
settings.
Press the button MENU again to exit
the Menu function.
NOTE The AF SWITCHING, TRAFFIC
INFORMATION and REGIONAL MODE
adjustments are only possible in FM
mode.
RADIO (Tuner)
To select the Radio function when
another audio source is being listened
to, briefly press the FM, AS or AM
buttons, depending on the desired
band.
Once the Radio mode has been
activated, the display will show the
name (only RDS stations) and the
frequency of the selected radio station,
the frequency band selected (e.g.
FM1) and the preselect button number
(e.g. P1).
Frequency band selection
With the Radio mode active, press the
FM, AS or AM button briefly and
repeatedly to select the desired
reception band.
192
MULTIMEDIA
Page 195 of 228

Each time the button is pressed, the
AM and FM bands are selected
cyclically:
Preset buttons
The buttons numbered from 1 to 6 can
used to set the following presettings:
18 in the FM band (6 in FM1, 6
in FM2, 6 in FMT or "FMA" (on some
versions);
12 in the MW band (6 in MW1, 6 in
MW2).
To listen to a preset station, select the
desired frequency band and then press
the corresponding preset button briefly
(from 1 to 6).
By pressing the preset button for more
than 2 seconds, the tuned station will
be stored. The storing phase is
confirmed by an acoustic signal.
Automatic tuning
Briefly press the
orbutton to start
the automatic tuning search for the
next station that can be received in the
selected direction.Manual tuning
Select the desired frequency band and
then press the
orbutton briefly
and repeatedly to start to the search in
the desired direction. If the
or
button is pressed longer, the fast
search will start and then stop when the
button is released.
CD PLAYER
To activate the CD player built-into the
equipment, proceed as follows:
insert a CD with the equipment
switched on: the first track will start to
play;
or
if a CD has already been loaded,
switch on the radio and then briefly
press the CD button to select the “CD”
operating mode: the last track listened
to will start to play.
It is advisable to use original CDs to
ensure optimal playback. If CD-R/RW
are used, we recommend using good
quality media that are burned at the
slowest speed possible.
CD loading/ejection
To load the CD, insert it gently into the
slot to activate the motorised loading
system, which will position it correctly.Press the
(EJECT) button with the
radio on to activate the motorised
CD ejection. After ejection, the last
audio source listened to before playing
the CD will be heard.
72)
Indications on the display
When the CD player is in operation,
information appears on the display with
the following meanings:
"CD Track 5": indicates the number
of the CD track;
"03:42": indicates the time elapsed
since the start of the track (if the
respective Menu function is activated).
Track selection (forward/back)
Briefly press the
button to play the
previous CD track and the
button to
play the next track.
Fast forward/rewind through tracks
Hold down the
button to fast
forward the selected track or hold
down the
button to fast rewind the
track.
The fast forward/rewind will stop once
the button is released.
193
Page 196 of 228

"Pause" function
To pause the CD player, press the
button. The words "CD Pause" will
appear on the display.
To resume listening to the track, press
the
button again. If another audio
source is selected, the pause function
is deactivated.
CD MP3 PLAYER
In addition to playing normal audio
CDs, the radio can also play CD-ROMs
on which MP3 format compressed
audio files are recorded. The radio
operates as described in the "CD
Player" chapter when an ordinary audio
CD is inserted.
Selecting next/previous folder
Press the
button to select one of the
next folders or press the
button to
select a previous folder.
The display will show the number and
the name of the folder (e.g. “DIR 2
XXXXXX”).
If no other folder/track is selected
during the next 2 seconds, the first
track contained in the new folder will be
played.
If the last track in the folder at that
moment selected is played, the next
folder will be played.
WARNING
183)If the volume is too loud this could be
dangerous for the driver and for
passengers when driving in traffic. Always
adjust the volume so that you can still
hear background noises.
184)Multimedia CDs include data tracks in
addition to the audio tracks. Playing this
type of CD can cause hissing at a volume
that may jeopardise road safety as well
as cause damage to the final stages and
the speakers.
185)Using some of the system functions
whilst driving can distract attention away
from the road, risking an accident or other
serious consequences; they should
therefore be used only when driving
conditions allow it and, if necessary, only
with the vehicle stationary.
186)IMPORTANT: Looking at the system
when driving can divert attention from
the road, with the risk of accidents or other
serious consequences. Do not change
the system settings or load data while
driving. Stop the vehicle in a safe and legal
manner before carrying out these
operations. Adopting these precautions is
important since setting or changing some
functions may require the driver to be
distracted from the road and remove their
hands from the steering wheel.187)Looking at the display for a long time:
while driving, do not use any function
that requires looking at the display for a
long time. Pull over in a safe and legal
manner before attempting to access a
function of the system that requires
prolonged attention. Even occasional short
glances at the display may be hazardous
if your attention is diverted from driving at a
critical moment.
188)Setting the volume: do not turn the
volume up too high. Keep the volume at a
level where you can still hear outside traffic
and emergency signals while driving.
Driving while unable to hear these sounds
may cause an accident.
WARNING
72)Do not press the eject button
accidentally when inserting a CD.
194
MULTIMEDIA
Page 197 of 228

Uconnect Mobile –
Uconnect Bluetooth
189) 190) 191) 192) 193) 194) 195) 196) 197) 198)
The Uconnect Mobile and Uconnect
Bluetooth systems were designed
according to the specific characteristics
of the passenger compartment, with a
customised design that perfectly
matches the style of the dashboard.
The instructions for use are given below
and we recommend you to read them
carefully.
TIPS
Familiarise yourself with the various
functions of the Uconnect systems (for
example, by storing the stations) before
starting to drive.
Reception conditions
Reception conditions change
constantly while driving. Reception may
be interfered with by the presence of
mountains, buildings or bridges,
especially when you are far away from
the broadcaster.
IMPORTANT The volume may be
increased when receiving traffic
information and news.Care and maintenance
Only clean the cover with a soft,
anti-static cloth. Cleaning and polishing
products may damage the surface.
ANTITHEFT PROTECTION
The Uconnect systems are equipped
with an anti-theft protection system
based on an exchange of information
between the Uconnect system and the
electronic control unit (Body Computer)
on the car.
This system guarantees maximum
safety and prevents the secret code
from being entered each time the
Uconnect system power supply is
disconnected.
If the check has a positive outcome, the
Uconnect system will start to operate,
whereas if the comparison codes
are not the same, or if the electronic
control unit (Body Computer) is
replaced, the device will ask the user to
enter the secret code according to
the procedure described in the
paragraph below.Entering the secret code
If the password is required when the
Uconnect system is switched on,
the display will show "Radio code" for
about 2 seconds, followed by four
dashes "----".
The code is made up of four digits from
1 to 6, each corresponding to one of
the dashes.
To enter the first digit, press the
corresponding button of the preset
stations (from 1 to 6). Enter the other
code digits in the same way.
If the four digits are not entered within
20 seconds, the display will show
"Enter code----".Ifthis occurs, it is
not considered an incorrect code entry.
After entering the fourth digit (within
20 seconds), the Uconnect system will
start to operate.
If an incorrect code is entered, the
Uconnect system will emit a sound and
the display will show "Radio blocked/
wait" to notify the user of the need
to enter the correct code.
Each time the user enters an incorrect
code, the waiting time gradually
increases (1 min, 2 min, 4 min, 8 min,
16 min, 30 min, 1h, 2h, 4h, 8h, 16h,
24h) to a maximum of 24 hours.
195
Page 198 of 228
The waiting time will be shown on the
display with the text "Radio blocked/
wait". After the text has disappeared it
is possible to start the code entering
procedure again.
Vehicle radio passport
This document certifies ownership of a
Uconnect system. The vehicle radio
passport shows the Uconnect system
model, serial number and secret code.
IMPORTANT Keep the radio passport in
a safe place so that you can give the
information to the relevant authorities if
the Uconnect system is stolen.
In the case of loss of the vehicle radio
passport, contact the Fiat Dealership,
taking an ID document and the vehicle
ownership documents.
196
MULTIMEDIA
Page 199 of 228
QUICK GUIDE
140F1D1006
197
Page 200 of 228
General functions
Button Functions Mode
Ignition short button press
Switching off long button press
Volume adjustment turn knob
RADIOSelect the radio source FM, AM, DAB (where present) short cyclical button press
ABC–123456Select preset ranges short cyclical button press
MEDIA
Select
Bluetooth® Audio, USB/iPodshort cyclical button press
(Play/Pause)Activate Play/Pause for the Media source
Activate Mute for the Radio sourceShort button press
Audio adjustments: low tones (BASS), high tones
(TREBLE), RH/LH balance (BALANCE), front/rear
balance (FADER) (where provided)Menu activation: short button press
Adjustment type selection: pressorbuttons.
Value adjustment: pressorbuttons.
MENUAdvanced functions adjustmentMenu activation: short button press
Adjustment type selection: press
orbuttons.
Value adjustment: pressorbuttons.
198
MULTIMEDIA