2018 FIAT FIORINO Owner handbook (in English)
-
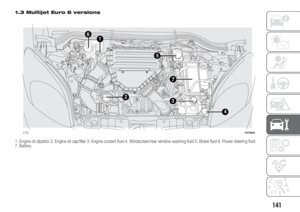
 1
1 -
 2
2 -
 3
3 -
 4
4 -
 5
5 -
 6
6 -
 7
7 -
 8
8 -
 9
9 -
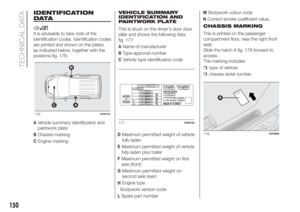
 10
10 -
 11
11 -
 12
12 -
 13
13 -
 14
14 -
 15
15 -
 16
16 -
 17
17 -
 18
18 -
 19
19 -
 20
20 -
 21
21 -
 22
22 -
 23
23 -
 24
24 -
 25
25 -
 26
26 -
 27
27 -
 28
28 -
 29
29 -
 30
30 -
 31
31 -
 32
32 -
 33
33 -
 34
34 -
 35
35 -
 36
36 -
 37
37 -
 38
38 -
 39
39 -
 40
40 -
 41
41 -
 42
42 -
 43
43 -
 44
44 -
 45
45 -
 46
46 -
 47
47 -
 48
48 -
 49
49 -
 50
50 -
 51
51 -
 52
52 -
 53
53 -
 54
54 -
 55
55 -
 56
56 -
 57
57 -
 58
58 -
 59
59 -
 60
60 -
 61
61 -
 62
62 -
 63
63 -
 64
64 -
 65
65 -
 66
66 -
 67
67 -
 68
68 -
 69
69 -
 70
70 -
 71
71 -
 72
72 -
 73
73 -
 74
74 -
 75
75 -
 76
76 -
 77
77 -
 78
78 -
 79
79 -
 80
80 -
 81
81 -
 82
82 -
 83
83 -
 84
84 -
 85
85 -
 86
86 -
 87
87 -
 88
88 -
 89
89 -
 90
90 -
 91
91 -
 92
92 -
 93
93 -
 94
94 -
 95
95 -
 96
96 -
 97
97 -
 98
98 -
 99
99 -
 100
100 -
 101
101 -
 102
102 -
 103
103 -
 104
104 -
 105
105 -
 106
106 -
 107
107 -
 108
108 -
 109
109 -
 110
110 -
 111
111 -
 112
112 -
 113
113 -
 114
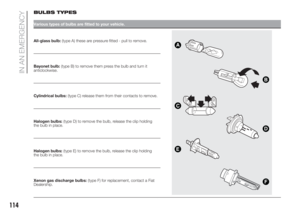
114 -
 115
115 -
 116
116 -
 117
117 -
 118
118 -
 119
119 -
 120
120 -
 121
121 -
 122
122 -
 123
123 -
 124
124 -
 125
125 -
 126
126 -
 127
127 -
 128
128 -
 129
129 -
 130
130 -
 131
131 -
 132
132 -
 133
133 -
 134
134 -
 135
135 -
 136
136 -
 137
137 -
 138
138 -
 139
139 -
 140
140 -
 141
141 -
 142
142 -
 143
143 -
 144
144 -
 145
145 -
 146
146 -
 147
147 -
 148
148 -
 149
149 -
 150
150 -
 151
151 -
 152
152 -
 153
153 -
 154
154 -
 155
155 -
 156
156 -
 157
157 -
 158
158 -
 159
159 -
 160
160 -
 161
161 -
 162
162 -
 163
163 -
 164
164 -
 165
165 -
 166
166 -
 167
167 -
 168
168 -
 169
169 -
 170
170 -
 171
171 -
 172
172 -
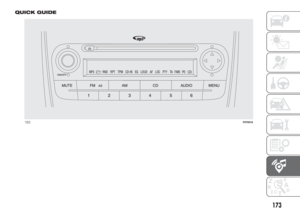
 173
173 -
 174
174 -
 175
175 -
 176
176 -
 177
177 -
 178
178 -
 179
179 -
 180
180 -
 181
181 -
 182
182 -
 183
183 -
 184
184 -
 185
185 -
 186
186 -
 187
187 -
 188
188 -
 189
189 -
 190
190 -
 191
191 -
 192
192 -
 193
193 -
 194
194 -
 195
195
 Versions with digital display
Warning lights
andare available on diesel versions only.
A. Speedometer – B. Fuel level gauge with reserve warning light – C. Engine coolant temperature indicator wit")
 Versions with multifunction display
Warning lights
andare available on diesel versions only.
A. Speedometer – B. Fuel level gauge with reserve warning light – C. Engine coolant temperature indicat")
 Versions with multifunction display
Warning lights
andare available on diesel versions only.
A. Speedometer – B. Fuel level gauge with reserve warning light – C. Engine coolant temperature indicat")
 DIGITAL DISPLAY
STANDARD SCREEN
The standard screen fig. 74 shows the
following information:
AHeadlamp alignment position (only
with dipped headlamps on).
BMilometer (distance covered in km or
miles).")
 Management modes differ according to
the characteristic of the option
selected.
The menu includes the following items:
ILLU
SPEEd
Hour
bUZZ
Unit
BAG P (for versions/markets, where
provided)
NOTE Only")
 To scroll down through the
screen and the related options
or to decrease the displayed
value.
NOTE The buttons
and
buttons activate different functions
according to the situation as follows:
Headlight")
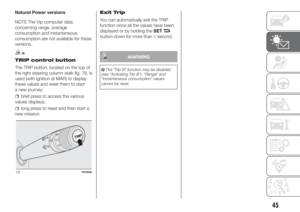
 Natural Power versions
NOTE The trip computer data
concerning range, average
consumption and instantaneous
consumption are not available for these
versions.
8)
TRIP control button
The TRIP button, loc")
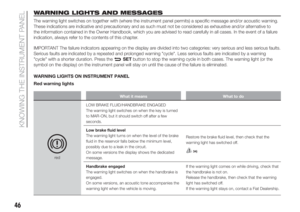
 WARNING LIGHTS AND MESSAGES
The warning light switches on together with (where the instrument panel permits) a specific message and/or acoustic warning.
These indications are indicative and precaution")