Page 145 of 196
 ENGINE OIL
Engine oil level check
Check the oil level a few minutes (about
5) after the engine has stopped, with
the vehicle parked on level ground.
Take out the dipstick 1, clean it and
then reinsert")
ENGINE OIL
Engine oil level check
Check the oil level a few minutes (about
5) after the engine has stopped, with
the vehicle parked on level ground.
Take out the dipstick 1, clean it and
then reinsert it fully; take it out and
check that the level is between the MIN
and MAX marks on the dipstick. The
interval between MIN and MAX marks
corresponds to about 1 litre of oil.
Topping up the engine oil
If the oil level is close to or below the
MIN mark, add oil via the filler 2 until it
reaches the MAX mark.
The oil level must never exceed the
MAX. mark.
IMPORTANT If the engine oil level after
the check is over the MAX level, go
to a Fiat Dealership to have the correct
level restored.
IMPORTANT After adding or changing
the oil, let the engine turn over for a few
seconds and wait a few minutes after
turning it off before you check the level.
Engine oil consumption
The maximum engine oil consumption
is usually 400 grams every 1000 km.
When the vehicle is new, the engine
needs to be run in, therefore the engine
oil consumption can only be considered
stabilised after the first 5,000–6,000
km.IMPORTANT The oil consumption
depends on driving style and the
conditions under which the vehicle is
used.
IMPORTANT Always top up using
engine oil of the same specifications as
that already in the engine.
134)
44)
ENGINE COOLANT
The coolant level should be checked
when the engine is cold and should be
between the MIN and MAX lines on
the vessel.
If the level is low, pour a 50% mixture of
demineralised water and PETRONAS
LUBRICANTS PARAFLU
UPinto the
vessel through cap 3.
The mixture of 50% PARAFLU
UPand
50% distilled water protects against
freezing down to temperatures of
-35°C. For particularly harsh climate
conditions, we recommended using a
mixture of 60% PARAFLU
UPand 40%
distilled water.
135)
45)
WINDSCREEN/REAR
WINDOW WASHING FLUID
To add fluid, lift the cap 4 and pour in a
mixture of water and PETRONAS
DURANCE SC 35 fluid, in the following
proportions:
30% PETRONAS DURANCE SC 35
and 70% water in summer;
50% PETRONAS DURANCE SC 35
and 50% water in winter.
At temperatures below -20°C, use
undiluted PETRONAS DURANCE SC
35 fluid.
Check fluid level through the reservoir.
136) 137)
BRAKE FLUID
Unscrew the cap 5 and check that the
fluid in the reservoir is at the maximum
level.
The fluid level in the reservoir must not
exceed the MAX mark.
Use the brake fluid shown in the "Fluids
and lubricants" table (see "Technical
Specifications"). When opening the cap
A, make sure that no dirt gets into the
reservoir.
For topping-up, always use a funnel
with integrated filter with mesh equal to
or lower than 0.12 mm.
143
Page 146 of 196
 IMPORTANT Brake fluid absorbs
moisture. For this reason, if the vehicle
is mainly used in areas with a high
degree of atmospheric humidity, the
fluid should be replaced at more
frequent intervals than")
IMPORTANT Brake fluid absorbs
moisture. For this reason, if the vehicle
is mainly used in areas with a high
degree of atmospheric humidity, the
fluid should be replaced at more
frequent intervals than specified in the
“Scheduled Servicing Plan”.
138) 139)
46)
POWER STEERING FLUID
Unscrew the cap 6 and check that the
fluid in the reservoir is between the
MIN and MAX marks on the reservoir.
The level may exceed the MAX mark
when the oil is hot. If topping up is
required, make sure the oil you use has
the same specifications as that already
in the system.
140)
3)
COMFORT-MATIC
TRANSMISSION
HYDRAULIC SYSTEM
FLUID
To check the transmission oil level and
to check/change the clutch hydraulic
system fluid, go to a Fiat Dealership.
4)
BATTERY
The battery does not require the
electrolyte to be topped up with distilled
water. A periodic check carried out at
a Fiat Dealership is, however, necessary
to check efficiency.
IMPORTANT If the charge level remains
under 50% for a long time, the battery
is damaged by sulphation, reducing
its capacity and efficiency at start-up.
141) 142)
Replacing the battery
If required, replace the battery with an
original spare part with the same
specifications.
If a battery with different specifications
is fitted, the service intervals given in
the “Scheduled Servicing Plan” will no
longer be valid.
Follow the battery manufacturer's
instructions for maintenance.
143)
47) 48)
5)
WARNING
133)Never smoke while working in the
engine compartment: inflammable gases
and vapours may be present, constituting
a fire risk.
134)Be very careful working in the engine
compartment when the engine is hot:
you may get burned. Remember that the
fan may start up if the engine is hot: this
could injure you. Scarves, ties and other
loose clothing might be pulled by moving
parts.
135)Do not remove the reservoir cap
when the engine is very hot as there is a
risk of scalding. The cooling system is
pressurised. If the cap needs replacing, do
so with another original or the effectiveness
of the system may be compromised.
136)Do not travel if the windscreen washer
reservoir is empty: using the windscreen
washer is essential for improving visibility.
137)Some commercial windscreen washer
additives are flammable. The engine
compartment contains hot parts which
could start a fire if they come into contact.
138)Brake fluid is poisonous and highly
corrosive. In the event of accidental
contact, immediately wash the affected
parts with water and mild soap. Then rinse
thoroughly. Call a doctor immediately if
swallowed.
139)The symbol
, on the brake fluid
container indicates if a brake fluid is
synthetic or mineralbased. Use of mineral
type fluids will damage the special rubber
seals of the braking system beyond repair.
144
SERVICING AND CARE
Page 147 of 196
 140)Prevent power steering fluid from
coming into contact with hot engine parts:
it is flammable.
141)Battery fluid is poisonous and
corrosive. Avoid contact with skin and
eyes. Keep naked flames and")
140)Prevent power steering fluid from
coming into contact with hot engine parts:
it is flammable.
141)Battery fluid is poisonous and
corrosive. Avoid contact with skin and
eyes. Keep naked flames and sources of
sparks away from the battery: risk of
explosion and fire.
142)Using the battery with insufficient
battery fluid may irreparably damage the
battery and may cause an explosion.
143)When performing any operation on
the battery or near it, always protect your
eyes with special goggles.
WARNING
43)When topping up, take care not to mix
up the various types of fluids: they are
not compatible with each other and could
seriously damage the vehicle.
44)Used engine oil and replaced oil filters
contain substances which are harmful to
the environment. To change oil and filters,
we advise you to contact a Fiat Dealership.
45)PARAFLU
UPanti-freeze fluid is used
in the cooling system. Use fluid of the
same type as that contained in the cooling
system for any top-ups. PARAFLU
UP
fluid cannot be mixed with any other type
of fluid. If this occurs, do not start the
engine and contact your Fiat Dealership
immediately.
46)Prevent brake fluid, which is highly
corrosive, from coming into contact with
painted parts. Should it happen,
immediately wash with water.47)Incorrect installation of electric and
electronic devices may cause severe
damage to your vehicle. After purchasing
your vehicle, if you wish to install any
accessories (anti-theft, radio phone, etc.),
go to a Fiat Dealership, which will suggest
the most suitable devices and advise
you whether a higher capacity battery
needs to be installed.
48)If the vehicle will be unused for an
extended period of time in extremely cold
weather conditions, remove the battery
and store it in a heated area to prevent it
from freezing.
WARNING
3)Power steering fluid consumption is
extremely low; if another top-up is required
after only a short period of time, have the
system checked for leaks at a Fiat
Dealership.
4)Used transmission fluid contains
substances that are harmful to the
environment. It is advisable to have the oil
changed by a Fiat Dealership where it
will be disposed of respecting the
environment and according to legal
requirements.
5)Batteries contain substances which are
very dangerous for the environment. You
are recommended to go to a Fiat
Dealership to have the battery replaced
where the old battery will be disposed of
respecting both the environment and
the laws in force.
BATTERY
RECHARGING
IMPORTANT The battery recharging
procedure is given as information only.
You are advised to contact a Fiat
Dealership to have this operation
carried out.
We recommend recharging the battery
slowly for approximately 24 hours at
low amperage. Charging for a longer
time may damage the battery.
To recharge, proceed as follows:
without Start&Stop system:
disconnect the terminal from the
negative battery pole;
connect the charger cables to the
battery terminals, observing the polarity;
turn on the battery charger;
when it is recharged, turn the
charger off before disconnecting it from
the battery;
reconnect the terminal to the
negative battery pole.
145
Page 148 of 196
 with Start&Stop system: fig. 172
(for versions/markets, where provided)
disconnect the quick release
negative terminal A from the dummy
negative terminal B; this is because
a battery status monitoring")
with Start&Stop system: fig. 172
(for versions/markets, where provided)
disconnect the quick release
negative terminal A from the dummy
negative terminal B; this is because
a battery status monitoring sensor IBS
D is fitted on the negative battery
terminal C and should never be
disconnected except for when the
battery is actually replaced;
connect the positive cable of the
charger to the positive pole E of the
battery and the negative cable to the
dummy negative terminal B;
turn on the battery charger;
when you have recharged, turn the
charger off before disconnecting it from
the battery;
after disconnecting the charger,
reconnect the negative quick release
negative terminal A from the dummy
pole B.with Start&Stop (RADSOK) system:
fig. 173
(for versions/markets, where provided)
disconnect the connector A (by
pressing button B) from IBS sensor C
for monitoring the status of the battery
installed on the negative pole D of
the battery itself;
connect the positive cable to the
positive battery terminal E and the
negative terminal to the IBS sensor F as
shown in fig. 173;
turn on the battery charger;
switch the charger off after
recharging;
after having disconnected the
charger, reconnect connector A to IBS
sensor C as shown in fig. 173.
IMPORTANT The cables of the
electrical system must be correctly
reconnected to the battery, i.e. the
positive cable (+) to the positiveterminal and the negative cable (–) to
the negative terminal. The battery
terminals are marked with the positive
(+) and negative (–) symbols, and are
shown on the battery cover. The battery
terminals must also be corrosion-free
and firmly secured to the terminals. If a
"quick-type" battery charger is used
with the battery fitted on the car,
disconnect both battery leads before
connecting it. Do not use a "quick-type"
battery charger to provide the starting
voltage.
144) 145)
WARNING
144)Battery fluid is poisonous and
corrosive: avoid contact with your skin and
eyes. The battery should be charged in a
well ventilated place, away from naked
flames or possible sources of sparks:
danger of explosion and fire.
145)Do not attempt to charge a frozen
battery: it must be thawed first, otherwise it
may explode. If freezing has occurred, the
battery should be checked by skilled
personnel to make sure that the internal
elements are not damaged and that the
body is not cracked, with the risk of leaking
poisonous and corrosive acid.
172F0T0441173F0T0442
146
SERVICING AND CARE
Page 149 of 196
 WINDSCREEN /
REAR WINDOW
WIPERS
(for versions/markets, where provided)
146)
Replacing the
windscreen wiper
blades
Proceed as follows:
lift up the windscreen wiper arm and
position the blade so that it")
WINDSCREEN /
REAR WINDOW
WIPERS
(for versions/markets, where provided)
146)
Replacing the
windscreen wiper
blades
Proceed as follows:
lift up the windscreen wiper arm and
position the blade so that it forms a
90° angle with the arm;
press tabs A fig. 174 and remove
the blade from the arm;
install the new blade by inserting the
straps into the supplied housings of
the arm. Make sure that the new blade
is secured in position.Replacing the rear
window wiper blade
(for versions/markets, where provided)
Proceed as follows:
raise the cover A fig. 175 and
remove the arm from the vehicle by
loosening nut B that fastens it to the
pivot pin;
correctly position the new arm and
tighten the nut fully;
lower the cover.
WARNING
146)Driving with worn windscreen wiper
blades is a serious hazard, because
visibility is reduced in bad weather
conditions.
LIFTING THE
VEHICLE
If the vehicle needs to be lifted, go to a
Fiat Dealership which is equipped
with the arm hoist or workshop lift.
174F0T0087
175F0T0088
147
Page 150 of 196
 WHEELS AND TYRES
RIMS AND TYRES
For the type of wheel rims and tyres
fitted on the vehicle see the \"Wheels\"
paragraph in the \"Technical data\"
chapter.
IMPORTANT NOTES
As far as possibl")
WHEELS AND TYRES
RIMS AND TYRES
For the type of wheel rims and tyres
fitted on the vehicle see the "Wheels"
paragraph in the "Technical data"
chapter.
IMPORTANT NOTES
As far as possible, avoid sharp
braking, screech starts and violent
shocks against pavements, potholes or
other hard obstacles. Driving for long
stretches over uneven roads can
damage the tyres;
periodically check that the tyres
have no cuts in the side wall, abnormal
swelling or irregular tyre tread wear.
Go to a Fiat Dealership if required;
avoid overloading the car when
travelling: this may cause serious
damage to the wheels and tyres;
if a tyre is punctured, stop
immediately and replace it to avoid
damage to the tyre, the rim, suspension
and steering system;
tyres age even if they are not used
much. Cracks in the tread and on
the sidewalls are a sign of ageing. In
any event, have the tyres checked
by specialised technicians if they have
been fitted for longer than 6 years.
Remember to check the spare wheel
very carefully;
in the case of replacement, always
fit new tyres, avoiding those of
unknown origin;
if a tyre is changed, also change the
inflation valve;
to allow even wear between the
front and rear tyres, it is advisable to
change them over every 10–15
thousand kilometres, keeping them on
the same side of the vehicle so as
not to reverse the direction of rotation.
147) 148) 149) 150)
SNOW CHAINS
The use of snow chains should be in
compliance with local regulations of
each country. The snow chains may be
applied only onto the front wheel (drive
wheels). Check the tension of the
snow chains after the first few metres
have been driven.
151)
WARNING
147)Remember that the road holding
qualities of your vehicle also depend on the
correct inflation pressure of the tyres.
148)If tyre pressure is too low, the tyre
may overheat and be severely damaged as
a result.
149)Do not switch tyres from the
righthand side of the vehicle to the
lefthand side, and vice versa.
150)Never submit alloy rims to repainting
treatments requiring the use of
temperatures exceeding 150°C. The
mechanical properties of the wheels could
be impaired.
151)Keep the vehicle's speed down when
snow chains are fitted; never exceed 50
km/h. Avoid potholes, do not drive over
steps or pavements, and do not drive long
distances over roads without snow, to
avoid damaging both your vehicle and the
road surface.
148
SERVICING AND CARE
Page 151 of 196
TECHNICAL DATA
Everything you may find useful for
understanding how your vehicle
is made and works is contained in this
chapter and illustrated with data, tables
and graphics. For the enthusiasts and
the technician, but also just for those
who want to know every detail of their
vehicle.ENGINE ..........................................152
WHEELS .........................................154
DIMENSIONS ..................................156
PERFORMANCE .............................159
WEIGHTS AND LOADS...................160
REFUELLING ..................................162
FLUIDS AND LUBRICANTS ............164
FUEL CONSUMPTION ....................167
CO2 EMISSIONS ............................168
PRESCRIPTIONS FOR HANDLING
THE VEHICLE AT THE END OF ITS
LIFE ................................................169
149
IDENTIFICATION DATA....................150
Page 152 of 196
 150
TECHNICAL DATA
IDENTIFICATION
DATA
It is advisable to take note of the
identification codes. Identification codes
are printed and shown on the plates
as indicated below, together with the
position")
150
TECHNICAL DATA
IDENTIFICATION
DATA
It is advisable to take note of the
identification codes. Identification codes
are printed and shown on the plates
as indicated below, together with the
positions fig. 176:
AVehicle summary identification and
paintwork plate
BChassis marking
CEngine marking
176F0T0175
VEHICLE SUMMARY
IDENTIFICATION AND
PAINTWORK PLATE
This is stuck on the driver's door door
pillar and shows the following data
fig. 177:
AName of manufacturer
BType-approval number
CVehicle type identification code
DMaximum permitted weight of vehicle
fully laden
EMaximum permitted weight of vehicle
fully laden plus trailer
FMaximum permitted weight on first
axle (front)
GMaximum permitted weight on
second axle (rear)
HEngine typeI
Bodywork version code
LSpare part number
VERSIONE-VERSION
N° PER RICAMBI
N° FOR SPARES
MADE IN TURKEY
MOTORE-ENGINECODICE COLORE/PAINT
2 - 1 -
Kg
Kg
Kg
Kg
177F0V0725
MBodywork colour code
NCorrect smoke coefficient value.
CHASSIS MARKING
This is printed on the passenger
compartment floor, near the right front
seat.
Slide the hatch A fig. 178 forward to
access.
The marking includes:
type of vehicle;
chassis serial number.
178F0T0084
 1
1 2
2 3
3 4
4 5
5 6
6 7
7 8
8 9
9 10
10 11
11 12
12 13
13 14
14 15
15 16
16 17
17 18
18 19
19 20
20 21
21 22
22 23
23 24
24 25
25 26
26 27
27 28
28 29
29 30
30 31
31 32
32 33
33 34
34 35
35 36
36 37
37 38
38 39
39 40
40 41
41 42
42 43
43 44
44 45
45 46
46 47
47 48
48 49
49 50
50 51
51 52
52 53
53 54
54 55
55 56
56 57
57 58
58 59
59 60
60 61
61 62
62 63
63 64
64 65
65 66
66 67
67 68
68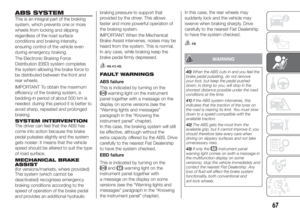 69
69 70
70 71
71 72
72 73
73 74
74 75
75 76
76 77
77 78
78 79
79 80
80 81
81 82
82 83
83 84
84 85
85 86
86 87
87 88
88 89
89 90
90 91
91 92
92 93
93 94
94 95
95 96
96 97
97 98
98 99
99 100
100 101
101 102
102 103
103 104
104 105
105 106
106 107
107 108
108 109
109 110
110 111
111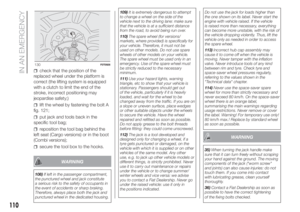 112
112 113
113 114
114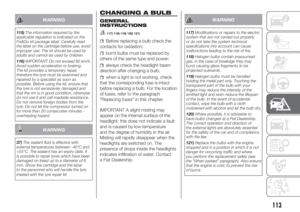 115
115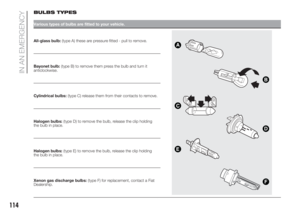 116
116 117
117 118
118 119
119 120
120 121
121 122
122 123
123 124
124 125
125 126
126 127
127 128
128 129
129 130
130 131
131 132
132 133
133 134
134 135
135 136
136 137
137 138
138 139
139 140
140 141
141 142
142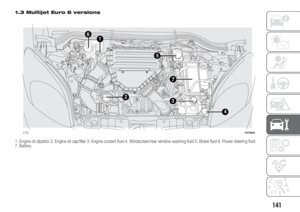 143
143 144
144 145
145 146
146 147
147 148
148 149
149 150
150 151
151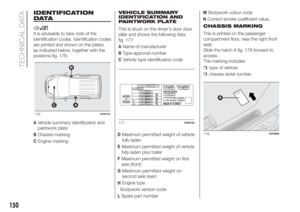 152
152 153
153 154
154 155
155 156
156 157
157 158
158 159
159 160
160 161
161 162
162 163
163 164
164 165
165 166
166 167
167 168
168 169
169 170
170 171
171 172
172 173
173 174
174 175
175 176
176 177
177 178
178 179
179 180
180 181
181 182
182 183
183 184
184 185
185 186
186 187
187 188
188 189
189 190
190 191
191 192
192 193
193 194
194 195
195 TECHNICAL DATA
Everything you may find useful for
understanding how your vehicle
is made and works is contained in this
chapter and illustrated with data, tables
and graphics. For the enthusiasts and")