Page 81 of 392

u co ..... N r--N ..... 0 <( 0 00
(D Tips
-Depending on the driving situation, the en
gine may already stop when
coasting before
the vehicle has come to a complete stop
ll.
- If you select the "D" selector lever position
after shifting into reverse, the vehicle must be driven faster than 6 mph (10 km/h) in or
der for the Start/Stop system to be active
again.
Stopping/starting the engine
Applies to: vehicles with Start/Stop system
"'Apply the brakes and keep your foot on the
brake pedal until the vehicle has stopped. The
rl1 indicator light appears in the instrument
cluster once the engine stops automatically .
"'The engine starts again when you take your
foot off the brake pedal. The indicator light
turns off.
(D Tips
-The ignition will turn off if you press the
I START ENGINE STOP I button during a stop
phase .
- You can determine for yourself if the engine
will stop or not by reducing or increasing
the amount of force you use to press the brake pedal. For example, if you only lightly
press on the brake pedal in stop-and-go
traffic or when turning, the engine will not
switch off when the vehicle is stationary. As
soon as you press the brake down harder,
the engine will switch off.
- Press the brake pedal during a Stop phase
to keep the vehicle from rolling.
Starting/stopping the engine automat
ically
Applies to: vehicles with Start/Stop system
The system checks if certain conditions are met
before and during the "stop" phase, and deter
mines if and how long the engine is stopped de
pending on the situation. For example, if power
usage is high, the engine will not be stopped .
ll Market-specific
Driving
Along with other conditions, the following fac
tors influence the automatic engine start or stop:
- Environmenta l conditions (slopes, inclines, ele-
vation, temperature)
- Battery (charge status, temperature, power us-
age)
- Engine temperature
- Assistance systems
- Driving behavior
If the
rid indicator light appears in the instru
ment cluster display, the engine will not be stop
ped.
Switching the ignition off automatically
Applies to: vehicles with Start/Stop system
If you leave the vehicle during a "stop" phase, the
engine can be restarted within approximately 30
seconds if the doors are closed, the driver's safe
ty belt is fastened and the brake pedal is pressed.
If you leave the vehicle longer than 30 seconds,
the ignition will switch off automatically to pre
vent the vehicle battery from draining. If this is
the case, the message
Start/stop system: igni
tion will be switched off in 30s
will appear in the
instrument cluster and, if the low beam head
lights are switched on, the parking lights will
switch on instead. The parking lights will switch
off after approximately 30 minutes or when you
lock the vehicle.
The ignition also switches off when you lock the
vehicle from the outside during a stop phase.
If the Start/Stop system has not turned off the
engine or if you have switched the Start/Stop sys
tem off manually, the ignition will not be auto matically switched off and the engine will contin
ue to run.
A WARNING
-To reduce the risk of poisoning, never allow
the engine to run in confined spaces.
-
79
Page 82 of 392

Drivin g
(D Tips
If you leave t he vehicle with the "D/S" or "R"
selector lever pos ition engaged, the parking
brake is automatically set.
Manually switching the Start/Stop system
off/on
A pp lies to: ve hicles w ith Sta rt/Stop system
The (A_) oFF button is located in the center conso le .
.. Press (A_) OfF to switch on or off. The LED in the
button turns on when the funct ion is switched
off.
@ Tips
If you switch the system off dur ing a stop
phase, the engine w ill start again automati
cally .
Messages
App lies to: ve hicles w ith Sta rt/Stop system
Start /stop system: deactivated . Please start
engin e manually
This message appea rs when specific conditions
are not met during a stop phase. The Sta rt/Stop
system wi ll not be ab le to restart the engine . The
engine must be started wit h the
I S TAR T ENGINE STOP I button.
Start /stop sy stem: malfunction! Function
una vailable . Please cont act Se rvice
There is a malfunction in the Start/Stop system .
Drive the vehicle to an authorized Audi dealer or
author ized Service Facility as soon as poss ible to
have the malfunction corrected.
80
Electromechanical
parking brake
F ig . 88 Center console: parking brake
,-.. ,-..
0
1 m
Your vehicle is equipped with an electromechani
ca l parking
brake (!)¢ fig . 88 . The parking brake
is designed to prevent the vehicle from ro lling
unintentionally and replaces the hand brake.
Setting /manuall y re leasing the parking
br ake
.. Pull the®> switch to set the parking brake. The
LED in the switch turns on. The
-(USA mod
els)/ . (Canada models) indicator light also
turns on in the instrument cluster display .
.. To release the parking brake manually, press
the brake or accelerator peda l w hile the ign i
tion is switched on and press
the®) sw itc h at
the same t ime. The LED in the button and the
indicator light in t he disp lay turn off .
Releasing the parking brake automatically
Requirement: the doors m ust be closed and the
drive r's safety belt must be fastened.
.. To start driving and release the parking brake
automatically, press the accelerator pedal as
usual.
In add ition to releasing the parking brake auto
matically, other convenience and safety functions
are available when you start
driving¢ page 82,
Starting to drive .
Preventing the automatic parking br ake
release
The vehicle could beg in rolling un intentionally,
depend ing on the hill or if towi ng a tra iler.
.,.
Page 83 of 392

u co ..... N r--N ..... 0 <( 0 00
~ To prevent the parking brake from releasing au
tomatica lly, pull and ho ld
the(®) switch and
press the acce lerator pedal. The park ing brake
remains set and prevents the veh icle from ro ll
ing backward.
~ You can release the(®) switch again once you are sure that you are g iv ing enough dr iv ing
force to the whee ls by pressing the accele rator
pedal.
Emergency braking function
You can use the emergency brak ing funct ion in an
emergency situation, or if the standard brake op
erat ion malfunct ions or is disabled .
~ Pull and hold the(®) switch.
~ As soon as you release the (®) switch or acceler-
ate, the brak ing stops .
Pu lling and holding the(®) switch while driv ing
the vehicle activates the emergency braking func
tion . The vehicle is braked at all four wheels by
activating the hydraulic brake system . The brak
i ng effect is s imilar to heavy
braking ~.,&. .
To reduce the r isk of activating the emergency
braking by mistake, a warn ing tone (buzzer)
sounds when
the(®) switch is pulled . Emergency
braking stops as soon as
the(®) switch is released
or the accele rato r peda l is p ressed .
Parking
~ Press the brake pedal to stop the vehicle.
~ Pull the(®) switch to set the parking brake.
~ Select the "P" selector lever posit ion .
~ Turn the eng ine off ~.,&. .
~ Turn the steer ing whee l w hen pa rking on in
clin es so that the whee ls will roll into the curb
i f t he ve hicle starts moving.
A WARNING
- Do not press the accelerator pedal inadver
tent ly if a gear is selected when the vehicle
is stationary and the engine is running. Oth
erwise, the veh icle w ill start to move imme
diately and th is could result in an acc ident.
- Emergency braking should only be used in an emergency, when the normal brake peda l
has failed or the brake pedal is obstructed .
Driving
During emergency braking, your vehicle will
brake s imilar to heavy braking. ESC and the
associated components (ABS, ASR, EDL)
cannot overcome the laws of physics .
Around curves and when road or weather
conditions are bad, a full brake applicat ion
can cause the veh icle to skid o r the rear end
to swerve, which inc reases the risk of an ac
cident.
- I f the power supply fails, you cannot set the
p ar king brake if it is released . In this case,
park the veh icle on leve l ground and secu re
it by placing the selector lever in the "P" po
sition. See an authorized Audi dealer or au
thor ized Audi Service Facility for assistance.
- Always set the parking brake when leaving
your veh icle, even if for a sho rt period of
time. Otherwise the vehicle could roll away, increasing the risk of an accident .
- If you leave the vehicle, switch the ignition off and take the veh icle key with you. This
applies particularly when children remain in
the vehicle . Otherwise, ch ildren cou ld start
the engine, release the parking brake or op
erate e lectr ica l equipment such as power
windows, wh ich increases the r is k of an acci
dent.
- No one, especially children, should remain
in the vehicle when it is lo cked. Lo cked
doors ma ke it more diffic ult for emergency
workers to get into the vehicle, which puts lives at risk .
(D Tips
When stopp ing at a t raff ic sign al or stopp ing
i n city traffic, yo u can set the park ing brake
manua lly . The vehicle does not have to be
held with the brake pedal. The parking brake
eliminates the tendency to creep when a se l ector lever position is engaged. As soon as
you press the accelerator peda l, the parking
brake re leases automatically and your vehicle
starts to move
~page 82 .
(D Tips
- Occasional noises when the parking brake is
set and released are normal and are not a
cause for concern .
.,.
81
Page 84 of 392

Driving
-The parking brake goes through a se lf -test
cycle at regular intervals when the vehicle is
stopped . Any noises associated w ith this are
normal.
- If there is a power failure , the parking brake
will not set if it is re leased, and it will not
release if it is
set¢,&. See an authorized
Audi dealer or authorized Audi Service Fa
cility for ass istance .
Starting to drive
Various convenience and safety functions may be
ava ilable when the vehicle begins driving , de
pending on vehicle equipment.
Starting on hills with the parking brake set
Requirement: the doors must be closed and the
driver's safety belt must be fastened .
~ To start driving comfortably when on a hill, set
the parking brake and begin driving as usual.
The braking force of the parking brake does not
release automatically until the wheels build up
enough dr iv ing force .
Starting on hills with hill hold assist
Hill hold assist makes it easier to start on hills .
Requirement: the driver's door must be closed
and the engine must be running.
~ To activate hill hold assist, press and hold the
brake peda l for several seconds. The veh icle
must be in an uph ill direction of travel.
After releasing the brake pedal, the brak ing pow
er is ma intained for a brief
moment ¢.& to pre
ve nt the vehicle from rolling back when starting.
During this time, you can easily beg in to move
your ve hicle.
A WARNING
-If you do not begin driving immediately or
the engine stalls after releasing the brake
pedal, your vehicle may begin to roll back
ward . Press the brake pedal or set the park
ing brake immed iate ly.
- The intelligent techno logy of hill hold assist
cannot overcome the limitations imposed by
82
-
natural physica l laws. The increased comfort
offered by hill hold assist should not cause
you to take safety risks .
- Hill hold assist cannot hold the vehicle in
place on all hills (for examp le, if the ground
is s lippery or icy).
- To reduce the r isk of an accident, always
make sure the veh icle is situated safely
while stationary .
Off road driving
General information
The Electronic Stabilization Control (ESC) func
tions were enhanced for driving offroad. Offroad
mode can be activated when driving in situations
where slippage or a differential lock function is
necessary ¢ page 141. The hill descent assist is
also available, wh ich automatically brakes the ve
hicle to maintain a constant speed
¢ page 142 .
In add it ion, your Audi provides cont inuous all
whee l drive .
However, your Audi is not a purely offroad vehi
cle . Your vehicle was not designed to dr ive under
extreme operating conditions such as driving in
an expedition style.
Only drive on terrain that is suitable for the ve
hicle and your driving ability. Never take any
unnecessary risks!
Before driving offroad
- Check the engine oil level, the tire pressure, the coo lant level and the fluid level in the washer
fluid reservoir.
- Store pieces of luggage and other objects in the
luggage compartment and secure them from
sliding out of place .
After driving offroad
-After driving offroad, remove branches and
other debris from the radiator grille, under
body, and wheels. Look especially for foreign
objects (such as s tones) that may be stuck in
the t ire tread .
- Clean the vehicle body and underbody and in-
spect the vehicle for possible damage .
.,,.
Page 85 of 392

u co ..... N ,..._
N ..... 0 <( 0 00
-Clean the windows, headlights, tail lights and
the license plate if they are dirty.
-Perfo rm a brake test (especially a fter dr iving
t h rough water) .
A WARNING
-Be especia lly caut io us and aware when driv
ing under difficult conditions and when off
road. Vehicle damage and injur ies may occ ur
whe n drivi ng at excessively high speeds o r
w ith incorrect dr iv ing ma neuvers .
-Always adjust your speed and driv ing style
to the roads, te rra in, traffic and weather
co ndi tions. Dr ive espec ially slowly if the re is
low v is ibi lity when offroad .
-Please note that the wheels can spin more
and the vehicle can swe rve w hen in off road
mode, especially whe n the road is s lip pery
o r has loose su rface m ater ial.
- Driv ing stab ility is reduced w hen in off road
mode.
@ For the sake of the environment
Avoid harmi ng the enviro nment and show
considera tion for nature .
(D Tips
Only dr ive where it is permitted a nd a lways
stay on the provided roads a nd paths.
Explanation of technical terms
The follow ing data is based on ideal cond it io ns.
The val ues may d iffe r depend ing o n the vehicle
l oad, road character ist ics, and the a rea. The d riv
e r i s therefo re res ponsible for dec iding w hethe r a
ve hicl e can hand le a spe cific
s ituation ¢.&. .
Pitch angle
The amount of ver tica l elevation c hange (grade)
in a dis tances of 109 yards (100 mete rs) is speci
fied as a percentage o r in degrees. Spe cifica tion
of how s teep of a grade t he ve hicle can dr ive up
usi ng its own power (de pends on the road sur
face and the eng ine power, among other things) .
M axim um permitted pitch ang le : 3 1
°.
Driving
Ground clearance
T he dis ta n ce be tween the road surface and the
l owest point of the vehicle underbody. Gro und
clearance : 8 .1 in (205 mm)
A WARNING
= -
Exceeding the max imum specified va lues can
l ead to serious injuries or vehicle damage.
-A ll sp ec ificat ions were determine d base d on
a level, f irm, an d non -slippe ry road s urface
in dry weather conditions.
-The ideal cond itions do not apply in offroad
d riving. Do not always go a ll the way up to
the maximum val ues . Stay slightly below
them for safety .
Messages
There is only one motto when driving in difficult
condi tions and off road: drive slowly and with
caution!
Observe the following when driv ing on unpaved
roads :
.. Only dr ive in ter ra in tha t is sui table fo r the ve
hicle and yo ur dr iv ing ability . Never take any
unnecessa ry risks!
.. Dr ive slow ly and caref ully.
.. Pay attent ion to the ground clearance of your
veh icle .
.. Activa te the offroad mode as needed
¢ page 141 .
.. Use the hill de scent assist when d riving down
s teep
hills ¢ page 142 .
Difficult terrain and off-road
When driving in unfam iliar areas and off road,
dr ive slowly and keep o n the watch for unexpect
ed obstacles (such as pot ho les, rocks, tree
stumps , etc.).
To p reve nt the vehicle from bottom ing o ut and to
reduce the risk of underbody damage, you should
dr ive across uneven gro und o n only o ne si de of
t h e ve hicle so that on ly two of you r whee ls c ross
t h e u neven a re a, ins tead of drivin g ac ross the
cente r of the u neven area wit h all four wheels.
..,
83
Page 86 of 392

Driving
Drive quick ly through sandy or marshy off-road
sections and do not stop , if at all poss ibl e.
Driving through water
Also read the information found in ¢ page 73.
Driving on a slope
If you a re ever unable to dr ive up a hill , do not try
to turn around . Drive back down in
re verse in
stead. Otherwise you r un the r isk o f tipping over .
If the vehicle threatens to tip over when dr iving
across a slope , you mu st immediately stee r
downhill in the direction of the slope.
Do not park your vehicle on steep hills.
To reduce the r isk of t ipping over, dr ive on hills in
the direction of the downward s lope (fa ll line)
-
never crosswise .
Tilt angle display
Description
Applies to: vehicles with a ti lt angle display
F ig. 89 I nfo ta in me nt syste m: tilt ang le d ispla y
You c an see the vehicle pos ition in re lation to a
leve l plane us ing the tilt angle display in the In
fotainment system . Bot h the sideways angle @
and the lengthwise angle @ of the vehicle are
disp layed. The accuracy depends on the driving
situation and is normally a round 1
°. The side
ways angle of your vehicle should no t exceed the
ye llow range in the gauge . If it reaches the red
range, there is a risk that the ve hicle m ight tip
¢ ,&. .
Displaying the tilt angle display
~ Select in the Infotainment system : IME NUI but
ton
> Vehicle > Lift / Offroad or Allroad *.
84
Showing the additional display
To ch ange the con ten ts shown in the r igh t ar ea of
t h e screen, se lect in the In fo ta inment system :
r ight contro l button
> Additional display.
Angle :
this displays t he cur rent stee ring wheel
angle and t he max imum ang le th at was re ached
dur ing a drive . These values are reset when the
i gnition is switche d off .
Position : displays the he ig ht, di re ct io n a nd geo
coor din at es of the cur rent veh icle posit io n.
Off : only the air suspe nsio n disp lay remains on .
A WARNING
- Do not excee d the yellow range in the
g au ge. Your ve hicle can t ip, whi ch in cre as es
t he risk of an accident.
- Unde r some ci rcumstan ce s, the vehicle can
t ip ove r or til t sid eways eve n if the s ideways
angle is low. The angle display does not re
p lace the driver's attent io n. To re duce the
risk of an accident, make sure the vehicle
does not tip, especially when yo u are driving
at high speeds.
Automatic transmission
Introduction
The au tom atic transmission is con trolled ele c
tronically. The transmission shifts up or down au
tomat ica lly depending on which dr ive p rogram is
selected .
When a
moderate driving style i s used, t he
transm iss ion selec ts the most economica l driv ing
mode. The transmission upshifts at a lower RPM
and downshifts at a higher RPM to improve fue l
e fficiency.
The tra nsmission switches to a sporty mode after
a kick-down or when the driver uses a
sporty
driving style
characterized by quick accelerator
pedal movements, heavy acceleration, frequent
changes in speed and t raveling at the max imum
speed .
If desired, th e driver can also select the gears
manually (tiptronic mode ) ¢ page 88.
Page 87 of 392

S tronic transmission
The S tronic is a dual-clutch transmiss ion. Power
is transferred using two clutches that work inde
pendently from one another. They replace the
torque converter used in conventional automatic
transmissions and allow the vehicle to accelerate
without a noticeable interruption in traction.
tiptron ic transmission
In the tiptronic transmission, power is transfer
red by a torque converter.
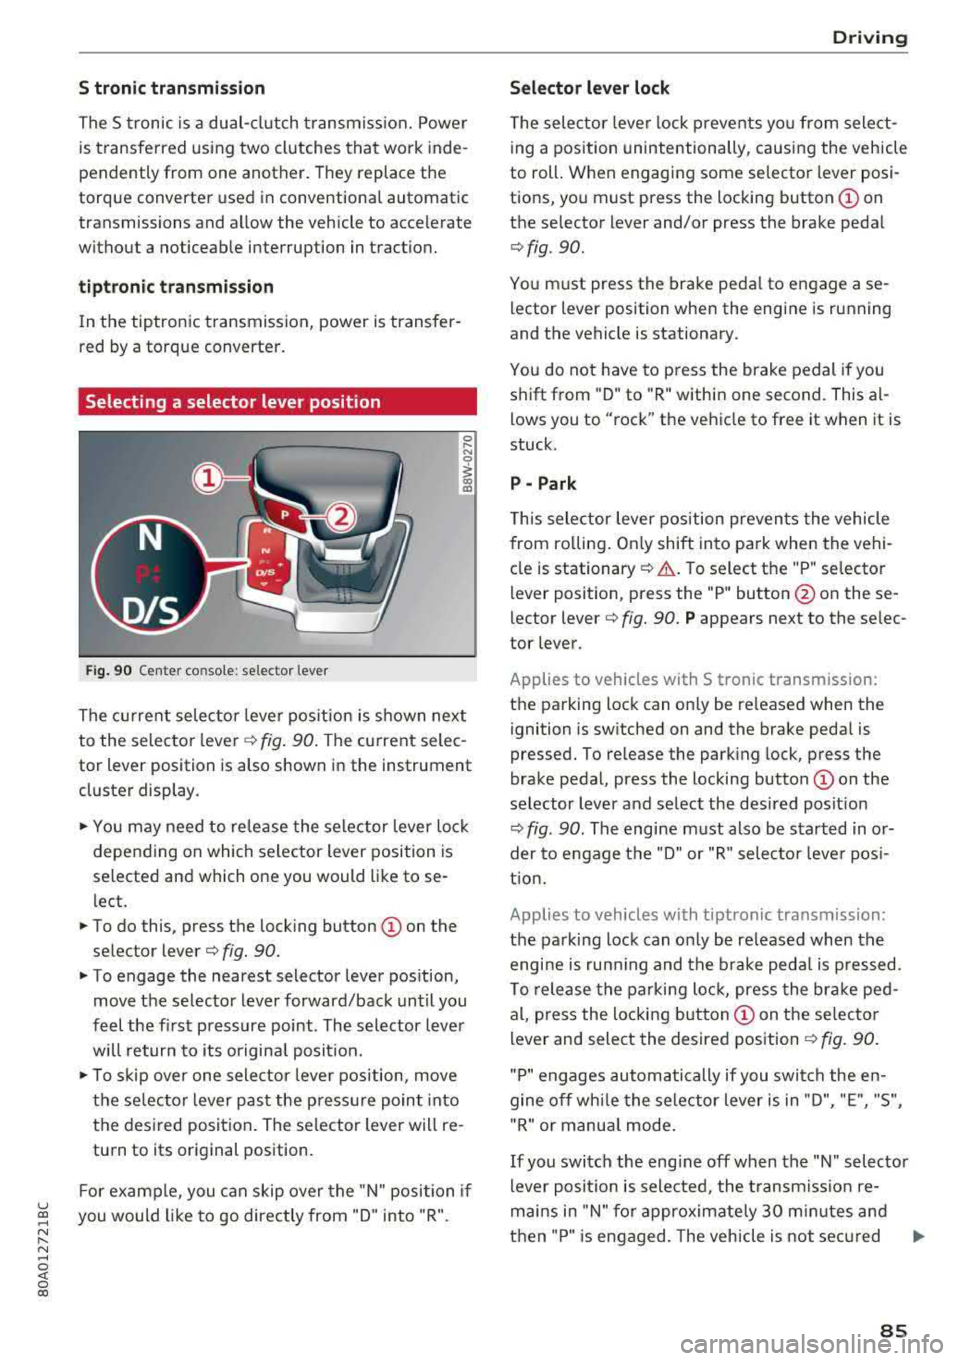
Selecting a selector lever position
Fig. 90 Center co nso le: selector lever
0 ,.... N
0
1 a,
The current selector lever position is shown next
to the selector
l ever ¢ fig. 90. The current selec
tor lever position is also shown in the instrument
cluster display .
... You may need to release the selector lever lock
depending on which selector lever position is
selected and which one you would like to se
l ect.
... To do this, press the locking button © on the
selector
lever¢ fig. 90.
... To engage the nearest selector lever position,
move the selector lever forward/back until you
feel the first pressure point . The selector lever
will return to its original posit ion.
.., To skip over one selector lever position, move
the selec tor lever past the pressure point into
the desired position . The selector lever will re
turn to its original position.
F or example, you can skip over the "N" position if
u ~ you would like to go directly from "D" into "R".
N ...... N ......
~ 0 co
Driving
Selector lever lock
The selector lever lock prevents you from select
ing a position unintentionally, causing the vehicle
to roll. When engaging some selector lever posi
tions, you must press the locking
button © on
the selector lever and/or press the brake pedal
¢ fig . 90.
You must press the brake pedal to engage a se
lector lever position when the engine is running
and the vehicle is stationary.
You do not have to p ress the brake pedal if you
shift from "D" to "R" within one second. This
al
lows you to "rock" the vehicle to free it when it is
stuck.
P - Park
This selector lever position prevents the vehicle
from ro lling . On ly shift into pa rk when the vehi
cle is
stationary ¢.&. . To select the "P" selector
lever position, press the "P" button @ on these
lector
lever¢ fig. 90. P appears next to the selec
tor lever.
Applies to vehicles with S t ronic transm ission:
the parking lock can only be re leased when the
ignition is switched on and the brake pedal is
pressed. To release the parking lock, press the
brake pedal, press the locking
button @ on the
selector lever and select the desired posit ion
¢ fig . 90. The engine must also be started in or
der to engage the "D" or "R" selector leve r pos i
tion.
Applies to vehicles with tiptronic transmission:
the parking lock can only be re leased when the
engi ne is ru nning and the brake pedal is pressed .
To release the parking lock, press the brake ped
al, press the locking
button @ on the selector
lever and select the desired position
¢ fig. 90.
"P " engages automatically if you switch the en
gine off whi le the selector lever is in "D", "E", "S",
" R" or manua l mode.
If you switch the eng ine off when the "N" selector
lever position is selected, the transmission re
mai ns in "N" for approximately 30 m inutes and
then "P" is engaged. The vehicle is not secured
..,
85
Page 88 of 392

Drivin g
from rolling in t he "N " selector lever position, so
you need to set the pa rking
brake<®> ¢ page 80.
You must use the parking lock emergency release
before towing the
vehicle ¢ page 90.
R-Reverse
The reverse gear is engaged in this pos ition . Only
select reverse gear when the veh icle is stationary
and the eng ine is running at idle
speed ¢.& . To
engage the "R" se lecto r lever posit ion, p ress the
brake pedal , press the lock ing button
CD on the
selector lever, and select the "R " position
¢ fig . 90.
A confirmation tone w ill sound when the reve rse
gear is engaged .
N
· N eutral (idle )
The transm ission is in idle in this pos ition . To en
gage the "N" selector lever position, press the loc king button
CD on the se lector lever and sh ift
into t he "N " posit io n
¢ fig. 90.
If you sw itch the engine off when the "N" selector
lever position is se lected, the transmission re
mains in "N " for app rox imately 30 minutes and
t hen "P " is engaged.
You cannot select the "N " pos ition when the ign i
tion is sw itched off. When d riving through an au
tomatic ca r wash, first select the "N " posi tion and
t hen t urn the engine off.
For safety reasons, the vehicle cannot be locked
when the transm ission is in the "N" pos ition .
DIS· Dr iving forward
When the transmission is in the "D/S" pos it ion, it
can be operated e ither in the normal "D " mode or
in the "S" sport mode . Move the selector lever
back to engage the "S" spo rt mode . You can o nly
select the "S" se lector lever position when the "D"
or " E" pos it io n is selected. To sele ct the "D" or " E"
position again w hen "S " is engaged, move these
lecto r leve r
back ¢.& . To shi ft from "N" to "D"
when traveling at speeds below 1 mph (2 km/h), pr ess th e brak e pedal and s hift into the "D" posi
tion ¢_& .
In t he normal mode "D" , the transmission a uto
matica lly selects the suitab le gear ratio . It de -
86
pends on engine load , vehicle speed and driving
sty le.
Se lect t he sport mod e "S " for sporty dr iv ing. The
vehicle makes f ull use of the eng ine's power.
S hi ft ing may become noticeable when accelerat
ing .
The "S" se lector lever posi tion engages automati
c all y w hen you select the dynam ic* mode in drive
select.
A WARNING
Read and fo llow all WARNINGS .
- The vehi cle can roll even i f the ig nit ion is
switched off .
- P owe r is s till tra nsmi tted to t he wheels
when t he engine is running at idle . To pre
vent the vehicle from "creeping", yo u must
keep your foot on the b rake in a ll selector
lever positions (except "P " and "N") when
the engine is ru nning.
- Before open ing the hood, select the "P " se
lector lever pos it ion and set the parking
brake. This reduces the risk of an acc ident .
Always read and follow the app licab le warn
ings ¢ page 314, Working in the engine
compartment.
(D Tips
If you accide nta lly select "N" while dr iv ing,
take your foot off the accelerator pedal and
wait fo r the e ng ine to slow down to idle be
fo re selecti ng "D " or "S" .
Driving tips
Starting the engine
.,. The "P" or "N " pos it io n m ust be selected.
St arting from a stop
.,. Press and hold the brake peda l.
.,. Start the engine ¢ page 76.
.,. Press the locking button CD on the selector lev
er a nd se lect the "D", "E", "S " or "R " pos it io n
¢ page 85.
.,. Wa it a mome nt until the t ransmiss ion sh ifts.
You will notice a slig ht movement when the
gear engages .