2017 PEUGEOT PARTNER TEPEE ELECTRIC display
[x] Cancel search: displayPage 105 of 252

67
Air conditioning A/C
The air conditioning only works with the engine
running.Pressing the button switches the air
conditioning on; the LED comes on.
Pressing the button again switches
the function off; the LED goes off.
The air conditioning cannot operate when the
air flow is set to 0.
Dual-zone automatic air
conditioning
1. AUTO comfort programme.
2. Temperature adjustment on driver/
passenger side.
3. Air distribution adjustment.
4. Air flow adjustment.
5. Air intake/Air recirculation.
6. Air conditioning On/Off. For maximum cooling or heating of the
passenger compartment, it is possible to
exceed the value 15 by turning till LO is
displayed or the value 27 by turning till HI
is displayed.
On entering the vehicle, the interior
temperature may be much colder (or
warmer) than the comfort temperature.
There is no need to alter the value
displayed in order to reach the required
level of comfort quickly. The system will
use its maximum power in order to reach
the required level of comfort.
Automatic operation
AUTO comfort programme
Driver or passenger comfort
value
The value shown on the display is a level of
comfort, not a temperature in degrees Celsius
or Fahrenheit.
This is the normal operating mode for the air
conditioning system. F
P
ress this button. The AUTO
symbol appears. When the engine is cold, the air flow will only
reach its optimum level gradually to prevent too
much cold air being distributed.
For your convenience the settings are stored
between two starts of your vehicle.
The automatic function will no longer be
maintained if you change a setting manually
(AUTO disappears).
Depending on the selected level of comfort, the
system controls the distribution, flow and intake of
air to ensure comfort and sufficient recirculation
of air in the passenger compartment. No further
adjustments are required.
F Rotate this control to the left
or to the right to decrease
or increase the value. A
setting of around 21 provides
optimum comfort. Nonetheless,
depending on your needs, a
setting between 18 and 24 is
typical.
Do not obstruct the sunshine sensor on
the dashboard.
3
Ease of use and comfort
Page 106 of 252
68
Manual operation
If you wish, you can make a different choice
from that offered by the system by changing a
setting. The other functions are still managed
automatically. Pressing the AUTO button
returns the system to full automatic operation.
Air distribution
Press this button repeatedly to direct
the air flow towards:
-
t
he windscreen,
-
t
he windscreen and the footwells,
-
t
he footwells,
-
t
he side vents, central vents and footwells,
-
t
he side vents and central vents,
Air flow
F Press the small fan button to
reduce air flow or the large fan
button to increase air flow.
The fan blades fill up in the screen, as the flow
rate increases.
Deactivating the system
F Press the small fan air flow
button until the fan symbol
disappears from the screen.
This will deactivate all system functions except
air recirculation and rear screen defrost (if your
vehicle is so equipped). Your comfort setting is
no longer maintained and disappears from the
screen.
For your comfort, avoid staying in the
deactivated position. Pressing the large fan button or the
AUTO button again reactivates the
system with the values set before
the deactivation.
Intake of exterior air/
Recirculation of interior air
F Press this button to recirculate the interior air. The recirculation
symbol is displayed.
Recirculation temporarily prevents exterior
odours and smoke from entering the passenger
compartment. Avoid prolonged operation in
interior air recirculation mode (risk of misting,
odour and humidity).
Pressing this button again activates the intake
of exterior air.
Air conditioning On/Off
F Once this button is pressed, the A/C symbol will be displayed
and the air conditioning
activated.
Pressing this button again stops cooling of the air.
The ventilation outlet located in the
glove box diffuses fresh air (if the air
conditioning is activated), regardless
of the temperature setting in the
passenger compartment and the exterior
temperature.
Ease of use and comfort
Page 147 of 252
109
With a 6 -speed electronic gearbox, for
your convenience when parking, the
STOP mode is not available for the few
seconds that follow disengagement of
reverse gear.
The Stop & Start system does not affect
the vehicle's functions, such as, for
example, braking, power steering, etc.
Never refuel with the engine in STOP
mode; you must switch off the ignition
using the key.
Special cases: STOP mode not
available
STOP mode is not triggered when:
- t he vehicle is on a steep slope (uphill or
downhill),
-
t
he driver's door is open,
-
t
he driver's seat belt is not fastened,
-
t
he vehicle has not exceeded 6 mph
(10
km/h) since the last engine start using
t h e key,
-
t
he engine is needed to maintain a
comfortable temperature in the passenger
compartment,
-
d
emisting is on, -
s
ome special conditions (battery charge,
engine temperature, braking assistance,
ambient temperature, etc.) are present
which require the engine to be running to
assure control of the system.
In this case, the " ECO" indicator
lamp flashes for a few seconds then
goes off.
This operation is perfectly normal.
Going into engine START mode
The " ECO" indicator lamp goes off
and the engine restarts:
-
w
ith a manual gearbox , when you fully
press the clutch pedal,
-
w
ith a 6-speed electronic gearbox
•
g
ear lever in position A or M , when you
release the brake pedal,
•
o
r gear lever in position N and the brake
pedal released, when you move the gear
selector to position A or M ,
•
o
r when you engage reverse gear. With a manual gearbox in STOP mode, if
a gear is engaged without fully pressing
the clutch pedal, a message is displayed
asking you to press the clutch pedal to
restart the engine.
Special cases: START mode
activated automatically
As a safety measure or to maintain comfort
levels in the vehicle, START mode is activated
automatically when:
-
y
ou open the driver's door,
-
y
ou unfasten the driver's seat belt,
-
t
he speed of the vehicle exceeds 16 mph
(25
km/h) with a manual gearbox or 7 mph
(11
km/h) with an electronic 6 -speed
gearbox,
-
s
ome special conditions (battery charge,
engine temperature, braking assistance,
ambient temperature, etc.) are present
which require the engine to be running to
assure control of the system or vehicle.
In this case, the " ECO" indicator
lamp flashes for a few seconds then
goes off.
This operation is perfectly normal.
6
Driving
Page 150 of 252
112
Tyre under-inflation
detection
This system automatically monitors the tyre
pressure while driving.
The system continuously monitors the
pressures of the four tyres, as soon as the
vehicle is moving.
A pressure sensor is located in the valve of
each tyre (except the spare wheel).
The system triggers an alert as soon as it
detects a drop in the pressure of one or more
tyres.This system does not eliminate the need
to check the tyre pressures (including
the spare wheel) every month as well as
before a long journey.
Driving with under-inflated tyres impairs
handling, extends braking distances and
causes early tyre wear, particularly in
adverse conditions (heavy loads, high
speeds, long journeys).
Driving with under-inflated tyres
increases fuel consumption. The tyre pressure specifications for your
vehicle can be found on the tyre pressure
label.
Tyre pressure should be checked when
the tyres are "cold" (vehicle stopped for
1
hour or after a journey of less than
6
miles (10 km) at moderate speeds).
Other wise, add 0.3
bar (30 kPa) to the
values indicated on the label.
For more information on Identification
markings , including the tyre pressure
label, refer to the corresponding section.
Under-inflation alert
This is indicated by continuous
illumination of this warning lamp, an
audible signal and, depending on
equipment, the display of a message.
- In the event of a puncture, use the temporary puncture repair kit or the spare
wheel (depending on equipment).
or
-
i
f you have a compressor, such as the one
in the temporary puncture repair kit, check
the pressures of the four tyres when cold,
or
-
i
f it is not possible to make this check
immediately, drive carefully at reduced
speed.
The loss of pressure detected does not
always cause visible bulging of the tyre.
Do not rely on a simple visual check.
The alert continues until the tyre or tyres
concerned are reinflated, repaired or
replaced.
The spare wheel (space-saver or a steel
rim type) does not have a sensor.
In the event of a problem with one of the tyres,
depending on equipment, the symbol or the
message appears to identify it.
-
R
educe speed immediately, avoid excessive
steering movements and sudden braking.
-
S
top as soon as it is safe to do so.
Driving
Page 151 of 252
113
Operating fault
The flashing and then fixed
illumination of this under-inflation
warning lamp accompanied by the
illumination of the Ser vice warning
lamp, and depending on equipment,
the display of a message indicates a
fault with the system.
In this case, the pressure in the tyres is no
longer monitored.
This alert is also displayed when one or
more wheels are not fitted with a sensor
(for example, a space-saver or steel spare
wheel).
Go to a PEUGEOT dealer or a qualified
workshop to have the system checked or,
following the repair of a puncture, to have the
original wheel, equipped with a sensor, refitted.
Tyre under-inflation
detection with
reinitialisation
The system monitors the pressure in all four
tyres, as soon as the vehicle is moving.
It compares the information given by the
wheel speed sensors with reference values,
which must be reinitialised after ever y tyre
pressure adjustment or wheel change .
The system triggers an alert once a drop in
pressure is detected in one or more tyres.
The under-inflation detection system does
not replace the need for vigilance on the
part of the driver.
This system does not eliminate the need
to check the tyre inflation pressures
(including the spare) every month and
before a long journey.
Driving with under-inflated tyres impairs
handling, extends braking distances and
causes early tyre wear, particularly in
adverse conditions (heavy loads, high
speeds, long journeys).
Driving with under-inflated tyres increases
fuel consumption.
System which automatically checks the
pressures of the tyres while driving. The inflation pressures specified for your
vehicle can be found on the tyre pressure
label.
For more information on the
Identification markings
, refer to the
corresponding section.
Tyre pressures must be checked "cold"
(vehicle stopped for 1
hour or after a
journey of less than 6
miles (10 km)
travelled at a moderate speed).
Other wise (when hot), add 0.3
bar to the
pressures shown on the label.
Under-inflation alert
This is indicated by continuous
illumination of this warning lamp, an
audible signal and, depending on
the equipment installed, a message
displayed on the screen.
F
R
educe speed immediately, avoid excessive
steering movements and sudden braking.
F
S
top the vehicle as soon as it is safe to do
so.
6
Driving
Page 152 of 252
114
The loss of pressure detected does not
always cause visible bulging of the tyre.
Do not satisfy yourself with just a visual
check.
F
I
f you have a compressor, such as the one
in the temporary puncture repair kit, check
the pressures of the four tyres when cold.
F
I
f it is not possible to make this check
immediately, drive carefully at reduced
speed.
or
F
I
n case of a puncture, use the temporary
puncture repair kit or the spare wheel
(depending on equipment).
The alert is kept active until the system is
reinitialised.
Reinitialisation
The system must be reinitialised after any
adjustment to the pressures of one or more
tyres, and after changing one or more wheels. Before reinitialising the system, ensure
that the pressures of the four tyres are
correct for the use of the vehicle and in
line with the recommendations on the tyre
pressure label.
The under-inflation alert can only be relied
on if the system has been reinitialised
with all four tyres inflated to the correct
pressures.
The under-inflation detection system
does not give a warning if a pressure is
incorrect at the time of reinitialisation.
The system must be reinitialised with the
ignition on and the vehicle stationary:
-
i
n the vehicle configuration menu for
vehicles fitted with a display screen,
-
v
ia the button on the dashboard for vehicles
without a screen.
Screen A
F Press the MENU button for access to the
main menu.
F
P
ress the " 5" or " 6" button to select the
" Veh conf ig " menu, then confirm by
pressing the OK button.
F
P
ress the " 5" or " 6" button to select the
" Reinit inflat " menu, then confirm by
pressing the OK button.
A message is displayed to confirm the request.
F
C
onfirm by pressing the OK button.
Screen C
F Press the MENU button to access the main
menu.
F
P
ress the " 5" or " 6" button to select the
" Personalisation-configuration " menu,
then confirm by pressing the OK button.
F
P
ress the " 5" or " 6" button to select the
" Define the vehicle parameters " menu,
then confirm by pressing the OK button.
F
P
ress the " 5" or " 6" button to select
the " Tyre pressures " menu, then the
" Reinitialisation " menu, then confirm
by pressing the OK button. A message
confirms the reinitialisation.
Touch screen
F Press the MENU button.
F Sel ect the " Driving" menu.
F
I
n the secondary page, select "
Under-
inflation initialisation ".
A message is displayed to confirm the
reinitialisation request.
F
Sel
ect "Ye s" or " No", then confirm.
A message confirms the reinitialisation.
Driving
Page 154 of 252
116
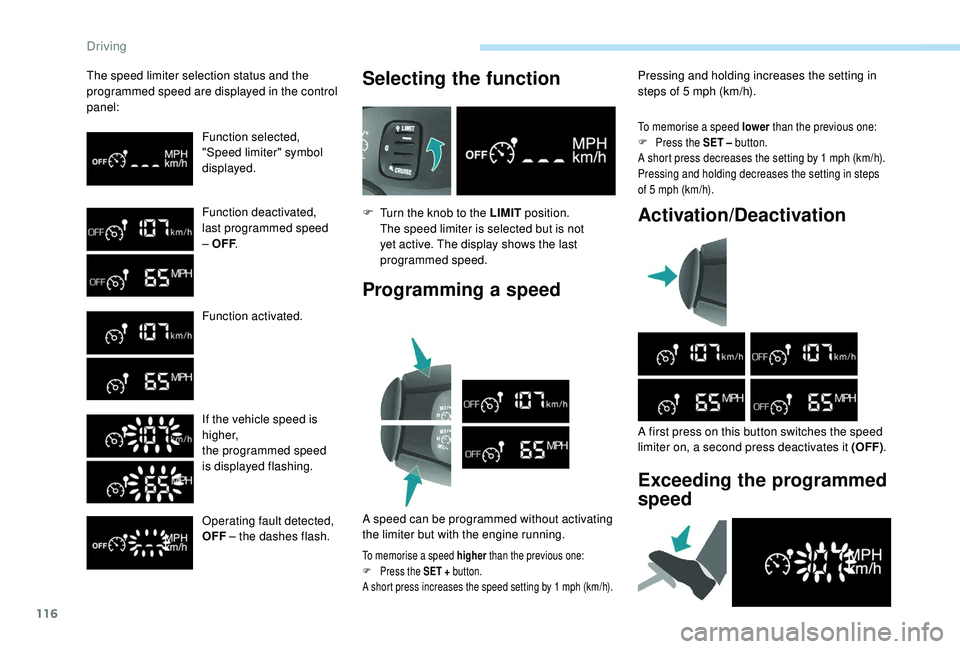
The speed limiter selection status and the
programmed speed are displayed in the control
panel:Function selected,
"Speed limiter" symbol
displayed.
Function deactivated,
last programmed speed
– OFF.
Function activated.
If the vehicle speed is
higher,
the programmed speed
is displayed flashing.
Operating fault detected,
OFF – the dashes flash.Selecting the function
F Turn the knob to the LIMIT position.
The speed limiter is selected but is not
yet active. The display shows the last
programmed speed.
Programming a speed
A speed can be programmed without activating
the limiter but with the engine running.
To memorise a speed higher than the previous one:
F P ress the SET + button.
A short press increases the speed setting by 1
mph (km/h).
To memorise a speed lower than the previous one:
F P ress the SET – button.
A short press decreases the setting by 1
mph (km/h).
Pressing and holding decreases the setting in steps
of 5
mph (km/h).
Activation/Deactivation
A first press on this button switches the speed
limiter on, a second press deactivates it (OFF) .
Exceeding the programmed
speed
Pressing and holding increases the setting in
steps of 5
mph (km/h).
Driving
Page 155 of 252
117
Pressing the accelerator pedal in order to
exceed the programmed speed will have
no effect unless you press the pedal firmly
beyond the point of resistance .
The speed limiter is deactivated temporarily
and the programmed speed setting flashes,
accompanied by an audible signal.
To return to the limiter function, reduce your
speed below the programmed speed.
Flashing of the speed setting
It flashes:
- a fter forcing the accelerator pedal past the
point of resistance,
-
w
hen the limiter cannot prevent the speed
of the vehicle increasing, because of the
profile of the road or when going down a
steep hill,
-
u
nder sharp acceleration.
Switching the funtion off
F Place the knob at the 0 position or switch off the ignition to switch the function off.
The last programmed speed remains in the
memory.
Operating fault
The programmed speed is cleared, then
replaced by three dashes.
Contact a PEUGEOT dealer or a qualified
workshop to have the system checked.
Under no circumstances can the speed
limiter replace the need to obser ve speed
limits, nor can it replace the need for
vigilance on the part of the driver.
Always pay attention to the profile of the
road and sharp acceleration and stay in
complete control of your vehicle.
To avoid any jamming under the pedals:
-
e
nsure that the mat is positioned and
secured to the floor correctly,
-
n
ever fit one mat on top of another.
"CRUISE" cruise control
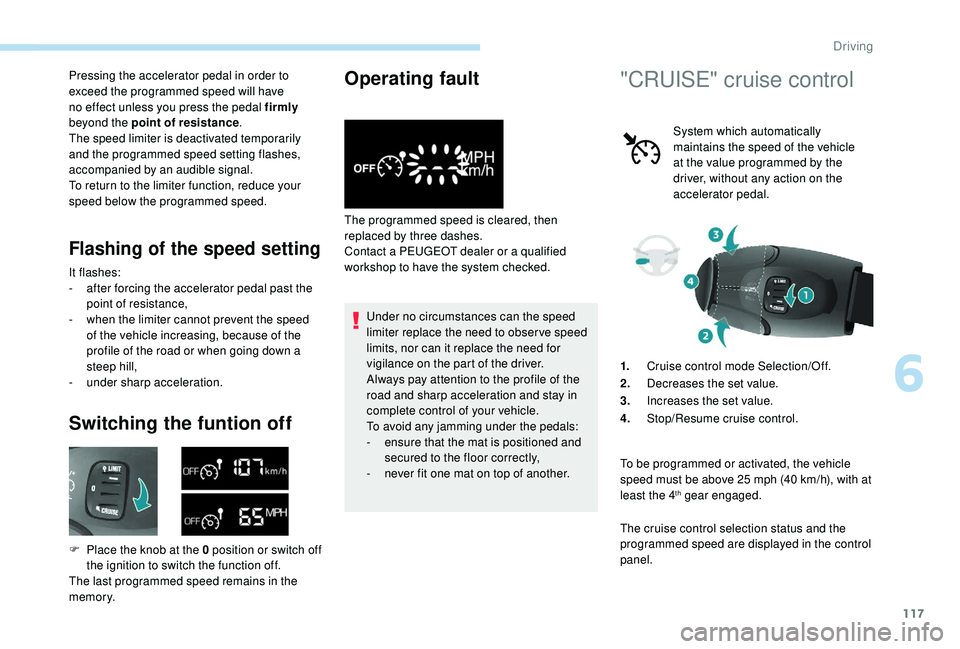
System which automatically
maintains the speed of the vehicle
at the value programmed by the
driver, without any action on the
accelerator pedal.
1. Cruise control mode Selection/Off.
2. Decreases the set value.
3. Increases the set value.
4. Stop/Resume cruise control.
To be programmed or activated, the vehicle
speed must be above 25
mph (40 km/h), with at
least the 4
th gear engaged.
The cruise control selection status and the
programmed speed are displayed in the control
panel.
6
Driving