Page 132 of 566

130
3008-2_en_Chap03_ergonomie-et-confort_ed01-2016
Rear seats
Rear head restraints
Bench seat with a fixed cushion and split folding backrests (2/3 -1/3) to adapt the boot load space.
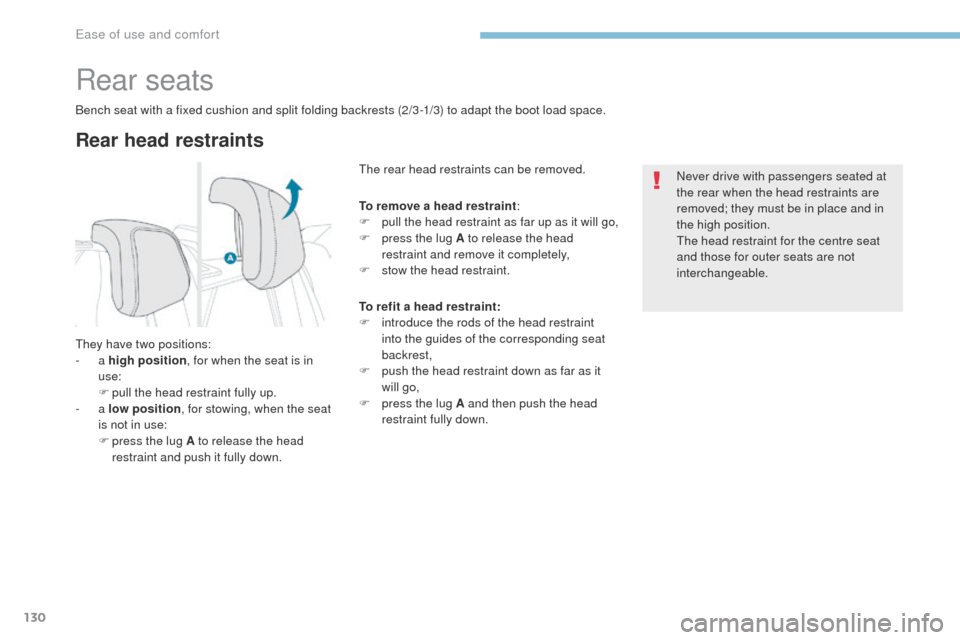
They have two positions:
- a high position , for when the seat is in
use:
F
p
ull the head restraint fully up.
-
a low position , for stowing, when the seat
is not in use:
F
p
ress the lug A to release the head
restraint and push it fully down. The rear head restraints can be removed.
Never drive with passengers seated at
the rear when the head restraints are
removed; they must be in place and in
the high position.
The head restraint for the centre seat
and those for outer seats are not
interchangeable.
To remove a head restraint
:
F
p
ull the head restraint as far up as it will go,
F
p
ress the lug A to release the head
restraint and remove it completely,
F
s
tow the head restraint.
To refit a head restraint:
F
i
ntroduce the rods of the head restraint
into the guides of the corresponding seat
backrest,
F
p
ush the head restraint down as far as it
will go,
F
p
ress the lug A and then push the head
restraint fully down.
Ease of use and comfort
Page 134 of 566
132
3008-2_en_Chap03_ergonomie-et-confort_ed01-2016
Returning the backrests to
their original positionFolding from the boot
F Pull the backrest release lever 2 towards you.
The backrest 3 folds fully onto the cushion. First check that the outer seat belts are
lying vertically alongside the backrest
latching rings.
F
P
ut the backrest 3 in the upright position
and push on it to latch it home.
F
C
heck that the red indicator is no longer
visible in the release grip 1 .
F
E
nsure that the outer seat belts are not
trapped during the manoeuvre.
Caution, a backrest that has not latched
correctly compromises the safety of
passengers in the event of sudden
braking or an accident.
The contents of the boot may be thrown
forward - Risk of serious injury!
Ease of use and comfort
Page 137 of 566
135
3008-2_en_Chap03_ergonomie-et-confort_ed01-2016
Boot fittings
1. Load space cover
2. 12 V accessor y socket (120 W)
3.
B
oot lamp
4.
R
ear seat folding controls
5.
Hoo
ks
6.
S
towing rings
7.
A
djustable boot floor (2 positions )
8.
S
torage well / Tool box under the floorThe stowing rings are designed for
securing luggage by attaching a
retaining net to the rings.
Such nets are available as an option or
as an accessory.
For more information, contact a
PEUGEOT dealer.
For the installation of a high load
retaining net, refer to the corresponding
section.
3
Ease of use and comfort
Page 138 of 566
136
3008-2_en_Chap03_ergonomie-et-confort_ed01-2016
Luggage cover
It is in two parts:
- a f ixed part with an open storage space,
-
a m
obile part which rises as the tailgate
opens, with an open storage space. To remove the luggage cover:
F
u nhook the two cords,
F
r
aise the moving part slightly, then unclip it
on each side,
F
u
nclip the fixed part on each side, then
remove the luggage cover.
The luggage cover can be stowed under the
boot floor.
Under sudden deceleration, objects
placed on the luggage cover may be
turned into projectiles.
12 V accessory socket
F To connect a 12 V accessory (max power: 120 W), remove the cap and connect an
appropriate adaptor.
F
S
witch on the ignition.
The connection of an electrical device
not approved by PEUGEOT, such as a
USB charger, may adversely affect the
operation of vehicle electrical systems,
causing faults such as poor telephone
reception or inter ference with displays
in the screens.
Ease of use and comfort
Page 140 of 566
138
3008-2_en_Chap03_ergonomie-et-confort_ed01-2016
Adjustable boot floor
This two-position floor allows you to optimise
the volume of the boot by means of the outer
stops placed on the sides:
-
Hig
h position ( 100 kg max ): you obtain a
flat floor up to the front seats, when the
rear seats are folded.
-
L
ow position ( 150 kg max): maximum boot
volume. To change the height of the floor:
F
P ush the floor fully for wards then use the
side stops to move the floor to the desired
position.
To support the floor in the raised position:
F
F
rom the high position, raise the floor
towards the load space cover.
F
T
ake it past the retractable stops, then rest
the floor on these stops.
On certain versions, the adjustable boot
floor cannot be fitted in the low position.
Ease of use and comfort
Page 141 of 566
139
3008-2_en_Chap03_ergonomie-et-confort_ed01-2016
Sliding boot floor
F From the high position, press the handle and pull the boot floor towards you, as far
as it will go.
This position facilitates loading and unloading
of the boot.
Maximum load: 100 kg .
Storage well
F Raise the boot floor fully for access to the
storage well. Depending on version, this houses:
-
a t emporary puncture repair kit with the
vehicle's tools,
-
a s
pare wheel with the vehicle's tools.
It also allows storage of the luggage cover.
3
Ease of use and comfort
Page 143 of 566

141
3008-2_en_Chap04_eclairage-et-visibilite_ed01-2016
Without AUTO lighting
With AUTO lighting
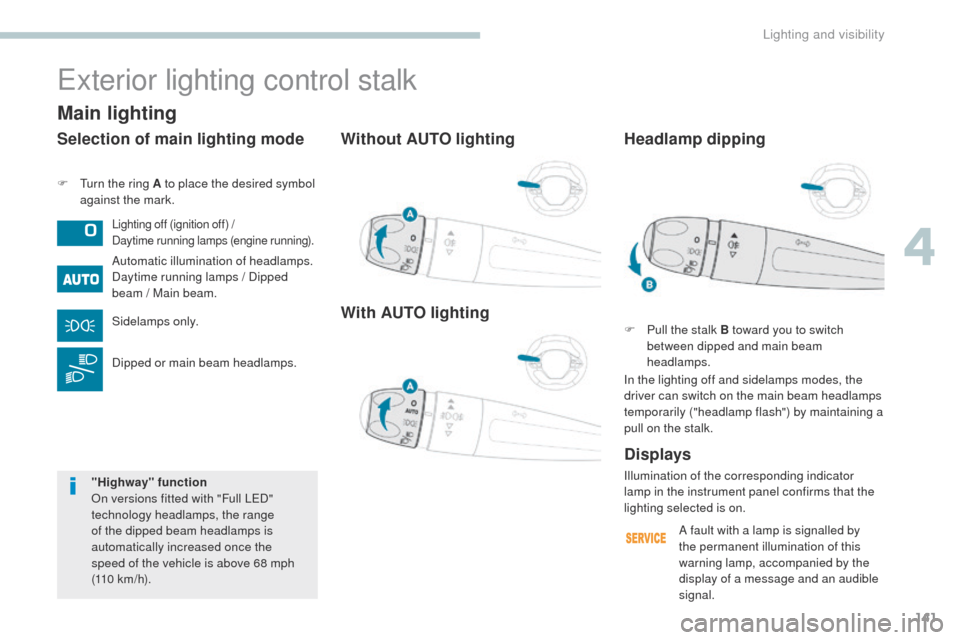
F Turn the ring A to place the desired symbol against the mark.
Exterior lighting control stalk
Lighting off (ignition off) /
Daytime running lamps (engine running).
Automatic illumination of headlamps.
Daytime running lamps / Dipped
beam / Main beam.
Sidelamps only.
Dipped or main beam headlamps.
Displays
Selection of main lighting mode
Illumination of the corresponding indicator
lamp in the instrument panel confirms that the
lighting selected is on.
Headlamp dipping
F Pull the stalk B toward you to switch
between dipped and main beam
headlamps.
In the lighting off and sidelamps modes, the
driver can switch on the main beam headlamps
temporarily ("headlamp flash") by maintaining a
pull on the stalk.
Main lighting
"Highway" function
On versions fitted with "Full LED"
technology headlamps, the range
of the dipped beam headlamps is
automatically increased once the
speed of the vehicle is above 68 mph
(110
km/h). A fault with a lamp is signalled by
the permanent illumination of this
warning lamp, accompanied by the
display of a message and an audible
signal.
4
Lighting and visibility
Page 154 of 566

152
3008-2_en_Chap04_eclairage-et-visibilite_ed01-2016
Programming
Your vehicle may also include some functions
that can be configured:
-
a
utomatic rain sensitive windscreen wipers,
-
r
ear wiping on engaging reverse gear.
In wintry conditions, remove snow, ice
or frost present on the windscreen,
around the wiper arms and blades and
the windscreen seal, before operating
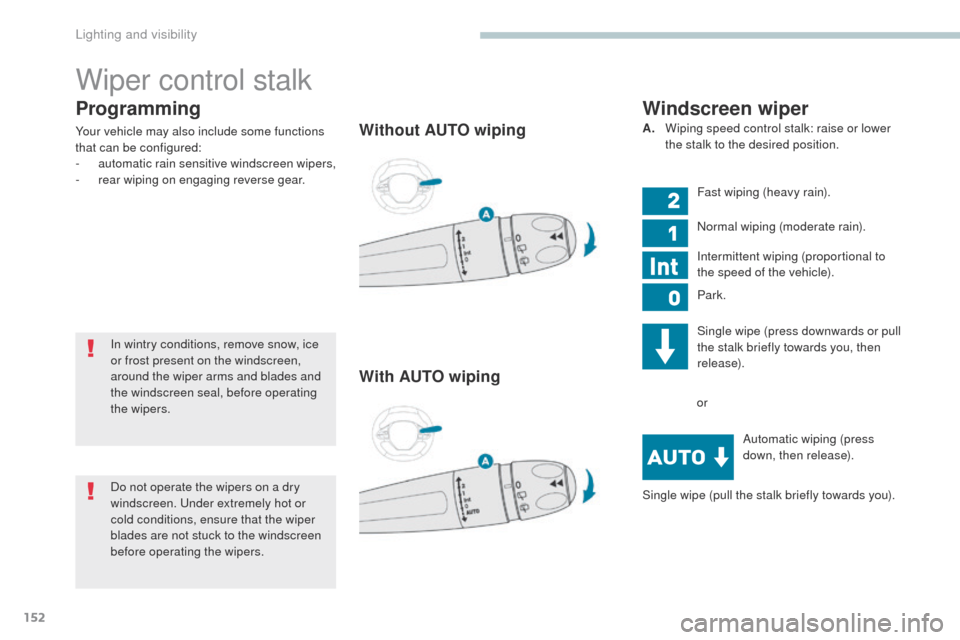
the wipers.Without AUTO wiping
With AUTO wiping
Windscreen wiper
A. Wiping speed control stalk: raise or lower the stalk to the desired position.
Fast wiping (heavy rain).
Normal wiping (moderate rain).
Intermittent wiping (proportional to
the speed of the vehicle).
Park.
Single wipe (press downwards or pull
the stalk briefly towards you, then
release).
Automatic wiping (press
down, then release).
or
Wiper control stalk
Single wipe (pull the stalk briefly towards you).
Do not operate the wipers on a dry
windscreen. Under extremely hot or
cold conditions, ensure that the wiper
blades are not stuck to the windscreen
before operating the wipers.
Lighting and visibility