2017 NISSAN JUKE ignition
[x] Cancel search: ignitionPage 279 of 416
5-18Starting and driving
back to the ON position. The vehicle
should return to its normal operating
condition. If it does not return to its normal
operating condition, have the transmission
checked and repaired, if necessary. It is
recommended you visit a NISSAN dealer
for this service.
WARNING
When the high fluid temperature pro-
tection mode or fail-safe operation
occurs, vehicle speed may be gradually
reduced. The reduced speed may be
lower than other traffic, which could
increase the chance of a collision. Be
especially careful when driving. If ne-
cessary, pull to the side of the road at a
safe place and allow the transmission
to return to normal operation, or have it
repaired if necessary.
SSD1142
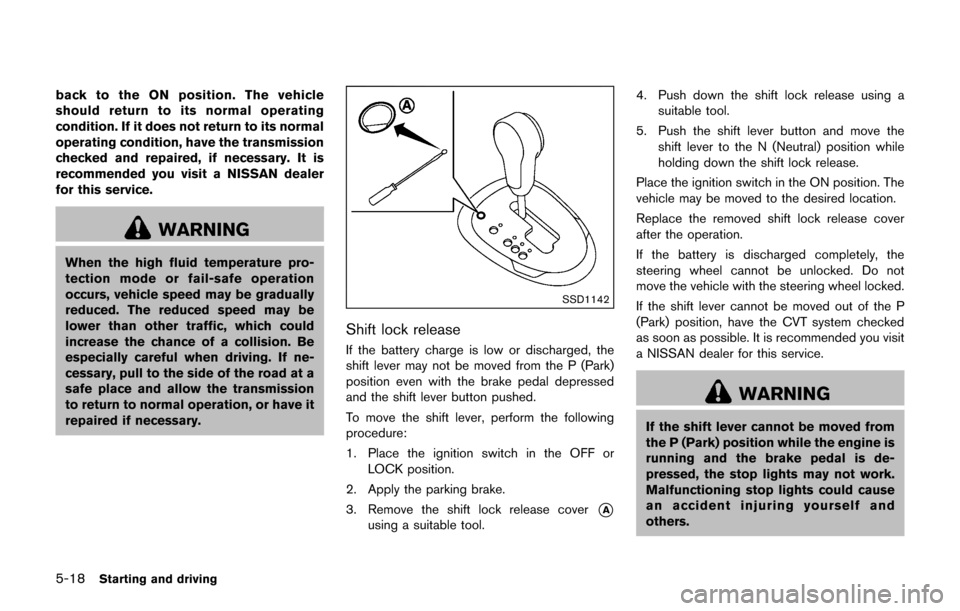
Shift lock release
If the battery charge is low or discharged, the
shift lever may not be moved from the P (Park)
position even with the brake pedal depressed
and the shift lever button pushed.
To move the shift lever, perform the following
procedure:
1. Place the ignition switch in the OFF orLOCK position.
2. Apply the parking brake.
3. Remove the shift lock release cover
*A
using a suitable tool. 4. Push down the shift lock release using a
suitable tool.
5. Push the shift lever button and move the shift lever to the N (Neutral) position while
holding down the shift lock release.
Place the ignition switch in the ON position. The
vehicle may be moved to the desired location.
Replace the removed shift lock release cover
after the operation.
If the battery is discharged completely, the
steering wheel cannot be unlocked. Do not
move the vehicle with the steering wheel locked.
If the shift lever cannot be moved out of the P
(Park) position, have the CVT system checked
as soon as possible. It is recommended you visit
a NISSAN dealer for this service.
WARNING
If the shift lever cannot be moved from
the P (Park) position while the engine is
running and the brake pedal is de-
pressed, the stop lights may not work.
Malfunctioning stop lights could cause
an accident injuring yourself and
others.
Page 290 of 416
.Keep your engine tuned up.
. Follow the recommended scheduled main-
tenance.
. Keep the tires inflated to the correct
pressure. Low tire pressure increases tire
wear and lowers fuel economy.
. Keep the wheels in correct alignment.
Improper alignment increases tire wear and
lowers fuel economy.
. Use the recommended viscosity engine oil.
(See “Engine oil and oil filter recommenda-
tion” (P.10-7) .)
WARNING
.For AWD equipped vehicles, do not
attempt to raise two wheels off the
ground and shift the transmission to
any drive or reverse position with
the engine running. Doing so may
result in drivetrain damage or un-
expected vehicle movement which
could result in serious vehicle da-
mage or personal injury.
. Do not attempt to test an AWD
equipped vehicle on a 2-wheel dy-
namometer (such as the dynam-
ometers used by some states for
emissions testing) or similar equip-
ment even if the other two wheels
are raised off the ground. Make sure
that you inform the test facility
personnel that your vehicle is
equipped with AWD before it is
placed on a dynamometer. Using
the wrong test equipment may re-
sult in drivetrain damage or unex-
pected vehicle movement which
could result in serious vehicle da-
mage or personal injury.
SSD1129
AWD mode switch
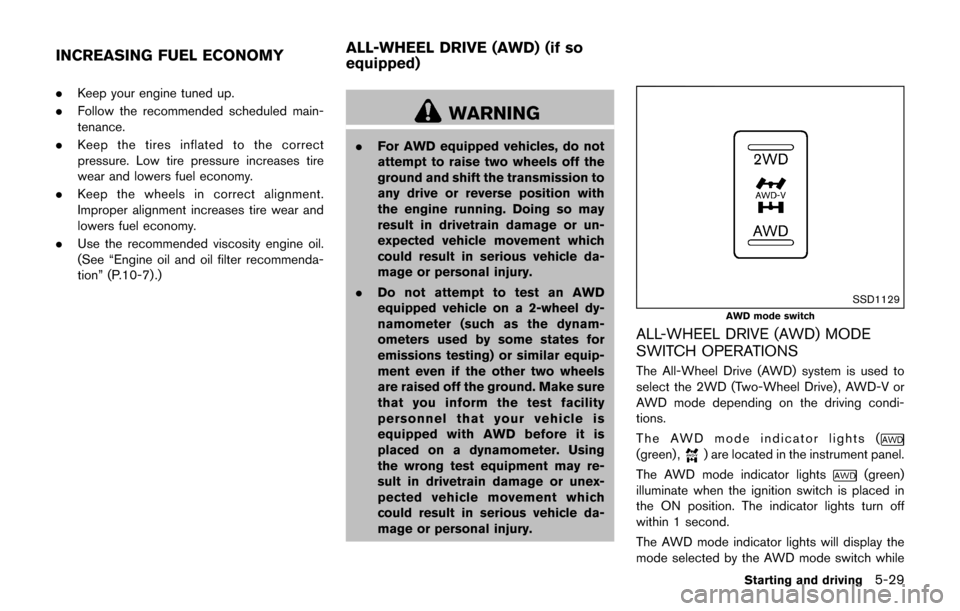
ALL-WHEEL DRIVE (AWD) MODE
SWITCH OPERATIONS
The All-Wheel Drive (AWD) system is used to
select the 2WD (Two-Wheel Drive) , AWD-V or
AWD mode depending on the driving condi-
tions.
The AWD mode indicator lights (
(green) ,) are located in the instrument panel.
The AWD mode indicator lights
(green)
illuminate when the ignition switch is placed in
the ON position. The indicator lights turn off
within 1 second.
The AWD mode indicator lights will display the
mode selected by the AWD mode switch while
Starting and driving5-29
INCREASING FUEL ECONOMY ALL-WHEEL DRIVE (AWD) (if so
equipped)
Page 292 of 416
AWD shift tips
.The oil temperature of power train parts will
increase if the vehicle is continuously
operated under conditions where the differ-
ence in rotation between the front and rear
wheels is large (wheel slip) , such as when
driving the vehicle on rough roads through
sand or mud or when freeing a stuck vehicle.
In these cases, the AWD warning light blinks
rapidly and the AWD mode changes to the
2WD mode to protect the power train parts.
If you stop driving with the engine idling and
wait until the warning light stops blinking,
the AWD returns to the AWD-V or AWD
mode.
. Brake distance in the AWD mode is the
same as 2WD.
CAUTION
.Do not start the engine with the
AWD mode switch in any mode in
the following cases:
— when the vehicle is placed on a
free-roller or jacking up the
vehicle with the front tires
raised and the rear tires on the
ground. — when towing the vehicle with the
rear tires raised from the
ground.
. Operate the AWD mode switch only
when driving straight. Do not oper-
ate the AWD mode switch when
making a turn or backing up. If the
AWD mode switch is operated while
making a turn, accelerating or de-
celerating, or if the ignition switch is
turned off while in the AWD-V or
AWD mode, you may feel a jolt. This
is not a malfunction.
. Do not operate the AWD mode
switch with the front wheel spin-
ning.
. Engine idling speed is high while
warming up the engine. Be espe-
cially careful when starting or driv-
ing on slippery surfaces with the
AWD mode switch set in the AWD-V
or AWD mode.SSD0336-D
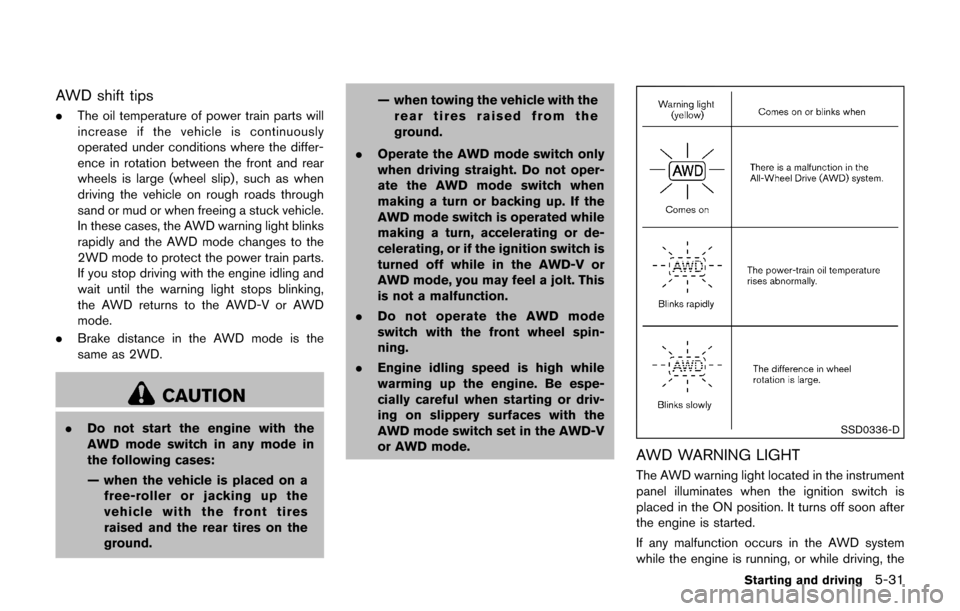
AWD WARNING LIGHT
The AWD warning light located in the instrument
panel illuminates when the ignition switch is
placed in the ON position. It turns off soon after
the engine is started.
If any malfunction occurs in the AWD system
while the engine is running, or while driving, the
Starting and driving5-31
Page 295 of 416
5-34Starting and driving
the vehicle forward until the curb side
wheel gently touches the curb.
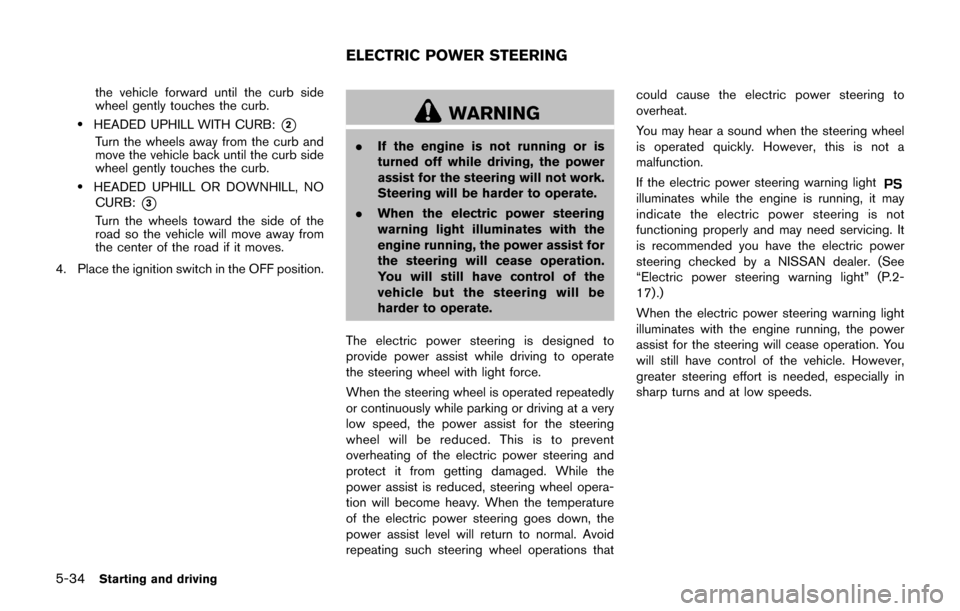
.HEADED UPHILL WITH CURB:*2
Turn the wheels away from the curb and
move the vehicle back until the curb side
wheel gently touches the curb.
.HEADED UPHILL OR DOWNHILL, NOCURB:
*3
Turn the wheels toward the side of the
road so the vehicle will move away from
the center of the road if it moves.
4. Place the ignition switch in the OFF position.
WARNING
. If the engine is not running or is
turned off while driving, the power
assist for the steering will not work.
Steering will be harder to operate.
. When the electric power steering
warning light illuminates with the
engine running, the power assist for
the steering will cease operation.
You will still have control of the
vehicle but the steering will be
harder to operate.
The electric power steering is designed to
provide power assist while driving to operate
the steering wheel with light force.
When the steering wheel is operated repeatedly
or continuously while parking or driving at a very
low speed, the power assist for the steering
wheel will be reduced. This is to prevent
overheating of the electric power steering and
protect it from getting damaged. While the
power assist is reduced, steering wheel opera-
tion will become heavy. When the temperature
of the electric power steering goes down, the
power assist level will return to normal. Avoid
repeating such steering wheel operations that could cause the electric power steering to
overheat.
You may hear a sound when the steering wheel
is operated quickly. However, this is not a
malfunction.
If the electric power steering warning light
illuminates while the engine is running, it may
indicate the electric power steering is not
functioning properly and may need servicing. It
is recommended you have the electric power
steering checked by a NISSAN dealer. (See
“Electric power steering warning light” (P.2-
17) .)
When the electric power steering warning light
illuminates with the engine running, the power
assist for the steering will cease operation. You
will still have control of the vehicle. However,
greater steering effort is needed, especially in
sharp turns and at low speeds.
ELECTRIC POWER STEERING
Page 298 of 416

indicate a malfunction. If the computer senses a
malfunction, it switches the ABS off and
illuminates the ABS warning light on the
instrument panel. The brake system then oper-
ates normally, but without anti-lock assistance.
If the ABS warning light illuminates during the
self-test or while driving, have the vehicle
checked. It is recommended you visit a NISSAN
dealer for this service.
Normal operation
The ABS operates at speeds above 3 to 6 MPH
(5 to 10 km/h) . The speed varies according to
road conditions.
When the ABS senses that one or more wheels
are close to locking up, the actuator rapidly
applies and releases hydraulic pressure. This
action is similar to pumping the brakes very
quickly. You may feel a pulsation in the brake
pedal and hear a noise from under the hood or
feel a vibration from the actuator when it is
operating. This is normal and indicates that the
ABS is operating properly. However, the pulsa-
tion may indicate that road conditions are
hazardous and extra care is required while
driving.The Vehicle Dynamic Control (VDC) system
uses various sensors to monitor driver inputs
and vehicle motion. Under certain driving con-
ditions, the VDC system helps to perform the
following functions.
.
Controls brake pressure to reduce wheel
slip on one slipping drive wheel so power is
transferred to a non slipping drive wheel on
the same axle.
. Controls brake pressure and engine output
to reduce drive wheel slip based on vehicle
speed (traction control function) .
. Controls brake pressure at individual wheels
and engine output to help the driver maintain
control of the vehicle in the following
conditions:
— understeer (vehicle tends to not follow
the steered path despite increased
steering input)
— oversteer (vehicle tends to spin due to certain road or driving conditions) .
The VDC system can help the driver to maintain
control of the vehicle, but it cannot prevent loss
of vehicle control in all driving situations. When the VDC system operates, the VDC
warning light
in the instrument panel flashes
so note the following:
. The road may be slippery or the system may
determine some action is required to help
keep the vehicle on the steered path.
. You may feel a pulsation in the brake pedal
and hear a noise or vibration from under the
hood. This is normal and indicates that the
VDC system is working properly.
. Adjust your speed and driving to the road
conditions.
If a malfunction occurs in the system, the VDC
warning light
illuminates in the instrument
panel. The VDC system automatically turns off.
The VDC OFF switch is used to turn off the VDC
system. The VDC off indicator
illuminates to
indicate the VDC system is off. When the VDC
switch is used to turn off the system, the VDC
system still operates to prevent one drive wheel
from slipping by transferring power to a non
slipping drive wheel. The VDC warning light
flashes if this occurs. All other VDC functions
are off, and the VDC warning lightwill not
flash. The VDC system is automatically reset to
on when the ignition switch is placed in the off
position then back to the on position.
See “Vehicle Dynamic Control (VDC) warning
light” (P.2-21) and “Vehicle Dynamic Control
Starting and driving5-37
VEHICLE DYNAMIC CONTROL (VDC)
SYSTEM
Page 303 of 416
6-2In case of emergency
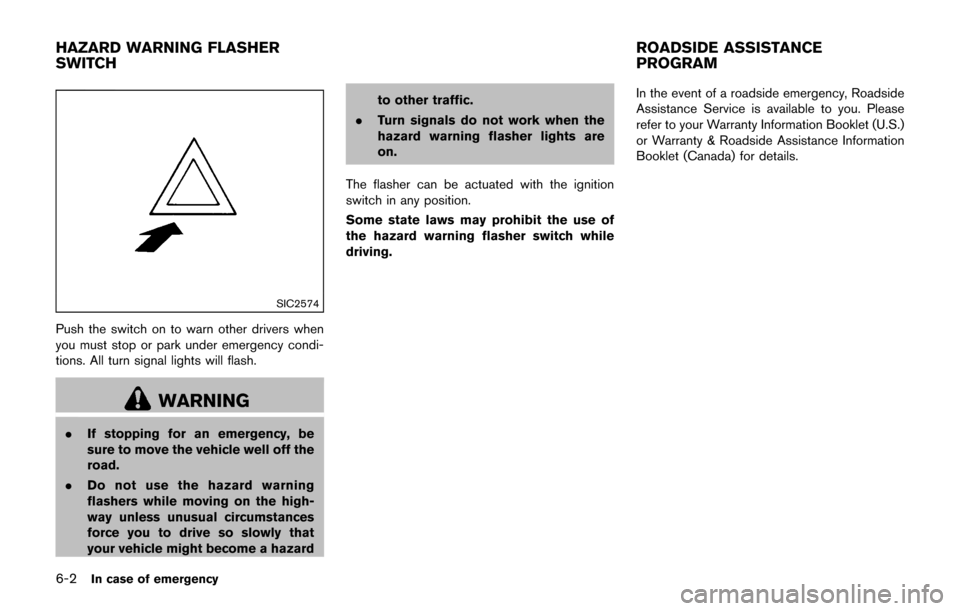
SIC2574
Push the switch on to warn other drivers when
you must stop or park under emergency condi-
tions. All turn signal lights will flash.
WARNING
.If stopping for an emergency, be
sure to move the vehicle well off the
road.
. Do not use the hazard warning
flashers while moving on the high-
way unless unusual circumstances
force you to drive so slowly that
your vehicle might become a hazard to other traffic.
. Turn signals do not work when the
hazard warning flasher lights are
on.
The flasher can be actuated with the ignition
switch in any position.
Some state laws may prohibit the use of
the hazard warning flasher switch while
driving. In the event of a roadside emergency, Roadside
Assistance Service is available to you. Please
refer to your Warranty Information Booklet (U.S.)
or Warranty & Roadside Assistance Information
Booklet (Canada) for details.
HAZARD WARNING FLASHER
SWITCH
ROADSIDE ASSISTANCE
PROGRAM
Page 304 of 416
To shut off the engine in an emergency situation
while driving, perform the following procedure:
.Rapidly push the push-button ignition switch
3 consecutive times in less than 1.5
seconds, or
. Push and hold the push-button ignition
switch for more than 2 seconds.TIRE PRESSURE MONITORING SYS-
TEM (TPMS)
This vehicle is equipped with the Tire Pressure
Monitoring System (TPMS) . It monitors tire
pressure of all tires except the spare. When
the low tire pressure warning light is lit, and the
CHECK TIRE PRES (pressure) warning mes-
sage is displayed in the vehicle information
display, one or more of your tires is significantly
under-inflated. If the vehicle is being driven with
low tire pressure, the TPMS will activate and
warn you of it by the low tire pressure warning
light. This system will activate only when the
vehicle is driven at speeds above 16 MPH (25
km/h) . For more details, see “Warning lights,
indicator lights and audible reminders” (P.2-15)
and “Tire Pressure Monitoring System (TPMS)”
(P.5-3) .
WARNING
.If the low tire pressure warning light
illuminates while driving, avoid sud-
den steering maneuvers or abrupt
braking, reduce vehicle speed, pull
off the road to a safe location and
stop the vehicle as soon as possi-
ble. Driving with under-inflated tires
may permanently damage the tires and increase the likelihood of tire
failure. Serious vehicle damage
could occur and may lead to an
accident and could result in serious
personal injury. Check the tire pres-
sure for all four tires. Adjust the tire
pressure to the recommended COLD
tire pressure shown on the Tire and
Loading Information label to turn
the low tire pressure warning light
OFF. If you have a flat tire, replace it
with a spare tire as soon as possi-
ble.
. Since the spare tire is not equipped
with the TPMS, when a spare tire is
mounted or a wheel is replaced, the
TPMS will not function and the low
tire pressure warning light will flash
for approximately 1 minute. The
light will remain on after 1 minute.
Have your tires replaced and/or
TPMS system reset as soon as
possible. It is recommended you
visit a NISSAN dealer for these
services.
. Replacing tires with those not ori-
ginally specified by NISSAN could
affect the proper operation of the
TPMS.
In case of emergency6-3
EMERGENCY ENGINE SHUT OFF FLAT TIRE
Page 311 of 416
6-10In case of emergency
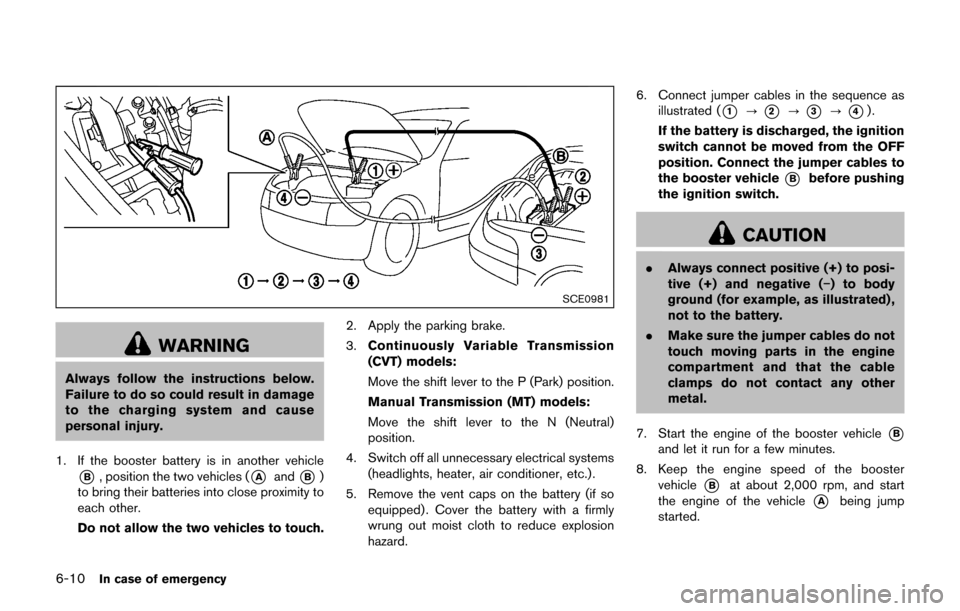
SCE0981
WARNING
Always follow the instructions below.
Failure to do so could result in damage
to the charging system and cause
personal injury.
1. If the booster battery is in another vehicle
*B, position the two vehicles (*Aand*B)
to bring their batteries into close proximity to
each other.
Do not allow the two vehicles to touch. 2. Apply the parking brake.
3.
Continuously Variable Transmission
(CVT) models:
Move the shift lever to the P (Park) position.
Manual Transmission (MT) models:
Move the shift lever to the N (Neutral)
position.
4. Switch off all unnecessary electrical systems (headlights, heater, air conditioner, etc.) .
5. Remove the vent caps on the battery (if so equipped) . Cover the battery with a firmly
wrung out moist cloth to reduce explosion
hazard. 6. Connect jumper cables in the sequence as
illustrated (
*1?*2?*3?*4).
If the battery is discharged, the ignition
switch cannot be moved from the OFF
position. Connect the jumper cables to
the booster vehicle
*Bbefore pushing
the ignition switch.
CAUTION
. Always connect positive (+) to posi-
tive (+) and negative (�í) to body
ground (for example, as illustrated) ,
not to the battery.
. Make sure the jumper cables do not
touch moving parts in the engine
compartment and that the cable
clamps do not contact any other
metal.
7. Start the engine of the booster vehicle
*B
and let it run for a few minutes.
8. Keep the engine speed of the booster vehicle
*Bat about 2,000 rpm, and start
the engine of the vehicle
*Abeing jump
started.