2017 NISSAN JUKE clutch
[x] Cancel search: clutchPage 20 of 416

JVC0747X
MR16DDT ENGINE
1. Engine oil filler cap (P.8-5)
2. Radiator filler cap (P.8-5)— Vehicle overheat (P.6-11)
3. Brake and clutch* fluid reservoir (P.8-9)
4. Air cleaner (P.8-14)
5. Window washer fluid reservoir (P.8-9) 6. Engine drive belt location (P.8-12)
7. Engine oil dipstick (P.8-5)
8. Engine coolant reservoir (P.8-5)
9. Fuse/fusible link holder (P.8-17)
10. Battery (P.8-10)
— Jump starting (P.6-9)
*: for Manual Transmission (MT) models
Illustrated table of contents0-11
ENGINE COMPARTMENT
Page 95 of 416

2-16Instruments and controls
CHECKING LIGHTS
With all doors closed, apply the parking brake,
fasten the seat belts and place the ignition
switch in the ON position without starting the
engine. The following lights (if so equipped) will
come on:
,or,,,,
The following lights (if so equipped) come on
briefly and then go off:
,,or,,,,,,,
If any light does not come on or operates in a
way other than described, it may indicate a
burned-out bulb and/or a system malfunction. It
is recommended you have the system checked
by a NISSAN dealer.
WARNING LIGHTS
All-Wheel Drive (AWD) warning
light (AWD model)
When the ignition switch is in the “ON” position,
the All-Wheel Drive (AWD) warning light will
illuminate. It will turn off soon after the engine is
started.
If the AWD system malfunctions or the revolu-
tion or radius of the front and the rear wheel
differs, the AWD warning light will either remain
illuminated or blink. (See “All-Wheel Drive (AWD)” (P.5-29) .)
orAnti-lock Braking System
(ABS) warning light
When the ignition switch is in the ON position,
the Anti-lock Braking System (ABS) warning
light illuminates and then turns off. This indicates
the ABS is operational.
If the ABS warning light illuminates while the
engine is running, or while driving, it may
indicate the ABS is not functioning properly.
Have the system checked. It is recommended
you visit a NISSAN dealer for this service.
If an ABS malfunction occurs, the anti-lock
function is turned off. The brake system then
operates normally, but without anti-lock assis-
tance. (See “Brake system” (P.5-35).)
orBrake warning light
This light functions for both the parking brake
and the foot brake systems.
Parking brake indicator:
When the ignition switch is in the ON position,
the light illuminates when the parking brake is
applied.
Low brake fluid warning light:
When the ignition switch is in the ON position, the light warns of a low brake fluid level. If the
light illuminates while the engine is running with
the parking brake not applied, stop the vehicle
and perform the following:
1. Check the brake fluid level. If brake fluid is
necessary, add fluid and have the system
checked. It is recommended you have this
service performed by a NISSAN dealer.
(See “Brake and clutch fluid” (P.8-9) .)
2. If the brake fluid level is correct, have the warning system checked. It is recommended
you have this service performed by a
NISSAN dealer.
Anti-lock Braking System (ABS) warning
indicator:
When the parking brake is released and the
brake fluid level is sufficient, if both the brake
warning light and the Anti-lock Braking System
(ABS) warning light illuminate, it may indicate
the ABS is not functioning properly. Have the
brake system checked, and if necessary re-
paired. It is recommended you visit a NISSAN
dealer for this service. (See “Anti-lock Braking
System (ABS) warning light” (P.2-16) .)
Page 100 of 416

Vehicle Dynamic Control (VDC)
warning light
When the ignition switch is in the “ON” position,
the Vehicle Dynamic Control (VDC) warning
light illuminates and then turns off.
The light will blink when the Vehicle Dynamic
Control (VDC) system or the traction control
system is operating, thus alerting the driver that
the vehicle is nearing its traction limits. The road
surface may be slippery.
If the VDC warning light illuminates while the
VDC system is on, this light alerts the driver to
the fact that the VDC system’s fail-safe mode is
operating, for example the VDC system may not
be functioning properly. Have the system
checked. It is recommended you visit a NISSAN
dealer for this service. If a malfunction occurs in
the system, the VDC system function will be
canceled but the vehicle is still driveable. For
additional information, see “Vehicle Dynamic
Control (VDC) system” (P.5-37) of this manual.
INDICATOR LIGHTS
All-Wheel Drive (AWD) indicator
light (AWD model)
When the ignition switch is in the “ON” position,
the All-Wheel Drive (AWD) indicator light
illuminates and then turns off.
When selecting AWD mode while the engine is
running, the AWD indicator light illuminates.
(See “All-Wheel Drive (AWD)” (P.5-29) .)
All-Wheel Drive (AWD-V) indicator
light (AWD model)
When selecting AWD-V mode while the engine
is running, the AWD-V indicator light illuminates.
(See “All-Wheel Drive (AWD)” (P.5-29) .)
Continuously Variable Transmis-
sion (CVT) indicator light (if so equipped)
When the ignition switch is in the “ON” position,
the Continuously Variable Transmission (CVT)
indicator light illuminates and then turns off.
Cruise indicator light
Cruise main switch indicator:
This light illuminates when the cruise control
main switch is pushed. The light turns off when
the main switch is pushed again. When the
cruise indicator light illuminates, the cruise
control system is operational.
Cruise malfunction:
If the cruise indicator light blinks while the
engine is running, it may indicate the cruise
control system is not functioning properly. Have
the system checked. It is recommended you visit
a NISSAN dealer for this service.
See “Cruise control” (P.5-26).
Engine start operation indicator
light
This light appears when the shift lever is in the P
(Park) position (Continuously Variable Transmis-
sion (CVT) models) or N (Neutral) position
(Manual Transmission (MT) models) . This light
means that the engine will start by pushing the
ignition switch with the brake pedal (CVT
models) or clutch pedal (MT models) depressed.
You can start the engine directly in any position.
Instruments and controls2-21
Page 271 of 416

5-10Starting and driving
SSD0436
OPERATING RANGE FOR ENGINE
START FUNCTION
The Intelligent Key can only be used for starting
the engine when the Intelligent Key is within the
specified operating range
*1.
When the Intelligent Key battery is almost
discharged or strong radio waves are present
near the operating location, the Intelligent Key
system’s operating range becomes narrower
and may not function properly.
If the Intelligent Key is within the operating
range, it is possible for anyone, even someone
who does not carry the Intelligent Key, to push
the ignition switch to start the engine. .
The cargo room area is not included in the
operating range but the Intelligent Key may
function.
. If the Intelligent Key is placed on the
instrument panel, inside the glove box or
door pocket, the Intelligent Key may not
function.
. If the Intelligent Key is placed near the door
or window outside the vehicle, the Intelligent
Key may function.
SSD0859
PUSH-BUTTON IGNITION SWITCH
OPERATION
When the ignition switch is pushed without
depressing the brake pedal (Continuously Vari-
able Transmission models) or the clutch pedal
(manual transmission models) , the ignition
switch position will change as follows:
.Push once to change to ACC.
. Push two times to change to ON.
. Push three times to change to OFF.
. Push four times to return to ACC.
. Open or close any door to return to LOCK
during the OFF position.
The indicator light
*Aon the ignition switch
Page 274 of 416

1. Apply the parking brake.
2. Move the shift lever to the P (Park) or N(Neutral) position. (P is recommended.)
The starter is designed not to operate unless
the shift lever is in either of the above
positions.
Manual Transmission (MT) models:
Move the shift lever to the N (Neutral)
position. Depress the clutch pedal fully to
the floor.
The starter is designed not to operate unless
the clutch pedal is fully depressed.
The Intelligent Key must be carried
when operating the ignition switch.
3. Push the ignition switch to the ON position. Depress the brake pedal (CVT models) or
the clutch pedal (MT models) and push the
ignition switch to start the engine.
To start the engine immediately, push and
release the ignition switch while depressing
the brake pedal (CVT models) or the clutch
pedal (MT models) with the ignition switch in
any position.
.If the engine is very hard to start inextremely cold weather or when restart-
ing, depress the accelerator pedal a little
(approximately 1/3 to the floor) and while
holding, crank the engine. Release the accelerator pedal when the engine starts.
.If the engine is very hard to start because
it is flooded, depress the accelerator
pedal all the way to the floor and hold it.
Push the ignition switch to the ON
position to start cranking the engine.
After 5 or 6 seconds, stop cranking by
pushing the ignition switch to OFF. After
cranking the engine, release the accel-
erator pedal. Crank the engine with your
foot off the accelerator pedal by
depressing the brake pedal and pushing
the push-button ignition switch to start
the engine. If the engine starts, but fails
to run, repeat the above procedure.
CAUTION
Do not operate the starter for more
than 15 seconds at a time. If the engine
does not start, push the ignition switch
to OFF and wait 10 seconds before
cranking again, otherwise the starter
could be damaged.
4. Warm-up
Allow the engine to idle for at least 30
seconds after starting. Do not race the
engine while warming it up. Drive at moderate speed for a short distance first,
especially in cold weather. In cold weather,
keep the engine running for a minimum of 2 -
3 minutes before shutting it off. Starting and
stopping the engine over a short period of
time may make the vehicle more difficult to
start.
When racing the engine up to 4,000 rpm or
more under no load condition, the engine
will enter the fuel cut mode.
5. To stop the engine, move the shift lever to the P (Park) position (CVT models) or move
the shift lever to the N (Neutral) position (MT
models) , and push the ignition switch to the
OFF position.
NOTE:
Care should be taken to avoid situations
that can lead to potential battery discharge
and potential no-start conditions such as:
1. Installation or extended use of electro-
nic accessories that consume battery
power when the engine is not running
(Phone chargers, GPS, DVD players,
etc.)
2. Vehicle is not driven regularly and/or
only driven short distances.
In these cases, the battery may need to be
charged to maintain battery health.
Starting and driving5-13
STARTING THE ENGINE
Page 280 of 416

MANUAL TRANSMISSION (MT)
WARNING
.Do not downshift abruptly on slip-
pery roads. This may cause a loss of
control.
. Do not over-rev the engine when
shifting to a lower gear. This may
cause a loss of control or engine
damage.
. When the high fluid temperature
protection mode or fail-safe opera-
tion occurs, vehicle speed may be
gradually reduced. The reduced
speed may be lower than other
traffic, which could increase the
chance of a collision. Be especially
careful when driving. If necessary,
pull to the side of the road at a safe
place and allow the transmission to
return to normal operation, or have
it repaired if necessary.
CAUTION
.Do not rest your foot on the clutch
pedal while driving. This may da-
mage the clutch.
. Fully depress the clutch pedal be-
fore shifting to help prevent trans-
mission damage.
. Stop your vehicle completely before
shifting into R (Reverse) .
. When the vehicle is stopped for a
period of time, for example at a stop
light, shift to N (Neutral) and release
the clutch pedal with the foot brake
applied.
SSD0552
Shifting
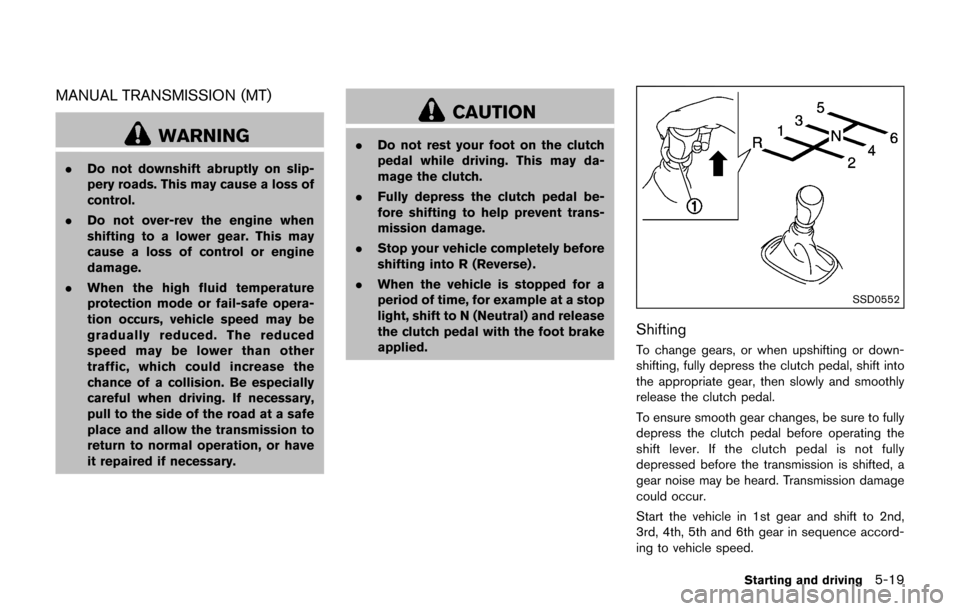
To change gears, or when upshifting or down-
shifting, fully depress the clutch pedal, shift into
the appropriate gear, then slowly and smoothly
release the clutch pedal.
To ensure smooth gear changes, be sure to fully
depress the clutch pedal before operating the
shift lever. If the clutch pedal is not fully
depressed before the transmission is shifted, a
gear noise may be heard. Transmission damage
could occur.
Start the vehicle in 1st gear and shift to 2nd,
3rd, 4th, 5th and 6th gear in sequence accord-
ing to vehicle speed.
Starting and driving5-19
Page 281 of 416

5-20Starting and driving
To back up, pull the shift lever ring*1upward
and then move it to the R (Reverse) gear after
stopping the vehicle completely.
The shift lever ring returns to its original position
when the shift lever is moved to the N (Neutral)
position.
If it is difficult to move the shift lever into the R
(Reverse) or 1st gear, shift to the N (Neutral)
position, and then release the clutch pedal once.
Fully depress the clutch pedal again and shift
into the R (Reverse) or 1st gear.
Suggested upshift speeds
The following are suggested vehicle speeds for
shifting into a higher gear. These suggestions
relate to fuel economy and vehicle performance.
Actual upshift speeds will vary according to road
conditions, the weather and individual driving
habits.
Gear change MPH (km/h)
1st to 2nd 13 (21)
2nd to 3rd 22 (35)
3rd to 4th 30 (48)
4th to 5th 35 (56)
5th to 6th 42 (68)
Suggested maximum speed in each gear
Downshift to a lower gear if the engine is not
running smoothly, or if you need to accelerate.
Do not exceed the maximum suggested speed
(shown below) in any gear. For level road
driving, use the highest gear suggested for that
speed. Always observe posted speed limits, and
drive according to the road conditions, which
will ensure safe operation. Do not over-rev the
engine when shifting to a lower gear as it may
cause engine damage or loss of vehicle control.
Except for NISMO RS models:
GearMPH (km/h)
1st 31 (50)
2nd 55 (88)
3rd 76 (122)
4th —
5th —
6th —
For NISMO RS models:
GearMPH (km/h)
1st 27 (44)
2nd 50 (80)
3rd 73 (118)
4th —
5th —
6th —
Page 287 of 416

5-26Starting and driving
PRECAUTIONS ON CRUISE CON-
TROL
.If the cruise control system malfunctions, it
will cancel automatically. The CRUISE in-
dicator light on the meter panel will then
blink to warn the driver.
. If the engine coolant temperature becomes
excessively high, the cruise control system
will cancel automatically.
. If the CRUISE indicator light blinks, turn the
cruise control MAIN switch off and have the
system checked. It is recommended you visit
a NISSAN dealer for this service.
. The CRUISE indicator light may blink when
the cruise control MAIN switch is turned ON
while pushing the ACCEL/RES, COAST/
SET or CANCEL switch. To properly set the
cruise control system, perform the following
procedures.
WARNING
Do not use the cruise control when
driving under the following conditions:
.when it is not possible to keep the
vehicle at a set speed
. in heavy traffic or in traffic that
varies in speed .
on winding or hilly roads
. on slippery roads (rain, snow, ice,
etc.)
. in very windy areas
Doing so could cause a loss of vehicle
control and result in an accident.
CAUTION
On Manual Transmission (MT) models,
do not shift into N (Neutral) without
depressing the clutch pedal when the
cruise control is set. Should this occur,
depress the clutch pedal and turn the
MAIN switch off immediately. Failure to
do so may cause engine damage.
SSD1128
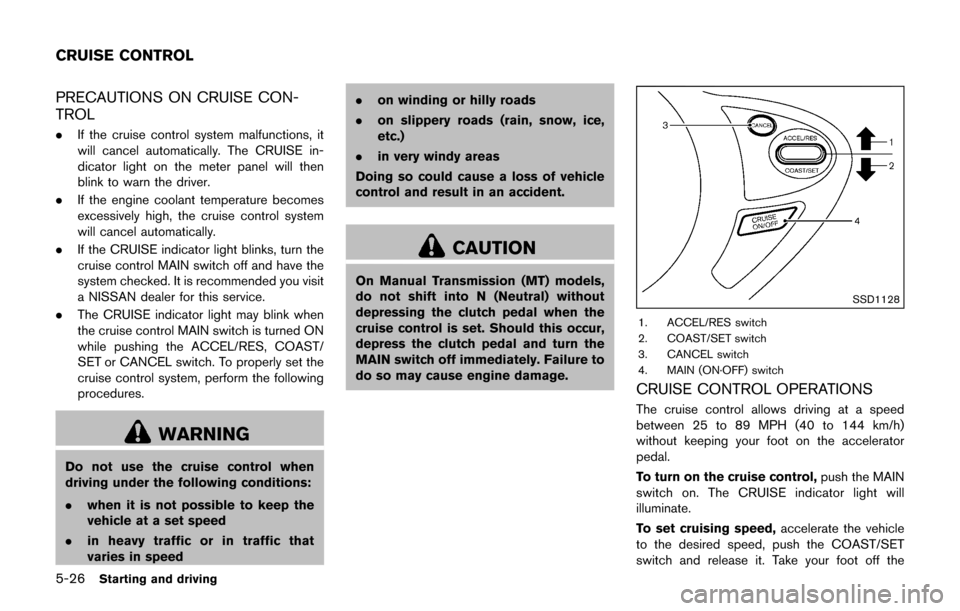
1. ACCEL/RES switch
2. COAST/SET switch
3. CANCEL switch
4. MAIN (ON·OFF) switch
CRUISE CONTROL OPERATIONS
The cruise control allows driving at a speed
between 25 to 89 MPH (40 to 144 km/h)
without keeping your foot on the accelerator
pedal.
To turn on the cruise control, push the MAIN
switch on. The CRUISE indicator light will
illuminate.
To set cruising speed, accelerate the vehicle
to the desired speed, push the COAST/SET
switch and release it. Take your foot off the
CRUISE CONTROL