2017 NISSAN JUKE ignition
[x] Cancel search: ignitionPage 173 of 416

4-14Heater, air conditioner, audio and phone systems
objects cannot be viewed. The four
corners of the vehicle in particular,
are areas where objects do not
always appear in the bird’s-eye,
front, or rear views. Always check
your surroundings to be sure that it
is safe to move before operating the
vehicle. Always operate the vehicle
slowly. Always look out the win-
dows and check mirrors to be sure
that it is safe to move.
. The driver is always responsible for
safety during parking and other
maneuvers.
CAUTION
Do not scratch the lens when cleaning
dirt or snow from the front of the
camera.
The Around View
�ŠMonitor system is designed
as an aid to the driver in situations such as slot
parking or parallel parking.
The monitor displays various views of the
position of the vehicle in a split screen format.
All views are not available at all times. Available views:
.
Bird’s-eye view
The surrounding view of the vehicle.
. Front-side view
The view around and ahead of the front
passenger’s side wheel.
. Front view
The view to the front of the vehicle.
. Rear view
The view to the rear of the vehicle.
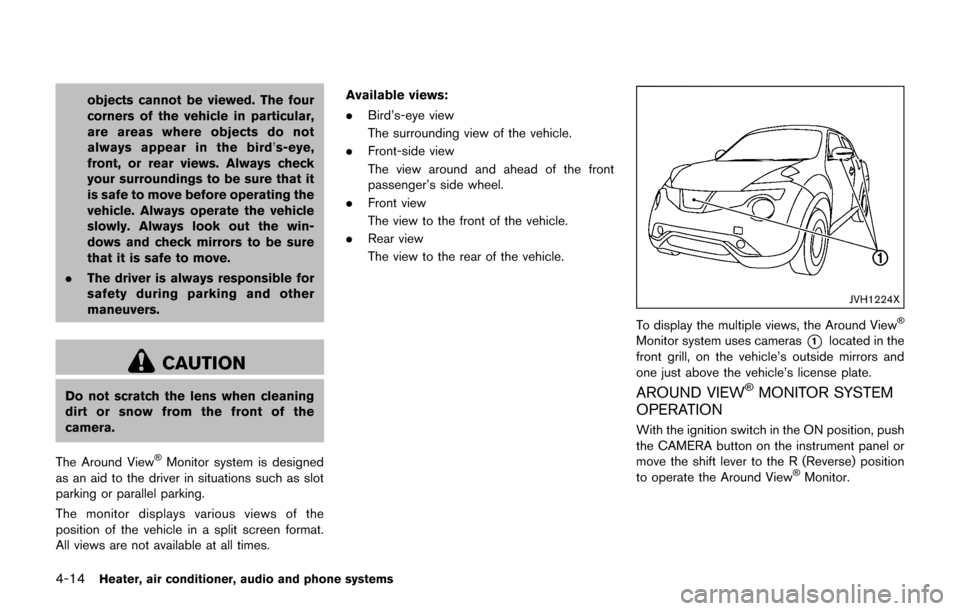
JVH1224X
To display the multiple views, the Around View�Š
Monitor system uses cameras*1located in the
front grill, on the vehicle’s outside mirrors and
one just above the vehicle’s license plate.
AROUND VIEW�ŠMONITOR SYSTEM
OPERATION
With the ignition switch in the ON position, push
the CAMERA button on the instrument panel or
move the shift lever to the R (Reverse) position
to operate the Around View
�ŠMonitor.
Page 175 of 416

4-16Heater, air conditioner, audio and phone systems
Front and rear view:
Guiding lines, which indicate the vehicle width
and distances to objects with reference to the
vehicle body line
*A, are displayed on the
monitor.
Distance guide lines:
Indicate distances from the vehicle body.
. Red line
*1: approx. 1.5 ft (0.5 m)
. Yellow line
*2: approx. 3 ft (1 m)
. Green line
*3: approx. 7 ft (2 m)
. Green line
*4: approx. 10 ft (3 m)
Vehicle width guide lines
*5:
Indicate the vehicle width when backing up.
Predictive course lines
*6:
Indicate the predictive course when operating
the vehicle. The predictive course lines will be
displayed on the monitor when the steering
wheel is turned. The predictive course lines will
move depending on how much the steering
wheel is turned and will not be displayed while
the steering wheel is in the straight ahead
position.
The front view will not be displayed when the
vehicle speed is above 6 MPH (10 km/h) .
NOTE:
. When the monitor displays the front
view and the steering wheel turns about 90 degrees or less from the
straight ahead position, both the right
and left predictive course lines
*6are
displayed. When the steering wheel
turns about 90 degrees or more, the
predictive course line is displayed only
on the opposite side of the turn.
JVH1037X
Bird’s-eye view:
The bird’s-eye view shows the overhead view of
the vehicle which helps confirm the vehicle
position and the predicted course to a parking
space.
The vehicle icon
*1shows the position of the
vehicle. Note that the distance between objects
viewed in the bird’s-eye view differs from the
actual distance.
The areas that the cameras cannot cover
*2are
indicated in black.
After the ignition switch is placed in the ON
position, the non-viewable area
*2is high-
lighted in yellow for 3 seconds after the bird’s-
Page 178 of 416

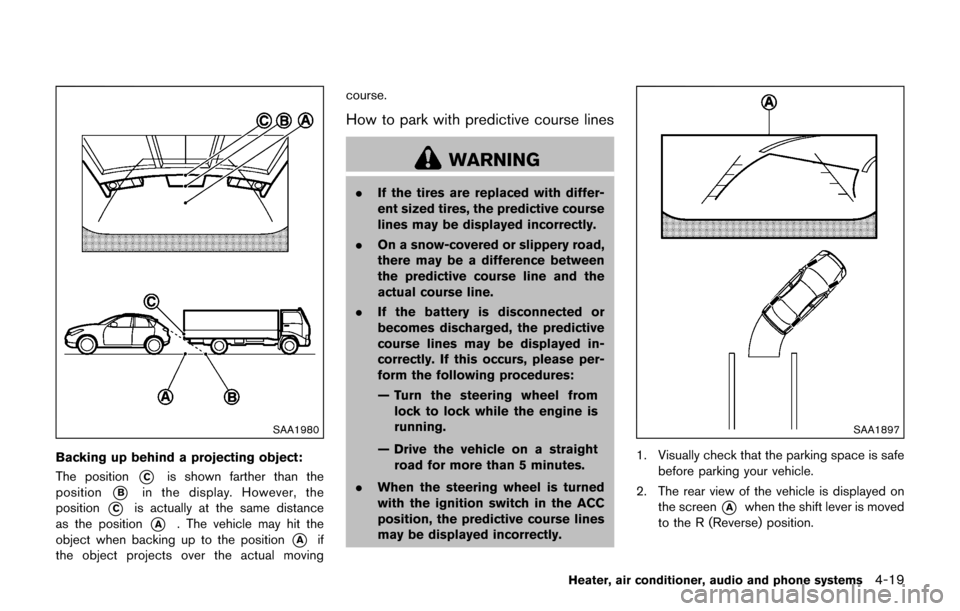
SAA1980
Backing up behind a projecting object:
The position
*Cis shown farther than the
position
*Bin the display. However, the
position
*Cis actually at the same distance
as the position
*A. The vehicle may hit the
object when backing up to the position
*Aif
the object projects over the actual moving course.
How to park with predictive course lines
WARNING
.
If the tires are replaced with differ-
ent sized tires, the predictive course
lines may be displayed incorrectly.
. On a snow-covered or slippery road,
there may be a difference between
the predictive course line and the
actual course line.
. If the battery is disconnected or
becomes discharged, the predictive
course lines may be displayed in-
correctly. If this occurs, please per-
form the following procedures:
— Turn the steering wheel from
lock to lock while the engine is
running.
— Drive the vehicle on a straight road for more than 5 minutes.
. When the steering wheel is turned
with the ignition switch in the ACC
position, the predictive course lines
may be displayed incorrectly.
SAA1897
1. Visually check that the parking space is safe
before parking your vehicle.
2. The rear view of the vehicle is displayed on the screen
*Awhen the shift lever is moved
to the R (Reverse) position.
Heater, air conditioner, audio and phone systems4-19
Page 184 of 416

.When vehicle speed decreases below
approximately 5 MPH (8 km/h) .
The MOD system operates in the following
conditions when the camera view is displayed:
. When the shift lever is in the P (Park) or N
(Neutral) position (CVT model) or the shift
lever is out of the R (Reverse) position (MT
model) and the vehicle is stopped, the MOD
system detects the moving objects in the
bird’s-eye view. The MOD system will not
operate if the outside mirrors are moving in
or out or if either door is opened.
. When the shift lever is in the D (Drive)
position (CVT model) or the shift lever is out
of the R (Reverse) position (MT model) , and
the vehicle speed is below approximately 5
MPH (8 km/h) , the MOD system detects
moving objects in the front view.
. When the shift lever is in the R (Reverse)
position and the vehicle speed is below
approximately 5 MPH (8 km/h) , the MOD
system detects moving objects in the rear
view. The MOD system will not operate if the
liftgate is open.
. When the ignition switch is placed in the
“OFF” position and then back to the “ON”
position.
The MOD system does not detect moving
objects in the front-side view. The MOD icon is not displayed on the screen when in this view.
When the MOD system detects a moving object
near the vehicle, the yellow frame will be
displayed on the view where the objects are
detected and a chime will sound once. While the
MOD system continues to detect moving
objects, the yellow frame continues to be
displayed.
JVH1256X
Front and bird’s-eye views
JVH0872XRear and bird’s-eye views
Heater, air conditioner, audio and phone systems4-25
Page 194 of 416

OPERATING TIPS (for automatic air
conditioner)
.When the engine coolant temperature and
outside air temperature are low, the air flow
from the foot outlets may not operate. This is
not a malfunction. After the coolant tem-
perature warms up, air will flow normally
from the foot outlets.
. The automatic air conditioner is equipped
with sensors as illustrated. The sensors
*A
and*Bon the instrument panel help
maintain a constant temperature. Do not
put anything on or around these sensors.
IN-CABIN MICROFILTER
The air conditioning system is equipped with an
in-cabin microfilter which collects dirt, pollen,
dust, etc. To make sure the air conditioner heats,
defogs, and ventilates efficiently, replace the
filter in accordance with the specified main-
tenance intervals listed in the “9. Maintenance
and schedules” section. It is recommended to
see a NISSAN dealer to replace the filter.
The filter should be replaced if the air flow
decreases significantly or if windows fog
up easily when operating the heater or air
conditioning system.
SERVICING AIR CONDITIONER
The air conditioner system in your vehicle is
charged with a refrigerant designed with the
environment in mind. This refrigerant will not
harm the earth’s ozone layer. Special char-
ging equipment and lubricant are required when
servicing your vehicle air conditioner. Using
improper refrigerants or lubricants will cause
severe damage to your air conditioner system.
(See “Capacities and recommended fluids/
lubricants” (P.10-2) for air conditioner system
refrigerant and lubricant recommendations.)
Your NISSAN dealer will be able to service your
environmentally friendly air conditioner system.
WARNING
The system contains refrigerant under
high pressure. To avoid personal injury,
any air conditioner service should be
done only by an experienced technician
with the proper equipment.
AUDIO OPERATION PRECAUTIONS
Radio
Place the ignition switch in the ACC or ON
position and push the FM·AM button to turn on
the radio. If you listen to the radio with the
engine not running, the ignition switch should be
placed in the ACC position.
Radio reception is affected by station signal
strength, distance from radio transmitter, build-
ings, bridges, mountains and other external
influences. Intermittent changes in reception
quality normally are caused by these external
influences.
Using a cellular phone in or near the
vehicle may influence radio reception
quality.
Radio reception:
Your vehicle radio system is equipped with
state-of-the-art electronic circuits to enhance
radio reception. These circuits are designed to
extend reception range, and to enhance the
quality of that reception.
However there are some general characteristics
of both FM and AM radio signals that can affect
radio reception quality in a moving vehicle, even
when the finest equipment is used. These
characteristics are completely normal in a given
reception area, and do not indicate any mal-
Heater, air conditioner, audio and phone systems4-35
AUDIO SYSTEM
Page 206 of 416

Apps button:
The
button launches the Smartphone
Integration mode. See “NissanConnectSMApp
smartphone integration” (P.4-75) .
FM-AM Radio operation
radio (FM·AM) band select:
Push the
button to change the band as
follows:
AM ?FM1 ?FM2? AM
TUNE (Tuning):
Turn the TUNE·FOLDER knob for manual tuning.
SEEK tuning:
Push the
orbutton to tune from low to
high or high to low frequencies and to stop at
the next broadcasting station.
SCAN tuning:
Push the
button to tune from low to high
frequencies and stop at each broadcasting
station for several seconds. Pushing the button
again during this several seconds period will
stop SCAN tuning and the radio will remain
tuned to that station.
If the
button is not pushed within this
period, SCAN tuning moves to the next station.
toRadio memory buttons:
Up to 12 stations can be set for the FM band (6
each for FM1 and FM2) and 6 stations can be
set for the AM band.
1. Choose the radio band using the
button.
2. Tune to the desired station.
3. Push and hold the desired station preset button
tountil beep sounds.
4. The station indicator will then come on. The station is now set to the button memory.
5. Other buttons can be set in the same manner.
If the battery cable is disconnected, or if the fuse
opens, the station memory will be erased. In that
case, reset the desired stations.
CD player operation
Place the ignition switch in the ON or ACC
position. Insert the Compact Disc (CD) into the
slot with the label side facing up. The CD will be
guided automatically into the slot and start
playing.
After loading the CD, the number of tracks on
the CD and the play time will appear on the
display.
If another audio source is already operating, it
will automatically turn off and the CD will play. If the system has been turned off while the CD
was playing, pushing the Power button will start
the CD.
CD PLAY:
When the CD button is pushed while a CD is
loaded, the CD will start playing.
SEEK TRACK:
When the
orbutton is pushed and hold
while the CD is being played, the CD will play
while fast forwarding or rewinding. When the
button is released, the CD will return to normal
play speed.
When the
orbutton is pushed while
the CD is being played, the next track or the
beginning of the current track on the CD will be
played. Push the
button again to select the
previous track.
Heater, air conditioner, audio and phone systems4-47
Page 209 of 416

4-50Heater, air conditioner, audio and phone systems
CAUTION
.Do not force the USB device into the
USB port. Inserting the USB device
tilted or up-side-down into the port
may damage the port. Make sure
that the USB device is connected
correctly into the USB port.
. Do not grab the USB port cover (if
so equipped) when pulling the USB
device out of the port. This could
damage the port and the cover.
. Do not leave the USB cable in a
place where it can be pulled unin-
tentionally. Pulling the cable may
damage the port.
Refer to your device manufacturer’s owner
information regarding the proper use and care
of the device.
Connecting iPod
�Š:
The USB connection port is located on the
lower part of the instrument panel. Connect the
iPod
�Šcable to the USB connector. See “USB
(Universal Serial Bus) connection port” (P.4-48) .
When the audio system operates, the system
will switch to the iPod
�Šmode automatically. The
battery of the iPod�Šis charged while the cable is connected to the vehicle.
Depending on the version of the iPod
�Š, the
display on the iPod�Šshows a NISSAN or
Accessory Attached screen when the connec-
tion is completed. When the iPod
�Šis connected
to the vehicle, the iPod�Šmusic library can only
be operated by the vehicle audio controls.
*iPod
�Šand iPhone�Šare a trademark of Apple
Inc., registered in the U.S. and other countries.
Compatibility:
The following models are compatible:
. iPod nano
�Š1G (Firmware version 1.3.1 -)
. iPod nano�Š2G (Firmware version 1.1.3 -)
. iPod nano�Š3G (Firmware version 1.0.0 -)
. iPod nano�Š4G (Firmware version 1.0.2 -)
. iPod nano�Š5G (Firmware version 1.0.1 -)
. iPod nano�Š6G (Firmware version 1.0 -)
. iPod nano�Š7G (Firmware version 1.0.0 -)
. iPod�Š5G (Firmware version 1.2.1 -)
. iPod classic�Š(Firmware version 1.0.0 -)
. iPod Touch�Š(iOS 1.1 -)
. iPod Touch�Š2G (iOS 2.1.1 -)
. iPod Touch�Š3G (iOS 3.1 -)
. iPod Touch�Š4G (iOS 4.1 -)
. iPod Touch�Š5G (iOS 6.0.0 -) .
iPhone
�Š(iOS 1.0.0 - 2.2.1)
. iPhone�Š3G (iOS 2.1 -)
. iPhone�Š3GS (iOS 3.0 -)
. iPhone�Š4/4S (iOS 4.0 -)
. iPhone�Š5 (iOS 6.0.0 -)
Operations attributable to firmware update by
Apple are not guaranteed.
iPod
�Šmain operation:
The system operates when the ignition switch is
in the ON or ACC position. Push the
button
repeatedly to switch to the iPod�Šmode.
If the system was turned off while the iPod�Šwas
playing, pushing the Power button will start the
iPod
�Š.
If another audio source is playing and the iPod�Š
is connected, pushing thebutton repeat-
edly will change the system to the iPod�Šmode.
When in the iPod�Šmode, the interface for iPod�Š
operation is shown on the audio display. The
items on the menu list can be scrolled by turning
the TUNE·FOLDER dial while the iPod
�Šis
operational. To select an item, push the
ENTER/SETTING button. The following items
in the iPod
�Šmenu appear on the display.
. Now playing
. Playlists
Page 212 of 416

JVH1055X
1. XM band select button
2. CD eject button
3. FM·AM button
4. MEDIA button
5. Color display
6. Apps button
7. Radio CAT (category)/REW (rewind) button forSEEK/TRACK 8. Radio SCAN tuning button
9. Radio CAT (category)/FF (fast forward) button
for SEEK/TRACK
10. BACK button
11. DISP (display) button
12. Power button/VOL (volume) control knob
13. RPT (repeat) play button 14. RDM (random) play button
15. Radio station preset select buttons
16. ENTER/SETTING button/TUNE·SCROLL con-
trol knob
FM-AM-SAT RADIO WITH COMPACT
DISC (CD) PLAYER (Type A) (if so
equipped)
For all operation precautions, see “Audio opera-
tion precautions” (P.4-35) .
.No satellite radio reception is available when
the SAT band option is selected unless the
optional satellite receiver and antenna are
installed, and there is an active SiriusXM
Satellite Radio subscription.
. The satellite radio mode requires an active
SiriusXM Satellite Radio subscription. The
satellite radio is not available in Alaska,
Hawaii and Guam.
. It may take some time to receive the
activation signal after subscribing the Sir-
iusXM Satellite Radio. After receiving the
activation signal, an available channel list will
be automatically updated in the radio. Push
the ignition switch from LOCK to ACC to
update the channel list.
Heater, air conditioner, audio and phone systems4-53