2017 MERCEDES-BENZ GLA SUV trailer
[x] Cancel search: trailerPage 150 of 369
position
Dor R, the vehicle may accelerate
suddenly. There is a risk of an accident.
When engaging transmission position Dor R,
always keep the brake pedal firmly depressed
and do not depress the accelerator pedal at
the same time.
! Vehicles with manual transmission:
change gear in good time and avoid spinning
the wheels. You could otherwise damage the
vehicle.
Depress the accelerator carefully when pulling
away.
The vehicle automatically locks centrally once
you have pulled away. The locking knobs in the
doors drop down.
You can open the doors from the inside at any
time.
You can also deactivate the automatic locking
feature (Y page 229).
Vehicles with automatic transmission: it is
possible to shift the transmission from position j to the desired position only if you depress
the brake pedal. Only then can the parking lock be deactivated.
All vehicles (except Mercedes-AMG vehi-
cles): if you do not depress the brake pedal, the
DIRECT SELECT lever can still be moved but the
parking lock remains engaged.
Mercedes-AMG vehicles: if you do not depress
the brake pedal, the selector lever can still be
moved but the parking lock remains engaged.
Vehicles with automatic transmission: at
transmission fluid temperatures below Ò20 †
you can only shift out of position jinto another
transmission position when the engine is run-
ning.
i Vehicles with automatic transmission:
upshifts take place at higher engine speeds
after a cold start. This helps the catalytic con- verter to reach its operating temperature
more quickly.
Vehicles with automatic transmission: infor-
mation on automatically releasing the electric
parking brake (Y page 168). Pulling away with a trailer
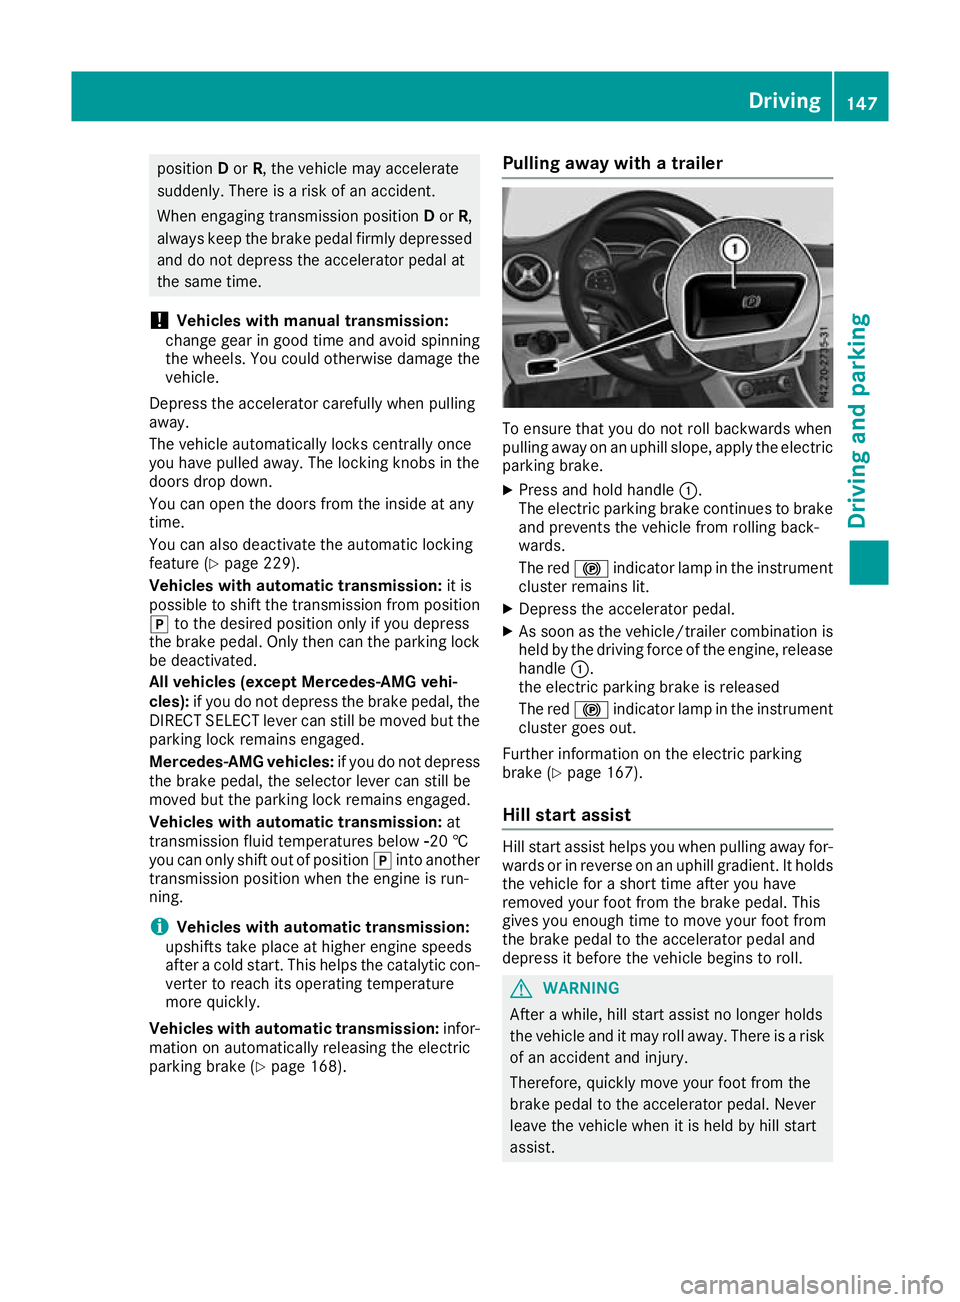
To ensure that you do not roll backwards when
pulling away on an uphill slope, apply the electric
parking brake.
X Press and hold handle :.
The electric parking brake continues to brake
and prevents the vehicle from rolling back-
wards.
The red !indicator lamp in the instrument
cluster remains lit.
X Depress the accelerator pedal.
X As soon as the vehicle/trailer combination is
held by the driving force of the engine, release
handle :.
the electric parking brake is released
The red !indicator lamp in the instrument
cluster goes out.
Further information on the electric parking
brake (Y page 167).
Hill start assist Hill start assist helps you when pulling away for-
wards or in reverse on an uphill gradient. It holds the vehicle for a short time after you have
removed your foot from the brake pedal. This
gives you enough time to move your foot from
the brake pedal to the accelerator pedal and
depress it before the vehicle begins to roll. G
WARNING
After a while, hill start assist no longer holds
the vehicle and it may roll away. There is a risk of an accident and injury.
Therefore, quickly move your foot from the
brake pedal to the accelerator pedal. Never
leave the vehicle when it is held by hill start
assist. Driving
147Driving and parking Z
Page 156 of 369
S+
Sport Plus Particularly sporty trans-
mission settings
RACE
Maximum sportiness and
engine and transmission
settings suitable for the
racetrack Additional information on drive programs
(Y
page 159).
You can also change gear yourself using the
steering wheel gearshift paddles. Further infor-
mation on manual gearshifting (Y page 161).Manual transmission
Gear lever
! Only engage gear when the clutch pedal is
depressed.
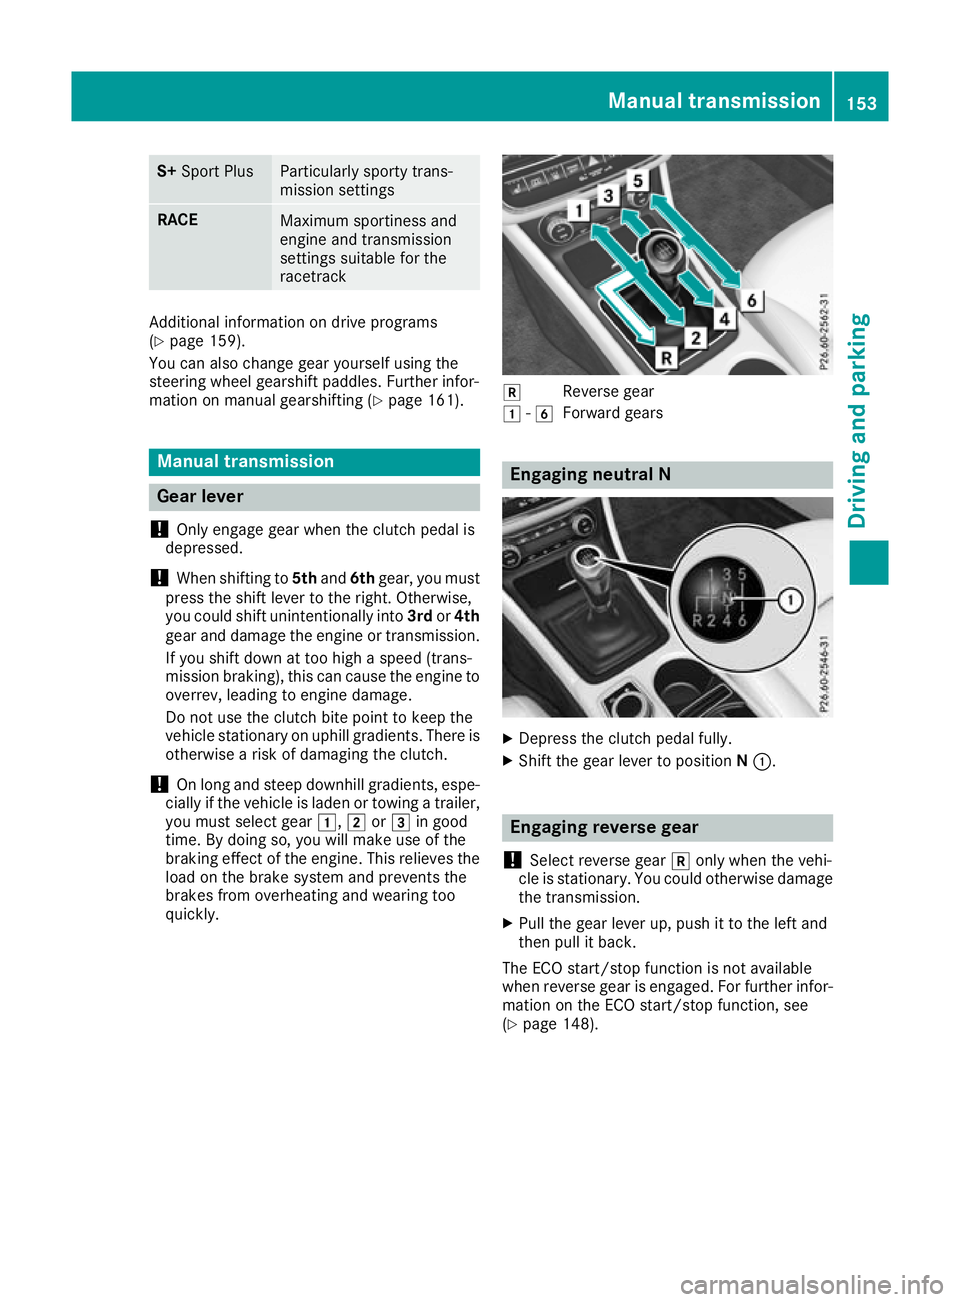
! When shifting to
5thand 6thgear, you must
press the shift lever to the right. Otherwise,
you could shift unintentionally into 3rdor4th
gear and damage the engine or transmission.
If you shift down at too high a speed (trans-
mission braking), this can cause the engine to
overrev, leading to engine damage.
Do not use the clutch bite point to keep the
vehicle stationary on uphill gradients. There is otherwise a risk of damaging the clutch.
! On long and steep downhill gradients, espe-
cially if the vehicle is laden or towing a trailer,
you must select gear 1,2or3 in good
time. By doing so, you will make use of the
braking effect of the engine. This relieves the
load on the brake system and prevents the
brakes from overheating and wearing too
quickly. k
Reverse gear
1 -6
Forward gears Engaging neutral N
X
Depress the clutch pedal fully.
X Shift the gear lever to position N:. Engaging reverse gear
! Select reverse gear
konly when the vehi-
cle is stationary. You could otherwise damage the transmission.
X Pull the gear lever up, push it to the left and
then pull it back.
The ECO start/stop function is not available
when reverse gear is engaged. For further infor-
mation on the ECO start/stop function, see
(Y page 148). Manual transmission
153Driving and parking Z
Page 162 of 369
For further information on kickdown in manual
drive program M(Y page 163).
Gliding mode (diesel engines only) Gliding mode is characterised by the following:
R the combustion engine is disconnected from
the drive train
R the engine is running at idling speed
R the gear indicated after the transmission
position hdisappears in the multifunction
display (Y page 157)
Gliding mode can be activated and transmission
position hshown in green under the following
conditions:
R you select the "ECO" setting for the drive sys-
tem within the Individualdrive program. You
can find information about this in the Digital
Owner's Manual
R the speed is within a suitable range
R the type of road is suitable, e.g. no steep uphill
or downhill gradients
R the distance to the vehicle in front is sufficient
R you are no longer depressing the accelerator
pedal
Gliding mode is deactivated under the following
conditions:
R you depress the accelerator pedal
R you depress the brake pedal
R you use the DIRECT SELECT lever to switch
the transmission position (Y page 155)
R you use the DYNAMIC SELECT controller to
change the drive program (Y page 152)
R you activate manual gearshifting
(Y page 161)
R the distance to the vehicle in front is too short
R you leave the suitable speed range
Towing a trailer Not all models can tow a trailer. For further
information, see (Y page 213).
X Drive in the middle of the engine speed range
on uphill gradients.
X Depending on the uphill or downhill gradient,
select a lower gear (Y page 171), even if
cruise control, Distance Pilot DISTRONIC or
the speed limiter are activated. Drive programs
All vehicles (except Mercedes-AMG
vehicles) Drive program C (Comfort)
Drive program Cis characterised by the follow-
ing:
R the vehicle exhibits comfortable, economical
driving characteristics.
R the vehicle pulls away more gently in forward
and reverse gears unless the accelerator
pedal is depressed fully.
R the vehicle has improved driving stability, e.g.
on slippery road surfaces.
R optimal fuel consumption resulting from the
automatic transmission shifting up sooner.
The vehicle is driven in the low engine speed
range and the wheels are less likely to spin.
Drive program S (Sport) Drive program Sis characterised by the follow-
ing:
R sporty engine settings.
R the automatic transmission shifts up later.
Fuel consumption may be higher as a result of
the later automatic transmission shift points.
Drive program I (Individual)
In drive program I, the following properties of
the drive program can be selected:
R the drive (engine and transmission manage-
ment)
R the suspension (vehicles with adjustable
damping)
R the steering
R the availability of the ECO start/stop function
R the climate control
Information on configuring drive program Iwith
the multimedia system can be found in the Dig-
ital Owner's Manual.
i To permanently shift the gears manually in
drive program Iusing the steering wheel gear-
shift paddles, select the M(Manual) setting
for the drive. Automatic transmission
159Driving and parking Z
Page 174 of 369
This increases the risk of skidding and having
an accident.
Do not shift down for additional engine brak-
ing on a slippery road surface.
Downhill gradients Shift to a lower gear in good time on long and
steep downhill gradients. For vehicles with auto-
matic transmission, you need to activate manual
gearshifting beforehand (Y page 161). Take par-
ticular note of this when driving a laden vehicle
and when towing a trailer.
This also applies if you have activated cruise
control, the speed limiter or Distance Pilot
DISTRONIC.
This will use the braking effect of the engine, so
less braking will be required to maintain the
vehicle speed. This relieves the load on the
brake system and prevents the brakes from
overheating and wearing too quickly.
Briefly depressing the accelerator pedal on
downhill gradients while the manual drive pro-
gram Mis temporarily activated (vehicles with
automatic transmission): the automatic trans-
mission may switch back to the last active auto- matic drive program Eor S. The automatic trans-
mission may shift to a higher gear. This can
reduce the engine's braking effect.
Heavy and light loads G
WARNING
The braking system can overheat if you leave your foot on the brake pedal while driving.
This increases the braking distance and could
even cause the braking system to fail. There is
a risk of an accident.
Never use the brake pedal as a footrest. Do
not simultaneously depress both the brake
pedal and the accelerator pedal while driving.
! Depressing the brake pedal constantly
results in excessive and premature wear to
the brake pads.
If heavy demands are made on the brakes, do
not park the vehicle immediately. Drive on for a
short while. This allows the airflow to cool the
brakes more quickly.
If the brakes have been used only moderately,
you should occasionally test their effectiveness. To do this, brake more firmly from a higher
speed, paying attention to traffic conditions.
This improves the grip of the brakes.
Wet road surfaces If you have driven for a long time in heavy rain
without braking, there may be a delayed reac-
tion from the brakes when braking for the first
time. This may also occur after a car wash or
after driving through deep water.
You will have to depress the brake pedal more
firmly. Maintain a greater distance to the vehicle
in front.
After driving on a wet road or having the vehicle washed, brake firmly while paying attention to
the traffic conditions. This will warm up the
brake discs, thereby drying them more quickly
and protecting them against corrosion.
Limited braking performance on salt-
treated roads If you drive on salt-treated roads, a layer of salt
may form on the brake discs and pads. This can increase the braking distance considerably.
R In order to prevent any salt build-up, apply the
brakes occasionally while paying attention to the traffic conditions.
R Carefully depress the brake pedal at the end
of the journey and when starting the next
journey.
R Maintain a much greater distance to the vehi-
cle in front.
New brake pads/linings Brake pads/linings and discs that are either new
or have been replaced only achieve optimum
braking effect after several hundred kilometres
of driving. Compensate for the reduced braking effect by applying greater force to the brake
pedal.
For safety reasons, Mercedes-Benz recom-
mends that you only have brake pads/linings
fitted to your vehicle which have been approved
for Mercedes-Benz vehicles or which corre-
spond to an equivalent quality standard. Brake
pads/linings which have not been approved for
Mercedes-Benz vehicles or which are not of an
equivalent quality could affect your vehicle's
operating safety. Driving tips
171Driving and parking Z
Page 179 of 369
Driving downhill
R
Drive slowly.
R Do not drive at an angle down steep inclines.
Steer into the line of fall and drive with the
front wheels aligned straight forwards. Oth-
erwise, the vehicle could slip sideways, tip
and overturn.
R Before tackling steep downhill gradients, use
the left-hand steering wheel gearshift paddle
to shift to a lower gear.
R Activate DSR. If this is not sufficient, brake
gently. When doing so, make sure that the
vehicle is facing in the direction of the line of fall.
R Check that the brakes are working normally
after a long downhill stretch.
Off-road ABS is activated when the off-road pro- gram is selected.
At speeds below 30 km/h the front wheels lock
cyclically during braking. The digging-in effect
achieved in the process reduces the stopping
distance during off-road driving. The steerability of the vehicle is considerably reduced if the
wheels lock. Driving systems
Cruise control
General notes Cruise control maintains a constant road speed
for you. It brakes automatically in order to avoid
exceeding the set speed. You must select a
lower gear in good time on long and steep down-
hill gradients, especially if the vehicle is laden or towing a trailer. For vehicles with automatic
transmission, you need to shift manually using
the steering wheel gearshift paddles. By doing
so, you will make use of the braking effect of the engine. This relieves the load on the brake sys-
tem and prevents the brakes from overheating
and wearing too quickly.
When the engine is running, you can use the
cruise control lever to limit the speed to any
speed between 30 km/h and the maximum
design speed of the vehicle. If the set value of
the permanent limiter is lower, then this value
applies (Y page 180).
Use cruise control only if road and traffic con-
ditions are appropriate for maintaining a steady speed for a prolonged period. The speed indicated in the speedometer may
differ slightly from the speed stored.
Important safety notes If you fail to adapt your driving style, cruise con-
trol can neither reduce the risk of an accident
nor override the laws of physics. Cruise control
cannot take into account road, weather or traffic conditions. Cruise control is only an aid. You are
responsible for the distance to the vehicle in
front, for vehicle speed, for braking in good time
and for staying in lane.
Do not use cruise control:
R in road and traffic conditions that do not allow
you to maintain a constant speed, e.g. in
heavy traffic or on winding roads.
R on icy or slippery roads. Braking or acceler-
ating can cause the drive wheels to lose trac-
tion and the vehicle could then skid.
R in poor visibility, e.g. due to fog, heavy rain or
snow.
If a new driver takes over, advise the new driver
of the speed stored.
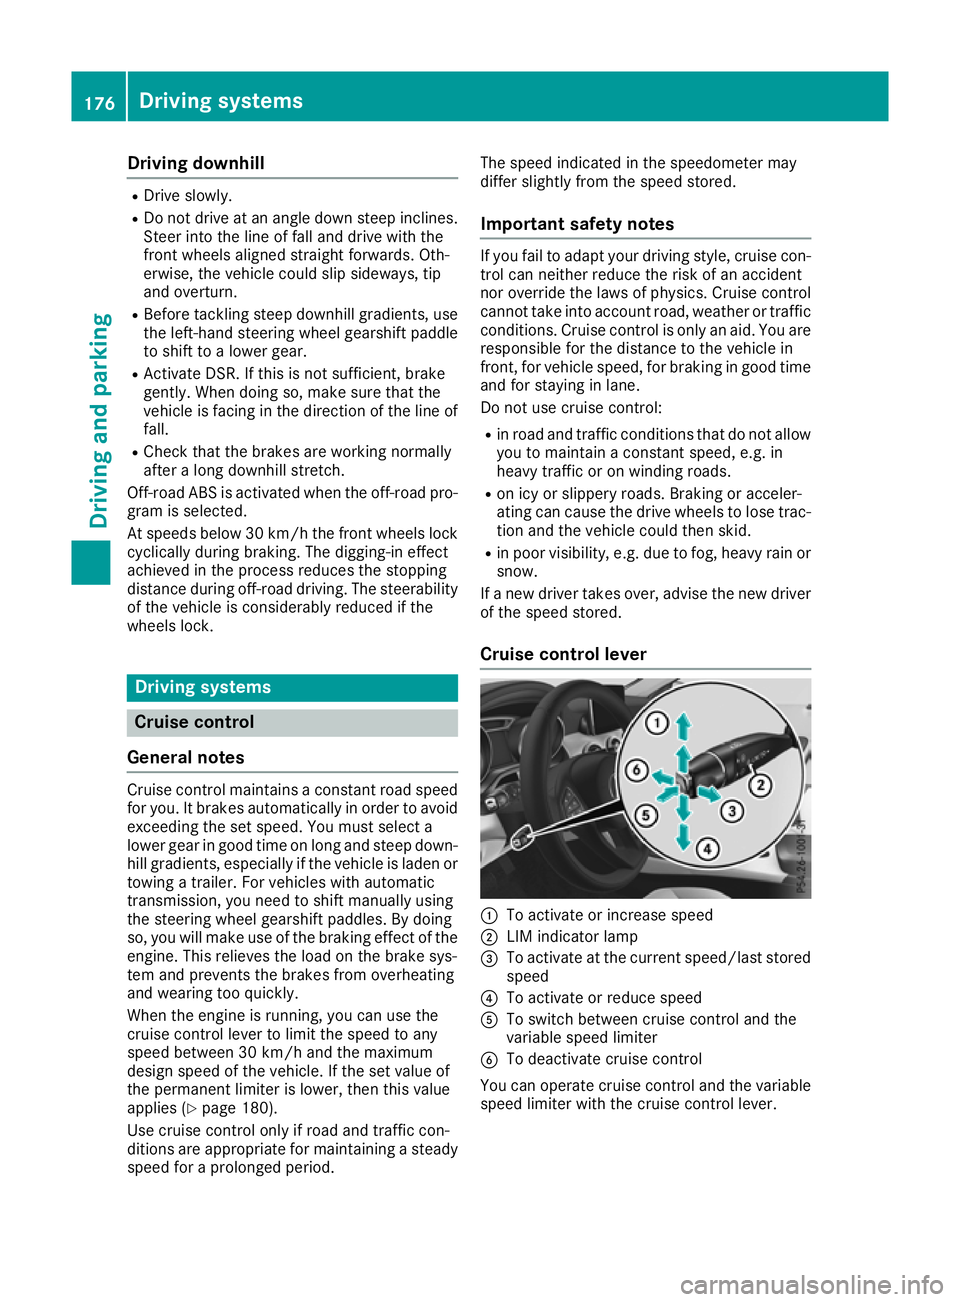
Cruise control lever :
To activate or increase speed
; LIM indicator lamp
= To activate at the current speed/last stored
speed
? To activate or reduce speed
A To switch between cruise control and the
variable speed limiter
B To deactivate cruise control
You can operate cruise control and the variable
speed limiter with the cruise control lever. 176
Driving syste
msDriving and parking
Page 181 of 369
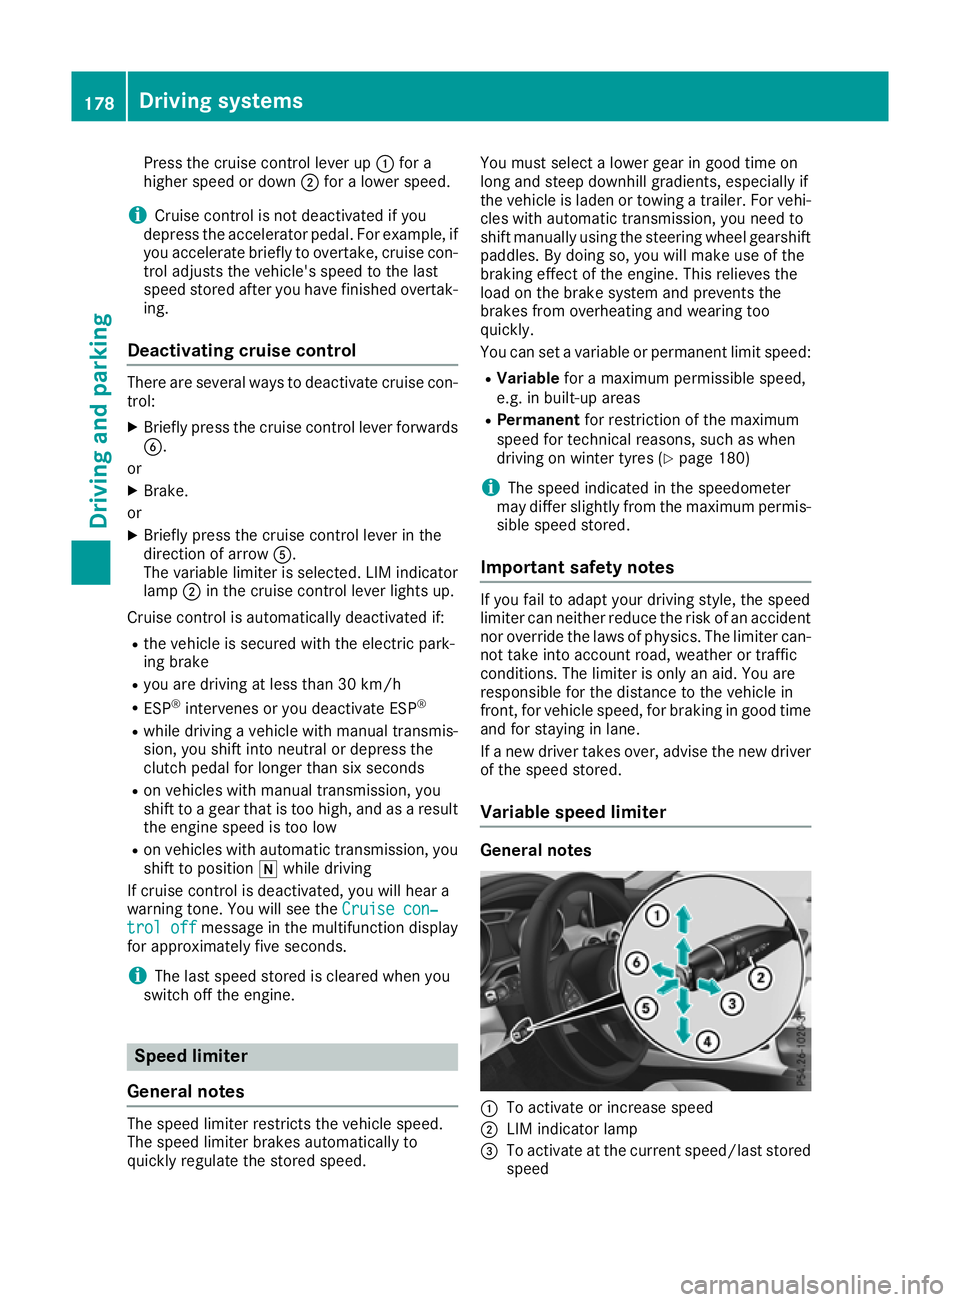
Press the cruise control lever up
:for a
higher speed or down ;for a lower speed.
i Cruise control is not deactivated if you
depress the accelerator pedal. For example, if
you accelerate briefly to overtake, cruise con-
trol adjusts the vehicle's speed to the last
speed stored after you have finished overtak-
ing.
Deactivating cruise control There are several ways to deactivate cruise con-
trol:
X Briefly press the cruise control lever forwards
B.
or X Brake.
or X Briefly press the cruise control lever in the
direction of arrow A.
The variable limiter is selected. LIM indicator lamp ;in the cruise control lever lights up.
Cruise control is automatically deactivated if:
R the vehicle is secured with the electric park-
ing brake
R you are driving at less than 30 km/h
R ESP ®
intervenes or you deactivate ESP ®
R while driving a vehicle with manual transmis-
sion, you shift into neutral or depress the
clutch pedal for longer than six seconds
R on vehicles with manual transmission, you
shift to a gear that is too high, and as a result
the engine speed is too low
R on vehicles with automatic transmission, you
shift to position iwhile driving
If cruise control is deactivated, you will hear a
warning tone. You will see the Cruise con‐
Cruise con‐
trol off trol off message in the multifunction display
for approximately five seconds.
i The last speed stored is cleared when you
switch off the engine. Speed limiter
General notes The speed limiter restricts the vehicle speed.
The speed limiter brakes automatically to
quickly regulate the stored speed. You must select a lower gear in good time on
long and steep downhill gradients, especially if
the vehicle is laden or towing a trailer. For vehi-
cles with automatic transmission, you need to
shift manually using the steering wheel gearshiftpaddles. By doing so, you will make use of the
braking effect of the engine. This relieves the
load on the brake system and prevents the
brakes from overheating and wearing too
quickly.
You can set a variable or permanent limit speed:
R Variable for a maximum permissible speed,
e.g. in built-up areas
R Permanent for restriction of the maximum
speed for technical reasons, such as when
driving on winter tyres (Y page 180)
i The speed indicated in the speedometer
may differ slightly from the maximum permis- sible speed stored.
Important safety notes If you fail to adapt your driving style, the speed
limiter can neither reduce the risk of an accident nor override the laws of physics. The limiter can-
not take into account road, weather or traffic
conditions. The limiter is only an aid. You are
responsible for the distance to the vehicle in
front, for vehicle speed, for braking in good time
and for staying in lane.
If a new driver takes over, advise the new driver
of the speed stored.
Variable speed limiter General notes
:
To activate or increase speed
; LIM indicator lamp
= To activate at the current speed/last stored
speed 178
Driving systemsDriving and parking
Page 196 of 369
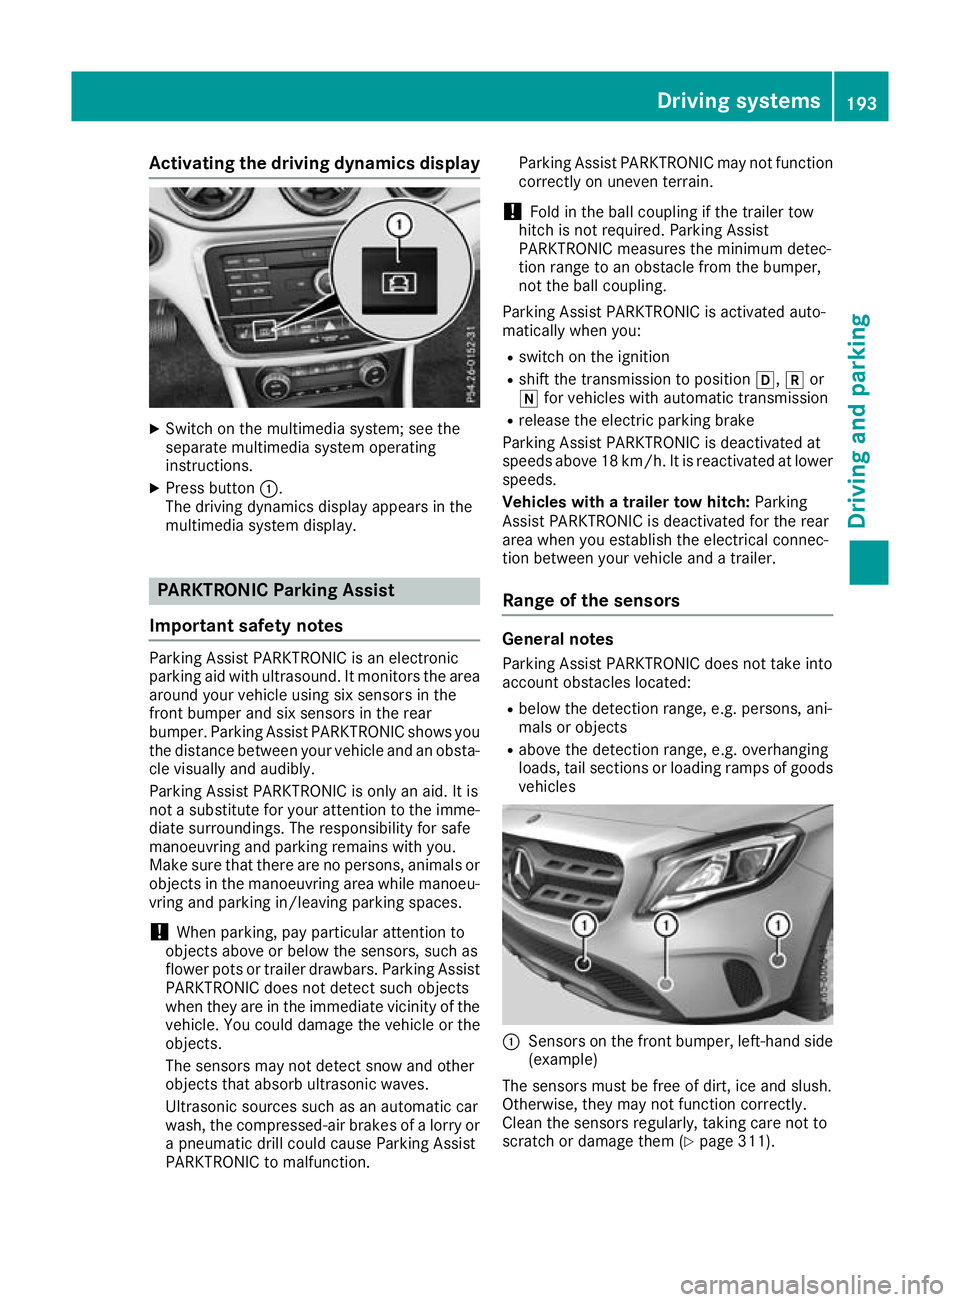
Activating the driving dynamics display
X
Switch on the multimedia system; see the
separate multimedia system operating
instructions.
X Press button :.
The driving dynamics display appears in the
multimedia system display. PARKTRONIC Parking Assist
Important safety notes Parking Assist PARKTRONIC is an electronic
parking aid with ultrasound. It monitors the area
around your vehicle using six sensors in the
front bumper and six sensors in the rear
bumper. Parking Assist PARKTRONIC shows you
the distance between your vehicle and an obsta- cle visually and audibly.
Parking Assist PARKTRONIC is only an aid. It is
not a substitute for your attention to the imme-
diate surroundings. The responsibility for safe
manoeuvring and parking remains with you.
Make sure that there are no persons, animals or
objects in the manoeuvring area while manoeu-
vring and parking in/leaving parking spaces.
! When parking, pay particular attention to
objects above or below the sensors, such as
flower pots or trailer drawbars. Parking Assist PARKTRONIC does not detect such objects
when they are in the immediate vicinity of the
vehicle. You could damage the vehicle or the
objects.
The sensors may not detect snow and other
objects that absorb ultrasonic waves.
Ultrasonic sources such as an automatic car
wash, the compressed-air brakes of a lorry or
a pneumatic drill could cause Parking Assist
PARKTRONIC to malfunction. Parking Assist PARKTRONIC may not function
correctly on uneven terrain.
! Fold in the ball coupling if the trailer tow
hitch is not required. Parking Assist
PARKTRONIC measures the minimum detec-
tion range to an obstacle from the bumper,
not the ball coupling.
Parking Assist PARKTRONIC is activated auto-
matically when you:
R switch on the ignition
R shift the transmission to position h,kor
i for vehicles with automatic transmission
R release the electric parking brake
Parking Assist PARKTRONIC is deactivated at
speeds above 18 km/h. It is reactivated at lower
speeds.
Vehicles with a trailer tow hitch: Parking
Assist PARKTRONIC is deactivated for the rear
area when you establish the electrical connec-
tion between your vehicle and a trailer.
Range of the sensors General notes
Parking Assist PARKTRONIC does not take into
account obstacles located:
R below the detection range, e.g. persons, ani-
mals or objects
R above the detection range, e.g. overhanging
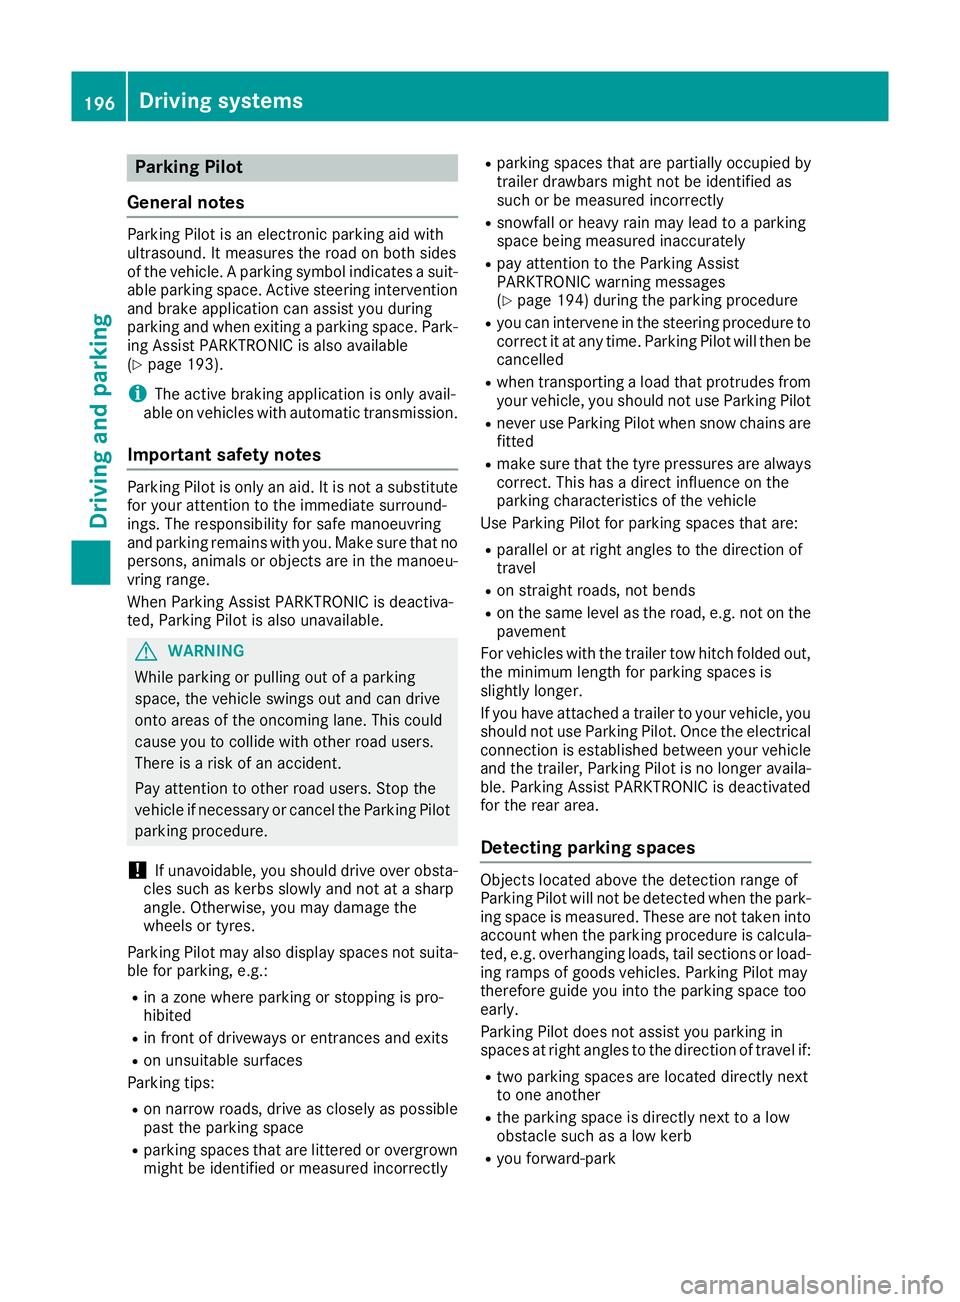
loads, tail sections or loading ramps of goods vehicles :
Sensors on the front bumper, left-hand side
(example)
The sensors must be free of dirt, ice and slush.
Otherwise, they may not function correctly.
Clean the sensors regularly, taking care not to
scratch or damage them (Y page 311). Driving systems
193Driving and parking Z
Page 199 of 369
Parking Pilot
General notes Parking Pilot is an electronic parking aid with
ultrasound. It measures the road on both sides
of the vehicle. A parking symbol indicates a suit-
able parking space. Active steering intervention
and brake application can assist you during
parking and when exiting a parking space. Park- ing Assist PARKTRONIC is also available
(Y page 193).
i The active braking application is only avail-
able on vehicles with automatic transmission.
Important safety notes Parking Pilot is only an aid. It is not a substitute
for your attention to the immediate surround-
ings. The responsibility for safe manoeuvring
and parking remains with you. Make sure that no
persons, animals or objects are in the manoeu-
vring range.
When Parking Assist PARKTRONIC is deactiva-
ted, Parking Pilot is also unavailable. G
WARNING
While parking or pulling out of a parking
space, the vehicle swings out and can drive
onto areas of the oncoming lane. This could
cause you to collide with other road users.
There is a risk of an accident.
Pay attention to other road users. Stop the
vehicle if necessary or cancel the Parking Pilot parking procedure.
! If unavoidable, you should drive over obsta-
cles such as kerbs slowly and not at a sharp
angle. Otherwise, you may damage the
wheels or tyres.
Parking Pilot may also display spaces not suita- ble for parking, e.g.:
R in a zone where parking or stopping is pro-
hibited
R in front of driveways or entrances and exits
R on unsuitable surfaces
Parking tips:
R on narrow roads, drive as closely as possible
past the parking space
R parking spaces that are littered or overgrown
might be identified or measured incorrectly R
parking spaces that are partially occupied by
trailer drawbars might not be identified as
such or be measured incorrectly
R snowfall or heavy rain may lead to a parking
space being measured inaccurately
R pay attention to the Parking Assist
PARKTRONIC warning messages
(Y page 194) during the parking procedure
R you can intervene in the steering procedure to
correct it at any time. Parking Pilot will then be cancelled
R when transporting a load that protrudes from
your vehicle, you should not use Parking Pilot
R never use Parking Pilot when snow chains are
fitted
R make sure that the tyre pressures are always
correct. This has a direct influence on the
parking characteristics of the vehicle
Use Parking Pilot for parking spaces that are:
R parallel or at right angles to the direction of
travel
R on straight roads, not bends
R on the same level as the road, e.g. not on the
pavement
For vehicles with the trailer tow hitch folded out,
the minimum length for parking spaces is
slightly longer.
If you have attached a trailer to your vehicle, you
should not use Parking Pilot. Once the electrical connection is established between your vehicle
and the trailer, Parking Pilot is no longer availa-
ble. Parking Assist PARKTRONIC is deactivated
for the rear area.
Detecting parking spaces Objects located above the detection range of
Parking Pilot will not be detected when the park-
ing space is measured. These are not taken into
account when the parking procedure is calcula- ted, e.g. overhanging loads, tail sections or load-
ing ramps of goods vehicles. Parking Pilot may
therefore guide you into the parking space too
early.
Parking Pilot does not assist you parking in
spaces at right angles to the direction of travel if:
R two parking spaces are located directly next
to one another
R the parking space is directly next to a low
obstacle such as a low kerb
R you forward-park 196
Driving systemsDriving and parking