2017 MERCEDES-BENZ GLA SUV fuse box
[x] Cancel search: fuse boxPage 15 of 369

F
Fault message see Display messages
Favourites
Overview ........................................ 278
Filler cap
see Fuel filler flap
Fire extinguisher .............................. .316
First-aid kit ......................................... 316
Fitting a wheel
Fitting a wheel ............................... 345
Lowering the vehicle ..................... .346
Preparing the vehicle ..................... 343
Raising the vehicle ......................... 344
Removing a wheel .......................... 345
Securing the vehicle against roll-
ing away ........................................ 344
Flat tyre
Changing a wheel/fitting the
spare wheel ................................... 342
MOExtended tyres ......................... 318
Preparing the vehicle ..................... 317
TIREFIT kit ...................................... 319
see Emergency spare wheel
Floormat ............................................. 301
Foglamps
Switching on/off ........................... 117
Frequencies
Mobile phone ................................. 350
Two-way radio ................................ 350
Front foglamps
Display message ............................ 247
Front-passenger front airbag deac-
tivation
Display message ............................ 244
Front-passenger front airbag deac-
tivation system
Operation ......................................... 49
Problems ......................................... 53
System self-test ............................... 52
Front-passenger seat
Folding the backrest forward/
back ............................................... 291
Fuel
Additives ........................................ 354
Consumption statistics .................. 221 Displaying the current consump-
tion ................................................ 221
Displaying the range .....................
.221
Driving tips ................................... .169
E10 ................................................ 353
Fuel gauge ....................................... 34
Grade (petrol) ................................ 353
Important safety notes .................. 353
Low outside temperatures ............. 355
Notes for Mercedes ‑AMG vehi-
cles ................................................ 354
Problem (malfunction) ................... 165
Quality (diesel )............................... 354
Refuelling ....................................... 163
Tank content/reserve fue l............. 353
Fuel filler flap
Opening ......................................... 164
Fuel filter (white display message) .. 251
Fuel level
Calling up the range (on-board
computer) ...................................... 221
Gauge .............................................. 34
Fuel reserve
see Fuel
Fuel tank
Capacity ........................................ 353
Problem (malfunction) ................... 165
Fuses
Allocation chart ............................. 332
Before changing ............................. 332
Fuse box in the engine compart-
ment .............................................. 332
Fuse box in the front-passenger
footwell .......................................... 332
Important safety notes .................. 331 G
Gear indicator (on-board com-
puter, Mercedes-AMG vehicles) ....... 231
Genuine Mercedes-Benz parts ........... 26
Glove compartment .......................... 289
Google™ Local Search
See also Digital Owner's Manua l... 277 12
Index
Page 334 of 369

Vehicles with 4MATIC may only be either towed
away with both axles on the ground or be loadedup and transported.
If the vehicle has transmission damage or dam-
age to the front or rear axle, have it transported on a transporter or trailer.
In the event of damage to the electrical sys-
tem:
If the battery is defective, the automatic trans-
mission will be locked in position j. To shift the
automatic transmission to position i, you
must provide power to the vehicle's on-board
electrical system in the same way as when jump- starting (Y page 325).
Have the vehicle transported on a transporter or trailer. Tow-starting (emergency engine
starting)
! Do not tow-start vehicles with automatic
transmission. You could otherwise damage
the automatic transmission.
i You can find information on "Jump-starting"
under (Y page 325).
Before tow-starting, the following conditions
must be fulfilled: R the battery is connected
R the engine has cooled down
R the exhaust system has cooled down
When tow-starting, it is important that you
observe the safety notes (Y page 327) and the
legal requirements in each respective country.
X Switch on the hazard warning lamps
(Y page 118).
X Fit the towing eye (Y page 328).
X Secure the rigid towing bar or the towing
rope.
X When the vehicle is stationary, depress the
brake pedal and keep it depressed.
X Turn the key to position 2in the ignition lock
(Y page 144).
X Depress the clutch pedal fully, engage second
gear and continue to keep the clutch pedal
fully depressed.
X Release the brake pedal.
X Tow-start the vehicle.
X Release the clutch pedal slowly; do not
depress the accelerator pedal while doing so. X
When the engine has been started, immedi-
ately depress the clutch pedal fully and shift
to neutral.
X Pull over at a suitable place and stop the vehi-
cle safely, paying attention to road and traffic
conditions.
X Use the electric parking brake to secure the
vehicle and prevent it from rolling away.
X Remove the rigid towing bar or towing rope.
X Remove the towing eye (Y page 329).
X Switch off the hazard warning lamps. Fuses
Important safety notes
G
WARNING
If you manipulate, bridge or replace a faulty
fuse with a fuse of a higher amperage, the
electric cables could be overloaded. This may result in a fire. There is a risk of an accident
and injury.
Always replace faulty fuses with specified newfuses of the correct amperage.
! Only use fuses that have been approved for
Mercedes-Benz vehicles and which have the
correct fuse rating for the system concerned.
Only use fuses marked with an "S". Compo-
nents or systems could otherwise be dam-
aged.
! Make sure that no moisture can enter the
fuse box when the cover is open.
! When closing the cover, make sure that it is
lying correctly on the fuse box. Moisture seep-
ing in or dirt could otherwise impair the oper- ation of the fuses.
The fuses in your vehicle disconnect faulty cir-
cuits. If a fuse blows, all the components in the circuit and their functions will fail.
Blown fuses must be replaced with fuses of the same rating, which you can recognise by the
colour and fuse rating. The fuse ratings are listed
in the fuse allocation chart.
The fuse allocation chart is in the fuse box in the front-passenger footwell (Y page 332).
If the newly inserted fuse also blows, have the
cause traced and rectified at a qualified special- Fuses
331Breakdown assistance Z
Page 335 of 369

ist workshop, e.g. a Mercedes-Benz Service
Centre. Before replacing a fuse
X Secure the vehicle against rolling away
(Y page 166).
X Switch off all electrical consumers.
X Vehicles without KEYLESS-GO: remove the
key from the ignition lock.
X Vehicles with KEYLESS-GO start-function
or KEYLESS-GO: open the driver's door.
The vehicle electronics are now in position
g. This is the same as “key removed”.
The fuses are located in various fuse boxes: R Fuse box in the engine compartment on the
left-hand side of the vehicle, when viewed in
the direction of travel
R Fuse box in the front-passenger footwell
The fuse allocation chart is on the fuse box in the front-passenger footwell (Y page 332).Fuse box in the engine compartment
G
WARNING
When the bonnet is open, and the windscreen wipers are set in motion, you can be injured by
the wiper linkage. There is a risk of injury.
Always switch off the windscreen wipers and
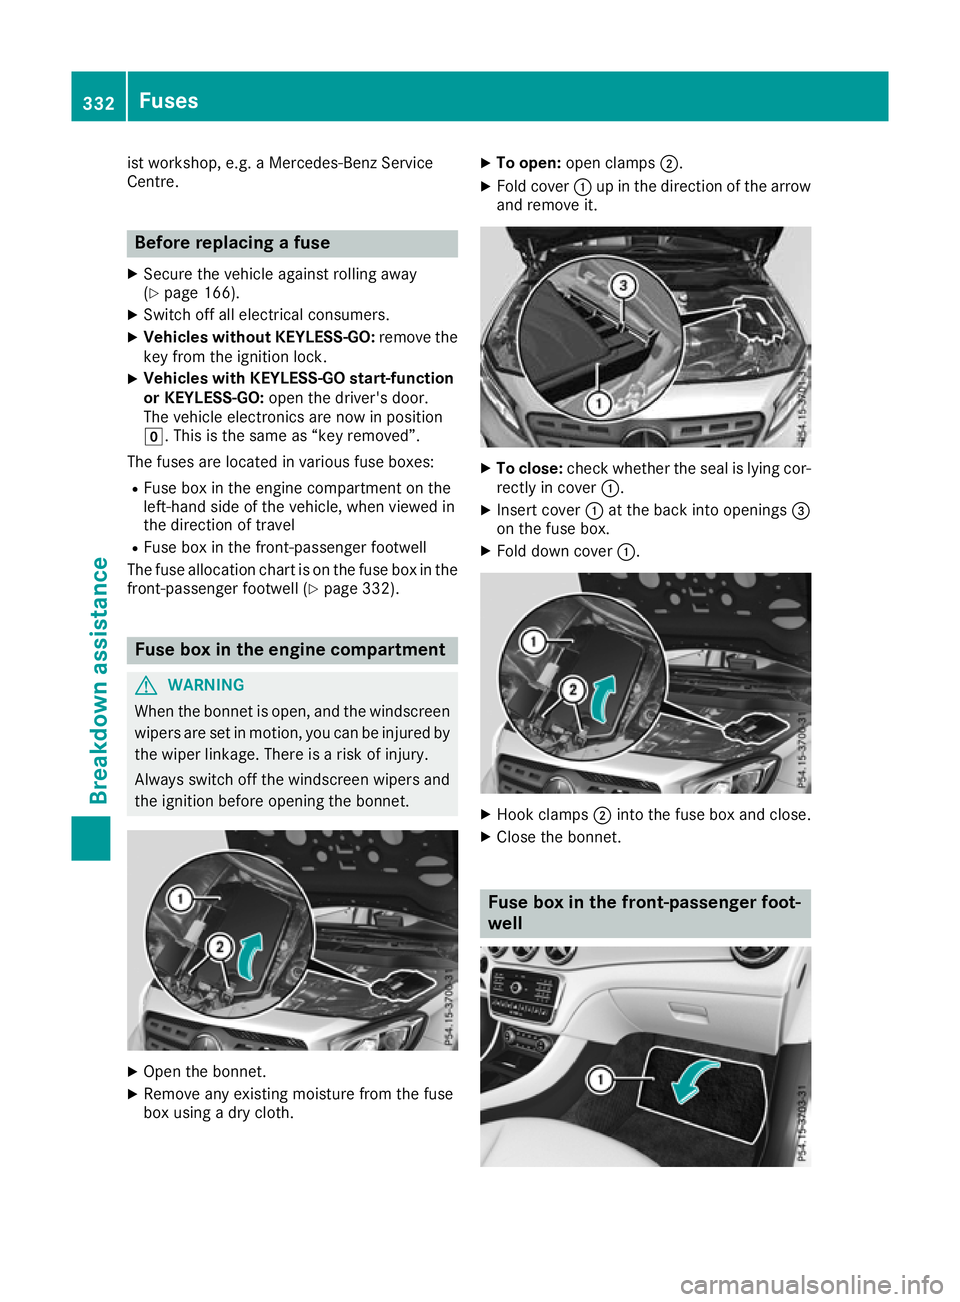
the ignition before opening the bonnet. X
Open the bonnet.
X Remove any existing moisture from the fuse
box using a dry cloth. X
To open: open clamps ;.
X Fold cover :up in the direction of the arrow
and remove it. X
To close: check whether the seal is lying cor-
rectly in cover :.
X Insert cover :at the back into openings =
on the fuse box.
X Fold down cover :. X
Hook clamps ;into the fuse box and close.
X Close the bonnet. Fuse box in the front-passenger foot-
well332
FusesBreakdown assistance
Page 336 of 369

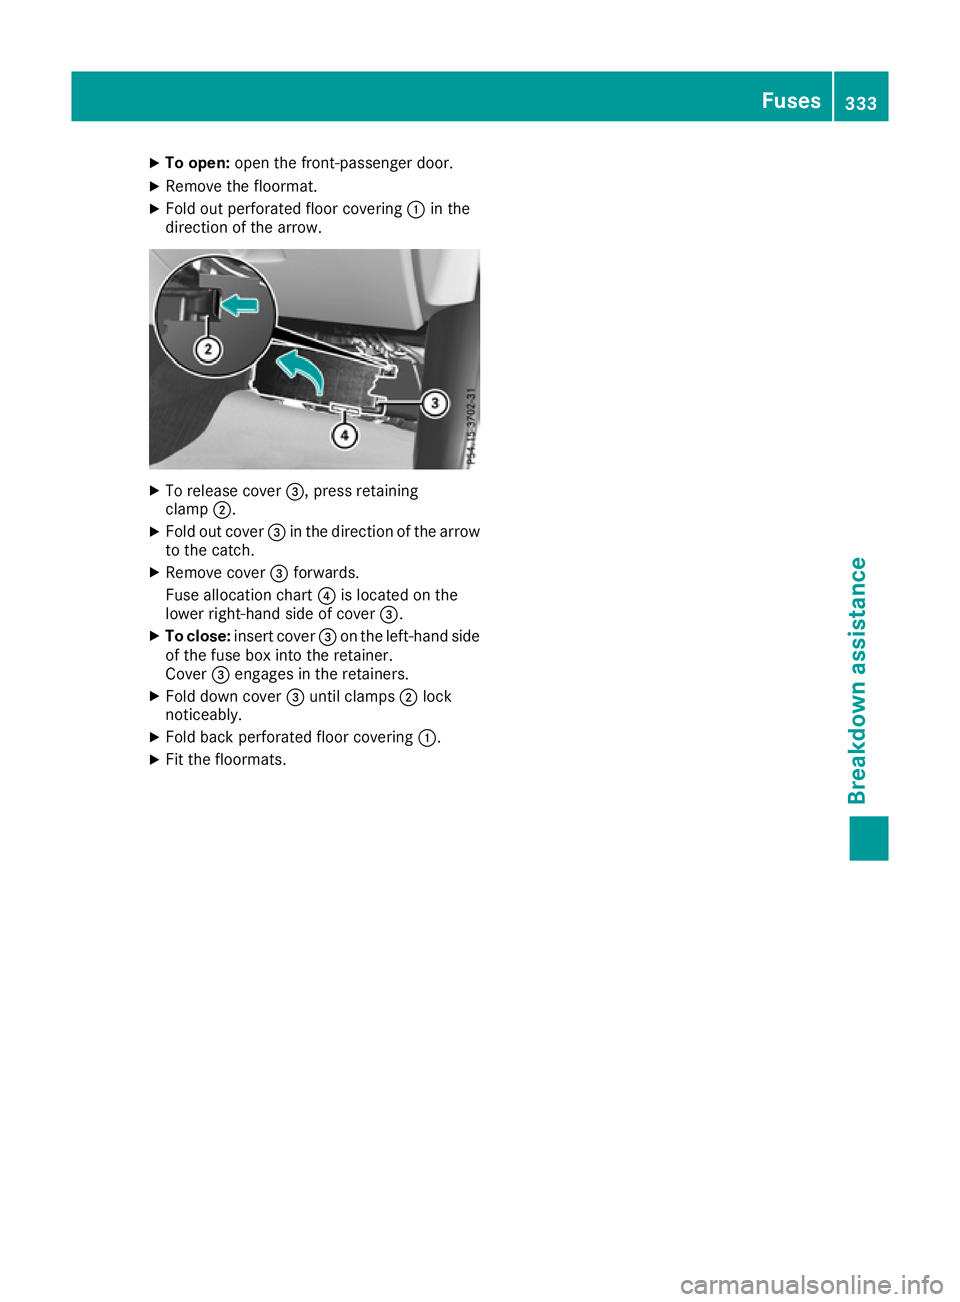
X
To open: open the front-passenger door.
X Remove the floormat.
X Fold out perforated floor covering :in the
direction of the arrow. X
To release cover =, press retaining
clamp ;.
X Fold out cover =in the direction of the arrow
to the catch.
X Remove cover =forwards.
Fuse allocation chart ?is located on the
lower right-hand side of cover =.
X To close: insert cover =on the left-hand side
of the fuse box into the retainer.
Cover =engages in the retainers.
X Fold down cover =until clamps ;lock
noticeably.
X Fold back perforated floor covering :.
X Fit the floormats. Fuses
333Breakdo wn assis tance Z