2017 MERCEDES-BENZ GLA SUV trailer
[x] Cancel search: trailerPage 21 of 369
Rear window heating
Problem (fault) ............................... 135
Switching on/off ........................... 135
Rear window wiper
Replacing the wiper blad e.............. 126
Switching on/of f........................... 124
Rear-compartment seat belt sta-
tus indicator ........................................ 46
Rear-view mirror
Anti-dazzle mode (automatic) ........ 113
Dipping (manual) ........................... 112
Reflective safety vest ....................... 315
Refuelling
Fuel gaug e....................................... 34
Important safety notes .................. 163
Notes for Mercedes‑ AMG vehi-
cles ................................................ 354
Refuelling process ......................... 164
see Fuel
Remote control
Auxiliary heating/ventilation .......... 138
Changing the batteries (auxiliary
heating) ......................................... 140
Replacing bulbs
Brake lamp .................................... 123
Dipped-beam headlamp s............... 122
Fitting/removing the cover (front
wheel arch) .................................... 121
Important safety notes .................. 120
Main-beam headlamp s................... 122
Overview of bulb types .................. 121
Rear fog lamp ................................ 123
Turn signals (front) ......................... 122
Turn signals (rear) .......................... 123
Replacing the battery (auxiliary
heating remote control) .................... 140
Rescue card ......................................... 30
Reserve (fuel tank)
see Fuel
Reserve fuel
Display message ............................ 251
Warning lamp ................................. 272
Residual heat (climate control) ........ 137
Restraint system
Display message ............................ 243
Introduction ..................................... 41
Warning lamp ................................. 272 Warning lamp (function) ................... 42
Rev counter ........................................ 217
Reverse gear
Engaging (manual transmission) .... 153
Reverse gear (selector lever) ........... 156
Reversing camera
"Reverse parking" function ............ 202
Cleaning instructions ..................... 311
Coupling up a trailer function ........ 203
Display in the multimedia system .. 201
Function/note s............................. 200
General notes ................................ 200
Switching on/of f........................... 201
Reversing feature
Side windows ................................... 98
Tailgate ............................................ 89
Reversing function
Roller sunblind ............................... 103
Reversing lamps
Display message ............................ 247
Roller sunblind
Panorama sliding sunroo f.............. 103
Roof carrier ........................................ 296
Roof lining and carpets (cleaning
instructions) ...................................... 314
Roof load (maximum) ........................ 358
Route guidance
See also Digital Owner's Manua l... 277 S
Safety Children in the vehicle ..................... 56
see Occupant safety
Safety net
Attaching ....................................... 294
Important safety information ......... 294
Safety system
see Driving safety systems
SD card
Inserting ........................................ 286
Inserting/removing ........................ 286
Removing ....................................... 286
SD memory card
See also Digital Owner's Manua l... 277
Seat
Adjusting (Performance Seat) ........ 110
Correct driver's seat position ........ 106 18
Index
Page 23 of 369
Spare wheel
see Emergency spare wheel
Specialist workshop ............................30
Spectacles compartment ................. 289
Speed limiter
Display message ............................2 55
Important safety notes .................. 178
Selecting ........................................ 179
Speed, controlling
see Cruise control
Speedometer
Activating/deactivating the addi-
tional speedometer ........................ 228
Digital ............................................ 222
In the Instrument cluster ................. 34
Segments ...................................... 217
Selecting a display unit .................. 228
SPORT handling mode
Deactivating/activating
(Mercedes-AMG vehicles) ................ 73
Warning lamp ................................. 270
Start-off assist
Activating ....................................... 188
Important safety notes .................. 187
Start/Stop button
Removing ....................................... 145
Starting the engine ........................ 146
Start/stop function
see ECO start/stop function
Starting (engine) ................................ 145
Starting the engine
see Starting (engine)
STEER CONTROL .................................. 75
Steering
Display message ............................ 262
Steering assistant STEER CON-
TROL
see STEER CONTROL
Steering wheel
Adjusting (manually) ...................... 111
Button overview ............................... 35
Buttons (on-board computer) ......... 218
Cleaning ......................................... 313
Gearshift paddle s........................... 161
Important safety notes .................. 111
Steering wheel gearshift paddles .... 161
Stopwatch (RACETIMER) ................... 232Stowage compartment
Map pockets .................................. 290
Stowage compartments
Armrest (front) ............................... 289
Armrest (under) ............................. 290
Centre console .............................. 289
Centre console (rear) ..................... 290
Cup holde r..................................... 296
Glove compartment ....................... 289
Important safety information ......... 288
Spectacles compartment ............... 289
Under driver's seat/front-
passenger sea t.............................. 290
Stowage net ....................................... 290
Stowage space
Stowage net ................................... 290
Summer opening
see Convenience opening feature
Summer tyres .................................... 336
Sun visor ............................................ 297
Suspension settings
AMG RIDE CONTROL sports sus-
pension .......................................... 189
Switching on media mode
Via the device list .......................... 286 T
Tail lamps see Lights
Tailgate
Display message ............................ 261
Emergency unlocking ................. 94, 97
Important safety notes .................... 89
Limiting the opening angle ............... 93
Obstruction detectio n...................... 89
Opening dimensions ...................... 358
Opening/closing (from outside) .. 90, 95 Opening/closing automatically
from inside ....................................... 92
Opening/closing automatically
from outside .................................... 90
Tank
see Fuel tank
Technical data
Capacities ...................................... 352
Information .................................... 350
Trailer load s................................... 359 20
Index
Page 24 of 369
Tyres/wheels ................................. 347
Vehicle data ................................... 358
Telephone
Accepting a call (multifunction
steering wheel) .............................. 225
Authorising a mobile phone (con-
necting) ......................................... 281
Authorising a mobile phone via
the device manager (connecting) ... 282
Connecting a mobile phone
(device manager) ........................... 282
Connecting a Mobile phone (gen-
eral information) ............................2 80
Display message ............................ 263
Introduction ................................... 225
Menu (on-board computer) ............ 225
Number from the phone book ....... .225
Redialling ....................................... 226
Rejecting/ending a call ................. 225
See also Digital Owner's Manual ... 277
Telephone compartment ................ 290
Telephone module with Bluetooth ®
(SAP profile) Activating and connecting the
module .......................................... .284
Charging a mobile phone .............. .286
Connecting the mobile phone ....... .284
Connecting the module via a USB
cable .............................................. 283
Data modem mode ........................ 285
Installing the module ..................... 283
Introduction ................................... 283
Saving/deleting the PIN for the
SIM card ........................................ 285
Settings ......................................... 285
SIM card mode .............................. 284
Text messages ............................... 285
Transferring the phone book .......... 285
Temperature
Coolant .......................................... 218
Coolant (on-board computer,
Mercedes-AMG vehicles) .............. .231
Engine oil (on-board computer,
Mercedes-AMG vehicles) .............. .231
Outside temperature ..................... .217
Setting (climate control) ................ 133
Transmission oil (on-board com-
puter, Mercedes-AMG vehicles) ..... 231 TEMPOMAT
Function/notes ............................ .176
Text messages
Telephone module with Blue-
tooth ®
(SAP profile) ....................... 285
Through-loading ................................ 291
Timing (RACETIMER) ......................... 232
TIREFIT kit .......................................... 319
Declaration of conformity ................ 28
Important safety notes .................. 319
Storage location ............................ 317
Tyre pressure not reached ............. 321
Tyre pressure reached ................... 321
Tool
see Vehicle tool kit
Top Tether ............................................ 59
Total distance recorder .................... 221
Tow-away protection
Activating ......................................... 76
Deactivating ..................................... 77
Function .......................................... .76
Tow-starting
Emergency engine starting ............ 331
Fitting the towing eye .................... 328
Important safety notes .................. 327
Removing the towing eye ............... 329
Towing
Important safety notes .................. 327
Notes for 4MATIC vehicles ............ 330
Transporting the vehicle ................ 330
Towing a trailer
Axle load, permissibl e.................... 359
ESP ®
(Electronic Stability Pro-
gram) ............................................... 75
Failure check for LEDs ................... 216
General notes ................................ 213
Parking Pilot .................................. 196
Pulling away with a traile r.............. 147
Trailer tow hitch display message .. 262
Towing away
Fitting the towing ey e.................... 328
Removing the towing eye ............... 329
With both axles on the ground ....... 329
With front axle raised ..................... 329
Towing eye ......................................... 317 Index
21
Page 25 of 369
Traction system
see ETS/4ETS (Electronic Trac-
tion System)
Traffic Sign Assist
Activating ....................................... 208
Activating/deactivating the warn-ing function .................................... 226
Display message ............................ 254
Function/note s............................. 207
Important safety notes .................. 208
Instrument cluster display ............. 208
Trailer
Folding the ball coupling in/out ..... 214
Trailer coupling
see Towing a trailer
Trailer towing
7-pin connecto r............................. 216
Blind Spot Assist ............................ 210
Cleaning the trailer tow hitch ......... 312
Coupling up a traile r...................... 215
Decoupling a traile r....................... 215
Driving tips .................................... 213
Folding in the ball coupling ............ 215
Folding out the ball coupling .......... 214
Important safety notes .................. 212
Lights display message .................. 246
Power supply ................................. 215
Trailer load s................................... 359
Transmission
see Automatic transmission
see Manual transmission
Transmission position display
(DIRECT SELECT lever) ...................... 155
Transporting the vehicle .................. 330
Travelling uphill
Brow of hill ..................................... 175
Driving downhill ............................. 176
Maximum gradient-climbing capa-
bility ............................................... 175
Trim pieces (cleaning instruc-
tions) .................................................. 313
Trip computer (on-board com-
puter) .................................................. 221
Trip meter
Calling up ....................................... 221
Resetting (on-board computer) ...... 222
Turn signal lamp
Replacing bulbs (rear) .................... 123 Turn signals
Replacing bulbs (front) ................... 122
Switching on/of f........................... 118
TV
Operating (on-board computer) ..... 224
see Separate operating instructions
Two-way radio
Frequencies ................................... 350
Installation ..................................... 350
Transmission output (maximum) .... 350
Type identification plate
see Vehicle identification plate
Tyre inflation compressor
see TIREFIT kit
Tyre pressure
Calling up (on-board computer) ..... 340
Display message ............................ 256
Not reached (TIREFIT) .................... 321
Reached (TIREFIT) .......................... 321
Recommended ............................... 337
Tyre pressure loss warning
General notes ................................ 339
Important safety notes .................. 339
Restarting ...................................... 339
Tyre pressure monitor
Checking the tyre pressure elec-
tronically ........................................ 340
Function/note s............................. 340
General notes ................................ 340
Important safety notes .................. 340
Radio type approval for the tyre
pressure monitor ........................... 342
Restarting ...................................... 341
Warning lamp ................................. 276
Warning message .......................... 341
Tyres
Changing a whee l.......................... 342
Checking ........................................ 334
Direction of rotation ...................... 343
Display message ............................ 256
General notes ................................ 347
Important safety notes .................. 334
Information on driving .................... 334
M+S tyres ...................................... 336
MOExtended tyre s......................... 336
Replacing ....................................... 342
Service life ..................................... 335
Storing ........................................... 343 22
Index
Page 78 of 369

Off-road ESP
®
intervenes with a delay if there is
oversteering or understeering, thus improving
traction.
ESP ®
trailer stabilisation General notes
If your vehicle/trailer combination begins to
lurch, ESP ®
assists you in this situation. ESP ®
slows the vehicle down by braking and limiting
the engine output until the vehicle/trailer com- bination has stabilised.
Important safety notes G
WARNING
If road and weather conditions are poor,
trailer stabilisation will not be able to prevent the vehicle/trailer combination from swerv-
ing. Trailers with a high centre of gravity can
tip over before ESP ®
can detect this. There is
a risk of an accident.
Always adapt your driving style to the prevail-
ing road and weather conditions.
If your vehicle/trailer combination begins to
lurch, you can only stabilise the vehicle/trailer
combination by depressing the brake firmly.
ESP ®
trailer stabilisation is active above speeds
of approximately 65 km/h.
ESP ®
trailer stabilisation does not work if ESP ®
is deactivated or disabled because of a malfunc- tion. EBD (electronic brake force distribu-
tion)
General information EBD monitors and controls the brake pressure
on the rear wheels to improve driving stability
while braking.
Important safety notes i
Observe the "Important safety notes" sec-
tion (Y page 68). G
WARNING
If EBD is malfunctioning, the rear wheels can
lock, e.g. under full braking. This increases the risk of skidding and an accident.
You should therefore adapt your driving style
to the different handling characteristics. Have the brake system checked at a qualified spe-
cialist workshop.
Please observe the information on warning and
indicator lamps (Y page 267)
(Y page 267) as well as on display messages
(Y page 237). ADAPTIVE BRAKE
ADAPTIVE BRAKE enhances braking safety and
offers increased braking comfort. In addition to
the braking function, ADAPTIVE BRAKE also has the HOLD function (Y page 186) and hill start
assist (Y page 147). STEER CONTROL
General information STEER CONTROL helps you by transmitting a
noticeable steering force to the steering wheel
in the direction required for vehicle stabilisation.
This steering support is provided in particular if:
R both right wheels or both left wheels are on a
wet or slippery road surface when you brake
R the vehicle begins to skid
Important safety notes i
Read the "Important safety notes" section
(Y page 68).
No steering support is provided from STEER
CONTROL, if:
R ESP ®
is malfunctioning
R the steering is malfunctioning
If ESP ®
is malfunctioning, you will be assisted
further by the electrical power steering. Driving safety systems
75Safety Z
Page 95 of 369
R
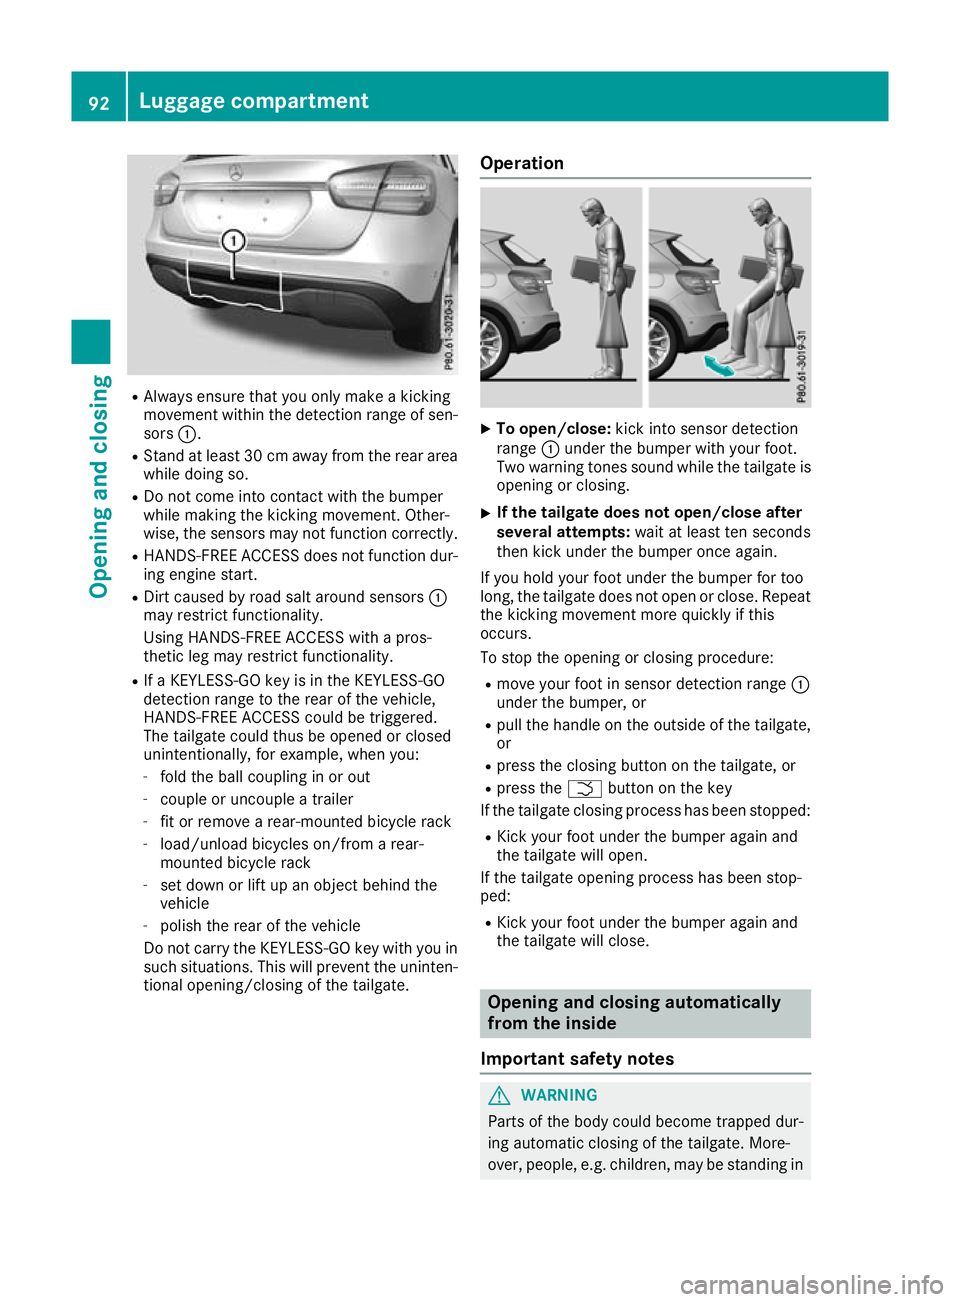
Always ensure that you only make a kicking
movement within the detection range of sen- sors :.
R Stand at least 30 cm away from the rear area
while doing so.
R Do not come into contact with the bumper
while making the kicking movement. Other-
wise, the sensors may not function correctly.
R HANDS-FREE ACCESS does not function dur-
ing engine start.
R Dirt caused by road salt around sensors :
may restrict functionality.
Using HANDS-FREE ACCESS with a pros-
thetic leg may restrict functionality.
R If a KEYLESS-GO key is in the KEYLESS-GO
detection range to the rear of the vehicle,
HANDS-FREE ACCESS could be triggered.
The tailgate could thus be opened or closed
unintentionally, for example, when you:
- fold the ball coupling in or out
- couple or uncouple a trailer
- fit or remove a rear-mounted bicycle rack
- load/unload bicycles on/from a rear-
mounted bicycle rack
- set down or lift up an object behind the
vehicle
- polish the rear of the vehicle
Do not carry the KEYLESS-GO key with you in such situations. This will prevent the uninten-tional opening/closing of the tailgate. Operation X
To open/close: kick into sensor detection
range :under the bumper with your foot.
Two warning tones sound while the tailgate is opening or closing.
X If the tailgate does not open/close after
several attempts: wait at least ten seconds
then kick under the bumper once again.
If you hold your foot under the bumper for too
long, the tailgate does not open or close. Repeat
the kicking movement more quickly if this
occurs.
To stop the opening or closing procedure:
R move your foot in sensor detection range :
under the bumper, or
R pull the handle on the outside of the tailgate,
or
R press the closing button on the tailgate, or
R press the Fbutton on the key
If the tailgate closing process has been stopped:
R Kick your foot under the bumper again and
the tailgate will open.
If the tailgate opening process has been stop-
ped:
R Kick your foot under the bumper again and
the tailgate will close. Opening and closing automatically
from the inside
Important safety notes G
WARNING
Parts of the body could become trapped dur-
ing automatic closing of the tailgate. More-
over, people, e.g. children, may be standing in 92
Luggage compartmentOpening and closing
Page 99 of 369
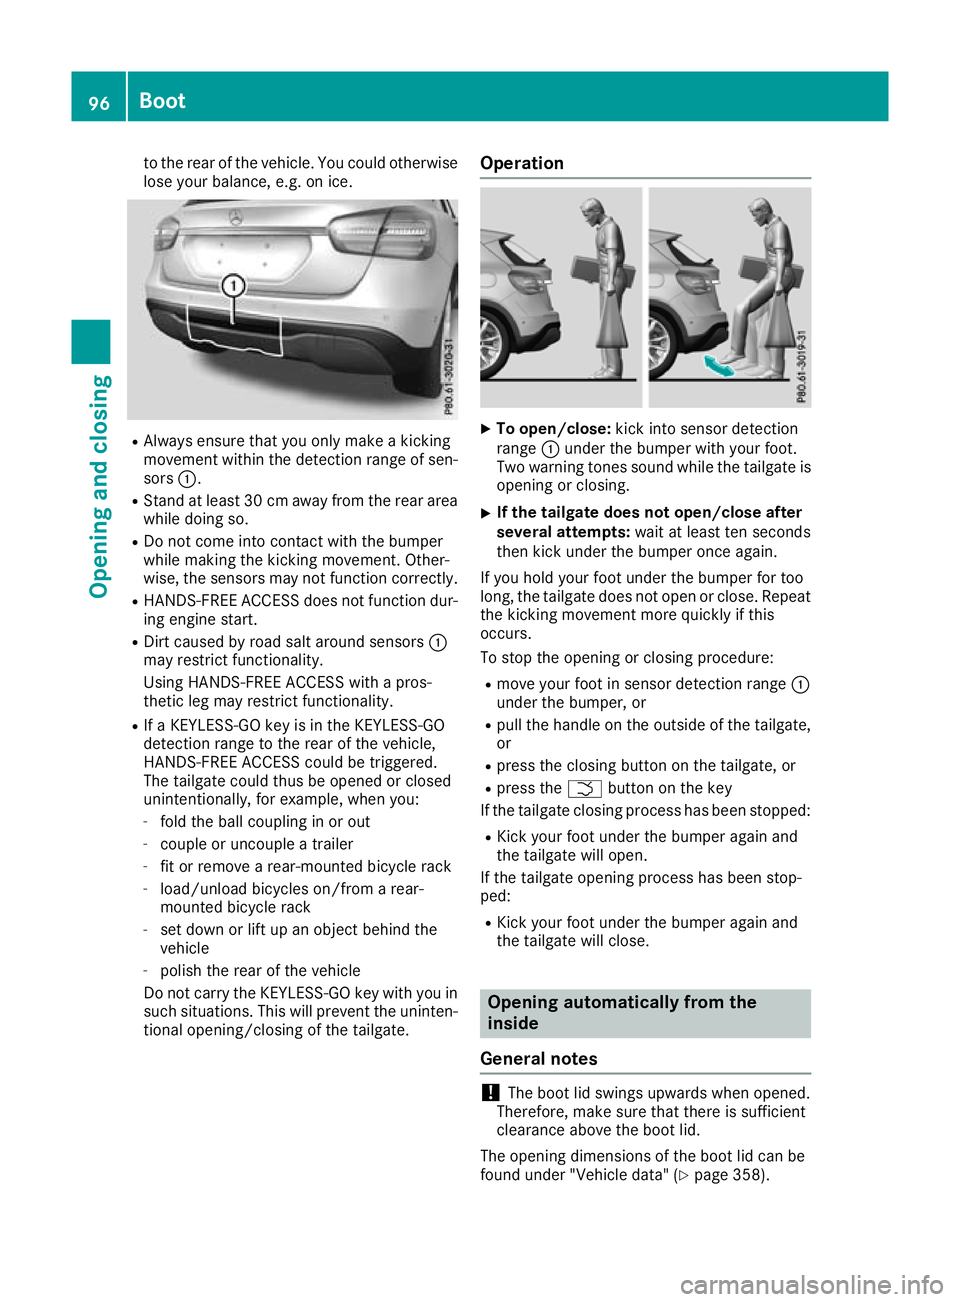
to the rear of the vehicle. You could otherwise
lose your balance, e.g. on ice. R
Always ensure that you only make a kicking
movement within the detection range of sen- sors :.
R Stand at least 30 cm away from the rear area
while doing so.
R Do not come into contact with the bumper
while making the kicking movement. Other-
wise, the sensors may not function correctly.
R HANDS-FREE ACCESS does not function dur-
ing engine start.
R Dirt caused by road salt around sensors :
may restrict functionality.
Using HANDS-FREE ACCESS with a pros-
thetic leg may restrict functionality.
R If a KEYLESS-GO key is in the KEYLESS-GO
detection range to the rear of the vehicle,
HANDS-FREE ACCESS could be triggered.
The tailgate could thus be opened or closed
unintentionally, for example, when you:
- fold the ball coupling in or out
- couple or uncouple a trailer
- fit or remove a rear-mounted bicycle rack
- load/unload bicycles on/from a rear-
mounted bicycle rack
- set down or lift up an object behind the
vehicle
- polish the rear of the vehicle
Do not carry the KEYLESS-GO key with you in such situations. This will prevent the uninten-tional opening/closing of the tailgate. Operation X
To open/close: kick into sensor detection
range :under the bumper with your foot.
Two warning tones sound while the tailgate is opening or closing.
X If the tailgate does not open/close after
several attempts: wait at least ten seconds
then kick under the bumper once again.
If you hold your foot under the bumper for too
long, the tailgate does not open or close. Repeat
the kicking movement more quickly if this
occurs.
To stop the opening or closing procedure:
R move your foot in sensor detection range :
under the bumper, or
R pull the handle on the outside of the tailgate,
or
R press the closing button on the tailgate, or
R press the Fbutton on the key
If the tailgate closing process has been stopped:
R Kick your foot under the bumper again and
the tailgate will open.
If the tailgate opening process has been stop-
ped:
R Kick your foot under the bumper again and
the tailgate will close. Opening automatically from the
inside
General notes !
The boot lid swings upwards when opened.
Therefore, make sure that there is sufficient
clearance above the boot lid.
The opening dimensions of the boot lid can be
found under "Vehicle data" (Y page 358).96
BootOpening and closing
Page 121 of 369
2
Driver's seat, front-passenger seat and rear
seats occupied, luggage compartment
laden
3 Driver's and front-passenger seat occupied
and maximum permissible rear axle load uti- lised, e.g. when towing a trailer
The headlamp range control allows you to adjust
the cone of light from the headlamps to suit the
vehicle load.
X Start the engine.
X Turn the headlamp range controller to the
position that corresponds to the load in your
vehicle. Combination switch
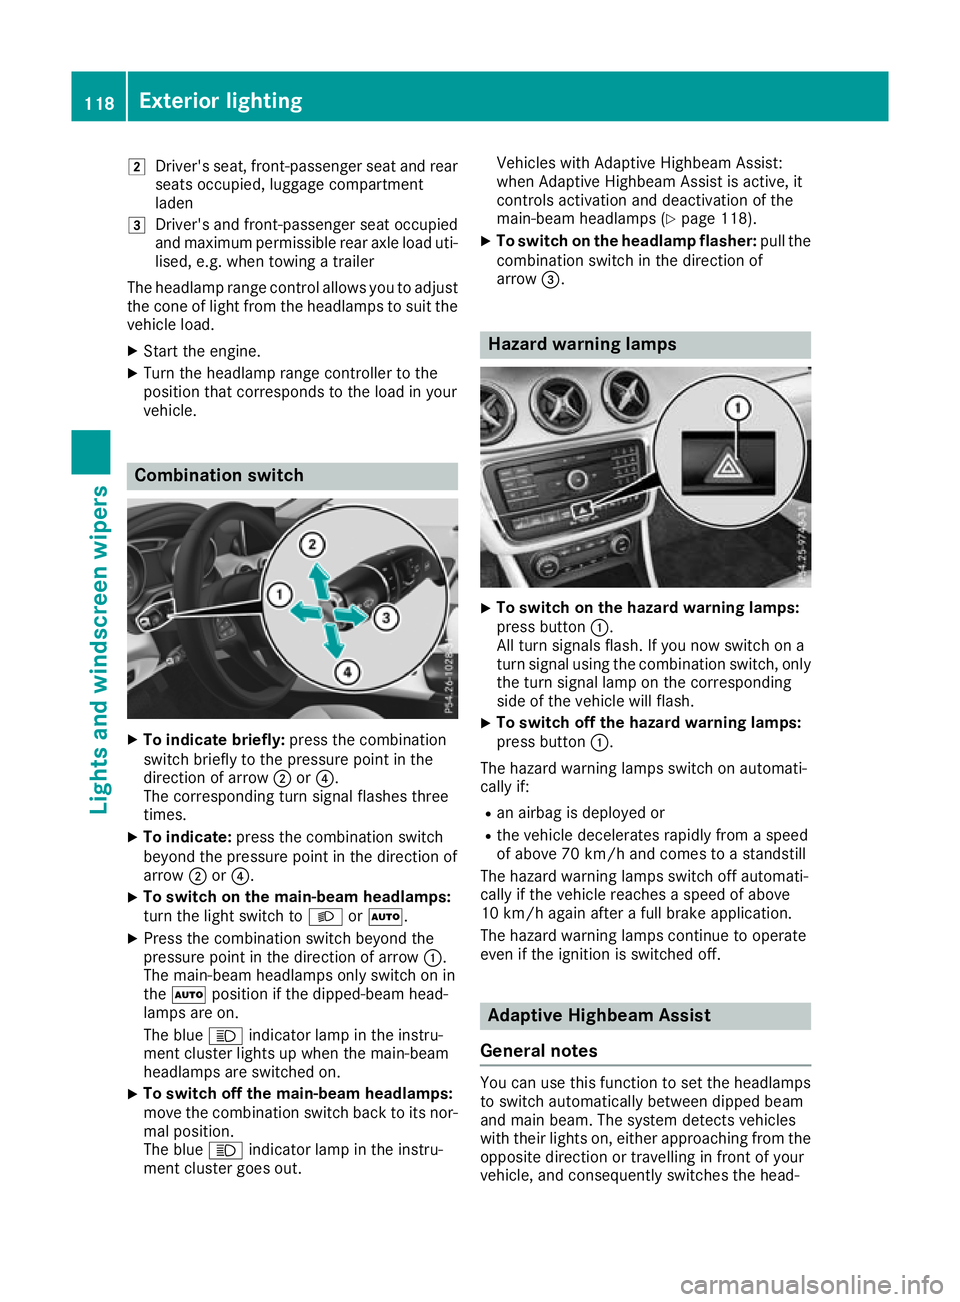
X
To indicate briefly: press the combination
switch briefly to the pressure point in the
direction of arrow ;or?.
The corresponding turn signal flashes three
times.
X To indicate: press the combination switch
beyond the pressure point in the direction of
arrow ;or?.
X To switch on the main-beam headlamps:
turn the light switch to LorÃ.
X Press the combination switch beyond the
pressure point in the direction of arrow :.
The main-beam headlamps only switch on in
the à position if the dipped-beam head-
lamps are on.
The blue Kindicator lamp in the instru-
ment cluster lights up when the main-beam
headlamps are switched on.
X To switch off the main-beam headlamps:
move the combination switch back to its nor-
mal position.
The blue Kindicator lamp in the instru-
ment cluster goes out. Vehicles with Adaptive Highbeam Assist:
when Adaptive Highbeam Assist is active, it
controls activation and deactivation of the
main-beam headlamps (Y page 118).
X To switch on the headlamp flasher: pull the
combination switch in the direction of
arrow =. Hazard warning lamps
X
To switch on the hazard warning lamps:
press button :.
All turn signals flash. If you now switch on a
turn signal using the combination switch, only the turn signal lamp on the corresponding
side of the vehicle will flash.
X To switch off the hazard warning lamps:
press button
:.
The hazard warning lamps switch on automati-
cally if:
R an airbag is deployed or
R the vehicle decelerates rapidly from a speed
of above 70 km/h and comes to a standstill
The hazard warning lamps switch off automati-
cally if the vehicle reaches a speed of above
10 km/h again after a full brake application.
The hazard warning lamps continue to operate
even if the ignition is switched off. Adaptive Highbeam Assist
General notes You can use this function to set the headlamps
to switch automatically between dipped beam
and main beam. The system detects vehicles
with their lights on, either approaching from the
opposite direction or travelling in front of your
vehicle, and consequently switches the head- 118
Exterior lightingLights and
windscreen wipers