2017 MERCEDES-BENZ GLA SUV USB port
[x] Cancel search: USB portPage 11 of 369
Demisting the windscreen ............
.134
Indicator lamp ................................ 132
Information on using
THERMOTRONIC automatic cli-
mate control .................................. 131
Notes on using the air-condition-
ing system ..................................... 129
Overview of systems ..................... .128
Problem with the rear window
heating .......................................... 135
Problems with cooling with air
dehumidification ............................ 132
Setting the air distribution ............. 133
Setting the air vents ..................... .141
Setting the airflow ......................... 134
Setting the temperature ................ 133
Switching air-recirculation mode
on/off ............................................ 135
Switching on/off ........................... 131
Switching residual heat on/off ...... 137
Switching the rear window heat-
ing on/off ...................................... 135
Switching the ZONE function
on/off ............................................ 134
THERMOTRONIC (2-zone) auto-
matic climate control ..................... 130
Cockpit
Overview .......................................... 32
Collision warning
see Active Brake Assist
COMAND display
Cleaning ......................................... 312
COMAND Online
Driving dynamics displa y............... 192
Combination switch .......................... 118
Connecting a USB device
See also Digital Owner's Manua l... 277
Consumption statistics (on-board
computer) .......................................... 221
Controller ........................................... 278
Convenience closing feature .............. 99
Convenience opening feature ............ 98
Convenience opening/closing (air-
recirculation mode) ........................... 136
Coolant (engine)
Checking the level ......................... 305
Display message ............................ 249 Important safety notes .................. 356
Temperature (on-board computer,
Mercedes-AMG vehicles) ............... 231
Temperature gaug e........................ 218
Warning lamp ................................. 273
Cooling
see Climate control
Copyright ............................................. 31
Cornering light function
Display message ............................ 246
Cover
see Roller sunblind
Cruise control
Activation conditions ..................... 177
Cruise control lever ....................... 176
Deactivating ................................... 178
Display message ............................ 255
Driving system ............................... 176
Important safety notes .................. 176
LIM indicator lamp ......................... 176
Selecting ........................................ 177
Setting a speed .............................. 177
Storing and maintaining current
speed ............................................. 177
Cup holder
Centre console .............................. 297
Important safety notes .................. 296
Rear compartment ......................... 297 D
Dashboard see Cockpit
Dashboard lighting
see Instrument cluster lighting
Data
see Technical data
Data modem mode
Telephone module with Blue-
tooth ®
(SAP profile) ....................... 285
Daytime driving lights
Display message ............................ 248
Function/note s............................. 116
Switching on/off (on-board com-
puter) ............................................. 229
Dealership
see Qualified specialist workshop
Declarations of conformity ................. 278
Index
Page 24 of 369
Tyres/wheels ................................. 347
Vehicle data ................................... 358
Telephone
Accepting a call (multifunction
steering wheel) .............................. 225
Authorising a mobile phone (con-
necting) ......................................... 281
Authorising a mobile phone via
the device manager (connecting) ... 282
Connecting a mobile phone
(device manager) ........................... 282
Connecting a Mobile phone (gen-
eral information) ............................2 80
Display message ............................ 263
Introduction ................................... 225
Menu (on-board computer) ............ 225
Number from the phone book ....... .225
Redialling ....................................... 226
Rejecting/ending a call ................. 225
See also Digital Owner's Manual ... 277
Telephone compartment ................ 290
Telephone module with Bluetooth ®
(SAP profile) Activating and connecting the
module .......................................... .284
Charging a mobile phone .............. .286
Connecting the mobile phone ....... .284
Connecting the module via a USB
cable .............................................. 283
Data modem mode ........................ 285
Installing the module ..................... 283
Introduction ................................... 283
Saving/deleting the PIN for the
SIM card ........................................ 285
Settings ......................................... 285
SIM card mode .............................. 284
Text messages ............................... 285
Transferring the phone book .......... 285
Temperature
Coolant .......................................... 218
Coolant (on-board computer,
Mercedes-AMG vehicles) .............. .231
Engine oil (on-board computer,
Mercedes-AMG vehicles) .............. .231
Outside temperature ..................... .217
Setting (climate control) ................ 133
Transmission oil (on-board com-
puter, Mercedes-AMG vehicles) ..... 231 TEMPOMAT
Function/notes ............................ .176
Text messages
Telephone module with Blue-
tooth ®
(SAP profile) ....................... 285
Through-loading ................................ 291
Timing (RACETIMER) ......................... 232
TIREFIT kit .......................................... 319
Declaration of conformity ................ 28
Important safety notes .................. 319
Storage location ............................ 317
Tyre pressure not reached ............. 321
Tyre pressure reached ................... 321
Tool
see Vehicle tool kit
Top Tether ............................................ 59
Total distance recorder .................... 221
Tow-away protection
Activating ......................................... 76
Deactivating ..................................... 77
Function .......................................... .76
Tow-starting
Emergency engine starting ............ 331
Fitting the towing eye .................... 328
Important safety notes .................. 327
Removing the towing eye ............... 329
Towing
Important safety notes .................. 327
Notes for 4MATIC vehicles ............ 330
Transporting the vehicle ................ 330
Towing a trailer
Axle load, permissibl e.................... 359
ESP ®
(Electronic Stability Pro-
gram) ............................................... 75
Failure check for LEDs ................... 216
General notes ................................ 213
Parking Pilot .................................. 196
Pulling away with a traile r.............. 147
Trailer tow hitch display message .. 262
Towing away
Fitting the towing ey e.................... 328
Removing the towing eye ............... 329
With both axles on the ground ....... 329
With front axle raised ..................... 329
Towing eye ......................................... 317 Index
21
Page 26 of 369
Summer tyres ................................ 336
Tyre size (data
).............................. 347
Tyre tread ...................................... 335
see Flat tyre U
Unlocking Emergency unlocking ....................... 88
From inside the vehicle (central
unlocking button) ............................. 87
Upshift indicator (on-board com-
puter, Mercedes-AMG vehicles) ....... 231
USB devices
Connecting to the Media Inter-
face ............................................... 287 V
Vanity mirror (in sun visor) .............. 298
Vehicle
Correct use ...................................... 30
Data acquisition ............................... 30
Display message ............................ 258
Electronics ..................................... 350
Equipment ....................................... 27
Implied warranty .............................. 30
Individual settings .......................... 228
Leaving parked up ......................... 169
Locking (in an emergency) ............... 88
Locking (key) ................................... 79
Lowering ........................................ 346
Pulling away ................................... 146
Raising ........................................... 344
Registration ..................................... 30
Securing from rolling away ............ 344
Transporting .................................. 330
Unlocking (in an emergency) ........... 88
Unlocking (key) ................................ 79
Vehicle data ................................... 358
Vehicle battery
see Battery (vehicle)
Vehicle data
Boot load (maximum) ..................... 358
Roof load (maximum) ..................... 358
Vehicle data (off-road driving)
Approach/departure angle ............ 359
Maximum gradient climbing abil-
ity .................................................. 359 Vehicle dimensions
........................... 358
Vehicle emergency locking ................ 88
Vehicle identification number
see VIN
Vehicle identification plate .............. 351
Vehicle tool kit .................................. 317
Ventilation
Setting the vents ........................... 141
Video
Operating the DVD ......................... 224
See also Digital Owner's Manua l... 277
VIN
Seat ............................................... 352
Type plate ...................................... 351 W
Warning and indicator lamps ABS ................................................ 267
Active Brake Assist ........................ 275
Brakes ........................................... 266
Distance warning signal ................. 275
ESP ®
.............................................. 269
ESP ®
OFF ....................................... 270
Fuel tank ........................................ 272
LIM (cruise control )........................ 176
LIM (Distance Pilot DISTRONIC ).... 181
LIM (variable limiter) ...................... 178
Overview .......................................... 34
Reserve fuel ................................... 272
Seat belt ........................................ 265
Tyre pressure monitor ................... 276
Warning triangle ................................ 316
Washer fluid
Display message ............................ 263
Weather display (COMAND Online)
See also Digital Owner's Manua l... 277
Wheel and tyre combinations
Tyres .............................................. 347
Wheel bolt tightening torque ........... 346
Wheel chock ...................................... 344
Wheels
Changing a whee l.......................... 342
Changing/replacing ....................... 342
Checking ........................................ 334
Cleaning ......................................... 310
Emergency spare wheel ................. 348
Fitting a new wheel ........................ 345 Index
23
Page 286 of 369
to two minutes to be displayed (see the man-
ufacturer's operating instructions).
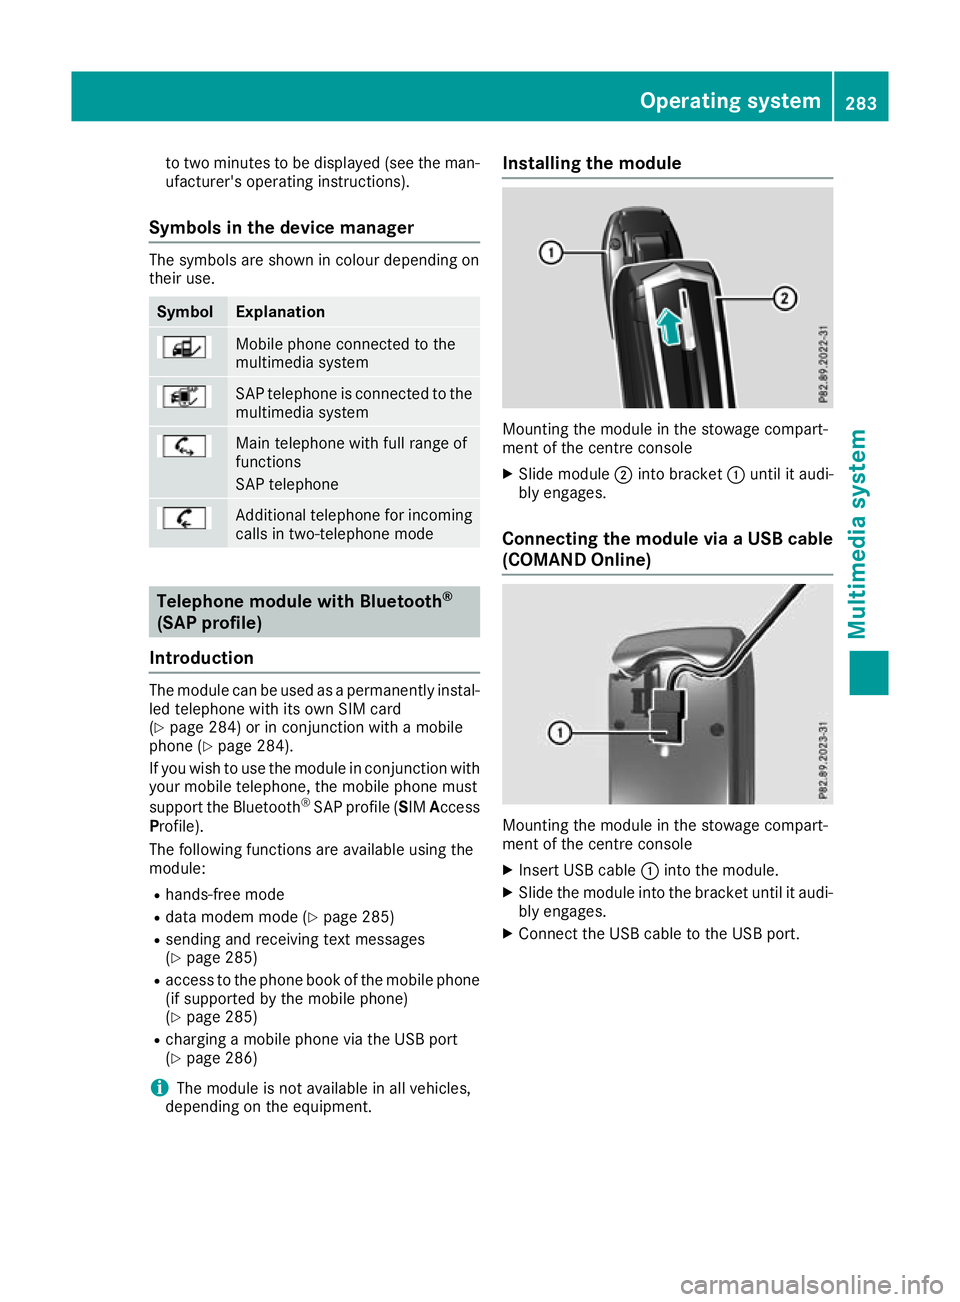
Symbols in the device manager The symbols are shown in colour depending on
their use. Symbol Explanation
Mobile phone connected to the
multimedia system
SAP telephone is connected to the
multimedia system Main telephone with full range of
functions
SAP telephone
Additional telephone for incoming
calls in two-telephone mode Telephone module with Bluetooth
®
(SAP profile)
Introduction The module can be used as a permanently instal-
led telephone with its own SIM card
(Y page 284) or in conjunction with a mobile
phone (Y page 284).
If you wish to use the module in conjunction with
your mobile telephone, the mobile phone must
support the Bluetooth ®
SAP profile (SIM Access
Profile).
The following functions are available using the
module:
R hands-free mode
R data modem mode (Y page 285)
R sending and receiving text messages
(Y page 285)
R access to the phone book of the mobile phone
(if supported by the mobile phone)
(Y page 285)
R charging a mobile phone via the USB port
(Y page 286)
i The module is not available in all vehicles,
depending on the equipment. Installing the module
Mounting the module in the stowage compart-
ment of the centre console
X Slide module ;into bracket :until it audi-
bly engages.
Connecting the module via a USB cable (COMAND Online) Mounting the module in the stowage compart-
ment of the centre console
X Insert USB cable :into the module.
X Slide the module into the bracket until it audi-
bly engages.
X Connect the USB cable to the USB port. Operating system
283Multimedia system Z
Page 289 of 369
Activating/deactivating text message
downloading from the mobile phone Dial number Function
00080 Text message down-
loading is deactiva-
ted.
00081 Text message down-
loading is activated.
For further information on receiving text mes-
sages when using the telephone module (see
the Digital Owner's Manual).
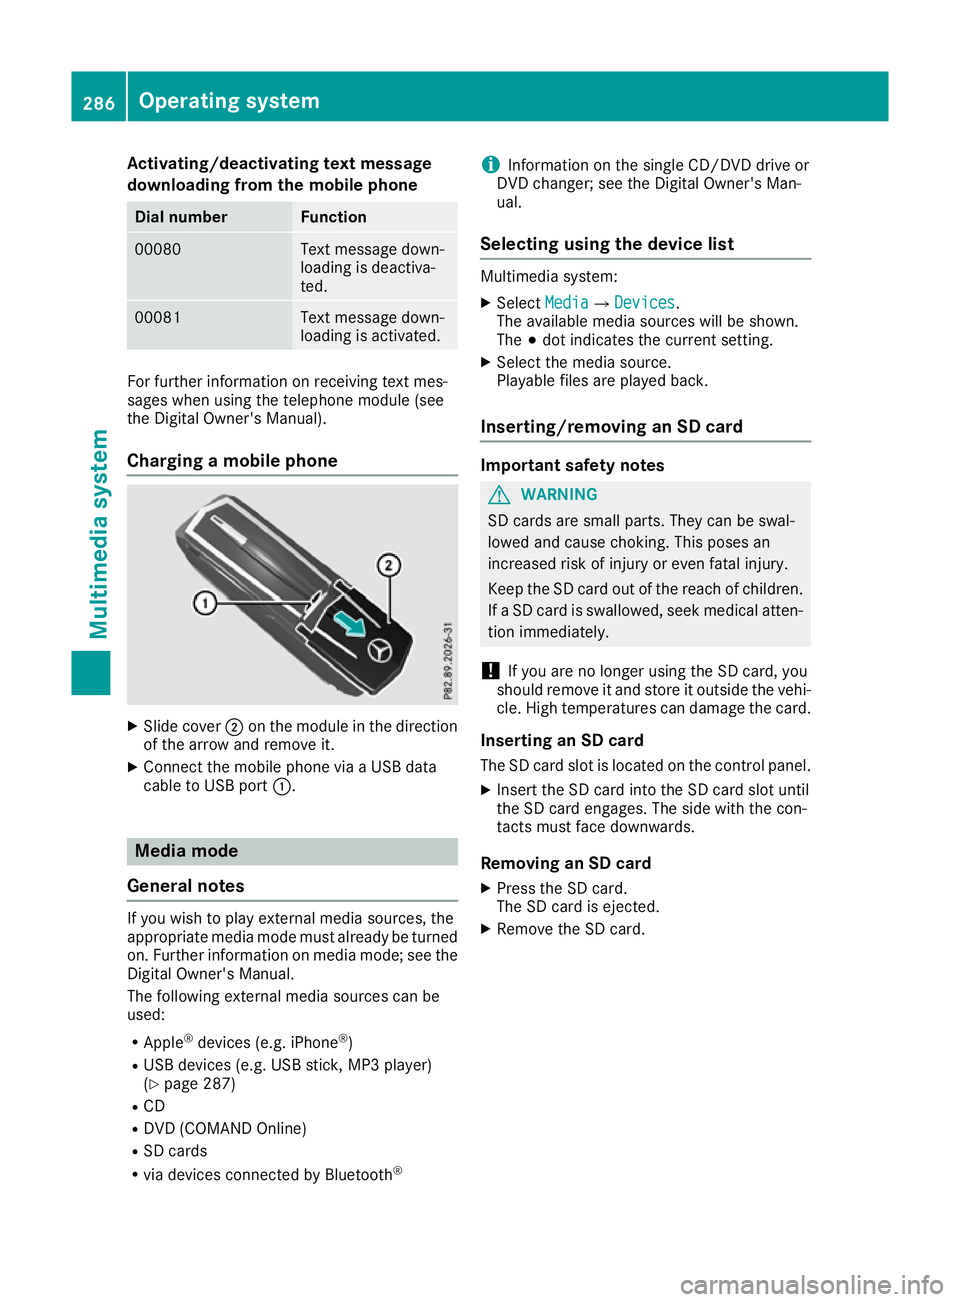
Charging a mobile phone X
Slide cover ;on the module in the direction
of the arrow and remove it.
X Connect the mobile phone via a USB data
cable to USB port :. Media mode
General notes If you wish to play external media sources, the
appropriate media mode must already be turned
on. Further information on media mode; see the Digital Owner's Manual.
The following external media sources can be
used:
R Apple ®
devices (e.g. iPhone ®
)
R USB devices (e.g. USB stick, MP3 player)
(Y page 287)
R CD
R DVD (COMAND Online)
R SD cards
R via devices connected by Bluetooth ®i
Information on the single CD/DVD drive or
DVD changer; see the Digital Owner's Man-
ual.
Selecting using the device list Multimedia system:
X Select Media MediaQ Devices
Devices.
The available media sources will be shown.
The #dot indicates the current setting.
X Select the media source.
Playable files are played back.
Inserting/removing an SD card Important safety notes
G
WARNING
SD cards are small parts. They can be swal-
lowed and cause choking. This poses an
increased risk of injury or even fatal injury.
Keep the SD card out of the reach of children. If a SD card is swallowed, seek medical atten-
tion immediately.
! If you are no longer using the SD card, you
should remove it and store it outside the vehi-
cle. High temperatures can damage the card.
Inserting an SD card
The SD card slot is located on the control panel. X Insert the SD card into the SD card slot until
the SD card engages. The side with the con-
tacts must face downwards.
Removing an SD card X Press the SD card.
The SD card is ejected.
X Remove the SD card. 286
Operating systemMultimedia system
Page 290 of 369
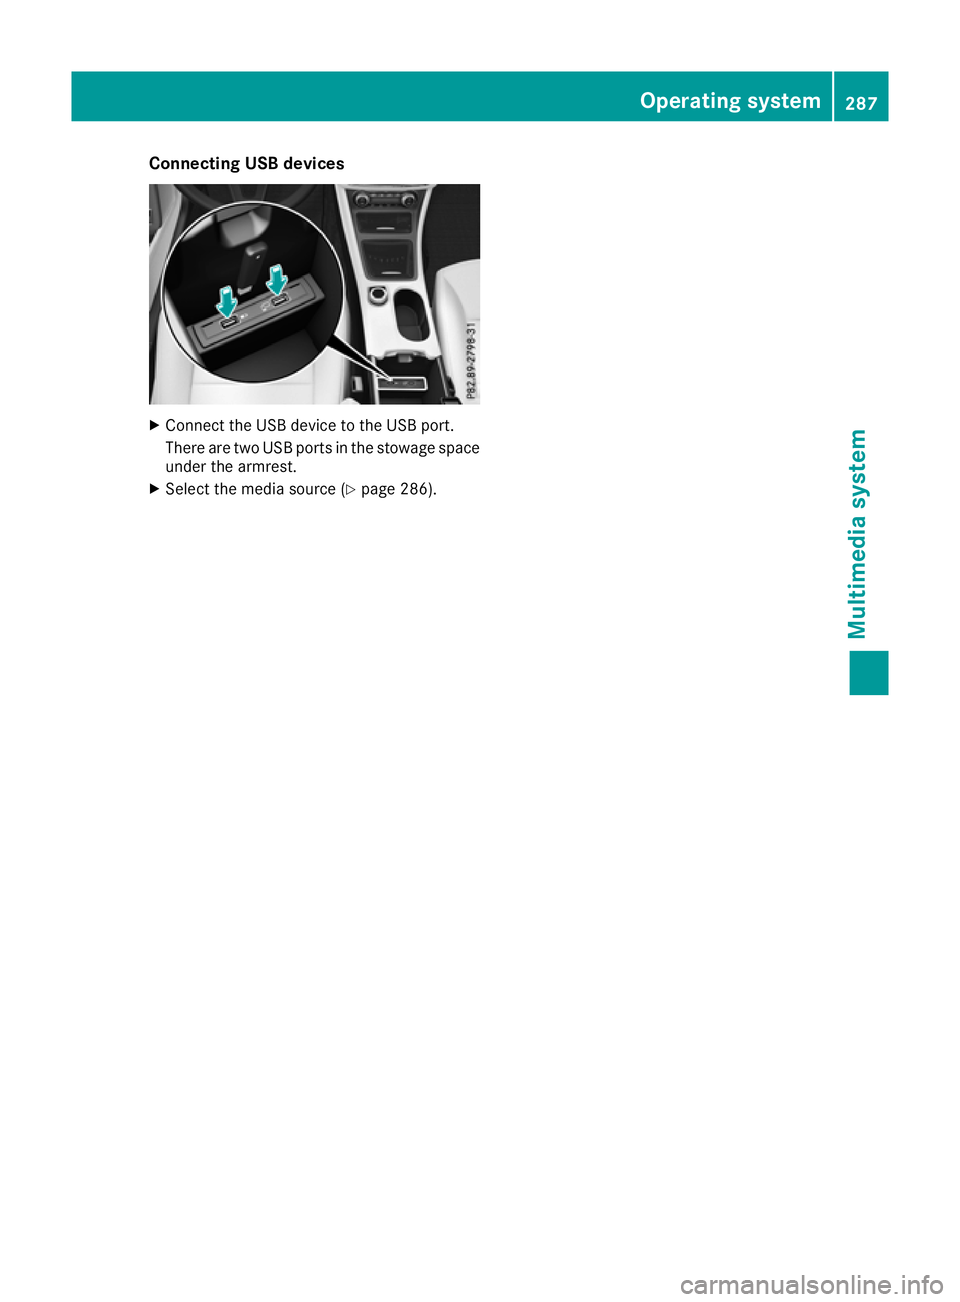
Connecting USB devices
X
Connect the USB device to the USB port.
There are two USB ports in the stowage space under the armrest.
X Select the media source (Y page 286). Operating system
287Multimedia system Z
Page 293 of 369
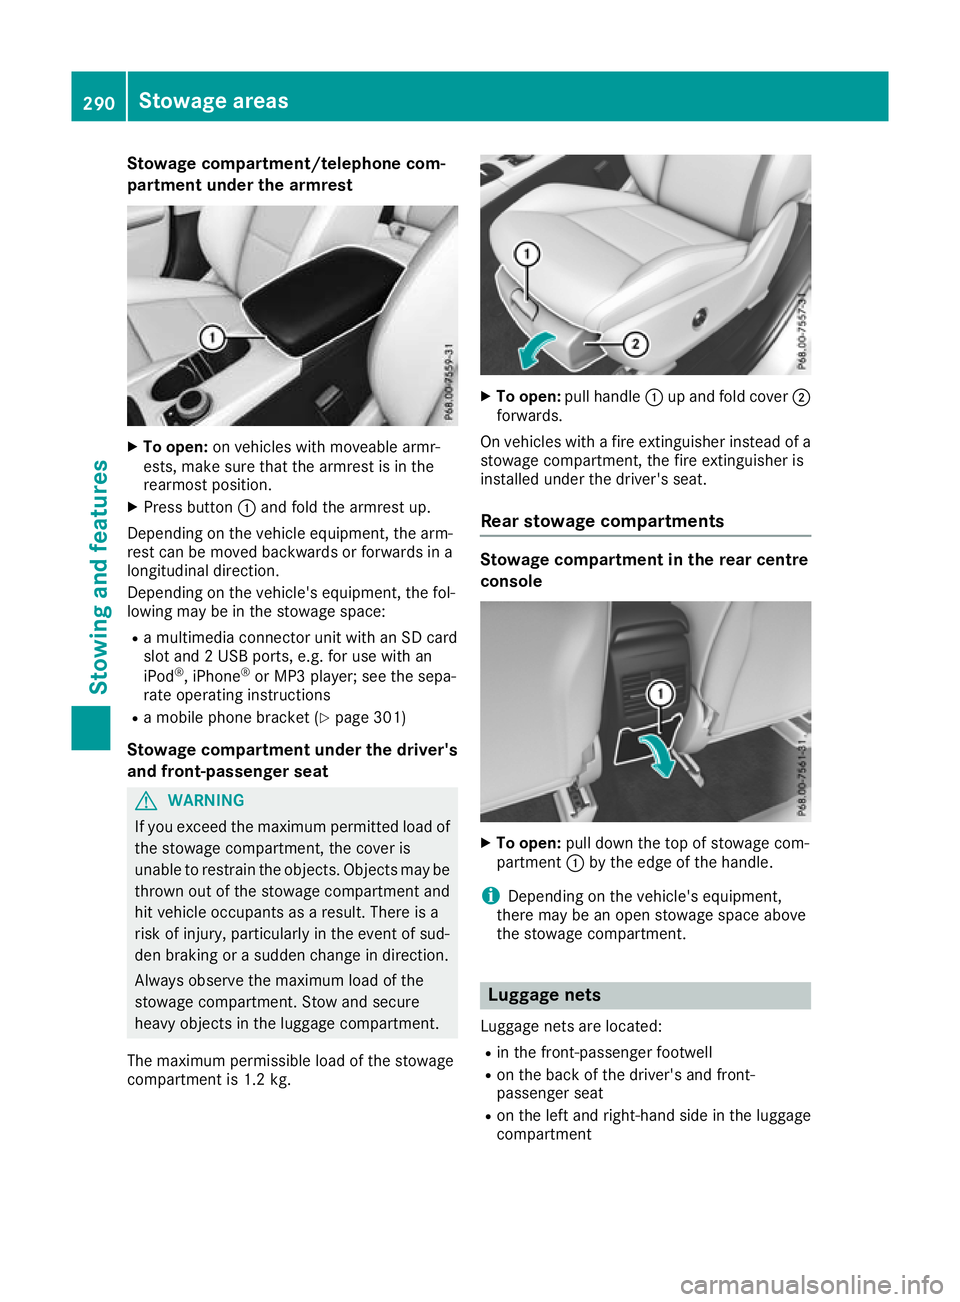
Stowage compartment/telephone com-
partment under the armrest X
To open: on vehicles with moveable armr-
ests, make sure that the armrest is in the
rearmost position.
X Press button :and fold the armrest up.
Depending on the vehicle equipment, the arm-
rest can be moved backwards or forwards in a
longitudinal direction.
Depending on the vehicle's equipment, the fol-
lowing may be in the stowage space:
R a multimedia connector unit with an SD card
slot and 2 USB ports, e.g. for use with an
iPod ®
, iPhone ®
or MP3 player; see the sepa-
rate operating instructions
R a mobile phone bracket (Y page 301)
Stowage compartment under the driver's and front-passenger seat G
WARNING
If you exceed the maximum permitted load of the stowage compartment, the cover is
unable to restrain the objects. Objects may be
thrown out of the stowage compartment and
hit vehicle occupants as a result. There is a
risk of injury, particularly in the event of sud-
den braking or a sudden change in direction.
Always observe the maximum load of the
stowage compartment. Stow and secure
heavy objects in the luggage compartment.
The maximum permissible load of the stowage
compartment is 1.2 kg. X
To open: pull handle :up and fold cover ;
forwards.
On vehicles with a fire extinguisher instead of a
stowage compartment, the fire extinguisher is
installed under the driver's seat.
Rear stowage compartments Stowage compartment in the rear centre
console
X
To open: pull down the top of stowage com-
partment :by the edge of the handle.
i Depending on the vehicle's equipment,
there may be an open stowage space above
the stowage compartment. Luggage nets
Luggage nets are located:
R in the front-passenger footwell
R on the back of the driver's and front-
passenger seat
R on the left and right-hand side in the luggage
compartment 290
Stowage areasStowing and features
Page 304 of 369
charge the mobile phone, you must connect it to
a USB port.
Further information on the telephone module
with Bluetooth ®
(SAP profile) can be found in the
Digital Owner's Manual.
Operating the mobile phone You can operate the phone using the
6and
~ buttons on the multifunction steering
wheel. You can operate other mobile phone
functions via the on-board computer
(Y page 225).
When you remove the key from the ignition lock, the mobile phone is disconnected from the vehi-cle. You can then no longer make calls using the
hands-free system.
If a call is active and you remove the key from
the ignition lock, the conversation is transferred
over to the mobile phone. It is then possible to
continue the conversation on the mobile phone.
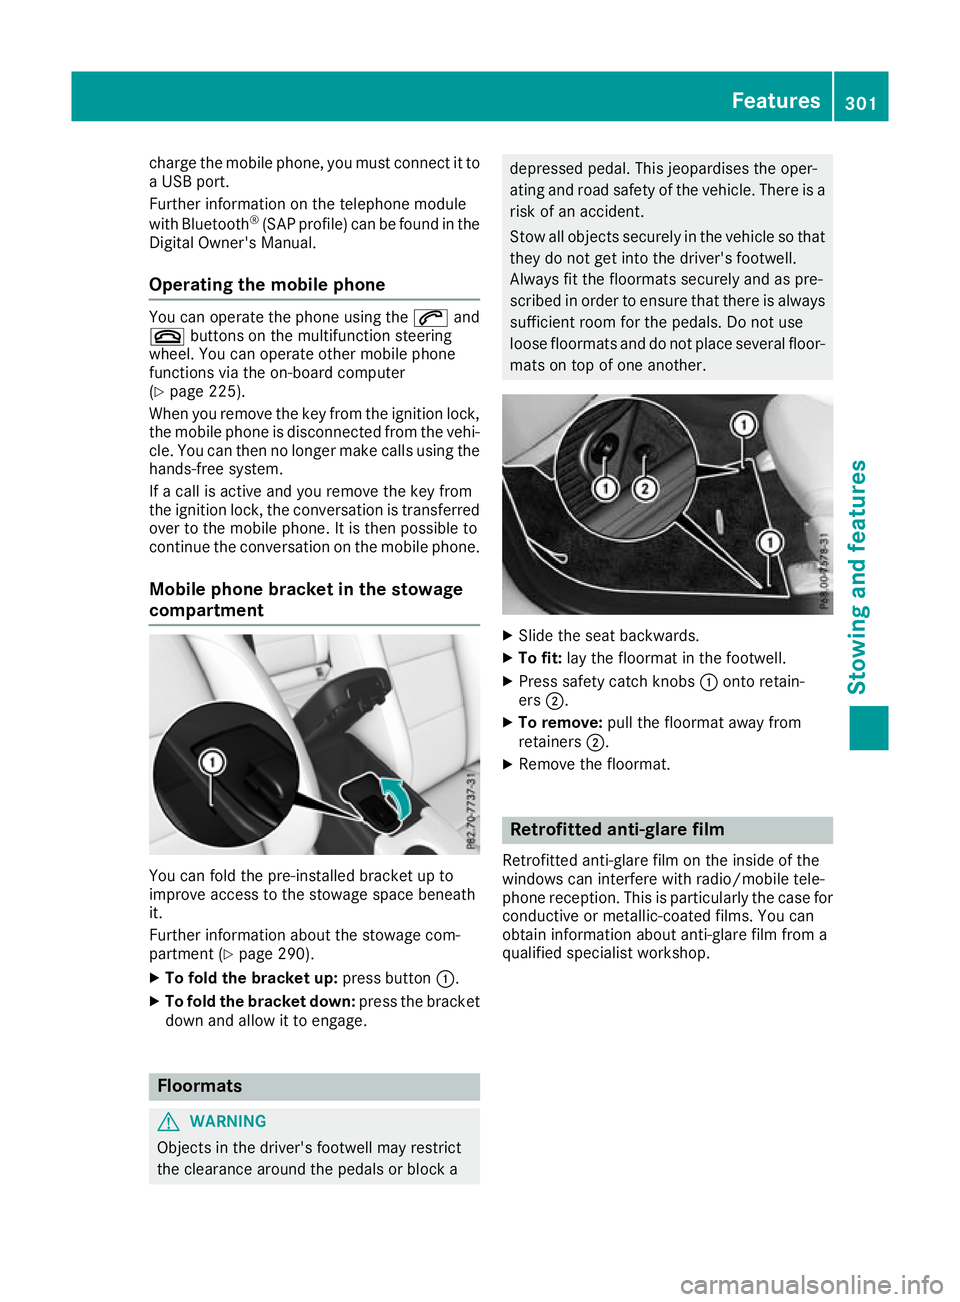
Mobile phone bracket in the stowage
compartment You can fold the pre-installed bracket up to
improve access to the stowage space beneath
it.
Further information about the stowage com-
partment (Y
page 290).
X To fold the bracket up: press button:.
X To fold the bracket down: press the bracket
down and allow it to engage. Floormats
G
WARNING
Objects in the driver's footwell may restrict
the clearance around the pedals or block a depressed pedal. This jeopardises the oper-
ating and road safety of the vehicle. There is a
risk of an accident.
Stow all objects securely in the vehicle so that
they do not get into the driver's footwell.
Always fit the floormats securely and as pre-
scribed in order to ensure that there is always sufficient room for the pedals. Do not use
loose floormats and do not place several floor-mats on top of one another. X
Slide the seat backwards.
X To fit: lay the floormat in the footwell.
X Press safety catch knobs :onto retain-
ers ;.
X To remove: pull the floormat away from
retainers ;.
X Remove the floormat. Retrofitted anti-glare film
Retrofitted anti-glare film on the inside of the
windows can interfere with radio/mobile tele-
phone reception. This is particularly the case for conductive or metallic-coated films. You can
obtain information about anti-glare film from a
qualified specialist workshop. Features
301Stowing and features Z