2017 MERCEDES-BENZ GLA SUV tow bar
[x] Cancel search: tow barPage 17 of 369
KEYLESS-GO
Convenience closing ........................ 99
Deactivation .................................... .80
Locking ............................................ 80
Unlocking .........................................80
Kickdown
Driving tips .................................... 158
Manual gearshifting ...................... .163
Kneebag ............................................... 48 L
Lamps see Warning and indicator lamps
Lane detection (automatic)
see Lane Keeping Assist
Lane Keeping Assist
Activating/deactivating (on-
board computer) ............................ 228
Display message ............................ 252
Function/informatio n.................... 210
Lane package ..................................... 209
Lap time (RACETIMER) ...................... 232
Lashing eyelets ................................. 293
Licence plate lamp (display mes-
sage) ................................................... 247
Light sensor (display message) ....... 248
Lighting
see Lights
Lights
Adaptive Highbeam Assist ............. 118
Automatic headlamp mode ............ 116
Dipped-beam headlamp s............... 117
Driving abroad ............................... 116
Foglamps ....................................... 117
Hazard warning lamps ................... 118
Headlamp flashe r........................... 118
Headlamp range ............................ 117
Light switch ................................... 116
Main-beam headlamp s................... 118
Misted up headlamp s.................... 119
Parking lamps ................................ 117
Rear foglamp ................................. 117
Setting exterior lighting ................. 116
Side lamps ..................................... 117
Switching the daytime driving
lights on/off (on-board com-
puter) ............................................. 229 Turn signals ................................... 118
LIM indicator lamp
Cruise control ................................ 176
Distance Pilot DISTRONIC ............. 181
Variable limite r.............................. 178
Limiter
Calling up the speed ...................... 179
Deactivating, variable .................... 179
Function/note s............................. 178
LIM indicator lamp ......................... 178
Permanent ..................................... 180
Setting a speed .............................. 179
Storing the current speed .............. 179
Switching to passive ...................... 179
Variabl e......................................... 178
Limiting the speed
Speed limiter ................................. 178
Loading guidelines ............................ 288
Locking
see Central locking
Locking (doors)
Automatic ........................................ 87
Emergency locking ........................... 88
From inside (central locking but-
ton) .................................................. 87
Locking centrally
see Central locking
Locking verification signal (on-
board computer) ............................... 229
Lubricant additives
see Additives (engine oil)
Luggage compartment enlarge-
ment ................................................... 291
Luggage compartment floor
Important safety notes .................. 295
opening/closing ............................ 295
stowage well, under ....................... 295
Lumbar support
Adjusting the 4-way lumbar sup-
port ................................................ 110 M
M+S tyres ........................................... 336
Main-beam headlamps
Adaptive Highbeam Assist ............. 118
Display message ............................ 247
Replacing bulb s............................. 122 14
Index
Page 196 of 369
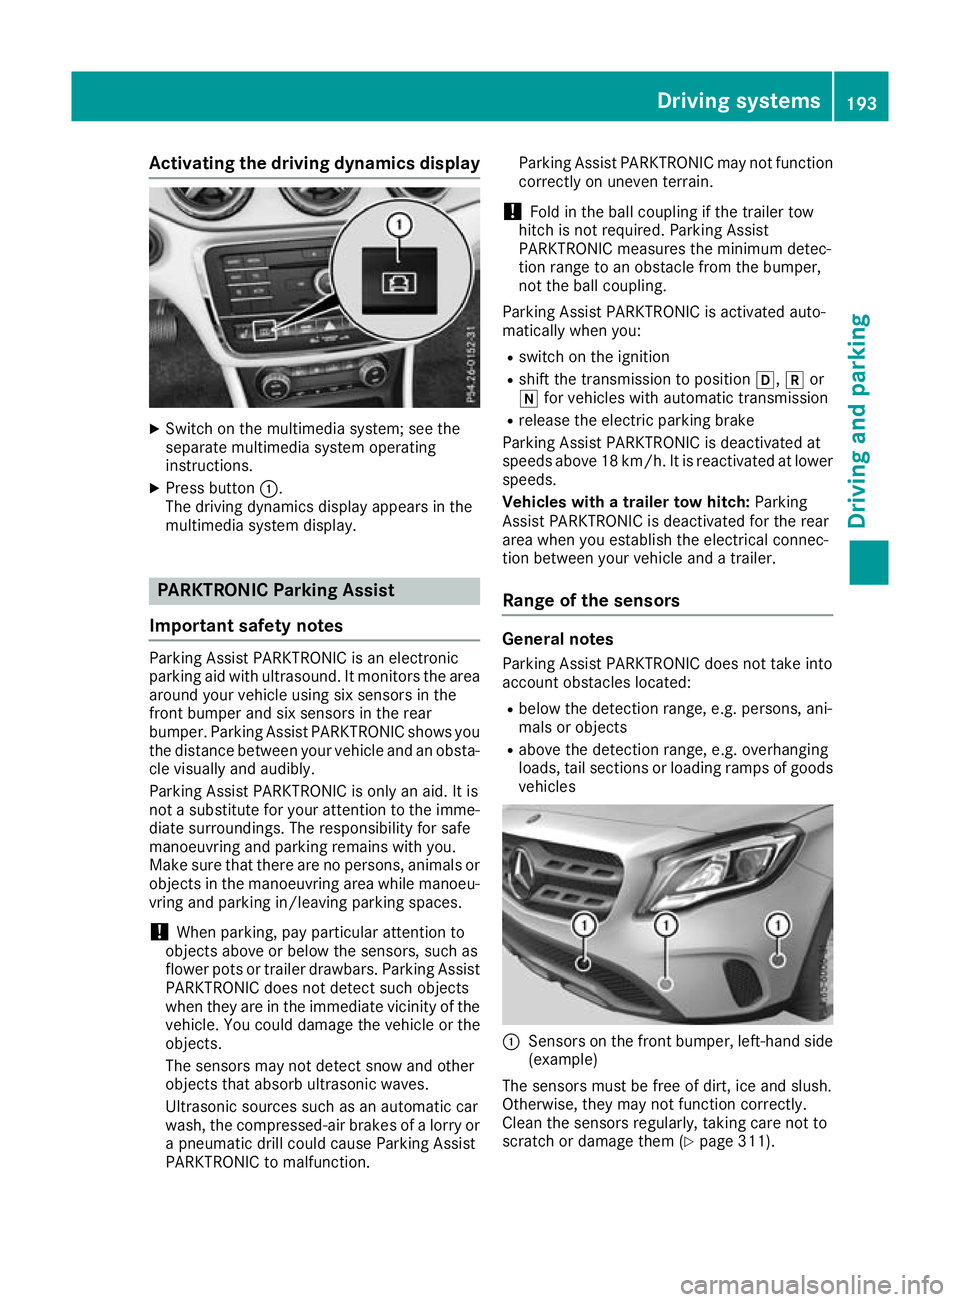
Activating the driving dynamics display
X
Switch on the multimedia system; see the
separate multimedia system operating
instructions.
X Press button :.
The driving dynamics display appears in the
multimedia system display. PARKTRONIC Parking Assist
Important safety notes Parking Assist PARKTRONIC is an electronic
parking aid with ultrasound. It monitors the area
around your vehicle using six sensors in the
front bumper and six sensors in the rear
bumper. Parking Assist PARKTRONIC shows you
the distance between your vehicle and an obsta- cle visually and audibly.
Parking Assist PARKTRONIC is only an aid. It is
not a substitute for your attention to the imme-
diate surroundings. The responsibility for safe
manoeuvring and parking remains with you.
Make sure that there are no persons, animals or
objects in the manoeuvring area while manoeu-
vring and parking in/leaving parking spaces.
! When parking, pay particular attention to
objects above or below the sensors, such as
flower pots or trailer drawbars. Parking Assist PARKTRONIC does not detect such objects
when they are in the immediate vicinity of the
vehicle. You could damage the vehicle or the
objects.
The sensors may not detect snow and other
objects that absorb ultrasonic waves.
Ultrasonic sources such as an automatic car
wash, the compressed-air brakes of a lorry or
a pneumatic drill could cause Parking Assist
PARKTRONIC to malfunction. Parking Assist PARKTRONIC may not function
correctly on uneven terrain.
! Fold in the ball coupling if the trailer tow
hitch is not required. Parking Assist
PARKTRONIC measures the minimum detec-
tion range to an obstacle from the bumper,
not the ball coupling.
Parking Assist PARKTRONIC is activated auto-
matically when you:
R switch on the ignition
R shift the transmission to position h,kor
i for vehicles with automatic transmission
R release the electric parking brake
Parking Assist PARKTRONIC is deactivated at
speeds above 18 km/h. It is reactivated at lower
speeds.
Vehicles with a trailer tow hitch: Parking
Assist PARKTRONIC is deactivated for the rear
area when you establish the electrical connec-
tion between your vehicle and a trailer.
Range of the sensors General notes
Parking Assist PARKTRONIC does not take into
account obstacles located:
R below the detection range, e.g. persons, ani-
mals or objects
R above the detection range, e.g. overhanging
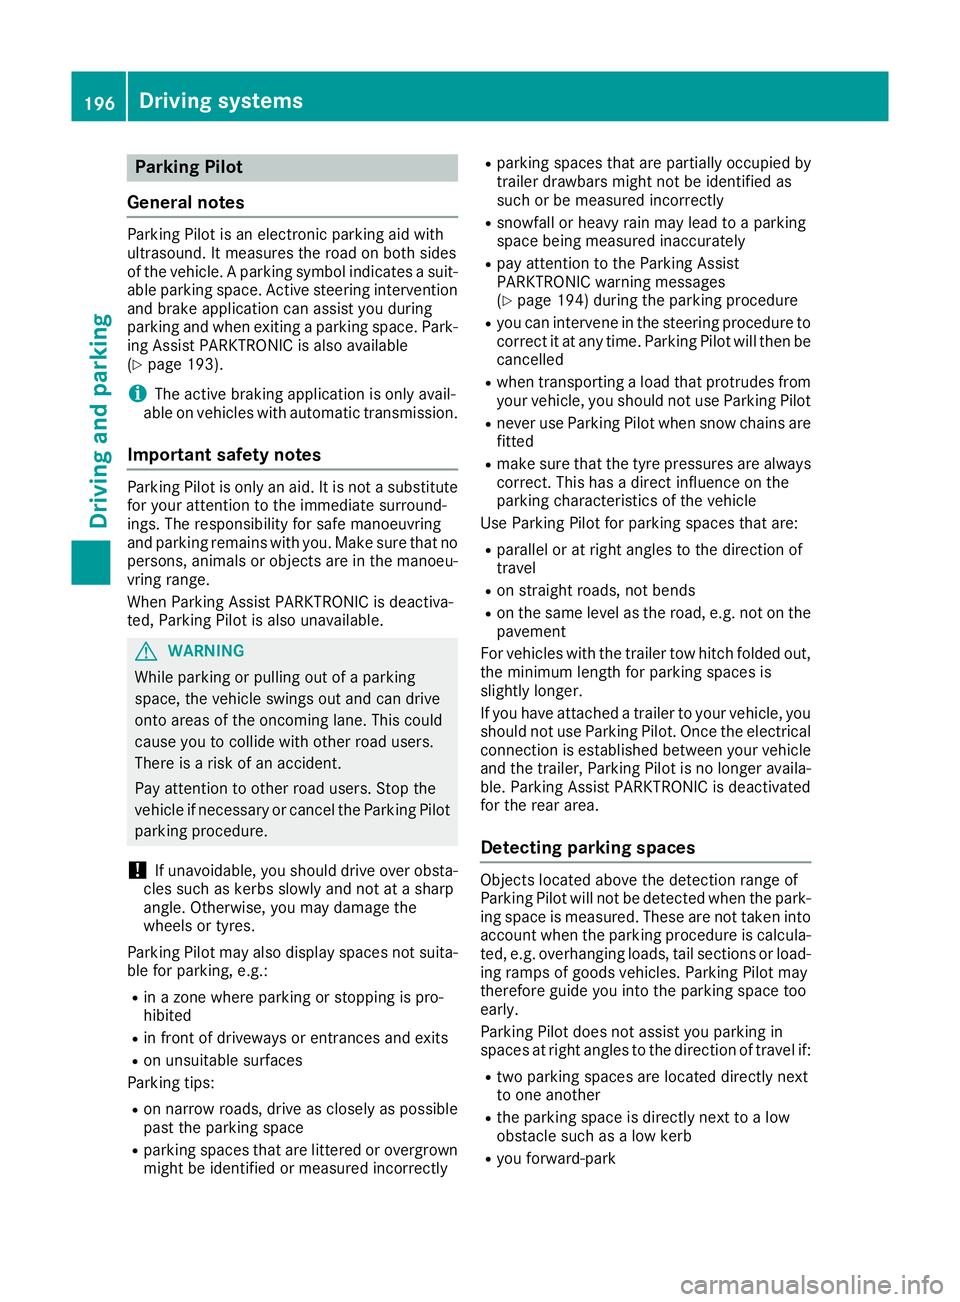
loads, tail sections or loading ramps of goods vehicles :
Sensors on the front bumper, left-hand side
(example)
The sensors must be free of dirt, ice and slush.
Otherwise, they may not function correctly.
Clean the sensors regularly, taking care not to
scratch or damage them (Y page 311). Driving systems
193Driving and parking Z
Page 199 of 369
Parking Pilot
General notes Parking Pilot is an electronic parking aid with
ultrasound. It measures the road on both sides
of the vehicle. A parking symbol indicates a suit-
able parking space. Active steering intervention
and brake application can assist you during
parking and when exiting a parking space. Park- ing Assist PARKTRONIC is also available
(Y page 193).
i The active braking application is only avail-
able on vehicles with automatic transmission.
Important safety notes Parking Pilot is only an aid. It is not a substitute
for your attention to the immediate surround-
ings. The responsibility for safe manoeuvring
and parking remains with you. Make sure that no
persons, animals or objects are in the manoeu-
vring range.
When Parking Assist PARKTRONIC is deactiva-
ted, Parking Pilot is also unavailable. G
WARNING
While parking or pulling out of a parking
space, the vehicle swings out and can drive
onto areas of the oncoming lane. This could
cause you to collide with other road users.
There is a risk of an accident.
Pay attention to other road users. Stop the
vehicle if necessary or cancel the Parking Pilot parking procedure.
! If unavoidable, you should drive over obsta-
cles such as kerbs slowly and not at a sharp
angle. Otherwise, you may damage the
wheels or tyres.
Parking Pilot may also display spaces not suita- ble for parking, e.g.:
R in a zone where parking or stopping is pro-
hibited
R in front of driveways or entrances and exits
R on unsuitable surfaces
Parking tips:
R on narrow roads, drive as closely as possible
past the parking space
R parking spaces that are littered or overgrown
might be identified or measured incorrectly R
parking spaces that are partially occupied by
trailer drawbars might not be identified as
such or be measured incorrectly
R snowfall or heavy rain may lead to a parking
space being measured inaccurately
R pay attention to the Parking Assist
PARKTRONIC warning messages
(Y page 194) during the parking procedure
R you can intervene in the steering procedure to
correct it at any time. Parking Pilot will then be cancelled
R when transporting a load that protrudes from
your vehicle, you should not use Parking Pilot
R never use Parking Pilot when snow chains are
fitted
R make sure that the tyre pressures are always
correct. This has a direct influence on the
parking characteristics of the vehicle
Use Parking Pilot for parking spaces that are:
R parallel or at right angles to the direction of
travel
R on straight roads, not bends
R on the same level as the road, e.g. not on the
pavement
For vehicles with the trailer tow hitch folded out,
the minimum length for parking spaces is
slightly longer.
If you have attached a trailer to your vehicle, you
should not use Parking Pilot. Once the electrical connection is established between your vehicle
and the trailer, Parking Pilot is no longer availa-
ble. Parking Assist PARKTRONIC is deactivated
for the rear area.
Detecting parking spaces Objects located above the detection range of
Parking Pilot will not be detected when the park-
ing space is measured. These are not taken into
account when the parking procedure is calcula- ted, e.g. overhanging loads, tail sections or load-
ing ramps of goods vehicles. Parking Pilot may
therefore guide you into the parking space too
early.
Parking Pilot does not assist you parking in
spaces at right angles to the direction of travel if:
R two parking spaces are located directly next
to one another
R the parking space is directly next to a low
obstacle such as a low kerb
R you forward-park 196
Driving systemsDriving and parking
Page 204 of 369
Activating/deactivating the reversing
camera X
To activate: make sure that the key is in
position 2in the ignition lock.
X Make sure that the Activation by R gear
Activation by R gear
function is selected in the multimedia system; see the Digital Owner's Manual.
X Engage reverse gear.
The area behind the vehicle is shown with
guide lines in the multimedia system display.
The image from the reversing camera is avail-
able throughout the manoeuvring process.
X To switch the function mode for vehicles
with trailer tow hitch: using the controller,
select symbol :for the "Reverse parking"
function or symbol ;for "Coupling up a
trailer".
The symbol of the selected function is high-
lighted.
To deactivate: the reversing camera deacti-
vates if you shift the transmission to jor after
driving forwards a short distance.
Messages in the multimedia system dis-
play The reversing camera may show a distorted view
of obstacles, show them incorrectly or not at all. Obstacles are not shown by the reversing cam-
era in the following locations:
R very close to the rear bumper
R under the rear bumper
R in the area immediately above the recessed
tailgate handle
! Objects not at ground level may appear to
be further away than they actually are, e.g.:
R the bumper of a parked vehicle
R the drawbar of a trailer R
the ball coupling of a trailer tow hitch
R the rear section of an HGV
R a slanted post
Use the guidelines only for orientation.
Approach objects no further than the bottom-
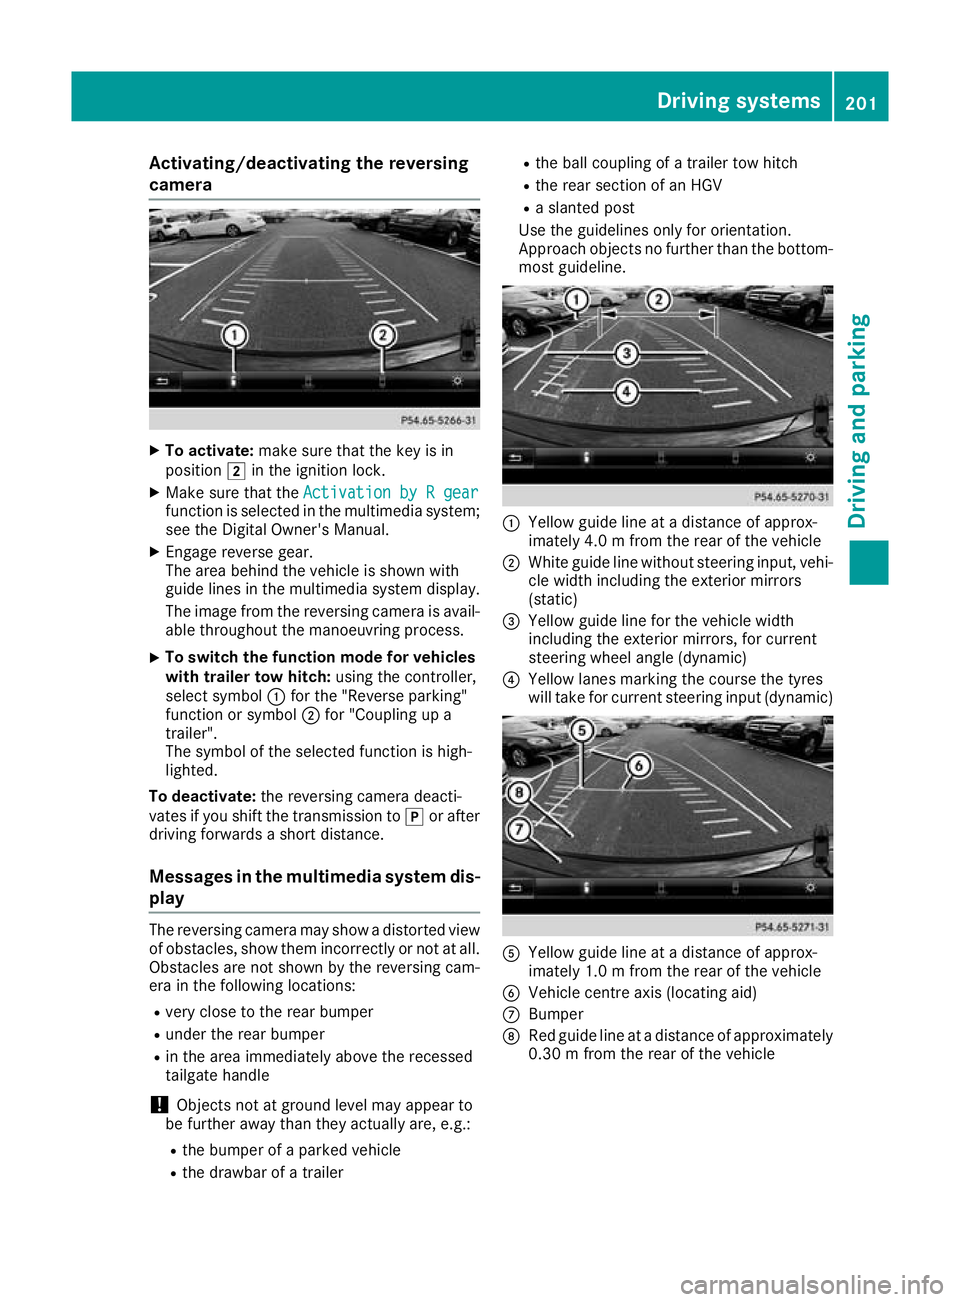
most guideline. :
Yellow guide line at a distance of approx-
imately 4.0 m from the rear of the vehicle
; White guide line without steering input, vehi-
cle width including the exterior mirrors
(static)
= Yellow guide line for the vehicle width
including the exterior mirrors, for current
steering wheel angle (dynamic)
? Yellow lanes marking the course the tyres
will take for current steering input (dynamic) A
Yellow guide line at a distance of approx-
imately 1.0 m from the rear of the vehicle
B Vehicle centre axis (locating aid)
C Bumper
D Red guide line at a distance of approximately
0.30 m from the rear of the vehicle Driving systems
201Driving and parking Z
Page 206 of 369
:
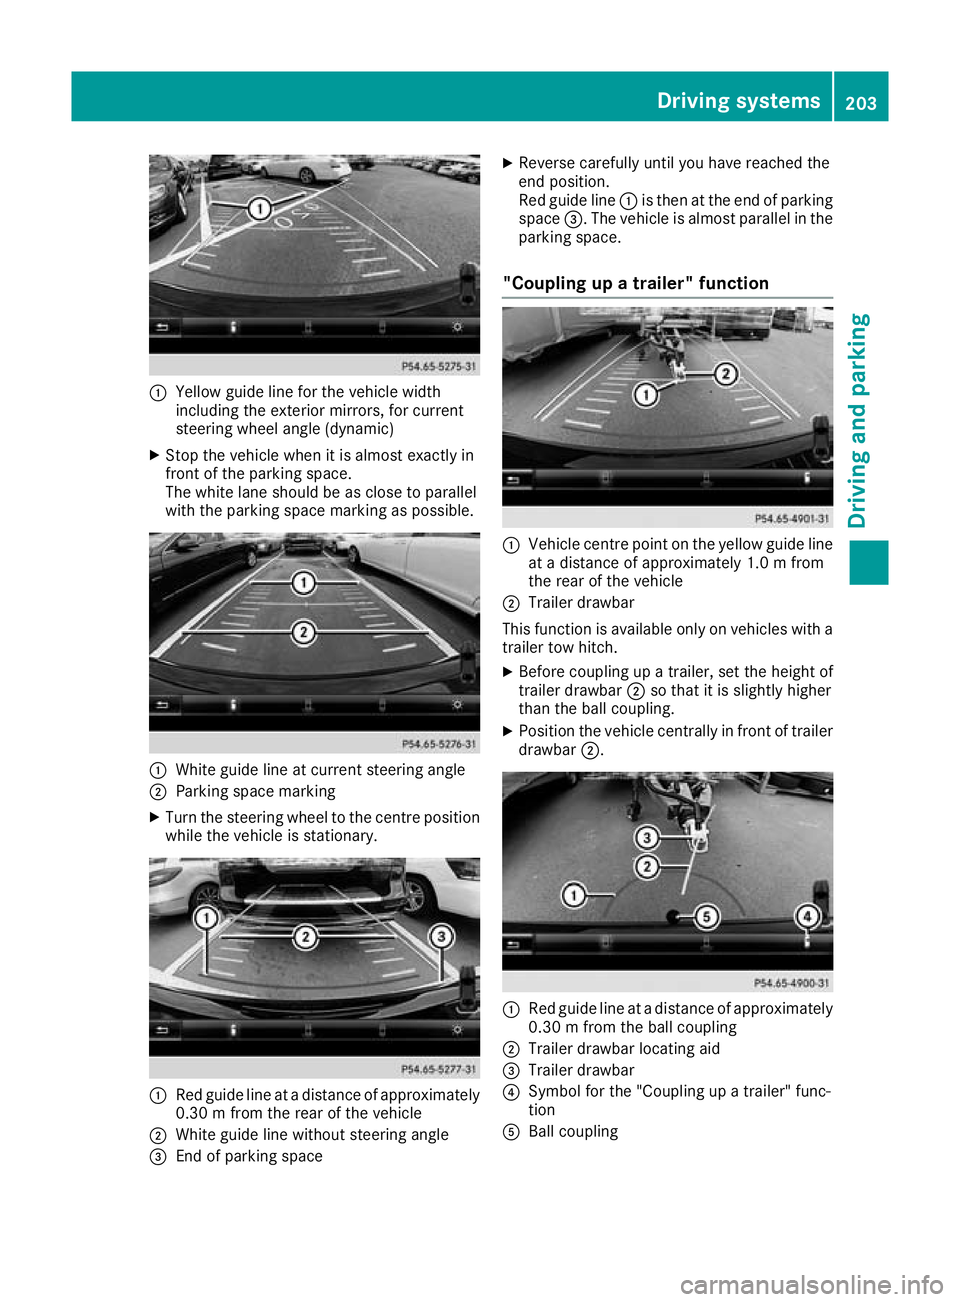
Yellow guide line for the vehicle width
including the exterior mirrors, for current
steering wheel angle (dynamic)
X Stop the vehicle when it is almost exactly in
front of the parking space.
The white lane should be as close to parallel
with the parking space marking as possible. :
White guide line at current steering angle
; Parking space marking
X Turn the steering wheel to the centre position
while the vehicle is stationary. :
Red guide line at a distance of approximately
0.30 m from the rear of the vehicle
; White guide line without steering angle
= End of parking space X
Reverse carefully until you have reached the
end position.
Red guide line :is then at the end of parking
space =. The vehicle is almost parallel in the
parking space.
"Coupling up a trailer" function :
Vehicle centre point on the yellow guide line
at a distance of approximately 1.0 m from
the rear of the vehicle
; Trailer drawbar
This function is available only on vehicles with a
trailer tow hitch.
X Before coupling up a trailer, set the height of
trailer drawbar ;so that it is slightly higher
than the ball coupling.
X Position the vehicle centrally in front of trailer
drawbar ;. :
Red guide line at a distance of approximately
0.30 m from the ball coupling
; Trailer drawbar locating aid
= Trailer drawbar
? Symbol for the "Coupling up a trailer" func-
tion
A Ball coupling Driving systems
203Driving and parking Z
Page 207 of 369
X
Select symbol ?using the controller.
The "Coupling up a trailer" function is selec-
ted. The distance specifications now apply
only to objects that are at the same level as
the ball coupling.
X Reverse carefully, making sure that trailer
drawbar locating aid ;points approximately
in the direction of trailer drawbar =.
X Reverse carefully until trailer drawbar =rea-
ches the red guide line.
The distance between the trailer drawbar and
the red guide line is now approximately
0.30 m.
X Couple up the trailer (Y page 213).
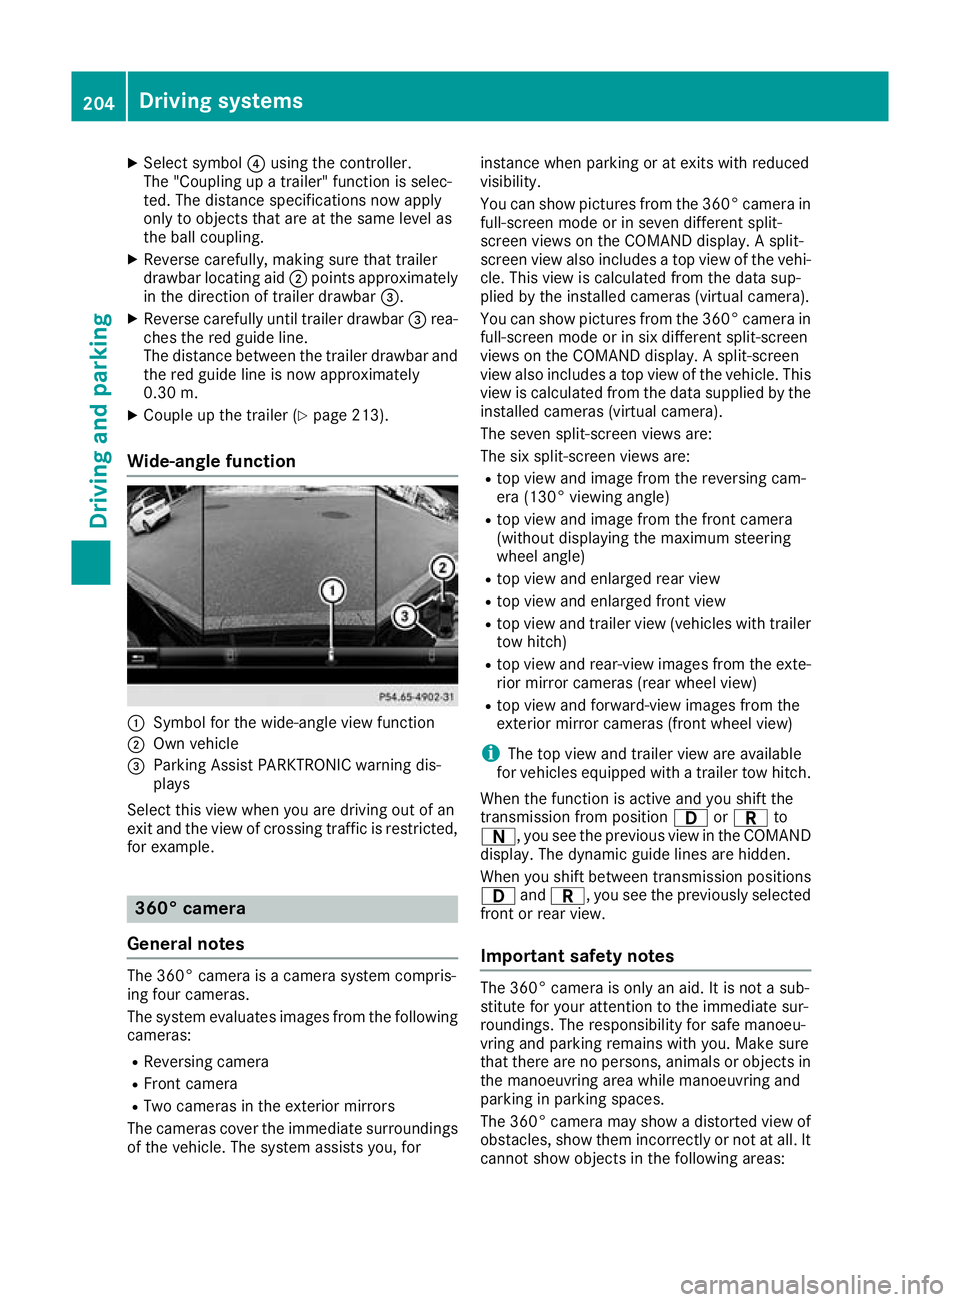
Wide-angle function :
Symbol for the wide-angle view function
; Own vehicle
= Parking Assist PARKTRONIC warning dis-
plays
Select this view when you are driving out of an
exit and the view of crossing traffic is restricted, for example. 360° camera
General notes The 360° camera is a camera system compris-
ing four cameras.
The system evaluates images from the following
cameras:
R Reversing camera
R Front camera
R Two cameras in the exterior mirrors
The cameras cover the immediate surroundings
of the vehicle. The system assists you, for instance when parking or at exits with reduced
visibility.
You can show pictures from the 360° camera in
full-screen mode or in seven different split-
screen views on the COMAND display. A split-
screen view also includes a top view of the vehi-
cle. This view is calculated from the data sup-
plied by the installed cameras (virtual camera).
You can show pictures from the 360° camera in
full-screen mode or in six different split-screen
views on the COMAND display. A split-screen
view also includes a top view of the vehicle. This
view is calculated from the data supplied by the installed cameras (virtual camera).
The seven split-screen views are:
The six split-screen views are:
R top view and image from the reversing cam-
era (130° viewing angle)
R top view and image from the front camera
(without displaying the maximum steering
wheel angle)
R top view and enlarged rear view
R top view and enlarged front view
R top view and trailer view (vehicles with trailer
tow hitch)
R top view and rear-view images from the exte-
rior mirror cameras (rear wheel view)
R top view and forward-view images from the
exterior mirror cameras (front wheel view)
i The top view and trailer view are available
for vehicles equipped with a trailer tow hitch.
When the function is active and you shift the
transmission from position 7orC to
A, you see the previous view in the COMAND
display. The dynamic guide lines are hidden.
When you shift between transmission positions 7 andC, you see the previously selected
front or rear view.
Important safety notes The 360° camera is only an aid. It is not a sub-
stitute for your attention to the immediate sur-
roundings. The responsibility for safe manoeu-
vring and parking remains with you. Make sure
that there are no persons, animals or objects in
the manoeuvring area while manoeuvring and
parking in parking spaces.
The 360° camera may show a distorted view of
obstacles, show them incorrectly or not at all. It
cannot show objects in the following areas: 204
Driving systemsDriving an
d parking
Page 213 of 369
Due to the nature of the system:
R warnings may be issued in error when driving
close to crash barriers or similar solid boun-
daries
R warnings may be interrupted when you are
driving alongside particularly long vehicles,
such as lorries, for a prolonged time
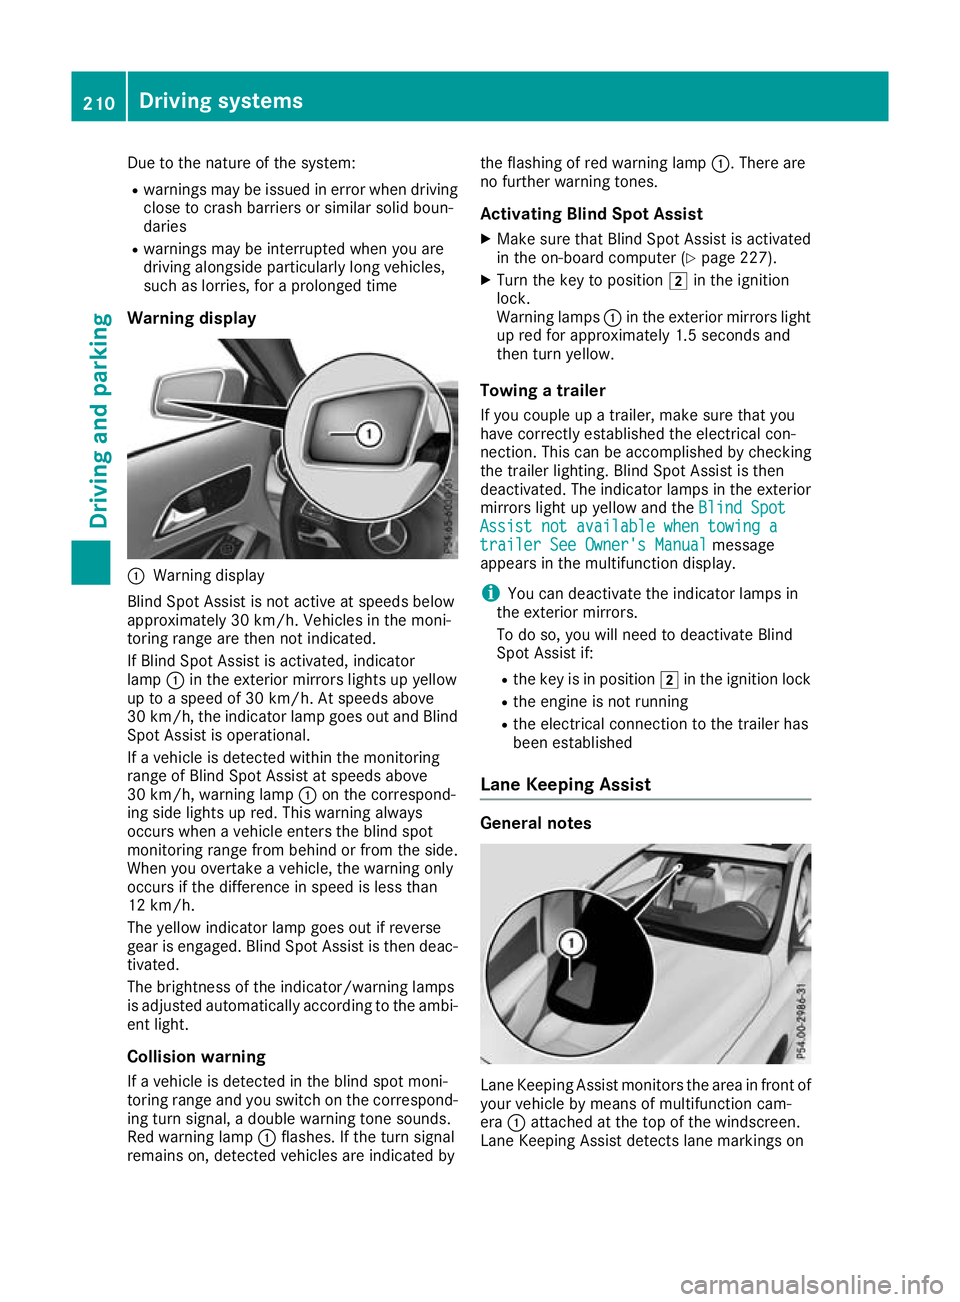
Warning display :
Warning display
Blind Spot Assist is not active at speeds below
approximately 30 km/h. Vehicles in the moni-
toring range are then not indicated.
If Blind Spot Assist is activated, indicator
lamp :in the exterior mirrors lights up yellow
up to a speed of 30 km/h. At speeds above
30 km/h, the indicator lamp goes out and Blind
Spot Assist is operational.
If a vehicle is detected within the monitoring
range of Blind Spot Assist at speeds above
30 km/h, warning lamp :on the correspond-
ing side lights up red. This warning always
occurs when a vehicle enters the blind spot
monitoring range from behind or from the side.
When you overtake a vehicle, the warning only
occurs if the difference in speed is less than
12 km/h.
The yellow indicator lamp goes out if reverse
gear is engaged. Blind Spot Assist is then deac- tivated.
The brightness of the indicator/warning lamps
is adjusted automatically according to the ambi-
ent light.
Collision warning
If a vehicle is detected in the blind spot moni-
toring range and you switch on the correspond-
ing turn signal, a double warning tone sounds.
Red warning lamp :flashes. If the turn signal
remains on, detected vehicles are indicated by the flashing of red warning lamp
:. There are
no further warning tones.
Activating Blind Spot Assist X Make sure that Blind Spot Assist is activated
in the on-board computer (Y page 227).
X Turn the key to position 2in the ignition
lock.
Warning lamps :in the exterior mirrors light
up red for approximately 1.5 second s and
then turn yellow.
Towing a trailer
If you couple up a trailer, make sure that you
have correctly established the electrical con-
nection. This can be accomplished by checking
the trailer lighting. Blind Spot Assist is then
deactivated. The indicator lamps in the exterior
mirrors light up yellow and the Blind Spot
Blind Spot
Assist not available when towing a Assist not available when towing a
trailer See Owner's Manual trailer See Owner's Manual message
appears in the multifunction display.
i You can deactivate the indicator lamps in
the exterior mirrors.
To do so, you will need to deactivate Blind
Spot Assist if:
R the key is in position 2in the ignition lock
R the engine is not running
R the electrical connection to the trailer has
been established
Lane Keeping Assist General notes
Lane Keeping Assist monitors the area in front of
your vehicle by means of multifunction cam-
era :attached at the top of the windscreen.
Lane Keeping Assist detects lane markings on 210
Driving systemsDriving an
d parking
Page 215 of 369
The warning vibration occurs earlier in the fol-
lowing situations if:
R you approach the outer lane marking on a
bend
R the road has very wide lanes, e.g. a motorway
R the system detects solid lane markings
The warning vibration occurs later in the follow-
ing situations if:
R the road has narrow lanes
R you cut the corner on a bend Towing a trailer
Important safety notes
G
WARNING
You could lose control of the vehicle/trailer
combination if it begins to swerve. The vehi-
cle/trailer combination could even overturn.
There is a risk of an accident.
On no account should you attempt to
straighten out the vehicle/trailer combina-
tion by increasing speed. Decrease your
speed and do not countersteer. Brake if nec-
essary. G
WARNING
If the maximum permissible load for a carrier system is exceeded, the carrier could come
loose from the vehicle and endanger other
road users. There is a risk of an accident and injury.
Never exceed the maximum permissible load
when using a carrier.
! If you have a trailer tow hitch retrofitted,
changes to the engine cooling system may be necessary, depending on the vehicle type.
If you have a trailer tow hitch retrofitted,
observe the anchorage points on the chassis.
Retrofitting a trailer tow hitch is only permissible
if a trailer load is specified in your vehicle docu-
ments. If this is not the case, then the vehicle is not approved for towing a trailer.
For more information, please contact a qualifiedspecialist workshop. Exceeding the maximum permissible nose-
weight of the trailer drawbar on the ball coupling
may cause damage to the following:
R your vehicle
R trailer
R ball coupling
R trailer tow hitch
The vehicle/trailer combination could become
unstable.
The vehicle/trailer combination could also
become unstable if the noseweight used is lower than the minimum permissible noseweight.
To avoid hazardous situations:
R make sure to check the noseweight before
each journey
R the noseweight should be as close as possible
to the maximum noseweight
R do not exceed the maximum permissible
noseweight
R the noseweight must not be lower than the
minimum permissible noseweight
Make sure that the following values are not
exceeded:
R the permissible noseweight
R the permissible trailer load
R the permissible rear axle load of the towing
vehicle
R the maximum permissible gross vehicle
weight of both the towing vehicle and the
trailer
The applicable permissible values, which must
not be exceeded, can be found:
R in your vehicle documents
R on the identification plates of the trailer tow
hitch and the trailer
R on the vehicle identification plate
If the values differ, the lowest value applies.
You will find the values approved by the manu-
facturer on the identification plates and for the
towing vehicle under "Technical data"
(Y page 359). G
WARNING
If you release the ball coupling or it does not
engage correctly when folding in, it will swing out. Within pivoting range of the ball coupling,
there is an increased risk of an accident and
injury. 212
Towing a trailerDriving and parking