2017 MERCEDES-BENZ GLA SUV torque
[x] Cancel search: torquePage 26 of 369
Summer tyres ................................ 336
Tyre size (data
).............................. 347
Tyre tread ...................................... 335
see Flat tyre U
Unlocking Emergency unlocking ....................... 88
From inside the vehicle (central
unlocking button) ............................. 87
Upshift indicator (on-board com-
puter, Mercedes-AMG vehicles) ....... 231
USB devices
Connecting to the Media Inter-
face ............................................... 287 V
Vanity mirror (in sun visor) .............. 298
Vehicle
Correct use ...................................... 30
Data acquisition ............................... 30
Display message ............................ 258
Electronics ..................................... 350
Equipment ....................................... 27
Implied warranty .............................. 30
Individual settings .......................... 228
Leaving parked up ......................... 169
Locking (in an emergency) ............... 88
Locking (key) ................................... 79
Lowering ........................................ 346
Pulling away ................................... 146
Raising ........................................... 344
Registration ..................................... 30
Securing from rolling away ............ 344
Transporting .................................. 330
Unlocking (in an emergency) ........... 88
Unlocking (key) ................................ 79
Vehicle data ................................... 358
Vehicle battery
see Battery (vehicle)
Vehicle data
Boot load (maximum) ..................... 358
Roof load (maximum) ..................... 358
Vehicle data (off-road driving)
Approach/departure angle ............ 359
Maximum gradient climbing abil-
ity .................................................. 359 Vehicle dimensions
........................... 358
Vehicle emergency locking ................ 88
Vehicle identification number
see VIN
Vehicle identification plate .............. 351
Vehicle tool kit .................................. 317
Ventilation
Setting the vents ........................... 141
Video
Operating the DVD ......................... 224
See also Digital Owner's Manua l... 277
VIN
Seat ............................................... 352
Type plate ...................................... 351 W
Warning and indicator lamps ABS ................................................ 267
Active Brake Assist ........................ 275
Brakes ........................................... 266
Distance warning signal ................. 275
ESP ®
.............................................. 269
ESP ®
OFF ....................................... 270
Fuel tank ........................................ 272
LIM (cruise control )........................ 176
LIM (Distance Pilot DISTRONIC ).... 181
LIM (variable limiter) ...................... 178
Overview .......................................... 34
Reserve fuel ................................... 272
Seat belt ........................................ 265
Tyre pressure monitor ................... 276
Warning triangle ................................ 316
Washer fluid
Display message ............................ 263
Weather display (COMAND Online)
See also Digital Owner's Manua l... 277
Wheel and tyre combinations
Tyres .............................................. 347
Wheel bolt tightening torque ........... 346
Wheel chock ...................................... 344
Wheels
Changing a whee l.......................... 342
Changing/replacing ....................... 342
Checking ........................................ 334
Cleaning ......................................... 310
Emergency spare wheel ................. 348
Fitting a new wheel ........................ 345 Index
23
Page 27 of 369
Important safety notes .................. 334
Information on driving .................... 334
Removing a wheel
.......................... 345
Storing ........................................... 343
Tightening torque ........................... 346
Wheel size/tyre size ...................... 347
Wheels and tyres
Changing a whee l.......................... 343
Windowbag
Display message ............................ 243
Operation ......................................... 49
Windows
Cleaning ......................................... 310
see Side windows
Windscreen
Demisting ...................................... 134
Windscreen washer fluid
see Windscreen washer system
Windscreen washer system
Important safety notes .................. 357
Topping up ..................................... 306
Windscreen wipers
Display message ............................ 263
Problem (malfunction) ................... 127
Rear window wipe r........................ 124
Replacing the wiper blades ............ 125
Switching on/of f........................... 124
Winter driving
General notes ................................ 336
Winter operation
Slippery road surfaces ................... 172
Snow chains .................................. 337
Winter tyres
Limiting the speed (on-board com-
puter) ............................................. 229
M+S tyres ...................................... 336
Wiper blades
Cleaning ......................................... 310
Important safety notes .................. 125
Replacing (on the rear window )..... 126
Wooden trim (cleaning instruc-
tions) .................................................. 313
Workshop
see Qualified specialist workshop Z
ZONE function Switching on/of f........................... 134 24
Index
Page 75 of 369
brakes are applied again, the brake lamps light
up continuously. The hazard warning lamps
switch off automatically if you travel faster than
10 km/ h.You can also switch off the hazard
warning lamps using the hazard warning button (Y page 118). ESP
®
(Electronic Stability Program)
General notes i
Observe the "Important safety notes" sec-
tion (Y page 68).
ESP ®
monitors driving stability and traction, i.e.
power transmission between the tyres and the
road surface.
If ESP ®
detects that the vehicle is deviating from
the direction desired by the driver, one or more
wheels are braked to stabilise the vehicle. The
engine output is also modified to keep the vehi- cle on the desired course within physical limits.
ESP ®
assists the driver when pulling away on
wet or slippery roads. ESP ®
can also stabilise
the vehicle during braking.
ETS/4ETS (Electronic Traction System) i
Observe the "Important safety notes" sec-
tion (Y page 68).
ETS traction control is part of ESP ®
. On vehicles
with 4MATIC, 4ETS is part of ESP ®
.
Traction control brakes the drive wheels indi-
vidually if they spin. This enables you to pull
away and accelerate on slippery surfaces, e.g. if the road surface is slippery on one side. In addi-
tion, more drive torque is transferred to the
wheel or wheels with traction.
Traction control remains active if you deactivate
ESP ®
.
Off-road 4ETS (Electronic Traction Sys-
tem) A 4ETS system specifically suited to off-road
terrain is activated automatically once the off-
road program is activated (Y page 192).
Important safety notes i
Observe the "Important safety notes" sec-
tion (Y page 68). G
WARNING
If ESP ®
is malfunctioning, ESP ®
is unable to
stabilise the vehicle. In addition, other driving
safety systems are switched off. This increa-
ses the risk of skidding and an accident.
Drive on carefully. Have ESP ®
checked at a
qualified specialist workshop.
Vehicles without 4MATIC: when towing your
vehicle with the front axle raised, it is important
that you observe the notes on ESP ®
(Y page 329).
If the å ESP®
OFF warning lamp lights up
continuously, ESP ®
is deactivated.
If the ÷ ESP®
warning lamp and the å
warning lamp are lit continuously, ESP ®
is not
available due to a malfunction.
Read the information on warning lamps
(Y page 269) and display messages that may be
shown in the instrument cluster (Y page 235).
Use only wheels with the recommended tyre
sizes. Only then will ESP ®
function properly.
Characteristics of ESP ® General information
If the ÷ ESP warning lamp goes out before
you begin the journey, ESP ®
is automatically
active.
If ESP ®
intervenes, the ÷ESP®
warning lamp
flashes on the instrument cluster.
If ESP ®
intervenes:
X Do not deactivate ESP ®
under any circum-
stances.
X When pulling away, depress the accelerator
pedal only as far as is necessary.
X Adapt your driving style to suit the prevailing
road and weather conditions.
ECO start/stop function
The ECO start/stop function switches the
engine off automatically if the vehicle stops
moving. When pulling away again, the engine
starts automatically. ESP ®
remains in its previ-
ously selected status. Example:if ESP®
was
deactivated before the engine was switched off,
ESP ®
remains deactivated when the engine is
switched on again. 72
Driving safety systemsSafety
Page 76 of 369
Activating/deactivating ESP
®
(except
Mercedes ‑AMG vehicles) Important safety notes
i Observe the "Important safety notes" sec-
tion (Y page 68).
You can select between the following ESP ®
sta-
tuses:
R ESP ®
is activated
R ESP ®
is deactivated. G
WARNING
If you deactivate ESP ®
, ESP ®
no longer sta-
bilises the vehicle. There is an increased risk
of skidding and an accident.
Only deactivate ESP ®
in the situations descri-
bed in the following.
The spinning of the wheels results in a cut for
better traction on loose surfaces.
It may be best to deactivate ESP ®
in the follow-
ing situations:
R when snow chains are used
R in deep snow
R on sand or gravel
i Activate ESP ®
as soon as the situations
described above no longer apply. ESP ®
will
otherwise not be able to stabilise the vehicle
if the vehicle starts to skid or a wheel starts to
spin.
Deactivating/activating ESP ®
You can deactivate or activate ESP ®
via the on-
board computer(Y page 227) .
ESP ®
deactivated:
The å ESP®
OFF warning lamp on the instru-
ment cluster lights up.
ESP ®
activated:
The å ESP®
OFF warning lamp on the instru-
ment cluster goes out.
Characteristics when ESP ®
is deactivated
If ESP ®
is deactivated and one or more wheels
start to spin, the ÷ESP®
warning lamp in the
instrument cluster flashes. In such situations,
ESP ®
will not stabilise the vehicle. If you deactivate ESP
®
:
R ESP ®
no longer improves driving stability
R engine torque is no longer limited and the
drive wheels may start to spin
R traction control is still activated
R Active Brake Assist is not available; it is not
activated even if you brake firmly with assis-
tance from ESP ®
R PRE-SAFE ®
is not available; it is not activated
even if you brake firmly with assistance from
ESP ®
R STEER CONTROL is no longer active
R ESP ®
still provides support when you brake
firmly
Deactivating/activating ESP ®
(Mercedes ‑AMG vehicles) Important safety notes
i Observe the "Important safety notes" sec-
tion (Y page 68).
You can select between the following ESP ®
sta-
tuses:
R ESP ®
is activated
R SPORT handling mode is activated
R ESP ®
is deactivated
ESP ®
is activated every time the engine is star-
ted, regardless of whether ESP ®
was deactiva-
ted before the engine was switched off. G
WARNING
When SPORT handling mode is activated,
there is a greater risk of skidding and acci-
dents.
Only activate SPORT handling mode in the sit- uations described in the following. G
WARNING
If you deactivate ESP ®
, ESP ®
no longer sta-
bilises the vehicle. There is an increased risk
of skidding and an accident.
Only deactivate ESP ®
in the situations descri-
bed in the following. Driving safety systems
73Safety Z
Page 77 of 369
In the following situations, it may be better to
activate SPORT handling mode or deactivate
ESP ®
:
R when snow chains are used
R in deep snow
R on sand or gravel
R on specially designated roads when the vehi-
cle's own oversteering and understeering
characteristics are desired
Driving in SPORT handling mode or without
ESP ®
requires a highly qualified and experi-
enced driver.
i Activate ESP ®
as soon as the situations
described above no longer apply. ESP ®
will
otherwise not be able to stabilise the vehicle
if the vehicle starts to skid or a wheel starts to
spin.
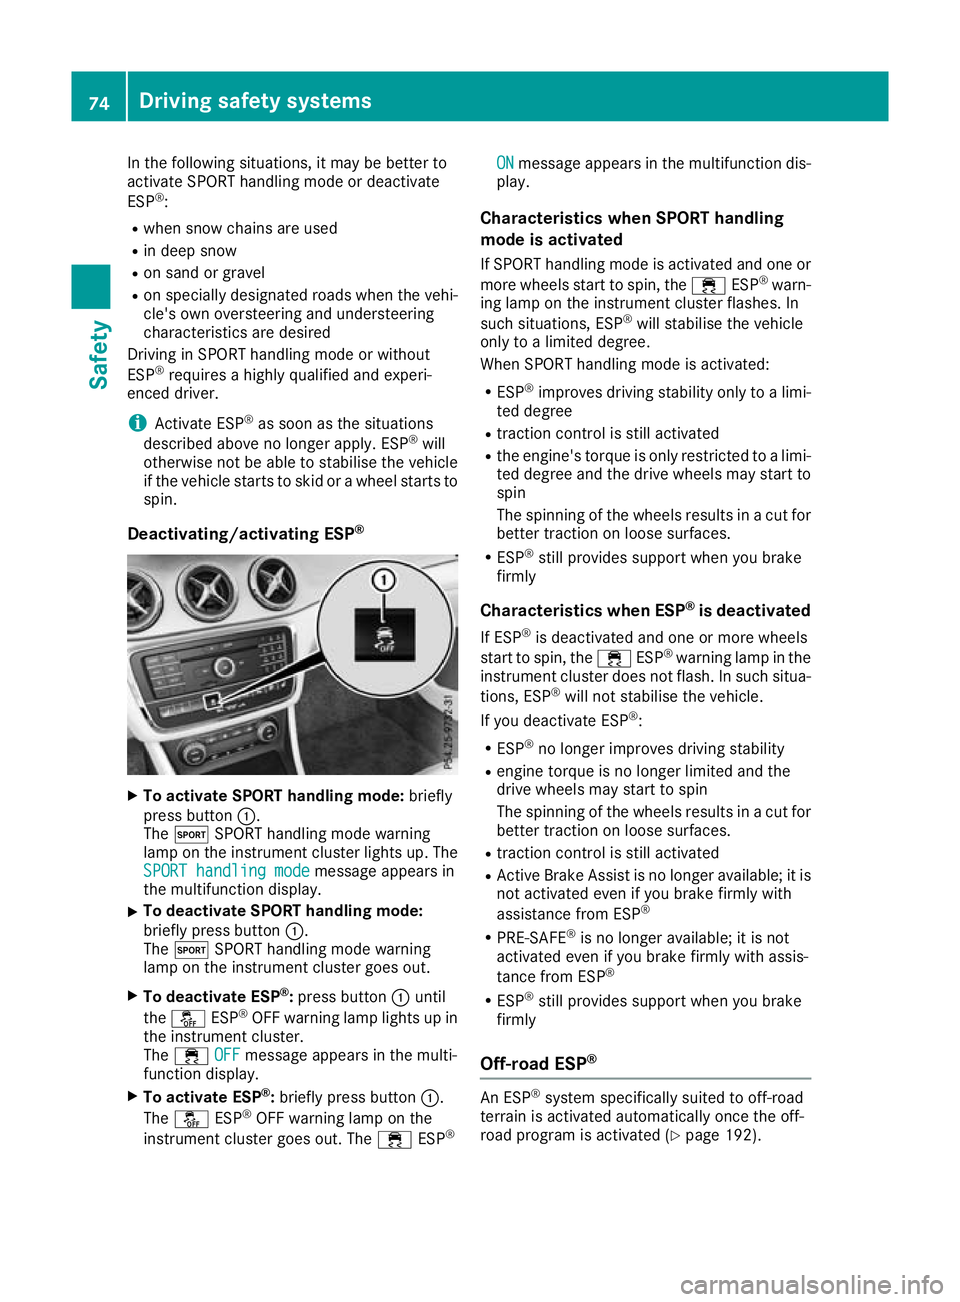
Deactivating/activating ESP ®X
To activate SPORT handling mode: briefly
press button :.
The M SPORT handling mode warning
lamp on the instrument cluster lights up. The
SPORT handling mode SPORT handling mode message appears in
the multifunction display.
X To deactivate SPORT handling mode:
briefly press button
:.
The M SPORT handling mode warning
lamp on the instrument cluster goes out.
X To deactivate ESP ®
:press button :until
the å ESP®
OFF warning lamp lights up in
the instrument cluster.
The ÷ OFF
OFF message appears in the multi-
function display.
X To activate ESP ®
:briefly press button :.
The å ESP®
OFF warning lamp on the
instrument cluster goes out. The ÷ESP® ON
ON message appears in the multifunction dis-
play.
Characteristics when SPORT handling
mode is activated
If SPORT handling mode is activated and one or more wheels start to spin, the ÷ESP®
warn-
ing lamp on the instrument cluster flashes. In
such situations, ESP ®
will stabilise the vehicle
only to a limited degree.
When SPORT handling mode is activated:
R ESP ®
improves driving stability only to a limi-
ted degree
R traction control is still activated
R the engine's torque is only restricted to a limi-
ted degree and the drive wheels may start to spin
The spinning of the wheels results in a cut for better traction on loose surfaces.
R ESP ®
still provides support when you brake
firmly
Characteristics when ESP ®
is deactivated
If ESP ®
is deactivated and one or more wheels
start to spin, the ÷ESP®
warning lamp in the
instrument cluster does not flash. In such situa-
tions, ESP ®
will not stabilise the vehicle.
If you deactivate ESP ®
:
R ESP ®
no longer improves driving stability
R engine torque is no longer limited and the
drive wheels may start to spin
The spinning of the wheels results in a cut for
better traction on loose surfaces.
R traction control is still activated
R Active Brake Assist is no longer available; it is
not activated even if you brake firmly with
assistance from ESP ®
R PRE-SAFE ®
is no longer available; it is not
activated even if you brake firmly with assis-
tance from ESP ®
R ESP ®
still provides support when you brake
firmly
Off-road ESP ® An ESP
®
system specifically suited to off-road
terrain is activated automatically once the off-
road program is activated (Y page 192).74
Driving safety systemsSafety
Page 349 of 369
bolts to come loose. As a result, you could
lose a wheel while driving. There is a risk of
accident.
Never oil or grease wheel bolts. In the event of damage to the threads, contact a qualified
specialist workshop immediately. Have the
damaged wheel bolts or hub threads
replaced/renewed. Do not continue driving. G
WARNING
If you tighten the wheel bolts or wheel nuts
when the vehicle is raised, the jack could tip
over. There is a risk of injury.
Only tighten the wheel bolts or wheel nuts
when the vehicle is on the ground.
It is imperative to observe the instructions and
safety notes on "Changing a wheel"
(Y page 342).
Only use wheel bolts that have been designed
for the wheel and the vehicle. For safety rea-
sons, Mercedes-Benz recommends that you
only use wheel bolts which have been approved for Mercedes-Benz vehicles and the respective
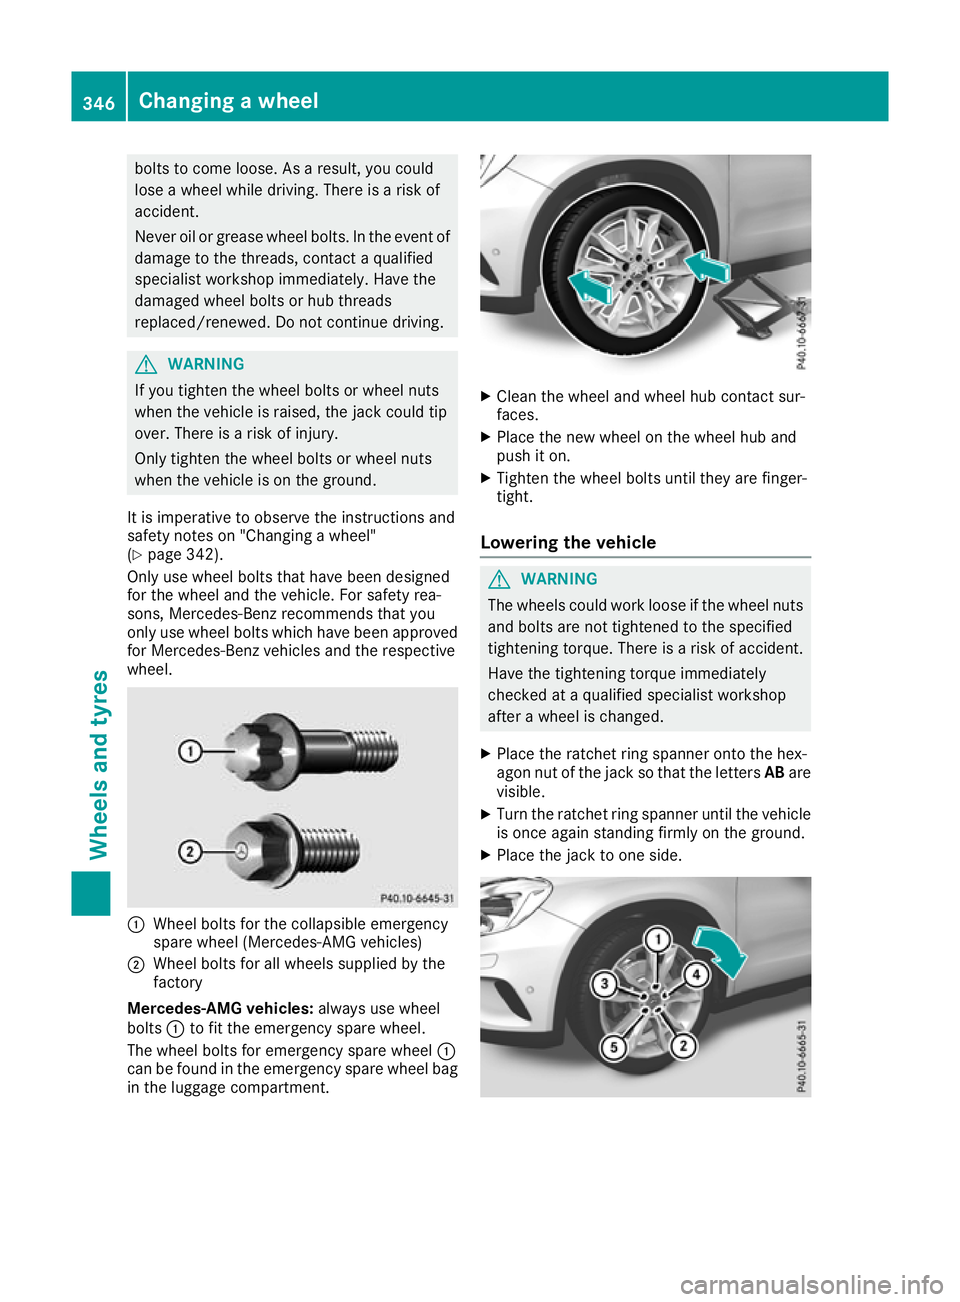
wheel. :
Wheel bolts for the collapsible emergency
spare wheel (Mercedes-AMG vehicles)
; Wheel bolts for all wheels supplied by the
factory
Mercedes-AMG vehicles: always use wheel
bolts :to fit the emergency spare wheel.
The wheel bolts for emergency spare wheel :
can be found in the emergency spare wheel bag
in the luggage compartment. X
Clean the wheel and wheel hub contact sur-
faces.
X Place the new wheel on the wheel hub and
push it on.
X Tighten the wheel bolts until they are finger-
tight.
Lowering the vehicle G
WARNING
The wheels could work loose if the wheel nuts and bolts are not tightened to the specified
tightening torque. There is a risk of accident.
Have the tightening torque immediately
checked at a qualified specialist workshop
after a wheel is changed.
X Place the ratchet ring spanner onto the hex-
agon nut of the jack so that the letters ABare
visible.
X Turn the ratchet ring spanner until the vehicle
is once again standing firmly on the ground.
X Place the jack to one side. 346
Changing a wheelWheels and tyres
Page 350 of 369
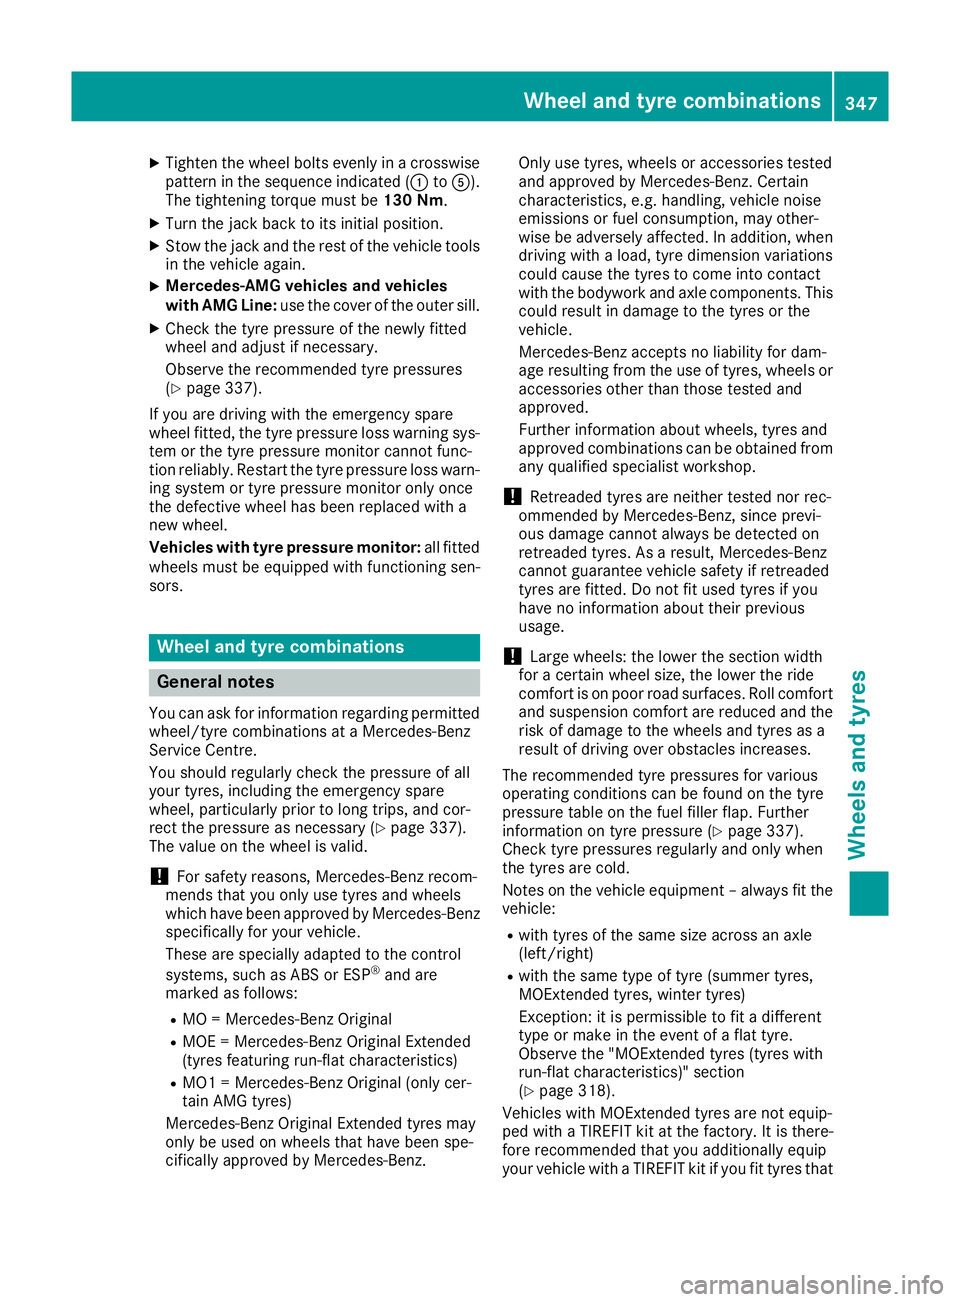
X
Tighten the wheel bolts evenly in a crosswise
pattern in the sequence indicated (: toA).
The tightening torque must be 130 Nm.
X Turn the jack back to its initial position.
X Stow the jack and the rest of the vehicle tools
in the vehicle again.
X Mercedes-AMG vehicles and vehicles
with AMG Line:
use the cover of the outer sill.
X Check the tyre pressure of the newly fitted
wheel and adjust if necessary.
Observe the recommended tyre pressures
(Y page 337).
If you are driving with the emergency spare
wheel fitted, the tyre pressure loss warning sys-
tem or the tyre pressure monitor cannot func-
tion reliably. Restart the tyre pressure loss warn- ing system or tyre pressure monitor only once
the defective wheel has been replaced with a
new wheel.
Vehicles with tyre pressure monitor: all fitted
wheels must be equipped with functioning sen-
sors. Wheel and tyre combinations
General notes
You can ask for information regarding permitted
wheel/tyre combinations at a Mercedes-Benz
Service Centre.
You should regularly check the pressure of all
your tyres, including the emergency spare
wheel, particularly prior to long trips, and cor-
rect the pressure as necessary (Y page 337).
The value on the wheel is valid.
! For safety reasons, Mercedes-Benz recom-
mends that you only use tyres and wheels
which have been approved by Mercedes-Benz specifically for your vehicle.
These are specially adapted to the control
systems, such as ABS or ESP ®
and are
marked as follows:
R MO = Mercedes-Benz Original
R MOE = Mercedes-Benz Original Extended
(tyres featuring run-flat characteristics)
R MO1 = Mercedes-Benz Original (only cer-
tain AMG tyres)
Mercedes-Benz Original Extended tyres may
only be used on wheels that have been spe-
cifically approved by Mercedes-Benz. Only use tyres, wheels or accessories tested
and approved by Mercedes-Benz. Certain
characteristics, e.g. handling, vehicle noise
emissions or fuel consumption, may other-
wise be adversely affected. In addition, when
driving with a load, tyre dimension variations
could cause the tyres to come into contact
with the bodywork and axle components. This
could result in damage to the tyres or the
vehicle.
Mercedes-Benz accepts no liability for dam-
age resulting from the use of tyres, wheels or accessories other than those tested and
approved.
Further information about wheels, tyres and
approved combinations can be obtained from
any qualified specialist workshop.
! Retreaded tyres are neither tested nor rec-
ommended by Mercedes-Benz, since previ-
ous damage cannot always be detected on
retreaded tyres. As a result, Mercedes-Benz
cannot guarantee vehicle safety if retreaded
tyres are fitted. Do not fit used tyres if you
have no information about their previous
usage.
! Large wheels: the lower the section width
for a certain wheel size, the lower the ride
comfort is on poor road surfaces. Roll comfort and suspension comfort are reduced and therisk of damage to the wheels and tyres as a
result of driving over obstacles increases.
The recommended tyre pressures for various
operating conditions can be found on the tyre
pressure table on the fuel filler flap. Further
information on tyre pressure (Y page 337).
Check tyre pressures regularly and only when
the tyres are cold.
Notes on the vehicle equipment – always fit the
vehicle:
R with tyres of the same size across an axle
(left/right)
R with the same type of tyre (summer tyres,
MOExtended tyres, winter tyres)
Exception: it is permissible to fit a different
type or make in the event of a flat tyre.
Observe the "MOExtended tyres (tyres with
run-flat characteristics)" section
(Y page 318).
Vehicles with MOExtended tyres are not equip-
ped with a TIREFIT kit at the factory. It is there-
fore recommended that you additionally equip
your vehicle with a TIREFIT kit if you fit tyres that Wheel and tyre combinations
347Wheels and tyres Z
Page 362 of 369
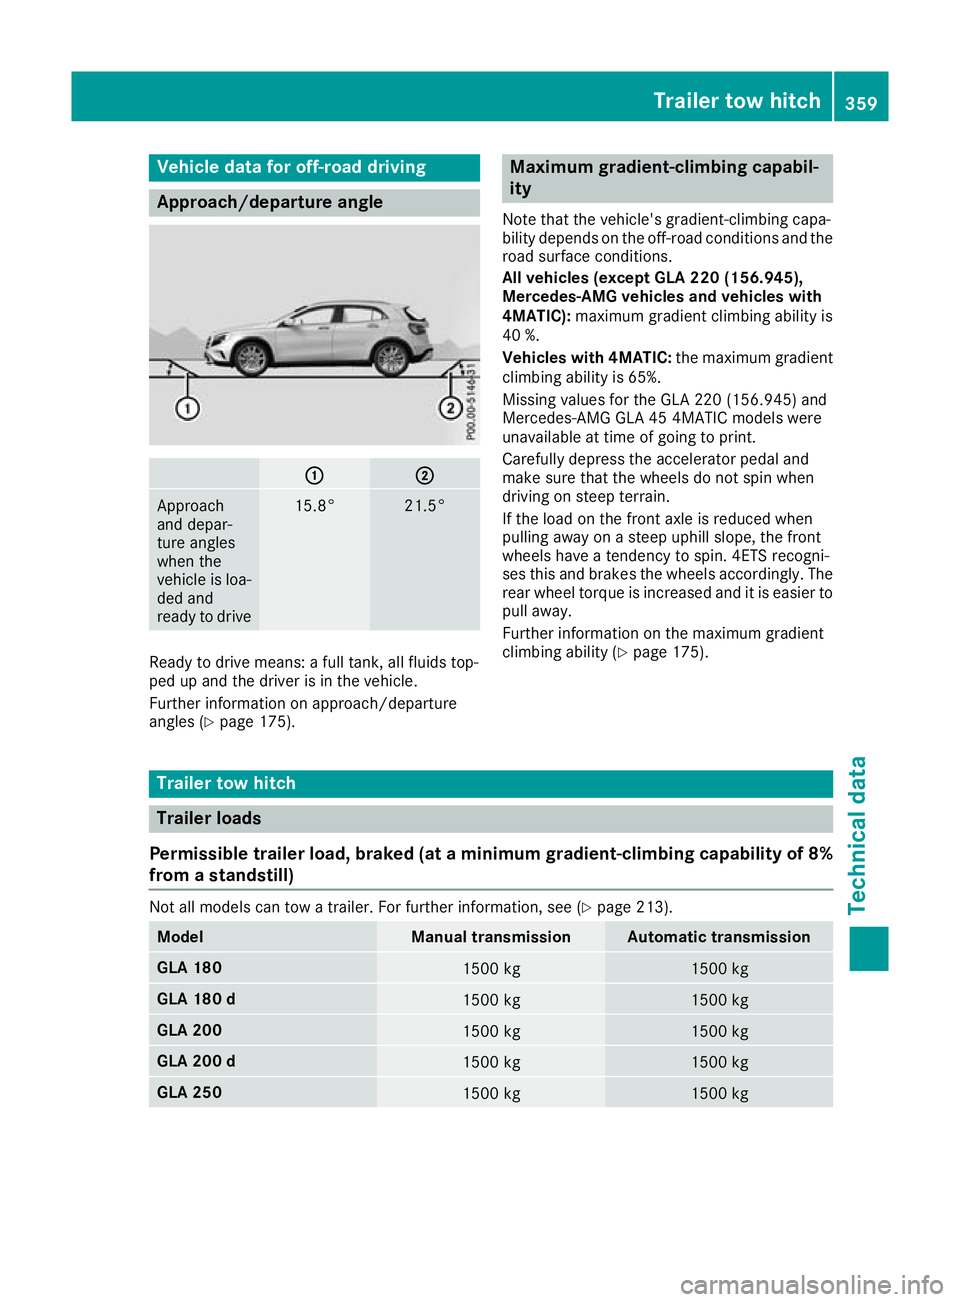
Vehicle data for off-road driving
Approach/departure angle
:
: ;
;
Approach
and depar-
ture angles
when the
vehicle is loa-
ded and
ready to drive 15.8° 21.5°
Ready to drive means: a full tank, all fluids top-
ped up and the driver is in the vehicle.
Further information on approach/departure
angles (Y page 175). Maximum gradient-climbing capabil-
ity
Note that the vehicle's gradient-climbing capa-
bility depends on the off-road conditions and the road surface conditions.
All vehicles (except GLA 220 (156.945),
Mercedes-AMG vehicles and vehicles with
4MATIC): maximum gradient climbing ability is
40 %.
Vehicles with 4MATIC: the maximum gradient
climbing ability is 65%.
Missing values for the GLA 220 (156.945) and
Mercedes‑AMG GLA 45 4MATIC models were
unavailable at time of going to print.
Carefully depress the accelerator pedal and
make sure that the wheels do not spin when
driving on steep terrain.
If the load on the front axle is reduced when
pulling away on a steep uphill slope, the front
wheels have a tendency to spin. 4ETS recogni-
ses this and brakes the wheels accordingly. The
rear wheel torque is increased and it is easier to pull away.
Further information on the maximum gradient
climbing ability (Y page 175). Trailer tow hitch
Trailer loads
Permissible trailer load, braked (at a minimum gradient-climbing capability of 8%
from a standstill) Not all models can tow a trailer. For further information, see (Y
page 213).Model Manual transmission Automatic transmission
GLA 180
1500 kg 1500 kg
GLA 180 d
1500 kg 1500 kg
GLA 200
1500 kg 1500 kg
GLA 200 d
1500 kg 1500 kg
GLA 250
1500 kg 1500 kgTrailer tow hitch
359Technical data Z