2017 MERCEDES-BENZ GLA SUV low beam
[x] Cancel search: low beamPage 37 of 369
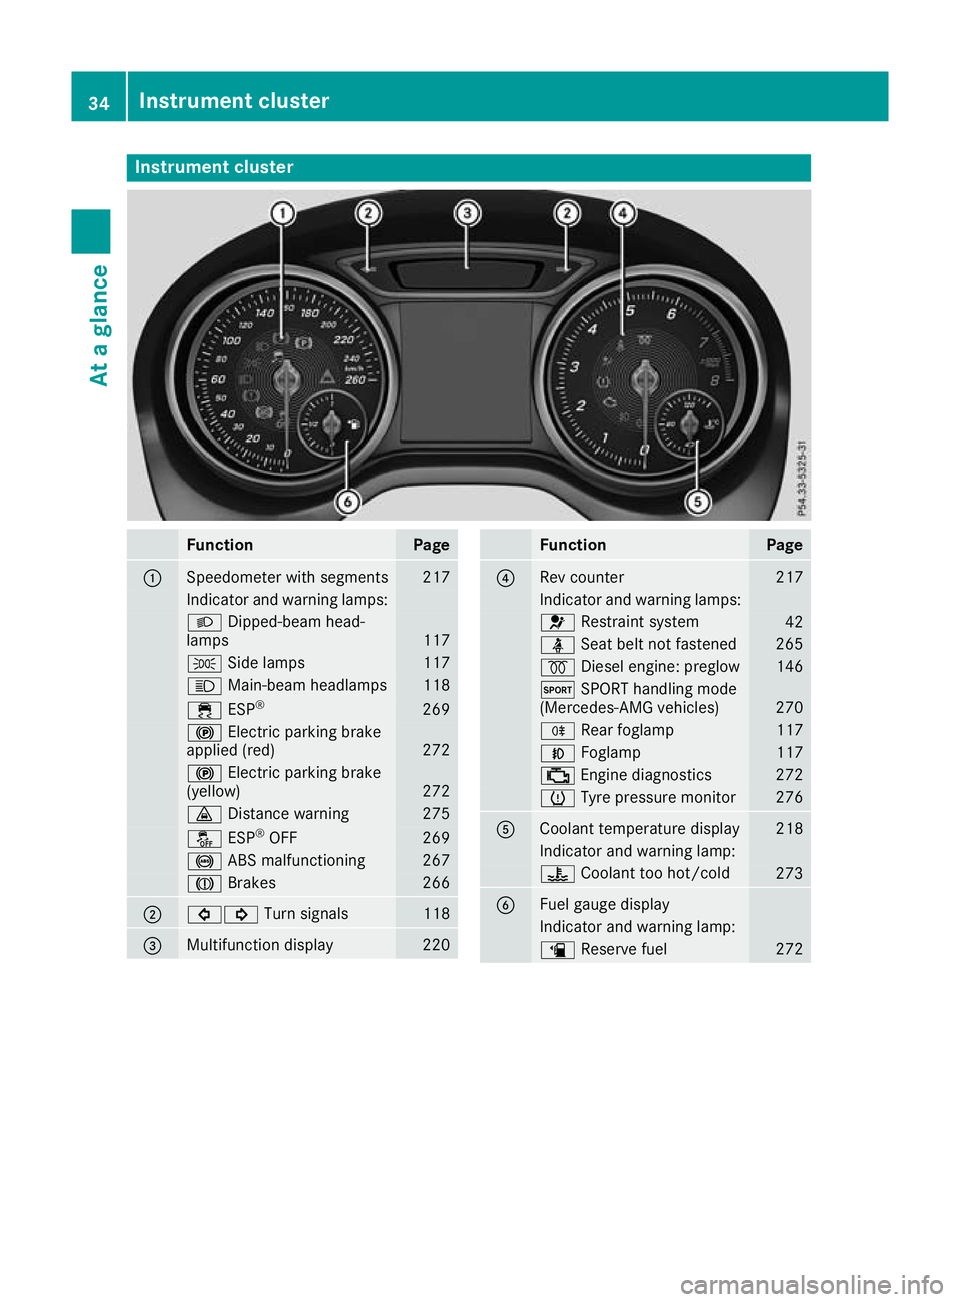
Instrument cluster
Function Page
:
Speedometer with segments 217
Indicator and warning lamps:
L
Dipped-beam head-
lamps 117
T
Side lamps 117
K
Main-beam headlamps 118
÷
ESP® 269
!
Electric parking brake
applied (red) 272
!
Electric parking brake
(yellow) 272
·
Distance warning 275
å
ESP®
OFF 269
!
ABS malfunctioning 267
J
Brakes 266
;
#!
Turn signals 118
=
Multifunction display 220 Function Page
?
Rev counter 217
Indicator and warning lamps:
6
Restraint system 42
ü
Seat belt not fastened 265
%
Diesel engine: preglow 146
M
SPORT handling mode
(Mercedes-AMG vehicles) 270
R
Rear foglamp 117
N
Foglamp 117
;
Engine diagnostics 272
h
Tyre pressure monitor 276
A
Coolant temperature display 218
Indicator and warning lamp:
?
Coolant too hot/cold 273
B
Fuel gauge display
Indicator and warning lamp:
æ
Reserve fuel 27234
Instrument clusterAt a glance
Page 120 of 369
The daytime driving lights improve the visibility
of your vehicle during the day. Here, the daytime
driving lights function must be switched on via
the on-board computer (Y page 229).
If the side lamps and dipped-beam headlamps
are switched on, the green indicator lamps T
(side lamps) and L(dipped-beam head-
lamps) in the instrument cluster light up.
Dipped-beam headlamps
When the ignition is switched on and the light
switch is in the Lposition, the side lamps
and dipped-beam headlamps are switched on
even if the light sensor does not sense dark
ambient light conditions. This is advantageous
when there is fog or rain.
X To switch on the dipped-beam headlamps:
turn the key to position 2in the ignition lock
or start the engine.
X Turn the light switch to L.
The green Lindicator lamp on the instru-
ment cluster lights up.
Foglamps
In conditions where visibility is poor due to fog,
snow or rain, the foglamps improve visibility as
well as making it easier for other road users to
see you. They can be operated together with the side lamps or together with the side lamps and
dipped-beam headlamps.
X To switch on the foglamps: turn the key to
position 2in the ignition lock or start the
engine.
X Turn the light switch to LorÃ.
X Press the Nbutton.
The green Nindicator lamp in the instru-
ment cluster lights up.
X To switch off the foglamps: press theN
button.
The green Nindicator lamp in the instru-
ment cluster goes out.
Rear foglamp
The rear foglamp improves the visibility of your
vehicle for the traffic behind in the event of
heavy fog. Please observe the country-specific
laws on the use of rear fog lamps.
X To switch on the rear fog lamp: turn the key
in the ignition lock to position 2or start the
engine.
X Turn the light switch to LorÃ. X
Press the Rbutton.
The yellow Rindicator lamp in the instru-
ment cluster lights up.
X To switch off the rear foglamp: press the
R button.
The yellow Rindicator lamp in the instru-
ment cluster goes out.
Side lamps
! When the battery is discharged heavily, the
side lamps or parking lamps are automatically
switched off to facilitate an engine start.
Always park your vehicle safely and in a well lit area, in accordance with the relevant legal
stipulations. Avoid using the Tside lamps
for periods lasting several hours. Where pos-
sible, switch on the right Xor left W
parking lamp.
X To switch on: turn the light switch to T.
The green Tindicator lamp in the instru-
ment cluster lights up.
Parking lamps Switching on the parking lamps ensures that the
corresponding side of the vehicle is illuminated.
X To switch on the parking lamps: the key
should not be in the ignition lock or it should
be in key position gin the ignition lock.
X Turn the light switch to W(left-hand side of
the vehicle) or X(right-hand side of the
vehicle).
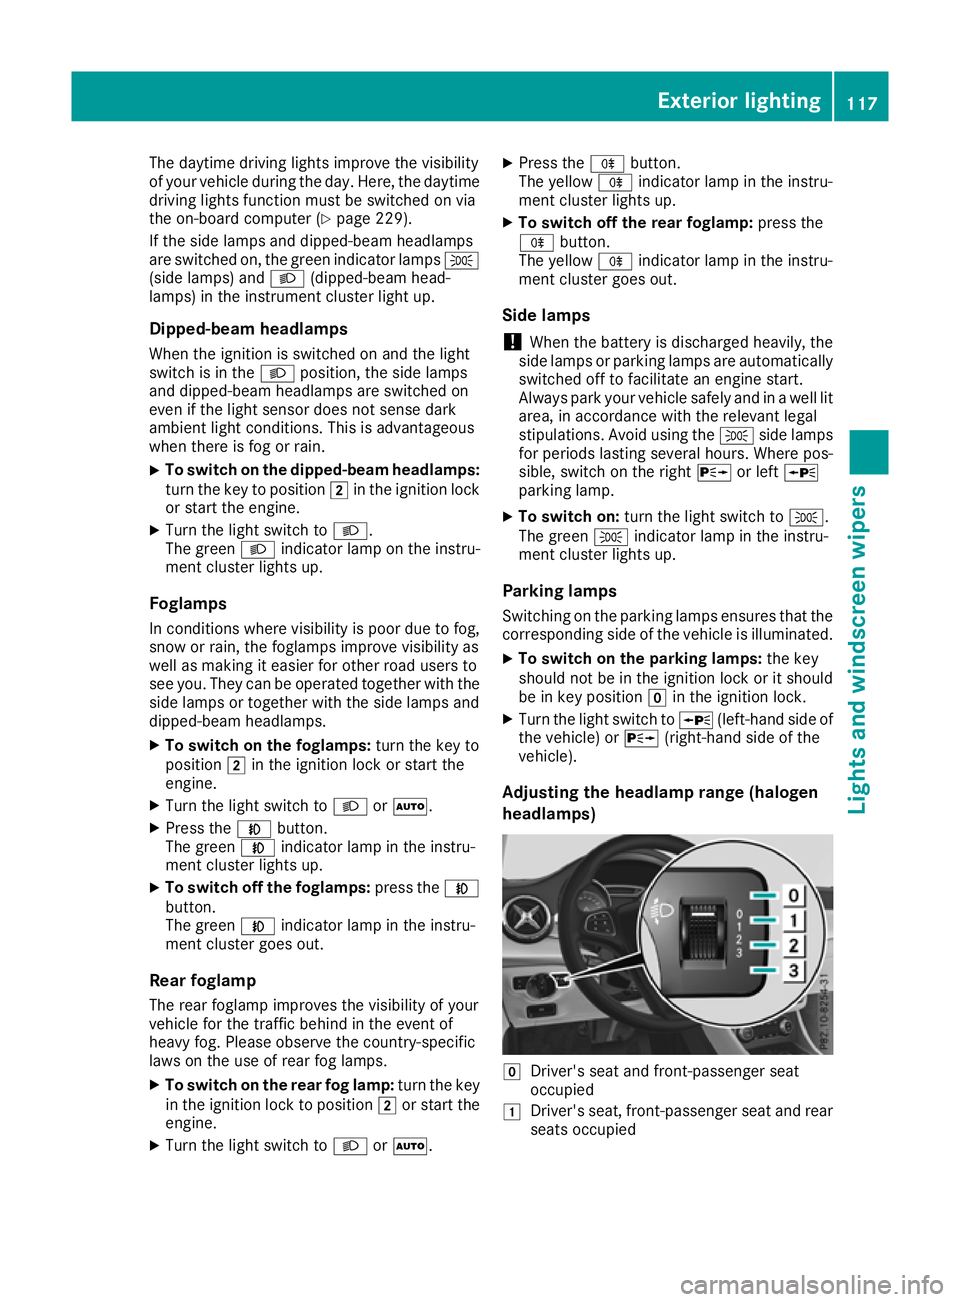
Adjusting the headlamp range (halogen
headlamps) g
Driver's seat and front-passenger seat
occupied
1 Driver's seat, front-passenger seat and rear
seats occupied Exterior lighting
117Lights and windscreen wipers Z
Page 121 of 369
2
Driver's seat, front-passenger seat and rear
seats occupied, luggage compartment
laden
3 Driver's and front-passenger seat occupied
and maximum permissible rear axle load uti- lised, e.g. when towing a trailer
The headlamp range control allows you to adjust
the cone of light from the headlamps to suit the
vehicle load.
X Start the engine.
X Turn the headlamp range controller to the
position that corresponds to the load in your
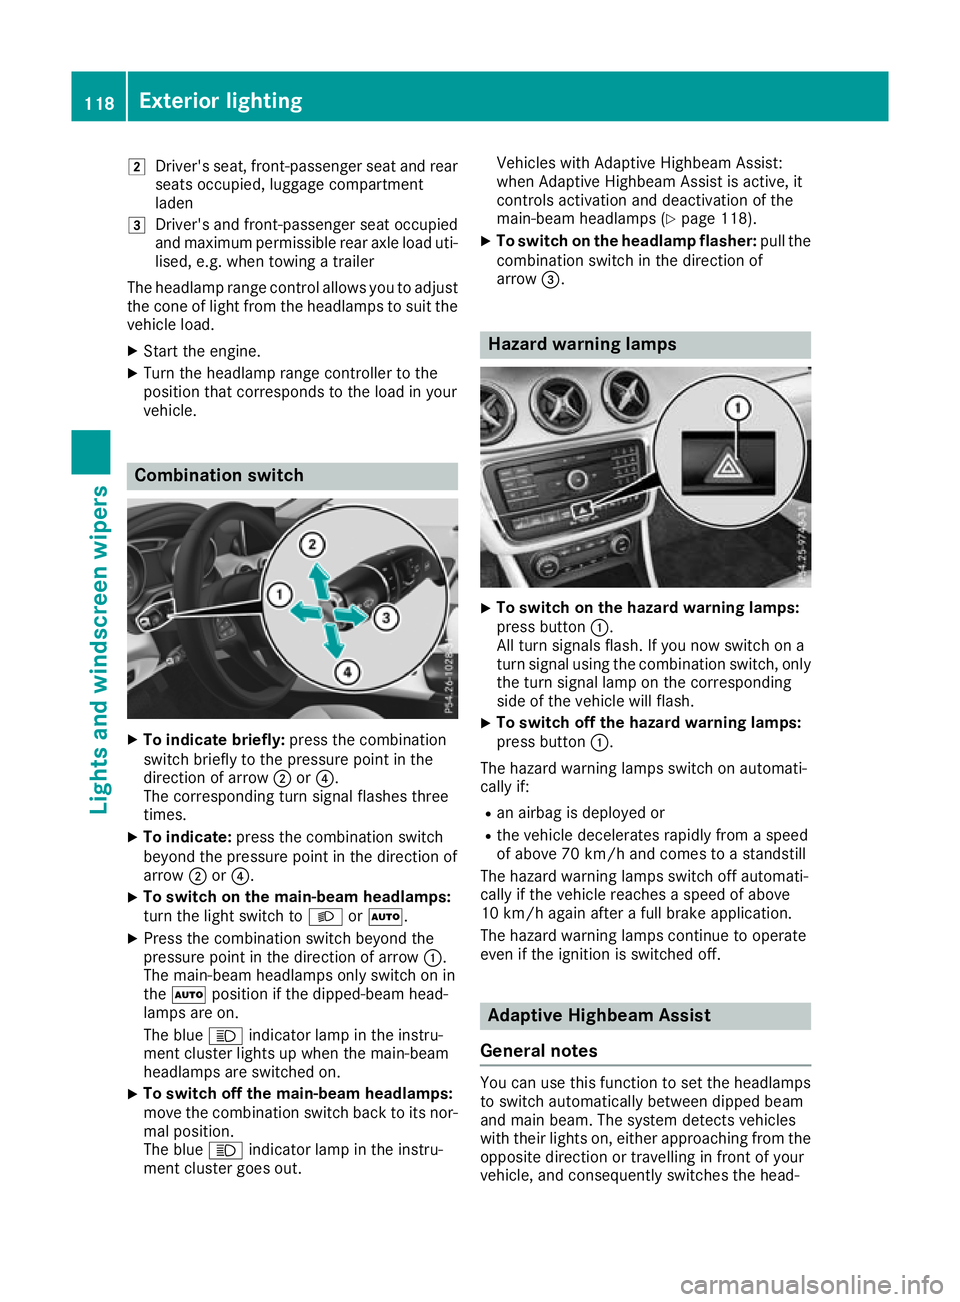
vehicle. Combination switch
X
To indicate briefly: press the combination
switch briefly to the pressure point in the
direction of arrow ;or?.
The corresponding turn signal flashes three
times.
X To indicate: press the combination switch
beyond the pressure point in the direction of
arrow ;or?.
X To switch on the main-beam headlamps:
turn the light switch to LorÃ.
X Press the combination switch beyond the
pressure point in the direction of arrow :.
The main-beam headlamps only switch on in
the à position if the dipped-beam head-
lamps are on.
The blue Kindicator lamp in the instru-
ment cluster lights up when the main-beam
headlamps are switched on.
X To switch off the main-beam headlamps:
move the combination switch back to its nor-
mal position.
The blue Kindicator lamp in the instru-
ment cluster goes out. Vehicles with Adaptive Highbeam Assist:
when Adaptive Highbeam Assist is active, it
controls activation and deactivation of the
main-beam headlamps (Y page 118).
X To switch on the headlamp flasher: pull the
combination switch in the direction of
arrow =. Hazard warning lamps
X
To switch on the hazard warning lamps:
press button :.
All turn signals flash. If you now switch on a
turn signal using the combination switch, only the turn signal lamp on the corresponding
side of the vehicle will flash.
X To switch off the hazard warning lamps:
press button
:.
The hazard warning lamps switch on automati-
cally if:
R an airbag is deployed or
R the vehicle decelerates rapidly from a speed
of above 70 km/h and comes to a standstill
The hazard warning lamps switch off automati-
cally if the vehicle reaches a speed of above
10 km/h again after a full brake application.
The hazard warning lamps continue to operate
even if the ignition is switched off. Adaptive Highbeam Assist
General notes You can use this function to set the headlamps
to switch automatically between dipped beam
and main beam. The system detects vehicles
with their lights on, either approaching from the
opposite direction or travelling in front of your
vehicle, and consequently switches the head- 118
Exterior lightingLights and
windscreen wipers
Page 122 of 369
lamps from main beam to dipped beam. Once
the system no longer detects any other vehicles, it switches on the main-beam headlamps again.
The system's optical sensor is located behind
the windscreen near the overhead control
panel.
Important safety notes G
WARNING
Adaptive Highbeam Assist does not recognise road users:
R who have no lights, e.g. pedestrians
R who have poor lighting, e.g. cyclists
R whose lighting is blocked, e.g. by a barrier
On very rare occasions, Adaptive Highbeam
Assist may fail to recognise other road users
that have lights, or may recognise them too
late. In this, or in similar situations, the auto-
matic main-beam headlamps will not be deac-
tivated or will be activated despite the pres-
ence of other road users. There is a risk of an accident.
Always carefully observe the traffic conditionsand switch off the main-beam headlamps in
good time.
Adaptive Highbeam Assist cannot take into
account road, weather or traffic conditions.
Adaptive Highbeam Assist is only an aid. You are
responsible for adjusting the vehicle's lighting
to the prevailing light, visibility and traffic con-
ditions.
In particular, the detection of obstacles can be
restricted if there is:
R poor visibility, e.g. due to fog, heavy rain or
snow
R dirt on the sensors or if the sensors are
obscured
Switching Adaptive Highbeam Assist
on/off X
To activate: turn the light switch to Ã.
X Press the combination switch beyond the
pressure point in the direction of arrow :.
When the _light sensor switches on the
dipped-beam headlamps when it is dark, the indicator lamp in the multifunction display
lights up.
If you are driving at speeds above approx-
imately 30 km/h and no other road users are
recognised:
The main-beam headlamps are switched on
automatically. The Kindicator lamp in the
instrument cluster also lights up.
If you are driving at speeds below 25 km/h or other road users are recognised or the roads
are adequately lit:
The main-beam headlamps are switched off
automatically. The Kindicator lamp in the
instrument cluster goes out. The _indi-
cator lamp in the multifunction display
remains lit.
X To deactivate: move the combination switch
back to its normal position.
The _ indicator lamp in the multifunction
display goes out. Headlamps misted up on the inside
Certain climatic and physical conditions may
cause moisture to form in the headlamp. This
moisture does not affect the functionality of the headlamp. Interior lighting
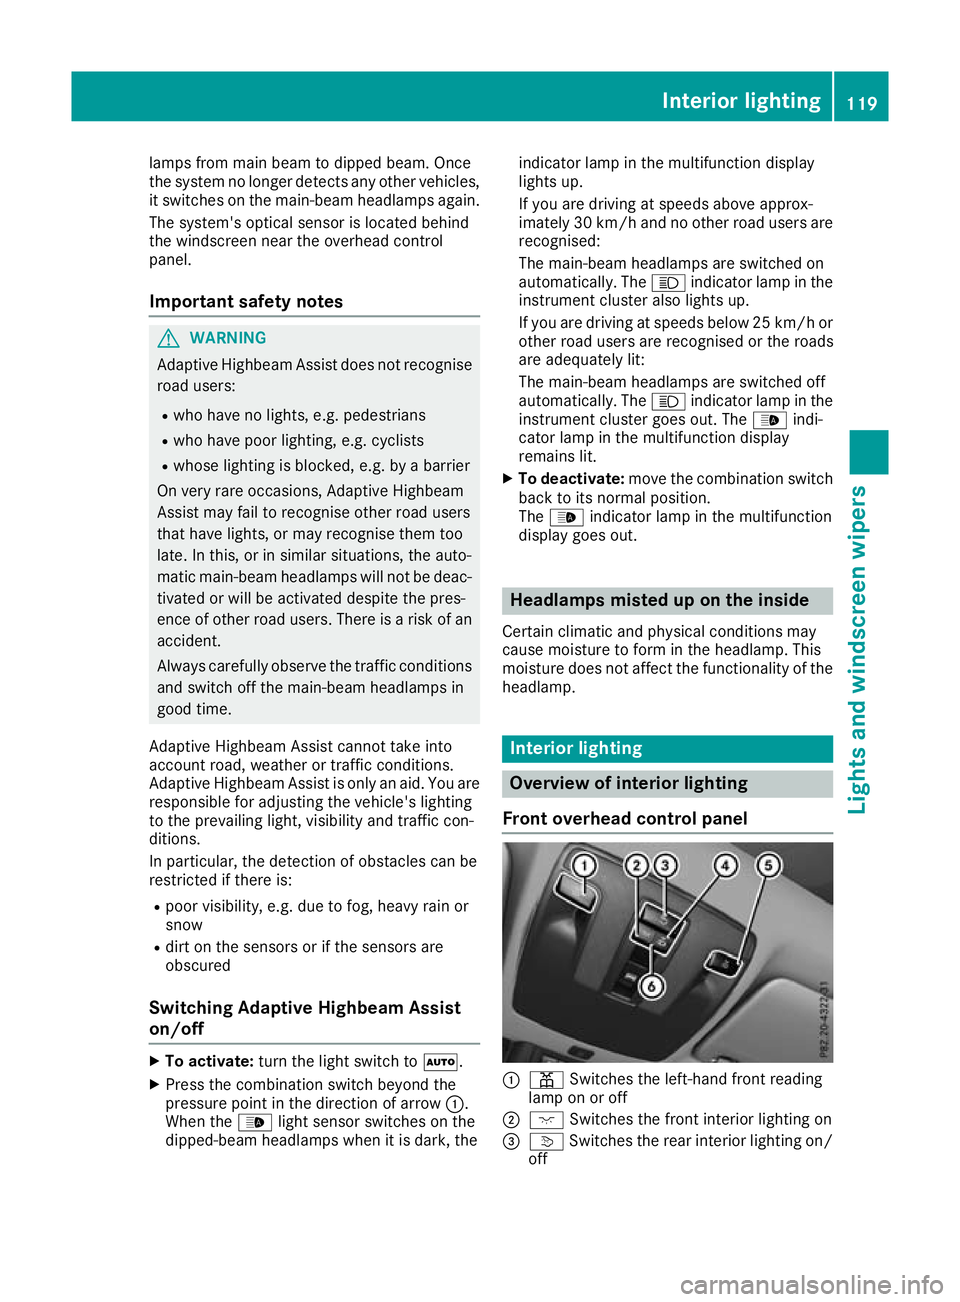
Overview of interior lighting
Front overhead control panel :
p Switches the left-hand front reading
lamp on or off
; c Switches the front interior lighting on
= v Switches the rear interior lighting on/
off Interior lighting
119Lights and windscreen wipers Z
Page 124 of 369
Protect bulbs from moisture during operation.
Do not allow bulbs to come into contact with
liquids.
Replace only the bulbs listed (Y page 121).
Have the bulbs that you cannot change yourself replaced at a qualified specialist workshop.
If you require assistance replacing bulbs, con-
sult a qualified specialist workshop.
If the new bulb still does not light up, consult a
qualified specialist workshop.
Headlamps and lights are an important aspect of
vehicle safety. You must therefore make sure
that these function correctly at all times. Have
the headlamp setting verified regularly.
Vehicles with LED headlamps: the front and
rear lamp clusters of your vehicle are equipped
with LED bulbs. Do not replace the bulbs your-
self. Contact a qualified specialist workshop
with the necessary specialist knowledge and
tools to carry out the work required. Overview of bulb types
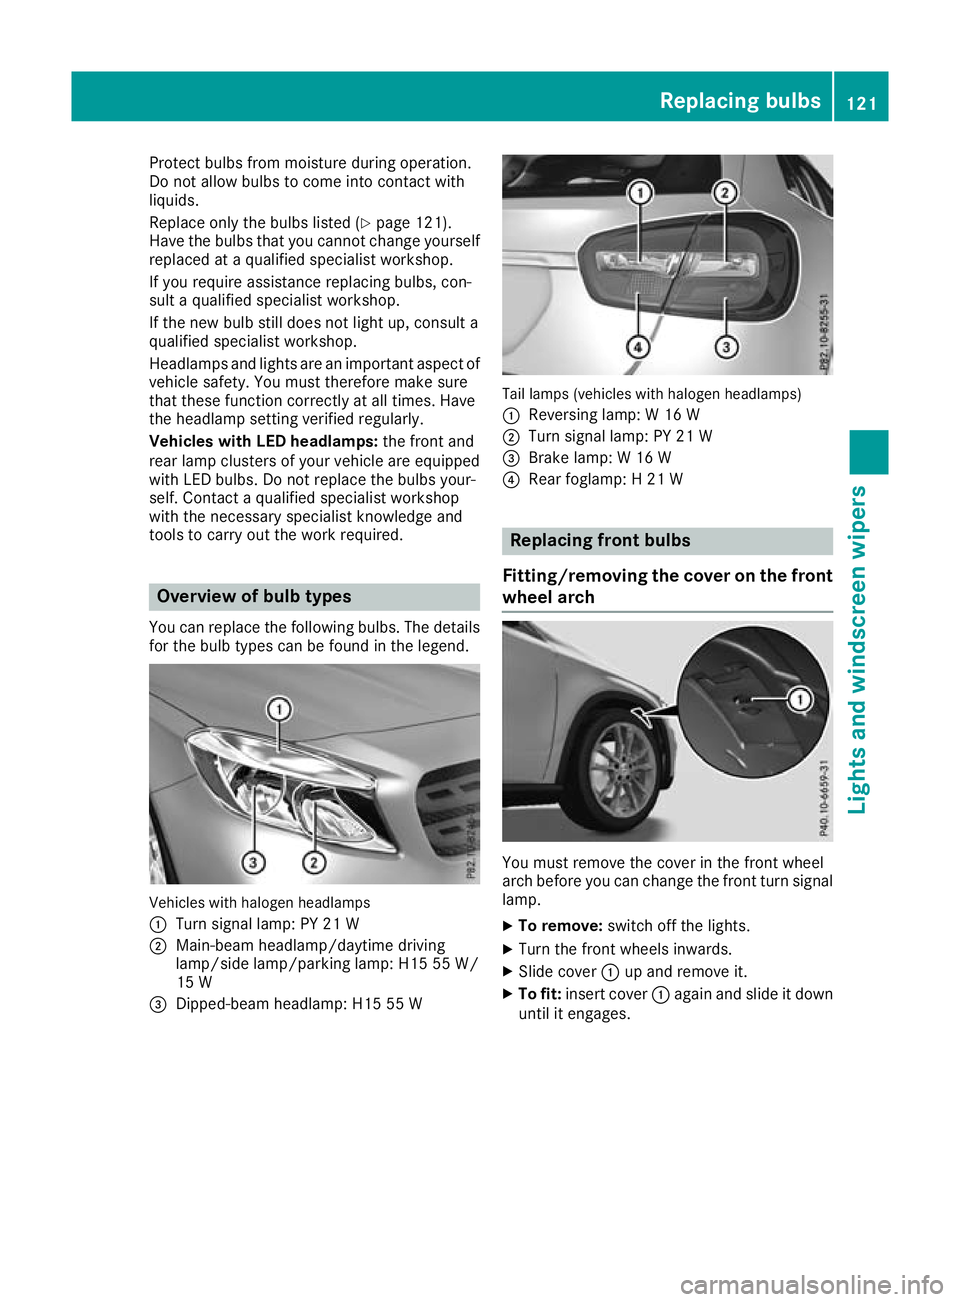
You can replace the following bulbs. The details for the bulb types can be found in the legend. Vehicles with halogen headlamps
:
Turn signal lamp: PY 21 W
; Main-beam headlamp/daytime driving
lamp/side lamp/parking lamp: H15 55 W/
15 W
= Dipped-beam headlamp: H15 55 W Tail lamps (vehicles with halogen headlamps)
: Reversing lamp: W 16 W
; Turn signal lamp: PY 21 W
= Brake lamp: W 16 W
? Rear foglamp: H 21 W Replacing front bulbs
Fitting/removing the cover on the front wheel arch You must remove the cover in the front wheel
arch before you can change the front turn signal
lamp.
X To remove: switch off the lights.
X Turn the front wheels inwards.
X Slide cover :up and remove it.
X To fit: insert cover :again and slide it down
until it engages. Replacing bulbs
121Lights and windscreen wipers Z
Page 223 of 369
~ R
Rejecting or ending a call
R Exits the telephone book/redial memory 6 R
Makes or accepts a call
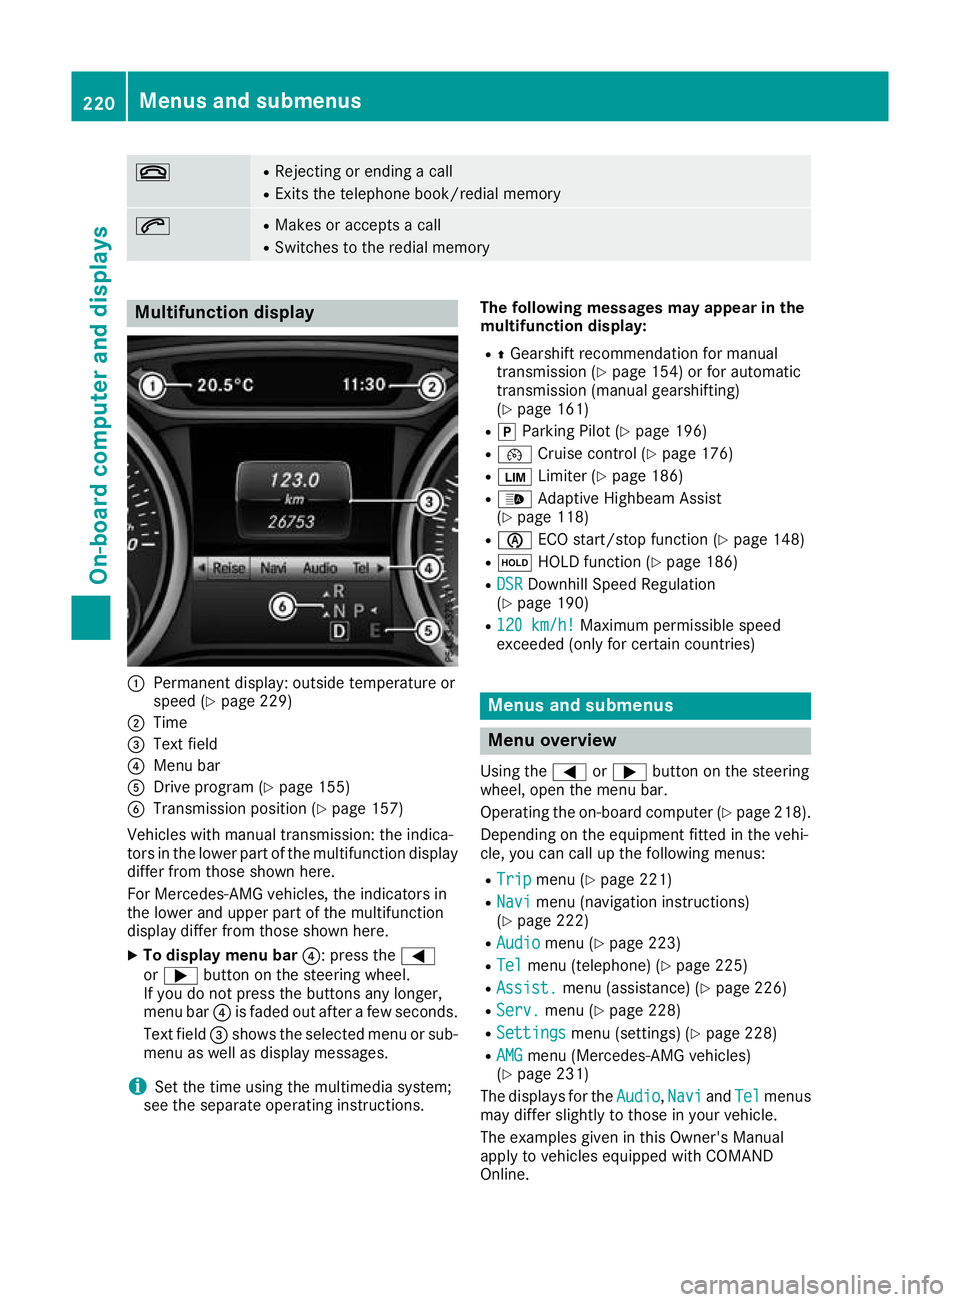
R Switches to the redial memory Multifunction display
:
Permanent display: outside temperature or
speed (Y page 229)
; Time
= Text field
? Menu bar
A Drive program (Y page 155)
B Transmission position (Y page 157)
Vehicles with manual transmission: the indica-
tors in the lower part of the multifunction display
differ from those shown here.
For Mercedes-AMG vehicles, the indicators in
the lower and upper part of the multifunction
display differ from those shown here.
X To display menu bar ?: press the=
or ; button on the steering wheel.
If you do not press the buttons any longer,
menu bar ?is faded out after a few seconds.
Text field =shows the selected menu or sub-
menu as well as display messages.
i Set the time using the multimedia system;
see the separate operating instructions. The following messages may appear in the
multifunction display:
R ZGearshift recommendation for manual
transmission (Y page 154) or for automatic
transmission (manual gearshifting)
(Y page 161)
R j Parking Pilot (Y page 196)
R ¯ Cruise control (Y page 176)
R È Limiter (Y page 186)
R _ Adaptive Highbeam Assist
(Y page 118)
R è ECO start/stop function (Y page 148)
R ë HOLD function (Y page 186)
R DSR
DSR Downhill Speed Regulation
(Y page 190)
R 120 km/h! 120 km/h! Maximum permissible speed
exceeded (only for certain countries) Menus and submenus
Menu overview
Using the =or; button on the steering
wheel, open the menu bar.
Operating the on-board computer (Y page 218).
Depending on the equipment fitted in the vehi-
cle, you can call up the following menus:
R Trip Trip menu (Y page 221)
R Navi
Navi menu (navigation instructions)
(Y page 222)
R Audio
Audio menu (Y page 223)
R Tel Tel menu (telephone) (Y page 225)
R Assist. Assist. menu (assistance) (Y page 226)
R Serv.
Serv. menu (Y page 228)
R Settings
Settings menu (settings) (Y page 228)
R AMG
AMG menu (Mercedes-AMG vehicles)
(Y page 231)
The displays for the Audio
Audio,Navi
NaviandTel
Tel menus
may differ slightly to those in your vehicle.
The examples given in this Owner's Manual
apply to vehicles equipped with COMAND
Online. 220
Menus and submenusOn-board computer and displays
Page 251 of 369
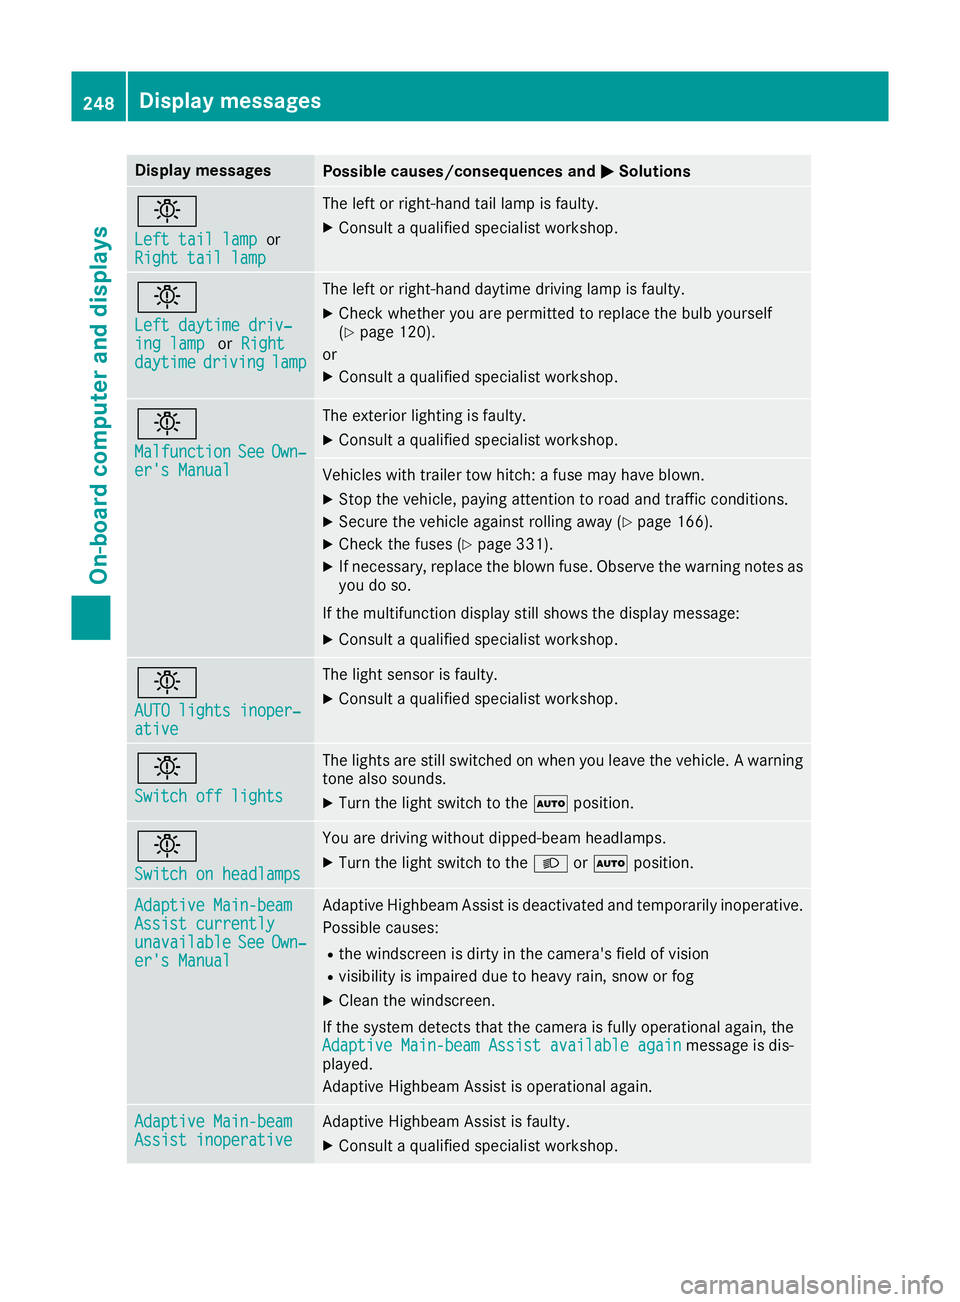
Display messages
Possible causes/consequences and
M
MSolutions b
Left tail lamp Left tail lamp
or
Right tail lamp
Right tail lamp The left or right-hand tail lamp is faulty.
X Consult a qualified specialist workshop. b
Left daytime driv‐ Left daytime driv‐
ing lamp ing lamp
orRight
Right
daytime
daytime driving
drivinglamp
lamp The left or right-hand daytime driving lamp is faulty.
X Check whether you are permitted to replace the bulb yourself
(Y page 120).
or
X Consult a qualified specialist workshop. b
Malfunction Malfunction
See
SeeOwn‐
Own‐
er's Manual
er's Manual The exterior lighting is faulty.
X Consult a qualified specialist workshop. Vehicles with trailer tow hitch: a fuse may have blown.
X Stop the vehicle, paying attention to road and traffic conditions.
X Secure the vehicle against rolling away (Y page 166).
X Check the fuses (Y page 331).
X If necessary, replace the blown fuse. Observe the warning notes as
you do so.
If the multifunction display still shows the display message: X Consult a qualified specialist workshop. b
AUTO lights inoper‐ AUTO lights inoper‐
ative ative The light sensor is faulty.
X
Consult a qualified specialist workshop. b
Switch off lights Switch off lights The lights are still switched on when you leave the vehicle. A warning
tone also sounds.
X Turn the light switch to the Ãposition. b
Switch on headlamps Switch on headlamps You are driving without dipped-beam headlamps.
X
Turn the light switch to the Lorà position. Adaptive Main-beam Adaptive Main-beam
Assist currently Assist currently
unavailable unavailable
See
SeeOwn‐
Own‐
er's Manual
er's Manual Adaptive Highbeam Assist is deactivated and temporarily inoperative.
Possible causes:
R the windscreen is dirty in the camera's field of vision
R visibility is impaired due to heavy rain, snow or fog
X Clean the windscreen.
If the system detects that the camera is fully operational again, the Adaptive Main-beam Assist available again
Adaptive Main-beam Assist available again message is dis-
played.
Adaptive Highbeam Assist is operational again. Adaptive Main-beam Adaptive Main-beam
Assist inoperative Assist inoperative Adaptive Highbeam Assist is faulty.
X
Consult a qualified specialist workshop. 248
Display
messagesOn-board computer and displays