2017 MERCEDES-BENZ GLA SUV height adjustment
[x] Cancel search: height adjustmentPage 22 of 369
Folding the backrest (rear com-
partment) forwards/back .............. 292
Seat belt
Correct usage .................................. 44
Switching belt adjustment on/off
(on-board computer) ...................... 231
Seat belts
Adjusting the driver's and front-
passenger seat bel t......................... 45
Adjusting the height ......................... 45
Cleaning ......................................... 313
Display message ............................ 242
Fastening ......................................... 45
Important safety guidelines ............. 43
Introduction ..................................... 43
Rear seat belt status indicator ......... 46
Releasing ......................................... 45
Warning lamp ................................. 265
Warning lamp (function) ................... 46
Seats
Adjusting (electrically) ................... 108
Adjusting (manually) ...................... 107
Adjusting the 4-way lumbar sup-
port ................................................ 110
Adjusting the head restraint .......... 108
Cleaning the cover ......................... 313
Important safety notes .................. 106
Seat heating problem .................... 111
Storing settings (memory func-
tion) ............................................... 115
Switching seat heating on/of f....... 110
Securing a load .................................. 293
Securing luggage ............................... 293
Selecting a gear
see Automatic transmission
Selector lever
Cleaning ......................................... 313
Sensors (cleaning instructions) ....... 311
Service Centre
see Qualified specialist workshop
Service menu (on-board com-
puter) .................................................. 228
Service message
see ASSYST PLUS
Service products
Brake fluid ..................................... 356
Coolant (engine) ............................ 356
Engine oil ....................................... 355 Fuel ................................................ 352
Important safety notes .................. 352
Washer fluid ................................... 357
Setting a speed
see Cruise control
Setting the air distribution ............... 133
Setting the airflow ............................ 134
Setting the date/time format
See also Digital Owner's Manua l... 277
Setting the language
See also Digital Owner's Manua l... 277
Setting the time
See also Digital Owner's Manua l... 277
Settings
Factory (on-board computer) ......... 231
On-board computer ....................... 228
SETUP (on-board computer,
Mercedes-AMG vehicles) .................. 232
Shifting to neutral (manual trans-
mission) ............................................. 153
Side lamps
Switching on/of f........................... 117
Side windows
Convenience closing ........................ 99
Convenience opening ...................... 98
Important safety notes .................... 97
Opening/closing .............................. 98
Problem (malfunction) ................... 100
Resetting ....................................... 100
Reversing feature ............................. 98
Sidebag ................................................ 48
SIM card
Inserting ........................................ 284
Sliding sunroof
see Panorama sliding sunroof
SMS
See also Digital Owner's Manua l... 277
Snow chains ...................................... 337
Socket
Luggage compartment ................... 299
Sockets
Centre console .............................. 299
General notes ................................ 299
Rear compartment ......................... 299
Sound
Switching on/of f........................... 278 Index
19
Page 48 of 369
arm or behind your back. If possible, adjust
the seat belt to the appropriate height.
R the lap belt is taut and passes across the lap
as low down as possible
The lap belt must always be routed across
your hip joints and never across your abdo-
men. This applies particularly to pregnant
women. If necessary, press the lap belt down
into your hip joints and pull tight with the
shoulder section of the belt.
R the seat belt is not routed across sharp, poin-
ted or fragile objects
If you have such items located on or in your
clothing, e.g. pens, keys or spectacles, store
these in a suitable place.
R only one person is using a seat belt
Infants and children must never travel sitting
on the lap of a vehicle occupant. In the event of an accident, they could be crushed
between the vehicle occupant and seat belt.
R objects are never secured with a seat belt if
the seat belt is also being used by one of the
vehicle's occupants
Also ensure that no objects are placed
between a person and the seat. e.g. a cush-
ion.
Seat belts are intended only to secure and
restrain vehicle occupants. Always observe the
"Loading guidelines" for securing objects, lug-
gage or loads (Y page 288).
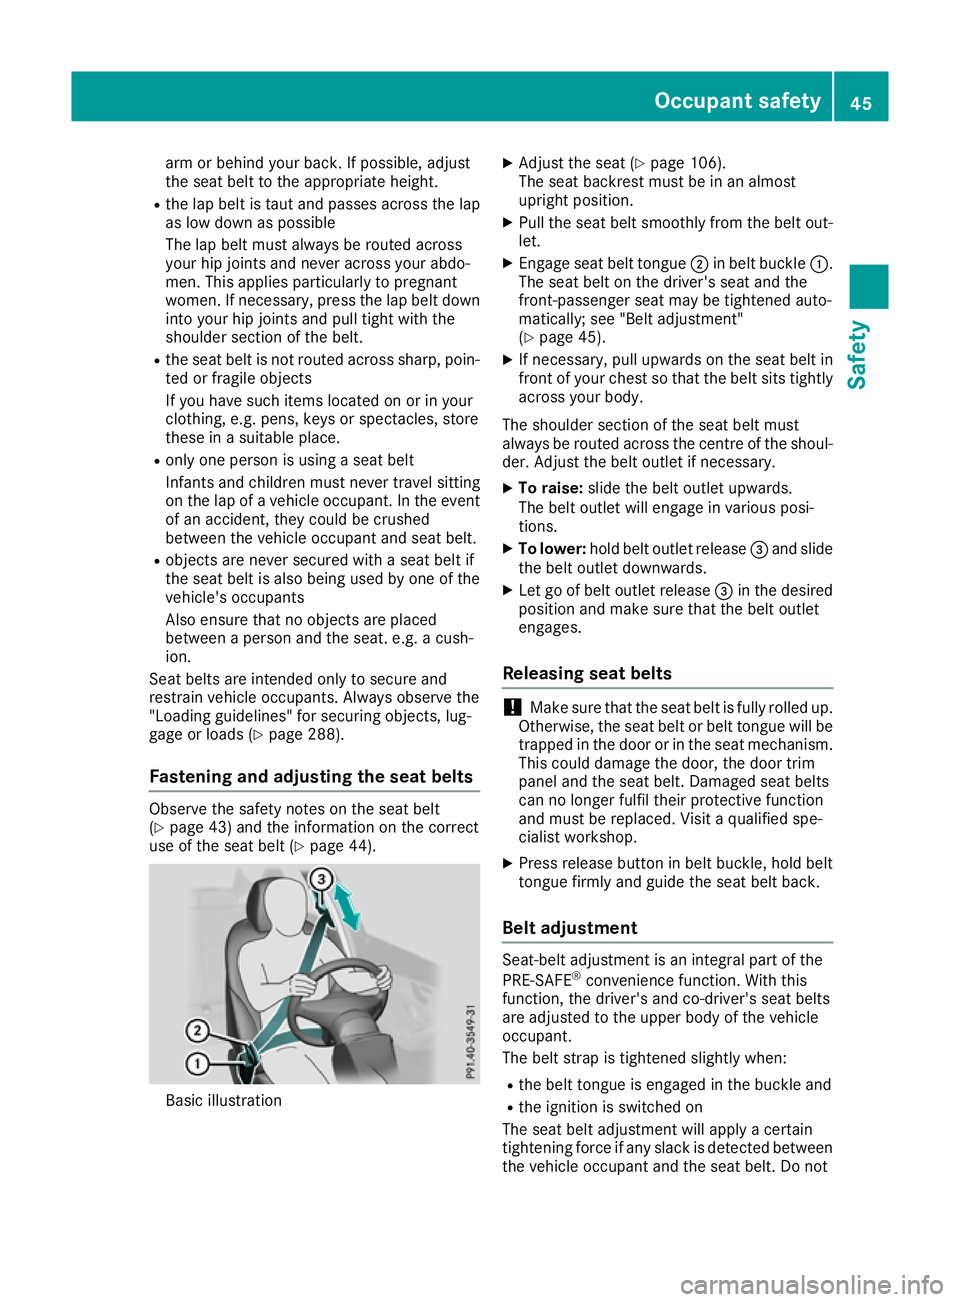
Fastening and adjusting the seat belts Observe the safety notes on the seat belt
(Y
page 43) and the information on the correct
use of the seat belt (Y page 44). Basic illustration X
Adjust the seat (Y page 106).
The seat backrest must be in an almost
upright position.
X Pull the seat belt smoothly from the belt out-
let.
X Engage seat belt tongue ;in belt buckle :.
The seat belt on the driver's seat and the
front-passenger seat may be tightened auto-
matically; see "Belt adjustment"
(Y page 45).
X If necessary, pull upwards on the seat belt in
front of your chest so that the belt sits tightly
across your body.
The shoulder section of the seat belt must
always be routed across the centre of the shoul- der. Adjust the belt outlet if necessary.
X To raise: slide the belt outlet upwards.
The belt outlet will engage in various posi-
tions.
X To lower: hold belt outlet release =and slide
the belt outlet downwards.
X Let go of belt outlet release =in the desired
position and make sure that the belt outlet
engages.
Releasing seat belts !
Make sure that the seat belt is fully rolled up.
Otherwise, the seat belt or belt tongue will be
trapped in the door or in the seat mechanism. This could damage the door, the door trim
panel and the seat belt. Damaged seat belts
can no longer fulfil their protective function
and must be replaced. Visit a qualified spe-
cialist workshop.
X Press release button in belt buckle, hold belt
tongue firmly and guide the seat belt back.
Belt adjustment Seat-belt adjustment is an integral part of the
PRE-SAFE
®
convenience function. With this
function, the driver's and co-driver's seat belts
are adjusted to the upper body of the vehicle
occupant.
The belt strap is tightened slightly when:
R the belt tongue is engaged in the buckle and
R the ignition is switched on
The seat belt adjustment will apply a certain
tightening force if any slack is detected between
the vehicle occupant and the seat belt. Do not Occupant safety
45Safety Z
Page 49 of 369
hold on to the seat belt tightly while it is adjust-
ing.
You can switch the seat belt adjustment on and off in the on-board computer (Y page 231).
Seat belt warning for the driver and
front-passenger The
7 seat belt warning lamp in the instru-
ment cluster is a reminder that all vehicle occu-
pants must wear their seat belts. It may light up
continuously or flash. In addition, a warning tone may sound.
The 7 seat belt warning lamp goes out and
the warning tone ceases when the driver and the
front passenger have fastened their seat belts.
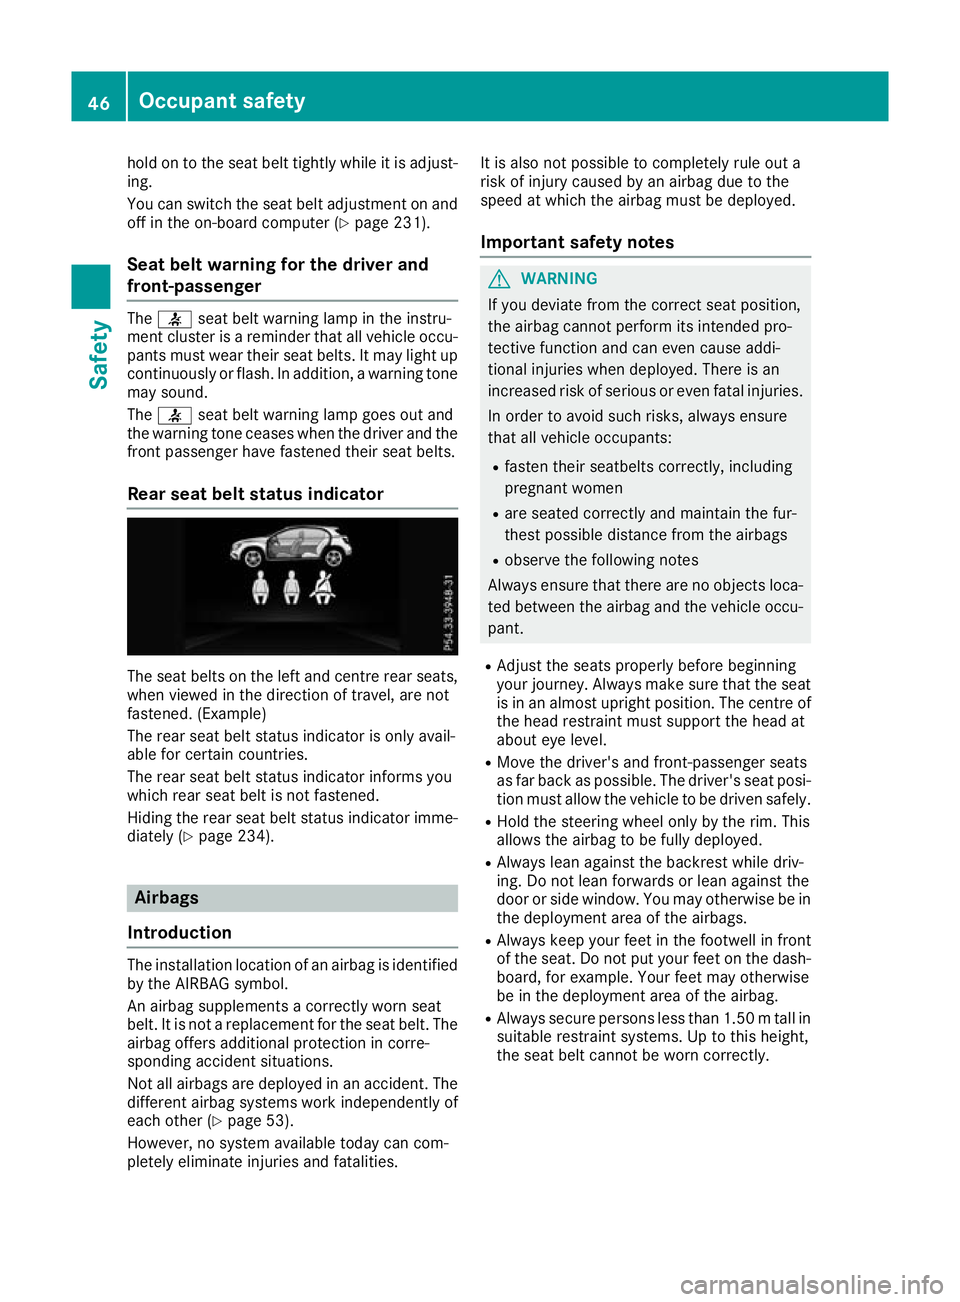
Rear seat belt status indicator The seat belts on the left and centre rear seats,
when viewed in the direction of travel, are not
fastened. (Example)
The rear seat belt status indicator is only avail-
able for certain countries.
The rear seat belt status indicator informs you
which rear seat belt is not fastened.
Hiding the rear seat belt status indicator imme- diately (Y page 234). Airbags
Introduction The installation location of an airbag is identified
by the AIRBAG symbol.
An airbag supplements a correctly worn seat
belt. It is not a replacement for the seat belt. The
airbag offers additional protection in corre-
sponding accident situations.
Not all airbags are deployed in an accident. The
different airbag systems work independently of
each other (Y page 53).
However, no system available today can com-
pletely eliminate injuries and fatalities. It is also not possible to completely rule out a
risk of injury caused by an airbag due to the
speed at which the airbag must be deployed.
Important safety notes G
WARNING
If you deviate from the correct seat position,
the airbag cannot perform its intended pro-
tective function and can even cause addi-
tional injuries when deployed. There is an
increased risk of serious or even fatal injuries.
In order to avoid such risks, always ensure
that all vehicle occupants:
R fasten their seatbelts correctly, including
pregnant women
R are seated correctly and maintain the fur-
thest possible distance from the airbags
R observe the following notes
Always ensure that there are no objects loca-
ted between the airbag and the vehicle occu-
pant.
R Adjust the seats properly before beginning
your journey. Always make sure that the seat
is in an almost upright position. The centre of
the head restraint must support the head at
about eye level.
R Move the driver's and front-passenger seats
as far back as possible. The driver's seat posi-
tion must allow the vehicle to be driven safely.
R Hold the steering wheel only by the rim. This
allows the airbag to be fully deployed.
R Always lean against the backrest while driv-
ing. Do not lean forwards or lean against the
door or side window. You may otherwise be in the deployment area of the airbags.
R Always keep your feet in the footwell in front
of the seat. Do not put your feet on the dash-
board, for example. Your feet may otherwise
be in the deployment area of the airbag.
R Always secure persons less than 1.50 mtall in
suitable restraint systems. Up to this height,
the seat belt cannot be worn correctly. 46
Occupant safetySafety
Page 59 of 369
about the convenience function can be found
under "Belt adjustment" (Y page 45).Automatic measures after an acci-
dent
Immediately after an accident, the following
measures may be implemented, depending on
the type and severity of the impact:
R the hazard warning lamps are activated
R the emergency lighting is activated
R the vehicle doors are unlocked
R the front side windows are lowered
R the engine is switched off and the fuel supply
is cut off
R vehicles with the Mercedes-Benz emergency
call system: automatic emergency call Children in the vehicle
Important safety notes
Accident statistics show that children secured
on the rear seats are safer than children secured
on the front-passenger seat. For this reason,
Mercedes-Benz strongly advises that you install the child restraint system on a rear seat. Chil-
dren are generally better protected there.
If a child younger than twelve years old and
under 1.50 m in height is travelling in the vehi-
cle:
R always secure the child in a child restraint
system suitable for Mercedes-Benz vehicles.
The child restraint system must be appropri-
ate to the age, weight and size of the child.
R be sure to observe the instructions and safety
notes in this section in addition to the child
restraint system manufacturer's installation
instructions.
R be sure to observe the instructions and safety
notes on the automatic front-passenger front
airbag deactivation system (Y page 49). G
WARNING
If you leave children unattended in the vehi-
cle, they may be able to set the vehicle in
motion if, for example, they:
R release the parking brake
R shift the automatic transmission out of park
position Por shift manual transmission into
neutral
R start the engine
In addition, they may operate vehicle equip-
ment and become trapped. There is a risk of
an accident and injury.
When leaving the vehicle, always take the key with you and lock the vehicle. Never leave
children unattended in the vehicle. G
WARNING
If persons (particularly children) are exposed
to heat or cold for a prolonged period, there is a risk of serious or even fatal injuries. Never
leave persons (particularly children) unatten-
ded in the vehicle. G
WARNING
If the child restraint system is placed in direct sunlight, the parts could become very hot.
Children could be suffer burns by touching
these parts, in particular on the metallic parts
of the child restraint system. There is a risk of injury.
If you and your child leave the vehicle, always
make sure that the child restraint system is
not in direct sunlight. Cover it with a blanket, for example. If the child restraint system has
been exposed to direct sunlight, leave it to
cool down before securing the child in it.
Never leave children unattended in the vehi-
cle.
Always ensure that all vehicle occupants have
their seat belts fastened correctly and are sitting
properly. Particular attention must be paid to
children.
Observe the safety notes on the seat belt
(Y page 43) and the information on the correct
use of the seat belt (Y page 44).56
Children in the vehicleSafety
Page 110 of 369
G
WARNING
If the driver's seat is not correctly engaged, it could unexpectedly move while driving. This
could cause you to lose control of the vehicle. There is a risk of an accident.
Always ensure that the driver's seat is
engaged before starting the vehicle. G
WARNING
You could lose control of the vehicle while
driving if you:
R adjust the driver's seat, steering wheel or
mirrors
R fasten the seat belt
There is a risk of an accident.
Adjust the driver's seat, head restraint, steer-
ing wheel and mirrors and fasten your seat
belt before starting the engine. G
WARNING
If you adjust the seat height carelessly, you or other vehicle occupants could be trapped andthereby injured. Children in particular could
accidentally press the electrical seat adjust-
ment buttons and become trapped. There is a
risk of injury.
While moving the seats, make sure that your
hands or other body parts do not get under the
lever assembly of the seat adjustment sys-
tem.
! To avoid damage to the seats and the seat
heating, observe the following information:
R do not spill any liquids on the seats. If liquid
is spilled on the seats, dry them as soon aspossible.
R if the seat covers are damp or wet, do not
switch on the seat heating. The seat heat-
ing should also not be used to dry the seats.
R clean the seat covers as recommended;
see the "Interior care" section.
R do not transport heavy loads on the seats.
Do not place sharp objects on the seat
cushions, e.g. knives, nails or tools. The seats should only be occupied by passen-
gers, if possible.
R when the seat heating is in operation, do
not cover the seats with insulating materi-
als, e.g. blankets, coats, bags, seat covers,
child seats or booster seats.
! Make sure that there are no objects in the
footwell under or behind the seats when mov-
ing the seats back. There is a risk that the
seats and/or the objects could be damaged.
i Further related subjects:
R Luggage compartment enlargement (fold-
ing down the rear seats) (Y page 291) Adjusting the seats manually
Vehicles without the seating comfort
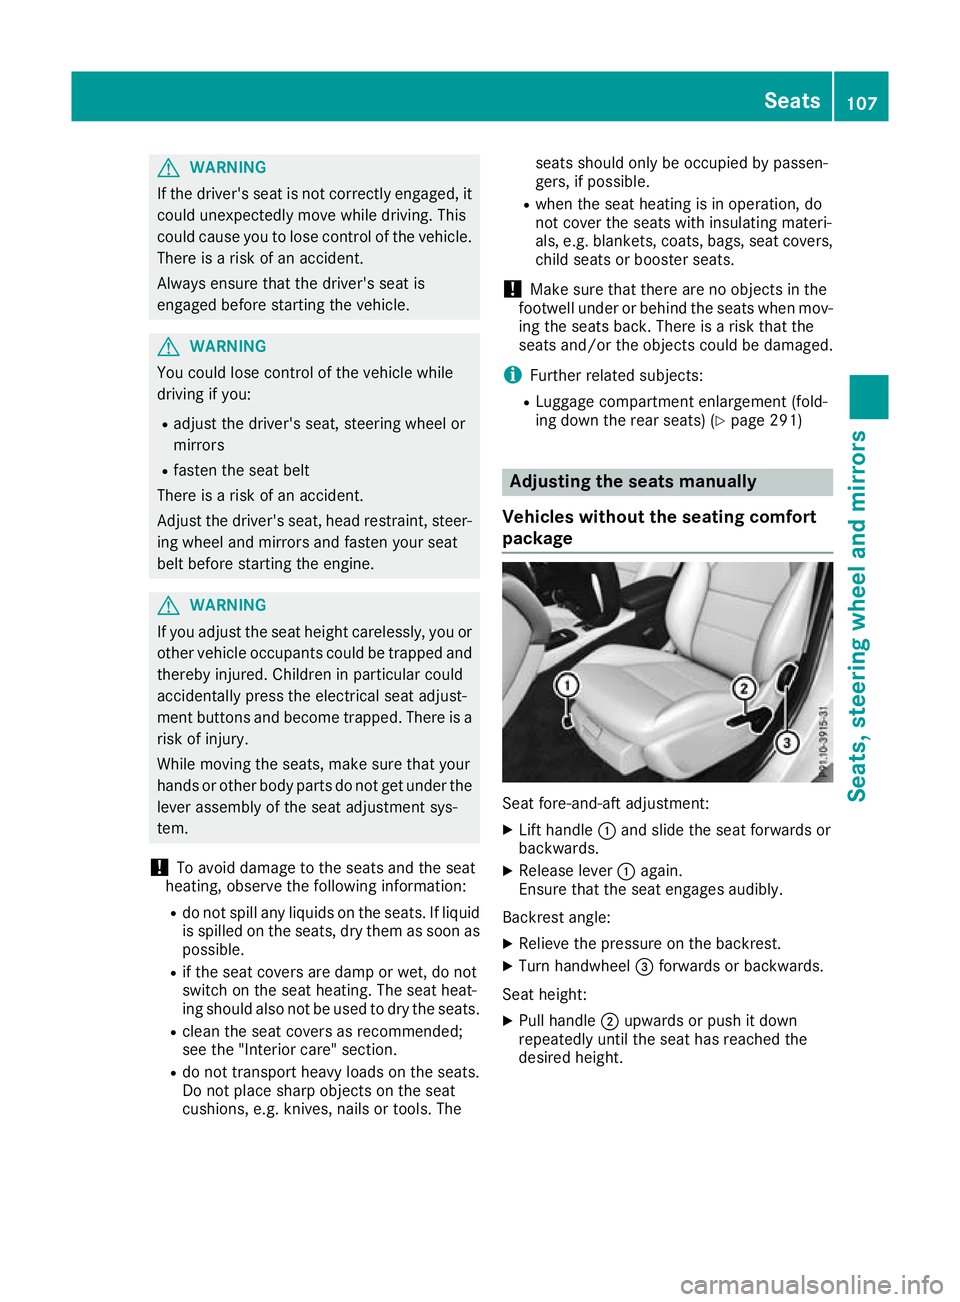
package Seat fore-and-aft adjustment:
X
Lift handle :and slide the seat forwards or
backwards.
X Release lever :again.
Ensure that the seat engages audibly.
Backrest angle:
X Relieve the pressure on the backrest.
X Turn handwheel =forwards or backwards.
Seat height: X Pull handle ;upwards or push it down
repeatedly until the seat has reached the
desired height. Seats
107Seats, steering wheel and mirrors Z
Page 111 of 369
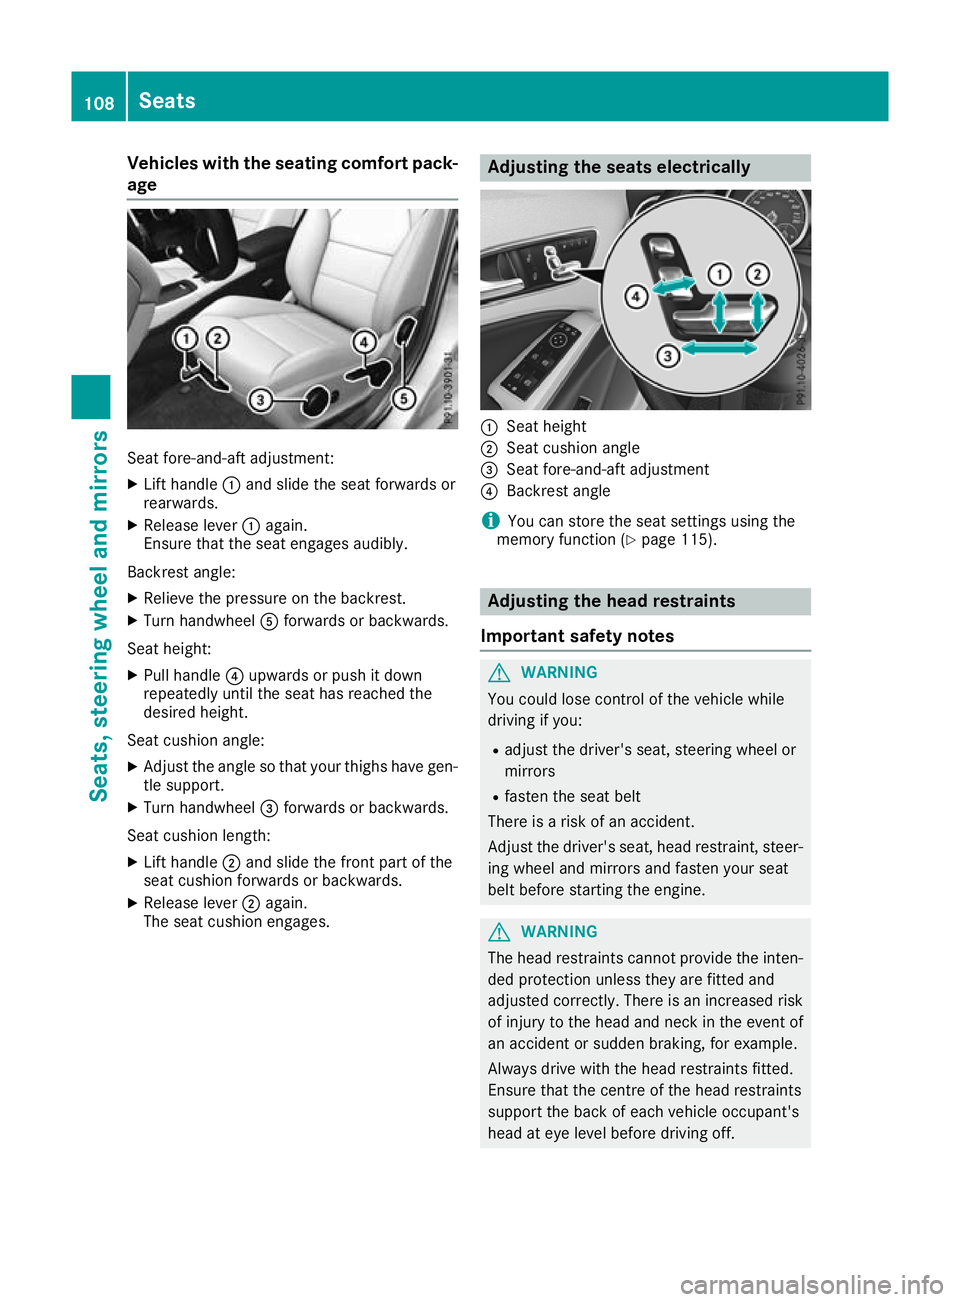
Vehicles with the seating comfort pack-
age Seat fore-and-aft adjustment:
X Lift handle :and slide the seat forwards or
rearwards.
X Release lever :again.
Ensure that the seat engages audibly.
Backrest angle:
X Relieve the pressure on the backrest.
X Turn handwheel Aforwards or backwards.
Seat height: X Pull handle ?upwards or push it down
repeatedly until the seat has reached the
desired height.
Seat cushion angle:
X Adjust the angle so that your thighs have gen-
tle support.
X Turn handwheel =forwards or backwards.
Seat cushion length: X Lift handle ;and slide the front part of the
seat cushion forwards or backwards.
X Release lever ;again.
The seat cushion engages. Adjusting the seats electrically
:
Seat height
; Seat cushion angle
= Seat fore-and-aft adjustment
? Backrest angle
i You can store the seat settings using the
memory function (Y page 115). Adjusting the head restraints
Important safety notes G
WARNING
You could lose control of the vehicle while
driving if you:
R adjust the driver's seat, steering wheel or
mirrors
R fasten the seat belt
There is a risk of an accident.
Adjust the driver's seat, head restraint, steer-
ing wheel and mirrors and fasten your seat
belt before starting the engine. G
WARNING
The head restraints cannot provide the inten-
ded protection unless they are fitted and
adjusted correctly. There is an increased risk of injury to the head and neck in the event of
an accident or sudden braking, for example.
Always drive with the head restraints fitted.
Ensure that the centre of the head restraints
support the back of each vehicle occupant's
head at eye level before driving off. 108
SeatsSeats, steering
wheel and mirrors
Page 115 of 369
:
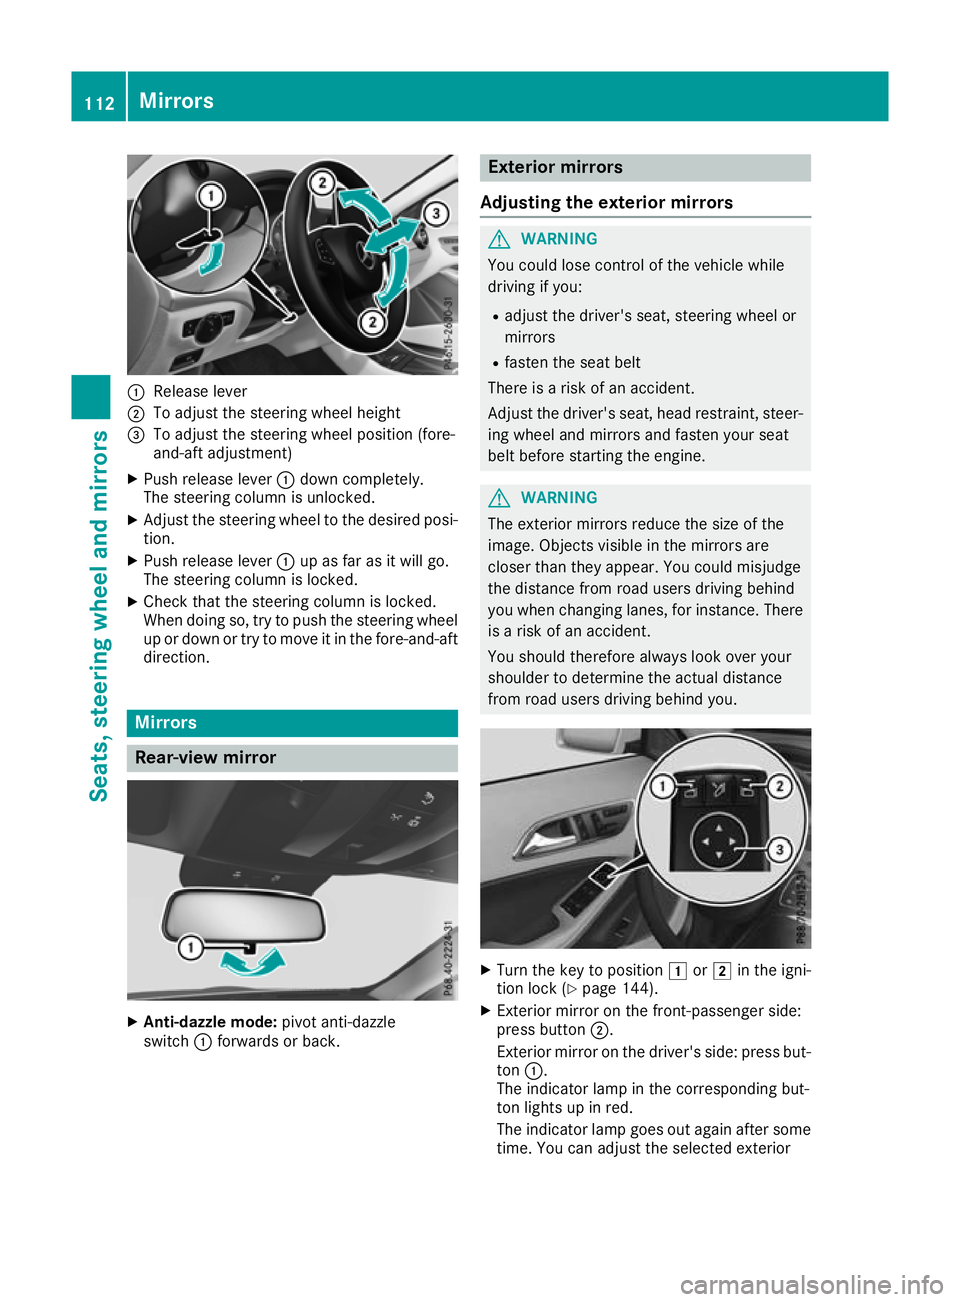
Release lever
; To adjust the steering wheel height
= To adjust the steering wheel position (fore-
and-aft adjustment)
X Push release lever :down completely.
The steering column is unlocked.
X Adjust the steering wheel to the desired posi-
tion.
X Push release lever :up as far as it will go.
The steering column is locked.
X Check that the steering column is locked.
When doing so, try to push the steering wheel
up or down or try to move it in the fore-and-aft
direction. Mirrors
Rear-view mirror
X
Anti-dazzle mode: pivot anti-dazzle
switch :forwards or back. Exterior mirrors
Adjusting the exterior mirrors G
WARNING
You could lose control of the vehicle while
driving if you:
R adjust the driver's seat, steering wheel or
mirrors
R fasten the seat belt
There is a risk of an accident.
Adjust the driver's seat, head restraint, steer-
ing wheel and mirrors and fasten your seat
belt before starting the engine. G
WARNING
The exterior mirrors reduce the size of the
image. Objects visible in the mirrors are
closer than they appear. You could misjudge
the distance from road users driving behind
you when changing lanes, for instance. There is a risk of an accident.
You should therefore always look over your
shoulder to determine the actual distance
from road users driving behind you. X
Turn the key to position 1or2 in the igni-
tion lock (Y page 144).
X Exterior mirror on the front-passenger side:
press button ;.
Exterior mirror on the driver's side: press but-
ton :.
The indicator lamp in the corresponding but-
ton lights up in red.
The indicator lamp goes out again after some
time. You can adjust the selected exterior 112
MirrorsSeats
, steering wheel and mirrors