2017 MERCEDES-BENZ GLA SUV reset
[x] Cancel search: resetPage 8 of 369
Anti-lock braking system
see ABS (Anti-lock Braking System)
Anti-skid chains
see Snow chains
Anti-Theft Alarm system
see ATA (Anti-Theft Alarm system)
Anticipatory occupant protection
see PRE-SAFE ®
(anticipatory
occupant protection)
Approach/departure angle .............. 175
Aquaplaning ...................................... .172
Ashtray ............................................... 298
Assistance display (on-board com-
puter) ................................................. .226
Assistance menu (on-board com-
puter) ................................................. .226
ASSYST PLUS
Displaying a service message ....... .307
Driving abroad ............................... 307
Hiding a service message .............. 307
Information about Service ............. 307
Resetting the service interval dis-
pla y................................................ 307
Service message ............................ 306
Special service requirements ......... 307
ATA (Anti-Theft Alarm system)
Activating/deactivating ................... 76
Function ........................................... 76
Switching off the alarm .................... 76
ATTENTION ASSIST
Activating/deactivating ................. 227
Display message ............................ 252
Function/note s............................. 206
Audio 20
Driving dynamics display ............... 192
Audio menu (on-board computer) .... 223
Authorised workshop
see Qualified specialist workshop
AUTO lights
Display message ............................ 248
see Lights
Automatic engine start (ECO start/
stop function) .................................... 149
Automatic engine switch-off (ECO
start/stop function) .......................... 148 Automatic front-passenger front
airbag deactivation
Display message ............................ 244
Automatic front-passenger front
airbag deactivation system
Operation ......................................... 49
Problems ......................................... 53
System self-test ............................... 52
Automatic headlamp mode .............. 116
Automatic transmission
Accelerator pedal position ............. 158
Changing gear ............................... 158
DIRECT SELECT lever ..................... 155
Drive program display .................... 155
Drive programs .............................. 159
Driving tip s.................................... 158
DYNAMIC SELECT button (all vehi- cles except Mercedes-AMG vehi-
cles) ............................................... 151
DYNAMIC SELECT controller
(Mercedes-AMG vehicles) .............. 152
Emergency running mode .............. 163
Engaging drive position .................. 156
Engaging neutral ............................ 156
Engaging park position
(Mercedes-AMG vehicles) .............. 157
Engaging park position automati-
cally ............................................... 155
Engaging reverse gear ................... 156
Engaging the park position ............ 155
Gliding mod e................................. 159
Holding the vehicle stationary on
uphill gradients .............................. 158
Kickdown ....................................... 158
Manual shifting .............................. 161
Oil temperature (on-board com-
puter, Mercedes-AMG vehicles) ..... 231
Overview ........................................ 154
Problem (fault) ............................... 163
Pulling away ................................... 146
Selector lever ................................ 156
Starting the engine ........................ 146
Steering wheel gearshift paddle s... 161
Trailer towing ................................. 159
Transmission position display ........ 157
Transmission position display
(DIRECT SELECT lever) ................... 155
Transmission positions .................. 157 Index
5
Page 14 of 369
Emergency key
Unlocking the driver's door .............. 88
Emergency key element
Function/notes ................................ 81
Inserting .......................................... 82
Locking vehicle ................................ 88
Removing ........................................ .82
Emergency release
Driver's door .................................... 88
Emergency spare wheel
General notes ................................ 348
Important safety notes .................. 348
Removing ...................................... .348
Emergency unlocking
Vehicle ............................................. 88
Engine
Display message ............................ 249
ECO start/stop function ................ 148
Engine number ............................... 352
Jump-starting ................................. 325
Running irregularl y......................... 150
Starting (important safety notes )... 145
Starting problems .......................... 150
Starting the engine with the key .... 146
Starting with the Start/Stop but-
ton ................................................. 146
Stopping ........................................ 166
Tow-starting (vehicle) ..................... 331
Warning lamp (engine diagnos-
tics) ............................................... 272
Engine electronics
Notes ............................................. 350
Problem (fault) ............................... 150
Engine oil
Additives ........................................ 356
Checking the oil level ..................... 304
Checking the oil level using the
dipstick .......................................... 304
Display message ............................ 250
Filling capacity ............................... 356
Notes about oil grade s................... 355
Notes on oil level/consumption .... 304
Temperature (on-board computer, Mercedes-AMG vehicles) ............... 231
Topping up ..................................... 305
Engine oil additives
see Additives (engine oil) Entering an address
See also Digital Owner's Manua l... 277
Environmental protection
Returning an end-of-life vehicle ....... 26
ESC (Electronic Stability Control)
see ESP ®
(Electronic Stability Program)
ESP ®
(Electronic Stability Pro-
gram)
Activating/deactivating (on-
board computer) ............................ 266
AMG menu (on-board computer) ... 232
Characteristics ................................. 72
Deactivating/activating (button
in Mercedes-AMG vehicles) ............. 73
Deactivating/activating (except
Mercedes‑ AMG vehicles) ................. 73
Deactivating/activating (on-
board computer, except
Mercedes-AMG vehicles) ............... 227
Display message ............................ 235
Function/note s................................ 72
General notes .................................. 72
Important safety guidelines ............. 72
Trailer stabilisation .......................... 75
Warning lamp ................................. 269
ETS/4ETS (Electronic Traction Sys-
tem) ...................................................... 72
Exhaust
see Exhaust pipe
Exhaust pipe
Cleaning ......................................... 312
Exterior lighting
Cleaning ......................................... 311
see Lights
Exterior mirrors
Adjusting ....................................... 112
Anti-dazzle mode (automatic) ........ 113
Folding in when locking (on-boardcomputer) ...................................... 231
Folding in/out (automatically )....... 113
Folding in/out (electrically) ........... 113
Out of position (troubleshooting) ... 113
Parking position ............................. 114
Resetting ....................................... 113
Storing settings (memory func-
tion) ............................................... 115 Index
11
Page 22 of 369
Folding the backrest (rear com-
partment) forwards/back .............. 292
Seat belt
Correct usage .................................. 44
Switching belt adjustment on/off
(on-board computer) ...................... 231
Seat belts
Adjusting the driver's and front-
passenger seat bel t......................... 45
Adjusting the height ......................... 45
Cleaning ......................................... 313
Display message ............................ 242
Fastening ......................................... 45
Important safety guidelines ............. 43
Introduction ..................................... 43
Rear seat belt status indicator ......... 46
Releasing ......................................... 45
Warning lamp ................................. 265
Warning lamp (function) ................... 46
Seats
Adjusting (electrically) ................... 108
Adjusting (manually) ...................... 107
Adjusting the 4-way lumbar sup-
port ................................................ 110
Adjusting the head restraint .......... 108
Cleaning the cover ......................... 313
Important safety notes .................. 106
Seat heating problem .................... 111
Storing settings (memory func-
tion) ............................................... 115
Switching seat heating on/of f....... 110
Securing a load .................................. 293
Securing luggage ............................... 293
Selecting a gear
see Automatic transmission
Selector lever
Cleaning ......................................... 313
Sensors (cleaning instructions) ....... 311
Service Centre
see Qualified specialist workshop
Service menu (on-board com-
puter) .................................................. 228
Service message
see ASSYST PLUS
Service products
Brake fluid ..................................... 356
Coolant (engine) ............................ 356
Engine oil ....................................... 355 Fuel ................................................ 352
Important safety notes .................. 352
Washer fluid ................................... 357
Setting a speed
see Cruise control
Setting the air distribution ............... 133
Setting the airflow ............................ 134
Setting the date/time format
See also Digital Owner's Manua l... 277
Setting the language
See also Digital Owner's Manua l... 277
Setting the time
See also Digital Owner's Manua l... 277
Settings
Factory (on-board computer) ......... 231
On-board computer ....................... 228
SETUP (on-board computer,
Mercedes-AMG vehicles) .................. 232
Shifting to neutral (manual trans-
mission) ............................................. 153
Side lamps
Switching on/of f........................... 117
Side windows
Convenience closing ........................ 99
Convenience opening ...................... 98
Important safety notes .................... 97
Opening/closing .............................. 98
Problem (malfunction) ................... 100
Resetting ....................................... 100
Reversing feature ............................. 98
Sidebag ................................................ 48
SIM card
Inserting ........................................ 284
Sliding sunroof
see Panorama sliding sunroof
SMS
See also Digital Owner's Manua l... 277
Snow chains ...................................... 337
Socket
Luggage compartment ................... 299
Sockets
Centre console .............................. 299
General notes ................................ 299
Rear compartment ......................... 299
Sound
Switching on/of f........................... 278 Index
19
Page 25 of 369
Traction system
see ETS/4ETS (Electronic Trac-
tion System)
Traffic Sign Assist
Activating ....................................... 208
Activating/deactivating the warn-ing function .................................... 226
Display message ............................ 254
Function/note s............................. 207
Important safety notes .................. 208
Instrument cluster display ............. 208
Trailer
Folding the ball coupling in/out ..... 214
Trailer coupling
see Towing a trailer
Trailer towing
7-pin connecto r............................. 216
Blind Spot Assist ............................ 210
Cleaning the trailer tow hitch ......... 312
Coupling up a traile r...................... 215
Decoupling a traile r....................... 215
Driving tips .................................... 213
Folding in the ball coupling ............ 215
Folding out the ball coupling .......... 214
Important safety notes .................. 212
Lights display message .................. 246
Power supply ................................. 215
Trailer load s................................... 359
Transmission
see Automatic transmission
see Manual transmission
Transmission position display
(DIRECT SELECT lever) ...................... 155
Transporting the vehicle .................. 330
Travelling uphill
Brow of hill ..................................... 175
Driving downhill ............................. 176
Maximum gradient-climbing capa-
bility ............................................... 175
Trim pieces (cleaning instruc-
tions) .................................................. 313
Trip computer (on-board com-
puter) .................................................. 221
Trip meter
Calling up ....................................... 221
Resetting (on-board computer) ...... 222
Turn signal lamp
Replacing bulbs (rear) .................... 123 Turn signals
Replacing bulbs (front) ................... 122
Switching on/of f........................... 118
TV
Operating (on-board computer) ..... 224
see Separate operating instructions
Two-way radio
Frequencies ................................... 350
Installation ..................................... 350
Transmission output (maximum) .... 350
Type identification plate
see Vehicle identification plate
Tyre inflation compressor
see TIREFIT kit
Tyre pressure
Calling up (on-board computer) ..... 340
Display message ............................ 256
Not reached (TIREFIT) .................... 321
Reached (TIREFIT) .......................... 321
Recommended ............................... 337
Tyre pressure loss warning
General notes ................................ 339
Important safety notes .................. 339
Restarting ...................................... 339
Tyre pressure monitor
Checking the tyre pressure elec-
tronically ........................................ 340
Function/note s............................. 340
General notes ................................ 340
Important safety notes .................. 340
Radio type approval for the tyre
pressure monitor ........................... 342
Restarting ...................................... 341
Warning lamp ................................. 276
Warning message .......................... 341
Tyres
Changing a whee l.......................... 342
Checking ........................................ 334
Direction of rotation ...................... 343
Display message ............................ 256
General notes ................................ 347
Important safety notes .................. 334
Information on driving .................... 334
M+S tyres ...................................... 336
MOExtended tyre s......................... 336
Replacing ....................................... 342
Service life ..................................... 335
Storing ........................................... 343 22
Index
Page 32 of 369
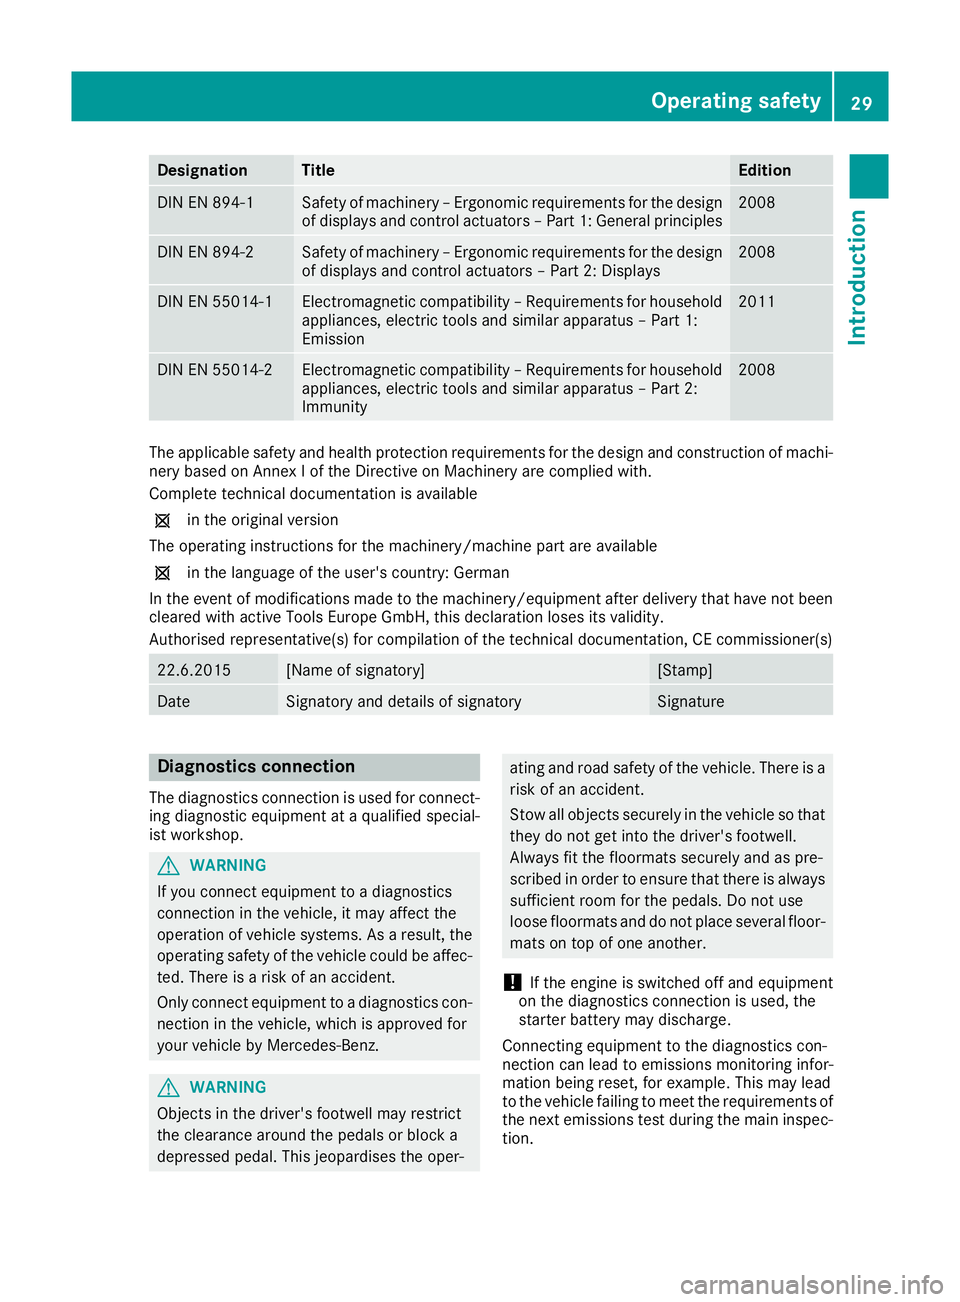
Designation Title Edition
DIN EN 894-1 Safety of machinery – Ergonomic requirements for the design
of displays and control actuators – Part 1: General principles 2008
DIN EN 894-2 Safety of machinery – Ergonomic requirements for the design
of displays and control actuators – Part 2: Displays 2008
DIN EN 55014-1 Electromagnetic compatibility – Requirements for household
appliances, electric tools and similar apparatus – Part 1:
Emission 2011
DIN EN 55014-2 Electromagnetic compatibility – Requirements for household
appliances, electric tools and similar apparatus – Part 2:
Immunity 2008
The applicable safety and health protection requirements for the design and construction of machi-
nery based on Annex I of the Directive on Machinery are complied with.
Complete technical documentation is available
1 in the original version
The operating instructions for the machinery/machine part are available
1 in the language of the user's country: German
In the event of modifications made to the machinery/equipment after delivery that have not been cleared with active Tools Europe GmbH, this declaration loses its validity.
Authorised representative(s) for compilation of the technical documentation, CE commissioner(s) 22.6.2015 [Name of signatory] [Stamp]
Date Signatory and details of signatory Signature
Diagnostics connection
The diagnostics connection is used for connect- ing diagnostic equipment at a qualified special-
ist workshop. G
WARNING
If you connect equipment to a diagnostics
connection in the vehicle, it may affect the
operation of vehicle systems. As a result, the operating safety of the vehicle could be affec-
ted. There is a risk of an accident.
Only connect equipment to a diagnostics con-
nection in the vehicle, which is approved for
your vehicle by Mercedes-Benz. G
WARNING
Objects in the driver's footwell may restrict
the clearance around the pedals or block a
depressed pedal. This jeopardises the oper- ating and road safety of the vehicle. There is a
risk of an accident.
Stow all objects securely in the vehicle so that
they do not get into the driver's footwell.
Always fit the floormats securely and as pre-
scribed in order to ensure that there is always sufficient room for the pedals. Do not use
loose floormats and do not place several floor-mats on top of one another.
! If the engine is switched off and equipment
on the diagnostics connection is used, the
starter battery may discharge.
Connecting equipment to the diagnostics con-
nection can lead to emissions monitoring infor-
mation being reset, for example. This may lead
to the vehicle failing to meet the requirements of
the next emissions test during the main inspec- tion. Operating safety
29Introduction Z
Page 101 of 369
G
WARNING
If children operate the side windows they
could become trapped, particularly if they are left unsupervised. There is a risk of injury.
Activate the override feature for the rear side
windows. When leaving the vehicle, always
take the key with you and lock the vehicle.
Never leave children unattended in the vehi-
cle. Side window reversing feature
The side windows are equipped with an auto-
matic reversing feature. If a solid object blocks
or restricts a side window from travelling
upwards during the automatic closing process,
the side window opens again automatically. Dur-
ing the manual closing process, the side window
only opens again automatically after the corre-
sponding switch is released. The automatic
reversing feature is only an aid and is no substi- tute for your attention when closing a side win-
dow. G
WARNING
The reversing function does not react:
R to soft, light and thin objects, e.g. small fin-
gers
R while resetting
This means that the reversing feature cannot
prevent someone being trapped in these sit-
uations. There is a risk of injury.
When closing, make sure that no parts of the
body are in the closing area. If someone
becomes trapped, press the switch to open
the side window again. Opening and closing the side win-
dows
The switches for all side windows are located on
the driver's door. There is also a switch on each door for the corresponding side window.
The switches on the driver's door take prece-
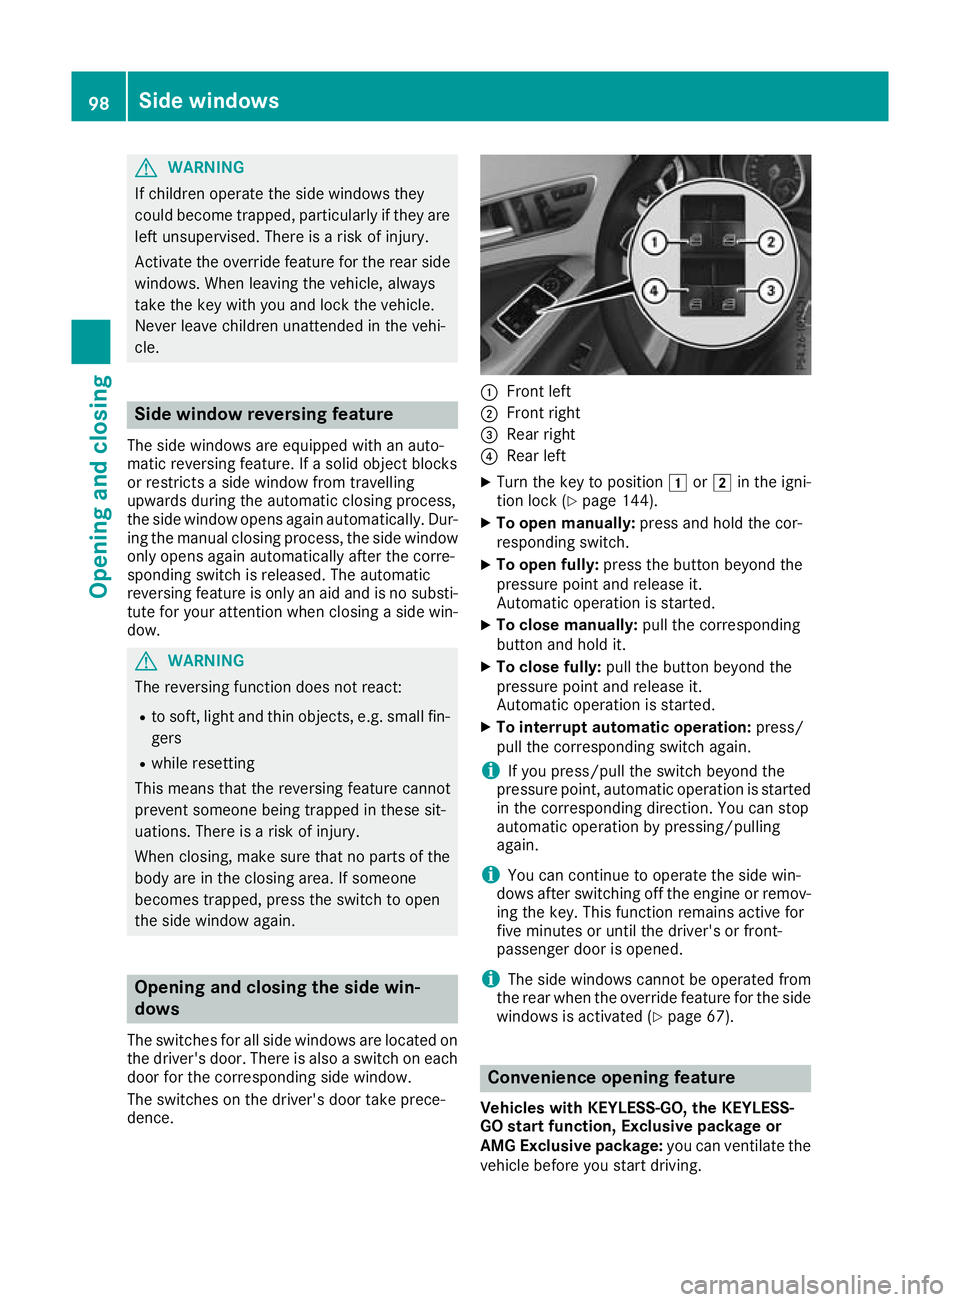
dence. :
Front left
; Front right
= Rear right
? Rear left
X Turn the key to position 1or2 in the igni-
tion lock (Y page 144).
X To open manually: press and hold the cor-
responding switch.
X To open fully: press the button beyond the
pressure point and release it.
Automatic operation is started.
X To close manually: pull the corresponding
button and hold it.
X To close fully: pull the button beyond the
pressure point and release it.
Automatic operation is started.
X To interrupt automatic operation: press/
pull the corresponding switch again.
i If you press/pull the switch beyond the
pressure point, automatic operation is started
in the corresponding direction. You can stop
automatic operation by pressing/pulling
again.
i You can continue to operate the side win-
dows after switching off the engine or remov-
ing the key. This function remains active for
five minutes or until the driver's or front-
passenger door is opened.
i The side windows cannot be operated from
the rear when the override feature for the side
windows is activated (Y page 67). Convenience opening feature
Vehicles with KEYLESS-GO, the KEYLESS-
GO start function, Exclusive package or
AMG Exclusive package: you can ventilate the
vehicle before you start driving. 98
Side windowsOpening and closing
Page 103 of 369
X
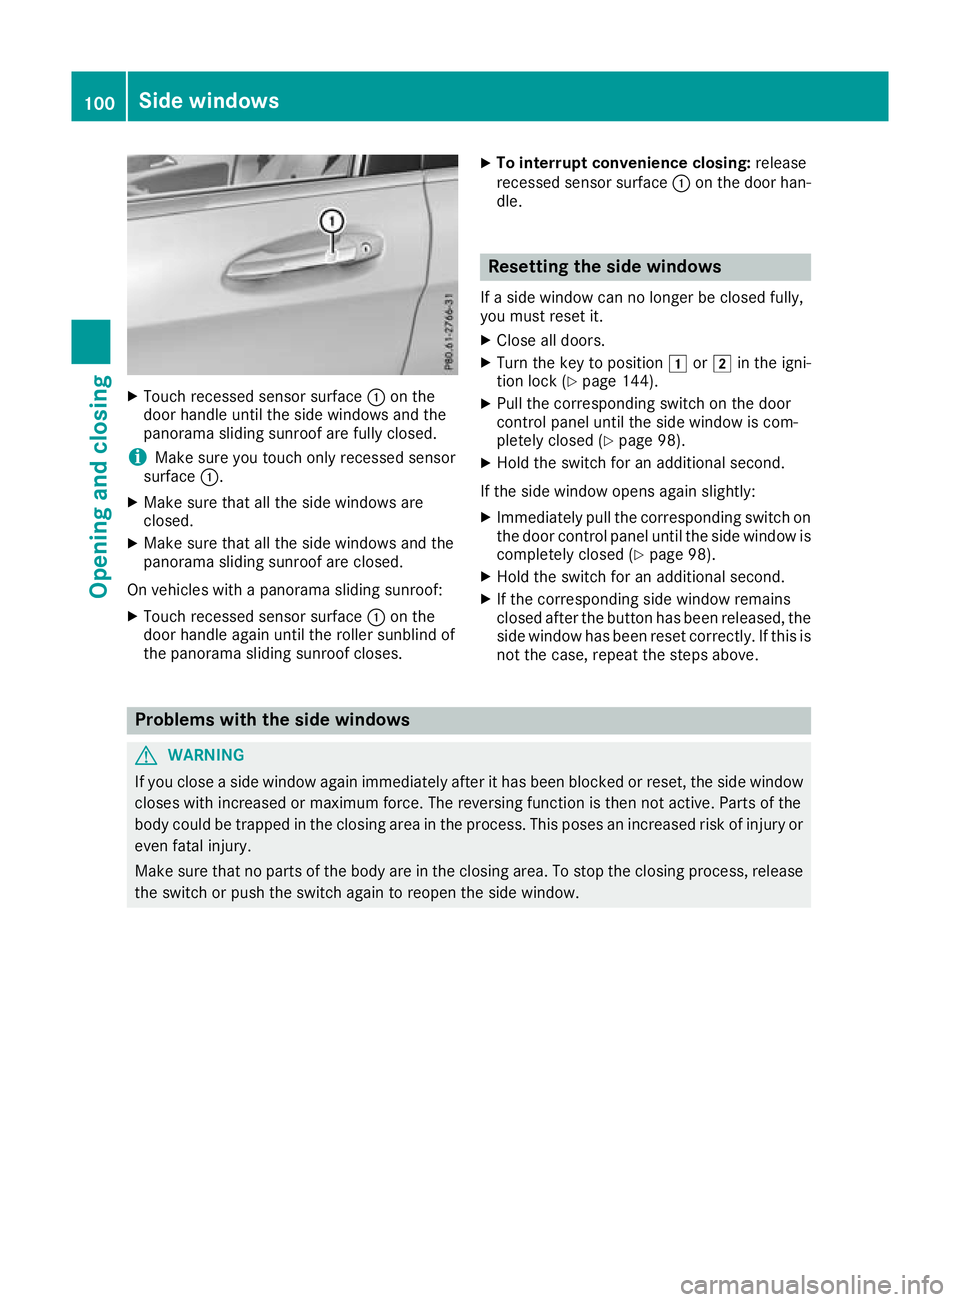
Touch recessed sensor surface :on the
door handle until the side windows and the
panorama sliding sunroof are fully closed.
i Make sure you touch only recessed sensor
surface :.
X Make sure that all the side windows are
closed.
X Make sure that all the side windows and the
panorama sliding sunroof are closed.
On vehicles with a panorama sliding sunroof: X Touch recessed sensor surface :on the
door handle again until the roller sunblind of
the panorama sliding sunroof closes. X
To interrupt convenience closing: release
recessed sensor surface :on the door han-
dle. Resetting the side windows
If a side window can no longer be closed fully,
you must reset it.
X Close all doors.
X Turn the key to position 1or2 in the igni-
tion lock (Y page 144).
X Pull the corresponding switch on the door
control panel until the side window is com-
pletely closed (Y page 98).
X Hold the switch for an additional second.
If the side window opens again slightly:
X Immediately pull the corresponding switch on
the door control panel until the side window is
completely closed (Y page 98).
X Hold the switch for an additional second.
X If the corresponding side window remains
closed after the button has been released, the
side window has been reset correctly. If this is
not the case, repeat the steps above. Problems with the side windows
G
WARNING
If you close a side window again immediately after it has been blocked or reset, the side window
closes with increased or maximum force. The reversing function is then not active. Parts of the
body could be trapped in the closing area in the process. This poses an increased risk of injury or even fatal injury.
Make sure that no parts of the body are in the closing area. To stop the closing process, releasethe switch or push the switch again to reopen the side window. 100
Side windowsOpening and closing
Page 105 of 369
Reversing feature of the sliding sun-
roof
In the following section, the term "sliding sun-
roof" refers to the panorama sliding sunroof.
The sliding sunroof is equipped with an auto-
matic reversing function. If a solid object blocks
or restricts the sliding sunroof during the closing process, the sliding sunroof opens again auto-
matically. The automatic reversing feature is,
however, only an aid and is no substitute for your attention when closing the sliding roof. G
WARNING
The reversing feature does not react:
R to soft, light and thin objects, e.g. small fin-
gers
R over the last 4 mm of the closing movement
R during resetting
R when closing the sliding sunroof again man-
ually immediately after automatic reversing
This means that the reversing feature cannot
prevent someone being trapped in these sit-
uations. There is a risk of injury.
When closing make sure that no body parts
are in the closing area.
If someone is trapped:
R release the switch immediately or
R press the switch in any direction during the
automatic closing process
The closing process is stopped. Operating the panorama sliding sun-
roof
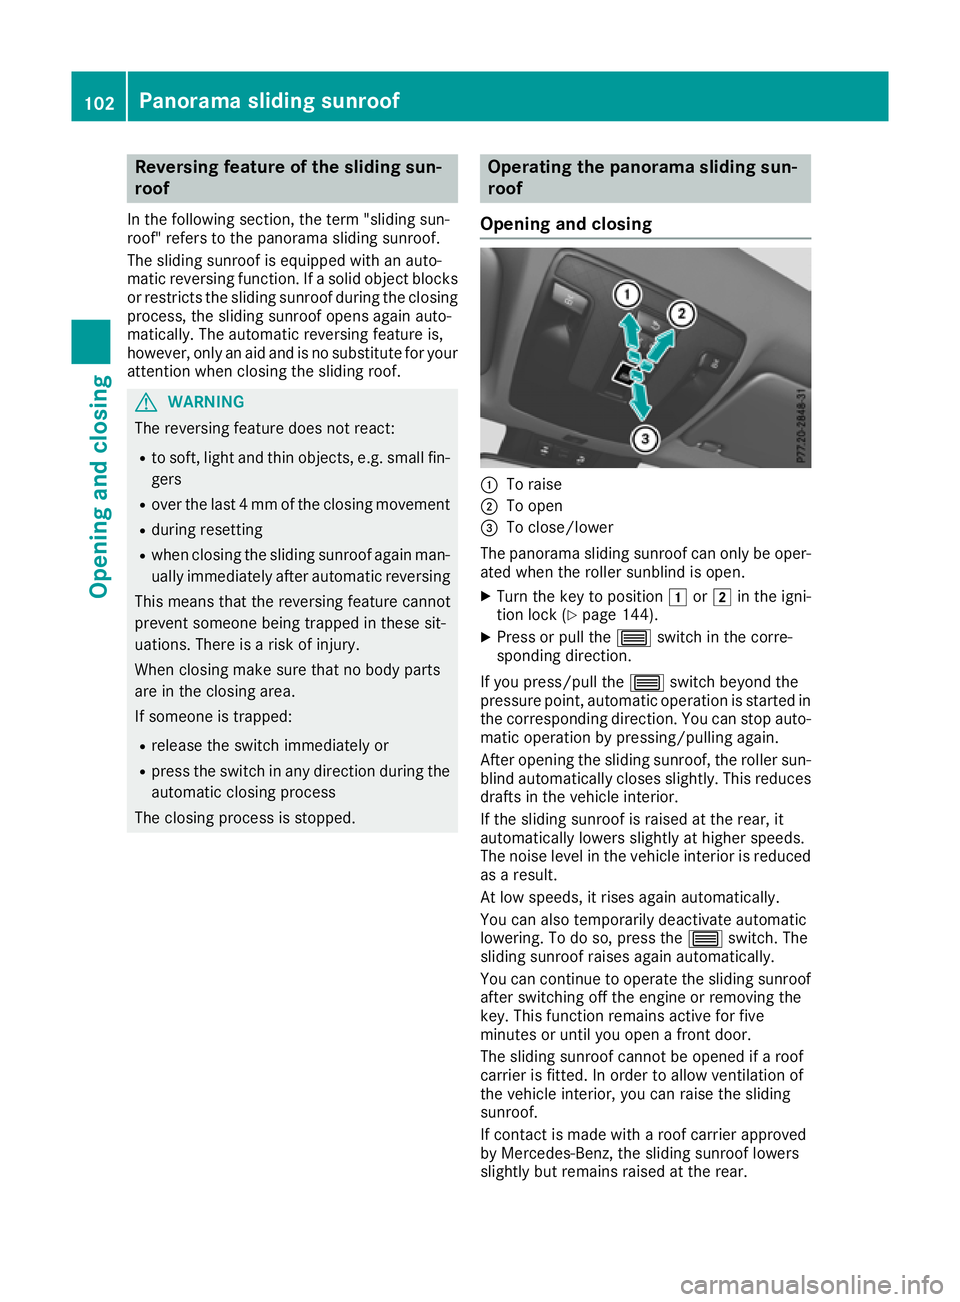
Opening and closing :
To raise
; To open
= To close/lower
The panorama sliding sunroof can only be oper-
ated when the roller sunblind is open.
X Turn the key to position 1or2 in the igni-
tion lock (Y page 144).
X Press or pull the 3switch in the corre-
sponding direction.
If you press/pull the 3switch beyond the
pressure point, automatic operation is started in
the corresponding direction. You can stop auto-
matic operation by pressing/pulling again.
After opening the sliding sunroof, the roller sun- blind automatically closes slightly. This reduces drafts in the vehicle interior.
If the sliding sunroof is raised at the rear, it
automatically lowers slightly at higher speeds.
The noise level in the vehicle interior is reduced
as a result.
At low speeds, it rises again automatically.
You can also temporarily deactivate automatic
lowering. To do so, press the 3switch. The
sliding sunroof raises again automatically.
You can continue to operate the sliding sunroof
after switching off the engine or removing the
key. This function remains active for five
minutes or until you open a front door.
The sliding sunroof cannot be opened if a roof
carrier is fitted. In order to allow ventilation of
the vehicle interior, you can raise the sliding
sunroof.
If contact is made with a roof carrier approved
by Mercedes-Benz, the sliding sunroof lowers
slightly but remains raised at the rear. 102
Panorama sliding sunroofOpening and closing