2017 MERCEDES-BENZ GLA SUV washer fluid
[x] Cancel search: washer fluidPage 22 of 369
Folding the backrest (rear com-
partment) forwards/back .............. 292
Seat belt
Correct usage .................................. 44
Switching belt adjustment on/off
(on-board computer) ...................... 231
Seat belts
Adjusting the driver's and front-
passenger seat bel t......................... 45
Adjusting the height ......................... 45
Cleaning ......................................... 313
Display message ............................ 242
Fastening ......................................... 45
Important safety guidelines ............. 43
Introduction ..................................... 43
Rear seat belt status indicator ......... 46
Releasing ......................................... 45
Warning lamp ................................. 265
Warning lamp (function) ................... 46
Seats
Adjusting (electrically) ................... 108
Adjusting (manually) ...................... 107
Adjusting the 4-way lumbar sup-
port ................................................ 110
Adjusting the head restraint .......... 108
Cleaning the cover ......................... 313
Important safety notes .................. 106
Seat heating problem .................... 111
Storing settings (memory func-
tion) ............................................... 115
Switching seat heating on/of f....... 110
Securing a load .................................. 293
Securing luggage ............................... 293
Selecting a gear
see Automatic transmission
Selector lever
Cleaning ......................................... 313
Sensors (cleaning instructions) ....... 311
Service Centre
see Qualified specialist workshop
Service menu (on-board com-
puter) .................................................. 228
Service message
see ASSYST PLUS
Service products
Brake fluid ..................................... 356
Coolant (engine) ............................ 356
Engine oil ....................................... 355 Fuel ................................................ 352
Important safety notes .................. 352
Washer fluid ................................... 357
Setting a speed
see Cruise control
Setting the air distribution ............... 133
Setting the airflow ............................ 134
Setting the date/time format
See also Digital Owner's Manua l... 277
Setting the language
See also Digital Owner's Manua l... 277
Setting the time
See also Digital Owner's Manua l... 277
Settings
Factory (on-board computer) ......... 231
On-board computer ....................... 228
SETUP (on-board computer,
Mercedes-AMG vehicles) .................. 232
Shifting to neutral (manual trans-
mission) ............................................. 153
Side lamps
Switching on/of f........................... 117
Side windows
Convenience closing ........................ 99
Convenience opening ...................... 98
Important safety notes .................... 97
Opening/closing .............................. 98
Problem (malfunction) ................... 100
Resetting ....................................... 100
Reversing feature ............................. 98
Sidebag ................................................ 48
SIM card
Inserting ........................................ 284
Sliding sunroof
see Panorama sliding sunroof
SMS
See also Digital Owner's Manua l... 277
Snow chains ...................................... 337
Socket
Luggage compartment ................... 299
Sockets
Centre console .............................. 299
General notes ................................ 299
Rear compartment ......................... 299
Sound
Switching on/of f........................... 278 Index
19
Page 26 of 369
Summer tyres ................................ 336
Tyre size (data
).............................. 347
Tyre tread ...................................... 335
see Flat tyre U
Unlocking Emergency unlocking ....................... 88
From inside the vehicle (central
unlocking button) ............................. 87
Upshift indicator (on-board com-
puter, Mercedes-AMG vehicles) ....... 231
USB devices
Connecting to the Media Inter-
face ............................................... 287 V
Vanity mirror (in sun visor) .............. 298
Vehicle
Correct use ...................................... 30
Data acquisition ............................... 30
Display message ............................ 258
Electronics ..................................... 350
Equipment ....................................... 27
Implied warranty .............................. 30
Individual settings .......................... 228
Leaving parked up ......................... 169
Locking (in an emergency) ............... 88
Locking (key) ................................... 79
Lowering ........................................ 346
Pulling away ................................... 146
Raising ........................................... 344
Registration ..................................... 30
Securing from rolling away ............ 344
Transporting .................................. 330
Unlocking (in an emergency) ........... 88
Unlocking (key) ................................ 79
Vehicle data ................................... 358
Vehicle battery
see Battery (vehicle)
Vehicle data
Boot load (maximum) ..................... 358
Roof load (maximum) ..................... 358
Vehicle data (off-road driving)
Approach/departure angle ............ 359
Maximum gradient climbing abil-
ity .................................................. 359 Vehicle dimensions
........................... 358
Vehicle emergency locking ................ 88
Vehicle identification number
see VIN
Vehicle identification plate .............. 351
Vehicle tool kit .................................. 317
Ventilation
Setting the vents ........................... 141
Video
Operating the DVD ......................... 224
See also Digital Owner's Manua l... 277
VIN
Seat ............................................... 352
Type plate ...................................... 351 W
Warning and indicator lamps ABS ................................................ 267
Active Brake Assist ........................ 275
Brakes ........................................... 266
Distance warning signal ................. 275
ESP ®
.............................................. 269
ESP ®
OFF ....................................... 270
Fuel tank ........................................ 272
LIM (cruise control )........................ 176
LIM (Distance Pilot DISTRONIC ).... 181
LIM (variable limiter) ...................... 178
Overview .......................................... 34
Reserve fuel ................................... 272
Seat belt ........................................ 265
Tyre pressure monitor ................... 276
Warning triangle ................................ 316
Washer fluid
Display message ............................ 263
Weather display (COMAND Online)
See also Digital Owner's Manua l... 277
Wheel and tyre combinations
Tyres .............................................. 347
Wheel bolt tightening torque ........... 346
Wheel chock ...................................... 344
Wheels
Changing a whee l.......................... 342
Changing/replacing ....................... 342
Checking ........................................ 334
Cleaning ......................................... 310
Emergency spare wheel ................. 348
Fitting a new wheel ........................ 345 Index
23
Page 27 of 369
Important safety notes .................. 334
Information on driving .................... 334
Removing a wheel
.......................... 345
Storing ........................................... 343
Tightening torque ........................... 346
Wheel size/tyre size ...................... 347
Wheels and tyres
Changing a whee l.......................... 343
Windowbag
Display message ............................ 243
Operation ......................................... 49
Windows
Cleaning ......................................... 310
see Side windows
Windscreen
Demisting ...................................... 134
Windscreen washer fluid
see Windscreen washer system
Windscreen washer system
Important safety notes .................. 357
Topping up ..................................... 306
Windscreen wipers
Display message ............................ 263
Problem (malfunction) ................... 127
Rear window wipe r........................ 124
Replacing the wiper blades ............ 125
Switching on/of f........................... 124
Winter driving
General notes ................................ 336
Winter operation
Slippery road surfaces ................... 172
Snow chains .................................. 337
Winter tyres
Limiting the speed (on-board com-
puter) ............................................. 229
M+S tyres ...................................... 336
Wiper blades
Cleaning ......................................... 310
Important safety notes .................. 125
Replacing (on the rear window )..... 126
Wooden trim (cleaning instruc-
tions) .................................................. 313
Workshop
see Qualified specialist workshop Z
ZONE function Switching on/of f........................... 134 24
Index
Page 127 of 369
Windscreen wipers
Switching the windscreen wipers on/
off
! Do not operate the windscreen wipers when
the windscreen is dry, as this could damage
the wiper blades. Moreover, dust that has col-
lected on the windscreen can scratch the
glass if wiping takes place when the wind-
screen is dry.
If it is necessary to switch on the windscreen wipers in dry weather conditions, always
operate them using washer fluid.
! If the windscreen wipers leave smears on
the windscreen after the vehicle has been
washed in an automatic car wash, this may be
due to wax or other residue. Clean the wind-
screen with washer fluid after an automatic
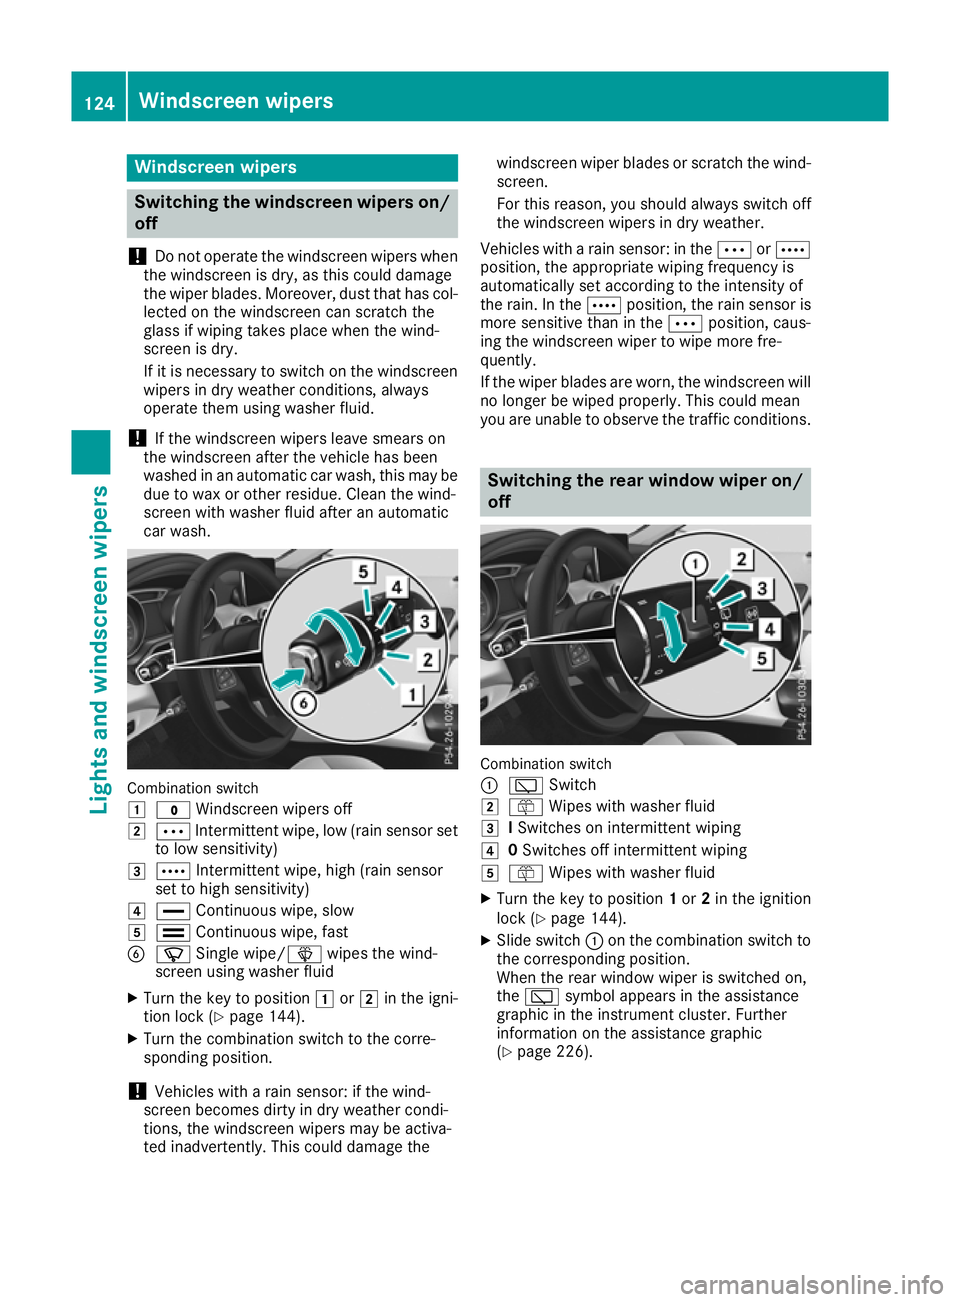
car wash. Combination switch
1
$ Windscreen wipers off
2 Ä Intermittent wipe, low (rain sensor set
to low sensitivity)
3 Å Intermittent wipe, high (rain sensor
set to high sensitivity)
4 ° Continuous wipe, slow
5 ¯ Continuous wipe, fast
B í Single wipe/î wipes the wind-
screen using washer fluid
X Turn the key to position 1or2 in the igni-
tion lock (Y page 144).
X Turn the combination switch to the corre-
sponding position.
! Vehicles with a rain sensor: if the wind-
screen becomes dirty in dry weather condi-
tions, the windscreen wipers may be activa-
ted inadvertently. This could damage the windscreen wiper blades or scratch the wind-
screen.
For this reason, you should always switch off
the windscreen wipers in dry weather.
Vehicles with a rain sensor: in the ÄorÅ
position, the appropriate wiping frequency is
automatically set according to the intensity of
the rain. In the Åposition, the rain sensor is
more sensitive than in the Äposition, caus-
ing the windscreen wiper to wipe more fre-
quently.
If the wiper blades are worn, the windscreen will
no longer be wiped properly. This could mean
you are unable to observe the traffic conditions. Switching the rear window wiper on/
off Combination switch
:
è Switch
2 ô Wipes with washer fluid
3 ISwitches on intermittent wiping
4 0Switches off intermittent wiping
5 ô Wipes with washer fluid
X Turn the key to position 1or 2in the ignition
lock (Y page 144).
X Slide switch :on the combination switch to
the corresponding position.
When the rear window wiper is switched on,
the è symbol appears in the assistance
graphic in the instrument cluster. Further
information on the assistance graphic
(Y page 226). 124
Windscreen wipersLights and windscreen wipers
Page 130 of 369
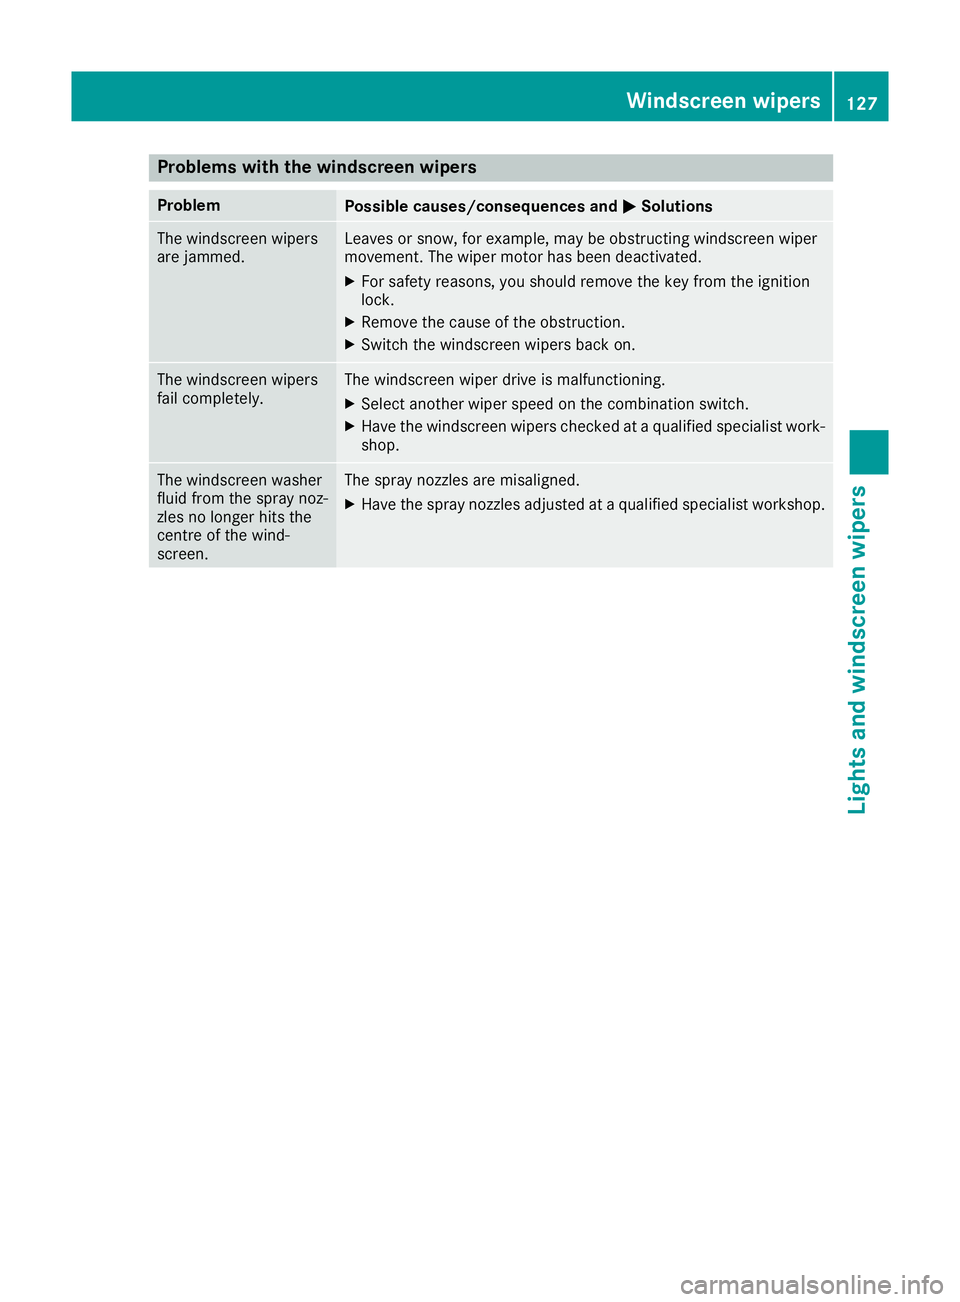
Problems with the windscreen wipers
Problem
Possible causes/consequences and
M
MSolutions The windscreen wipers
are jammed. Leaves or snow, for example, may be obstructing windscreen wiper
movement. The wiper motor has been deactivated.
X For safety reasons, you should remove the key from the ignition
lock.
X Remove the cause of the obstruction.
X Switch the windscreen wipers back on. The windscreen wipers
fail completely. The windscreen wiper drive is malfunctioning.
X Select another wiper speed on the combination switch.
X Have the windscreen wipers checked at a qualified specialist work-
shop. The windscreen washer
fluid from the spray noz-
zles no longer hits the
centre of the wind-
screen. The spray nozzles are misaligned.
X Have the spray nozzles adjusted at a qualified specialist workshop. Windscreen wipers
127Lights and windscreen wipers Z
Page 266 of 369
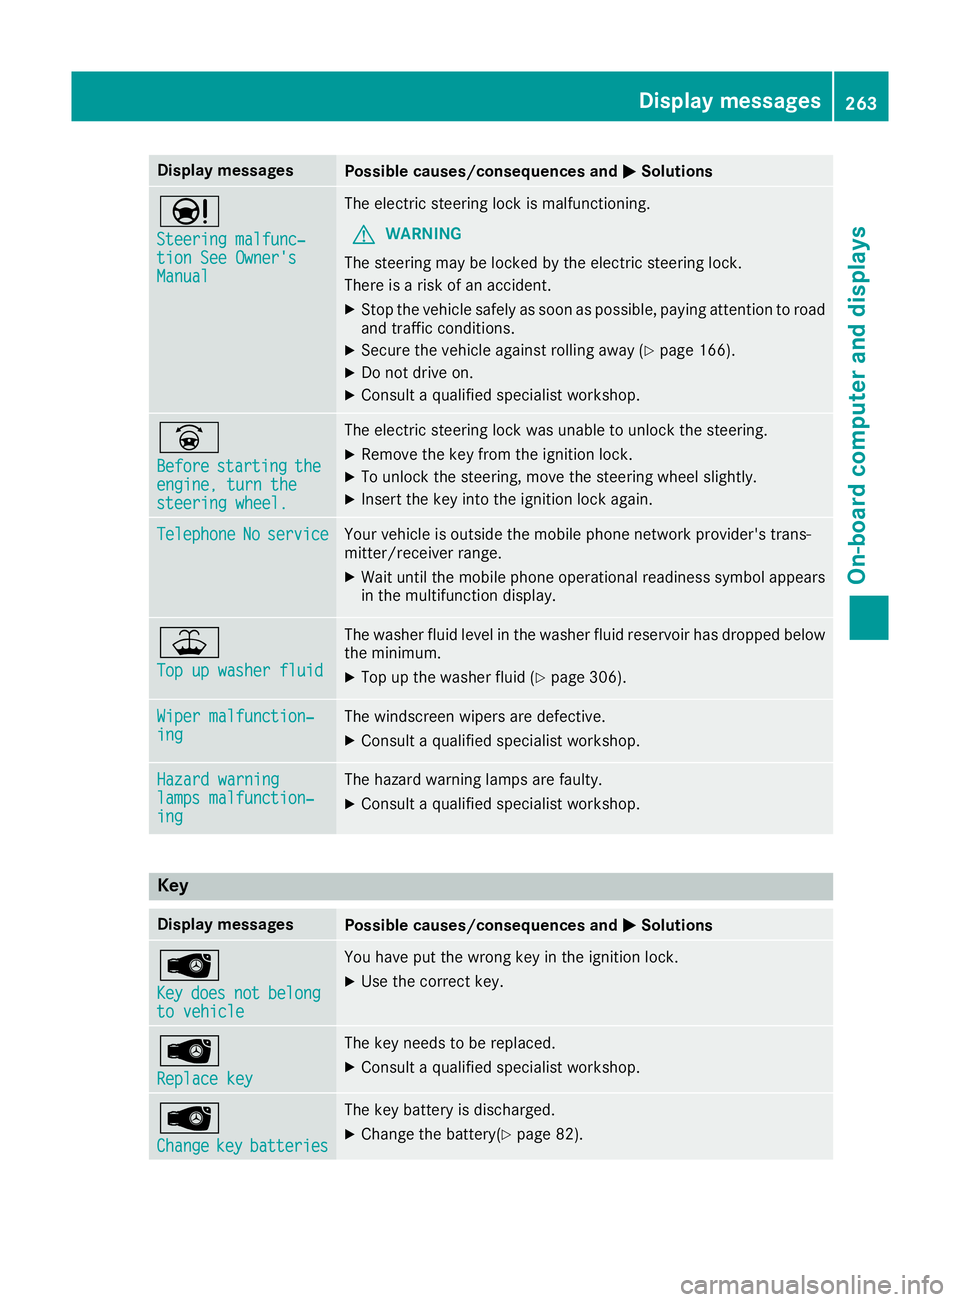
Display messages
Possible causes/consequences and
M
MSolutions Ð
Steering malfunc‐ Steering malfunc‐
tion See Owner's tion See Owner's
Manual Manual The electric steering lock is malfunctioning.
G WARNING
The steering may be locked by the electric steering lock.
There is a risk of an accident.
X Stop the vehicle safely as soon as possible, paying attention to road
and traffic conditions.
X Secure the vehicle against rolling away (Y page 166).
X Do not drive on.
X Consult a qualified specialist workshop. _
Before Before
starting
starting the
the
engine, turn the
engine, turn the
steering wheel. steering wheel. The electric steering lock was unable to unlock the steering.
X Remove the key from the ignition lock.
X To unlock the steering, move the steering wheel slightly.
X Insert the key into the ignition lock again. Telephone
Telephone
No
Noservice
service Your vehicle is outside the mobile phone network provider's trans-
mitter/receiver range.
X Wait until the mobile phone operational readiness symbol appears
in the multifunction display. ¥
Top up washer fluid Top up washer fluid The washer fluid level in the washer fluid reservoir has dropped below
the minimum.
X Top up the washer fluid (Y page 306).Wiper malfunction‐
Wiper malfunction‐
ing ing The windscreen wipers are defective.
X Consult a qualified specialist workshop. Hazard warning
Hazard warning
lamps malfunction‐ lamps malfunction‐
ing ing The hazard warning lamps are faulty.
X Consult a qualified specialist workshop. Key
Display messages
Possible causes/consequences and
M
MSolutions Â
Key Key
does
does not
notbelong
belong
to vehicle
to vehicle You have put the wrong key in the ignition lock.
X Use the correct key. Â
Replace key Replace key The key needs to be replaced.
X Consult a qualified specialist workshop. Â
Change Change
key
keybatteries
batteries The key battery is discharged.
X Change the battery(Y page 82). Display
messages
263On-board computer and displays Z
Page 309 of 369
X
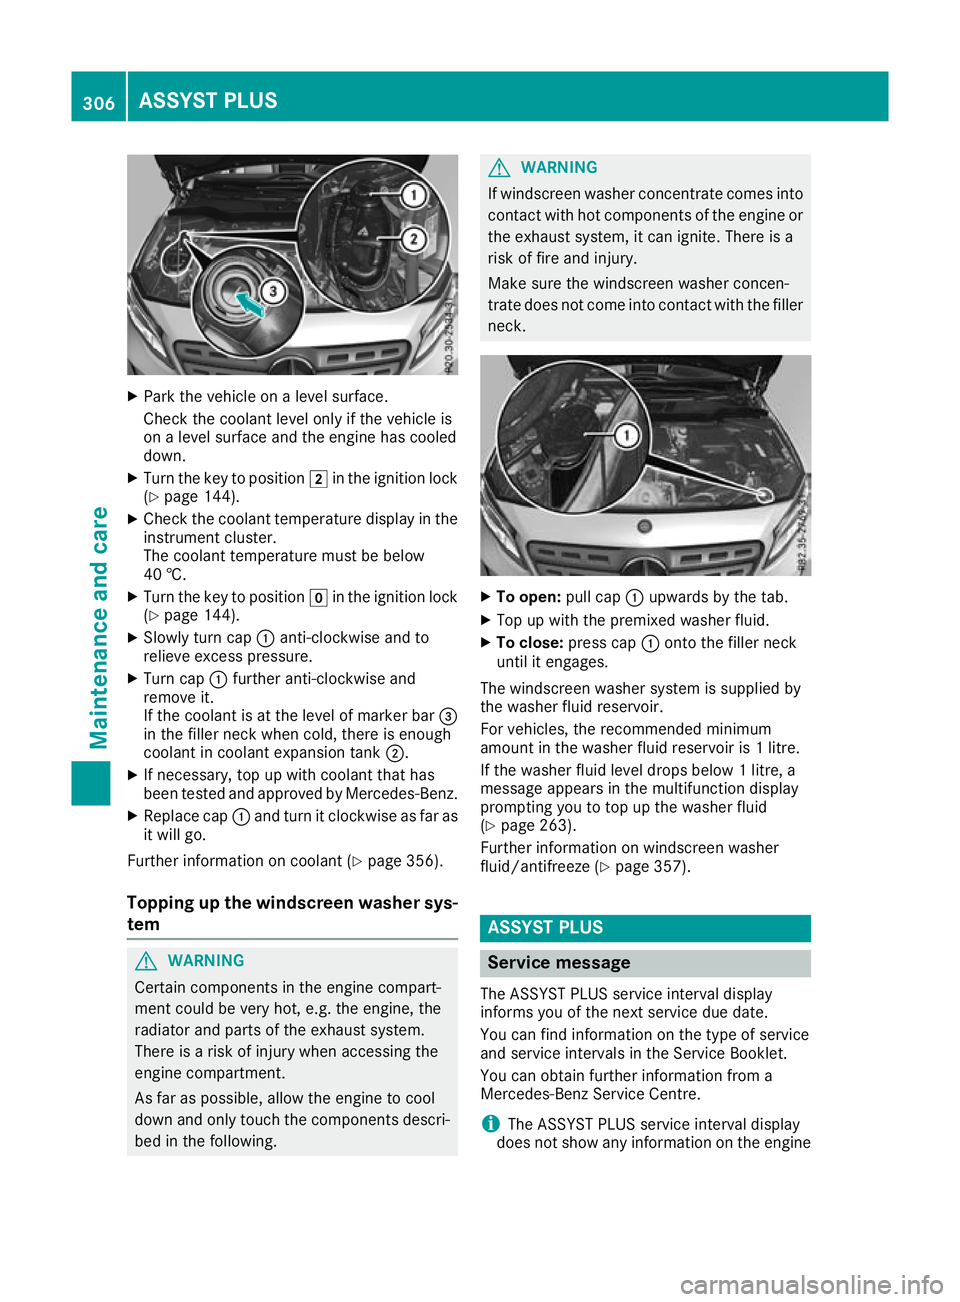
Park the vehicle on a level surface.
Check the coolant level only if the vehicle is
on a level surface and the engine has cooled
down.
X Turn the key to position 2in the ignition lock
(Y page 144).
X Check the coolant temperature display in the
instrument cluster.
The coolant temperature must be below
40 †.
X Turn the key to position gin the ignition lock
(Y page 144).
X Slowly turn cap :anti-clockwise and to
relieve excess pressure.
X Turn cap :further anti-clockwise and
remove it.
If the coolant is at the level of marker bar =
in the filler neck when cold, there is enough
coolant in coolant expansion tank ;.
X If necessary, top up with coolant that has
been tested and approved by Mercedes-Benz.
X Replace cap :and turn it clockwise as far as
it will go.
Further information on coolant (Y page 356).
Topping up the windscreen washer sys-
tem G
WARNING
Certain components in the engine compart-
ment could be very hot, e.g. the engine, the
radiator and parts of the exhaust system.
There is a risk of injury when accessing the
engine compartment.
As far as possible, allow the engine to cool
down and only touch the components descri- bed in the following. G
WARNING
If windscreen washer concentrate comes into contact with hot components of the engine or
the exhaust system, it can ignite. There is a
risk of fire and injury.
Make sure the windscreen washer concen-
trate does not come into contact with the filler neck. X
To open: pull cap:upwards by the tab.
X Top up with the premixed washer fluid.
X To close: press cap :onto the filler neck
until it engages.
The windscreen washer system is supplied by
the washer fluid reservoir.
For vehicles, the recommended minimum
amount in the washer fluid reservoir is 1 litre.
If the washer fluid level drops below 1 litre, a
message appears in the multifunction display
prompting you to top up the washer fluid
(Y page 263).
Further information on windscreen washer
fluid/antifreeze (Y page 357). ASSYST PLUS
Service message
The ASSYST PLUS service interval display
informs you of the next service due date.
You can find information on the type of service
and service intervals in the Service Booklet.
You can obtain further information from a
Mercedes-Benz Service Centre.
i The ASSYST PLUS service interval display
does not show any information on the engine 306
ASSYST PLUSMaintenance and care
Page 355 of 369
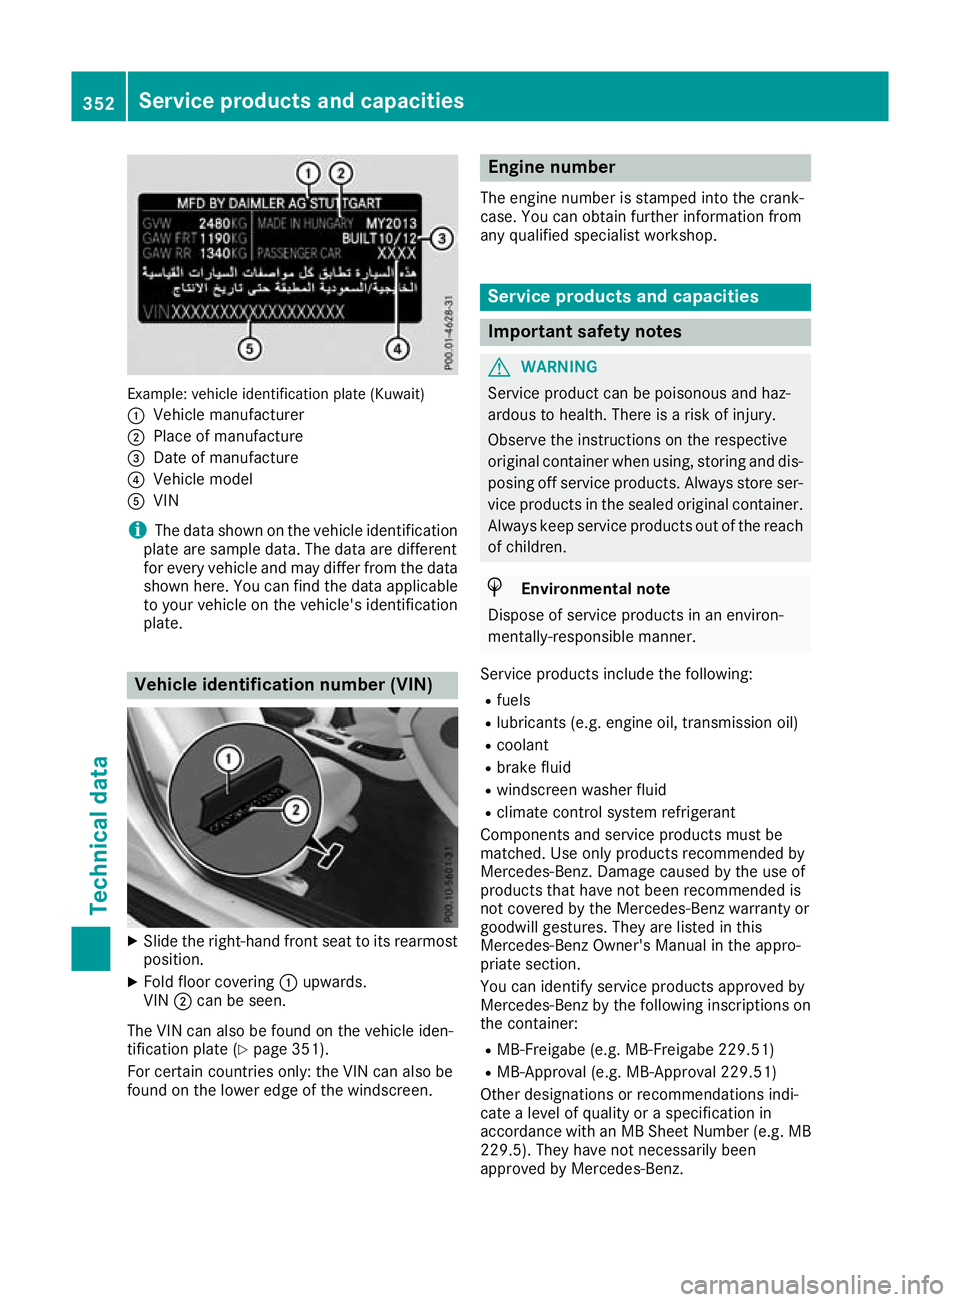
Example: vehicle identification plate (Kuwait)
: Vehicle manufacturer
; Place of manufacture
= Date of manufacture
? Vehicle model
A VIN
i The data shown on the vehicle identification
plate are sample data. The data are different
for every vehicle and may differ from the data shown here. You can find the data applicable
to your vehicle on the vehicle's identification
plate. Vehicle identification number (VIN)
X
Slide the right-hand front seat to its rearmost
position.
X Fold floor covering :upwards.
VIN ;can be seen.
The VIN can also be found on the vehicle iden-
tification plate (Y page 351).
For certain countries only: the VIN can also be
found on the lower edge of the windscreen. Engine number
The engine number is stamped into the crank-
case. You can obtain further information from
any qualified specialist workshop. Service products and capacities
Important safety notes
G
WARNING
Service product can be poisonous and haz-
ardous to health. There is a risk of injury.
Observe the instructions on the respective
original container when using, storing and dis- posing off service products. Always store ser-
vice products in the sealed original container. Always keep service products out of the reach
of children. H
Environmental note
Dispose of service products in an environ-
mentally-responsible manner.
Service products include the following:
R fuels
R lubricants (e.g. engine oil, transmission oil)
R coolant
R brake fluid
R windscreen washer fluid
R climate control system refrigerant
Components and service products must be
matched. Use only products recommended by
Mercedes-Benz. Damage caused by the use of
products that have not been recommended is
not covered by the Mercedes-Benz warranty or
goodwill gestures. They are listed in this
Mercedes-Benz Owner's Manual in the appro-
priate section.
You can identify service products approved by
Mercedes-Benz by the following inscriptions on the container:
R MB-Freigabe (e.g. MB-Freigabe 229.51)
R MB-Approval (e.g. MB-Approval 229.51)
Other designations or recommendations indi-
cate a level of quality or a specification in
accordance with an MB Sheet Number (e.g. MB 229.5). They have not necessarily been
approved by Mercedes-Benz. 352
Service products and capacitiesTechnical data