2017 MERCEDES-BENZ GLA SUV oil temperature
[x] Cancel search: oil temperaturePage 8 of 369
Anti-lock braking system
see ABS (Anti-lock Braking System)
Anti-skid chains
see Snow chains
Anti-Theft Alarm system
see ATA (Anti-Theft Alarm system)
Anticipatory occupant protection
see PRE-SAFE ®
(anticipatory
occupant protection)
Approach/departure angle .............. 175
Aquaplaning ...................................... .172
Ashtray ............................................... 298
Assistance display (on-board com-
puter) ................................................. .226
Assistance menu (on-board com-
puter) ................................................. .226
ASSYST PLUS
Displaying a service message ....... .307
Driving abroad ............................... 307
Hiding a service message .............. 307
Information about Service ............. 307
Resetting the service interval dis-
pla y................................................ 307
Service message ............................ 306
Special service requirements ......... 307
ATA (Anti-Theft Alarm system)
Activating/deactivating ................... 76
Function ........................................... 76
Switching off the alarm .................... 76
ATTENTION ASSIST
Activating/deactivating ................. 227
Display message ............................ 252
Function/note s............................. 206
Audio 20
Driving dynamics display ............... 192
Audio menu (on-board computer) .... 223
Authorised workshop
see Qualified specialist workshop
AUTO lights
Display message ............................ 248
see Lights
Automatic engine start (ECO start/
stop function) .................................... 149
Automatic engine switch-off (ECO
start/stop function) .......................... 148 Automatic front-passenger front
airbag deactivation
Display message ............................ 244
Automatic front-passenger front
airbag deactivation system
Operation ......................................... 49
Problems ......................................... 53
System self-test ............................... 52
Automatic headlamp mode .............. 116
Automatic transmission
Accelerator pedal position ............. 158
Changing gear ............................... 158
DIRECT SELECT lever ..................... 155
Drive program display .................... 155
Drive programs .............................. 159
Driving tip s.................................... 158
DYNAMIC SELECT button (all vehi- cles except Mercedes-AMG vehi-
cles) ............................................... 151
DYNAMIC SELECT controller
(Mercedes-AMG vehicles) .............. 152
Emergency running mode .............. 163
Engaging drive position .................. 156
Engaging neutral ............................ 156
Engaging park position
(Mercedes-AMG vehicles) .............. 157
Engaging park position automati-
cally ............................................... 155
Engaging reverse gear ................... 156
Engaging the park position ............ 155
Gliding mod e................................. 159
Holding the vehicle stationary on
uphill gradients .............................. 158
Kickdown ....................................... 158
Manual shifting .............................. 161
Oil temperature (on-board com-
puter, Mercedes-AMG vehicles) ..... 231
Overview ........................................ 154
Problem (fault) ............................... 163
Pulling away ................................... 146
Selector lever ................................ 156
Starting the engine ........................ 146
Steering wheel gearshift paddle s... 161
Trailer towing ................................. 159
Transmission position display ........ 157
Transmission position display
(DIRECT SELECT lever) ................... 155
Transmission positions .................. 157 Index
5
Page 14 of 369
Emergency key
Unlocking the driver's door .............. 88
Emergency key element
Function/notes ................................ 81
Inserting .......................................... 82
Locking vehicle ................................ 88
Removing ........................................ .82
Emergency release
Driver's door .................................... 88
Emergency spare wheel
General notes ................................ 348
Important safety notes .................. 348
Removing ...................................... .348
Emergency unlocking
Vehicle ............................................. 88
Engine
Display message ............................ 249
ECO start/stop function ................ 148
Engine number ............................... 352
Jump-starting ................................. 325
Running irregularl y......................... 150
Starting (important safety notes )... 145
Starting problems .......................... 150
Starting the engine with the key .... 146
Starting with the Start/Stop but-
ton ................................................. 146
Stopping ........................................ 166
Tow-starting (vehicle) ..................... 331
Warning lamp (engine diagnos-
tics) ............................................... 272
Engine electronics
Notes ............................................. 350
Problem (fault) ............................... 150
Engine oil
Additives ........................................ 356
Checking the oil level ..................... 304
Checking the oil level using the
dipstick .......................................... 304
Display message ............................ 250
Filling capacity ............................... 356
Notes about oil grade s................... 355
Notes on oil level/consumption .... 304
Temperature (on-board computer, Mercedes-AMG vehicles) ............... 231
Topping up ..................................... 305
Engine oil additives
see Additives (engine oil) Entering an address
See also Digital Owner's Manua l... 277
Environmental protection
Returning an end-of-life vehicle ....... 26
ESC (Electronic Stability Control)
see ESP ®
(Electronic Stability Program)
ESP ®
(Electronic Stability Pro-
gram)
Activating/deactivating (on-
board computer) ............................ 266
AMG menu (on-board computer) ... 232
Characteristics ................................. 72
Deactivating/activating (button
in Mercedes-AMG vehicles) ............. 73
Deactivating/activating (except
Mercedes‑ AMG vehicles) ................. 73
Deactivating/activating (on-
board computer, except
Mercedes-AMG vehicles) ............... 227
Display message ............................ 235
Function/note s................................ 72
General notes .................................. 72
Important safety guidelines ............. 72
Trailer stabilisation .......................... 75
Warning lamp ................................. 269
ETS/4ETS (Electronic Traction Sys-
tem) ...................................................... 72
Exhaust
see Exhaust pipe
Exhaust pipe
Cleaning ......................................... 312
Exterior lighting
Cleaning ......................................... 311
see Lights
Exterior mirrors
Adjusting ....................................... 112
Anti-dazzle mode (automatic) ........ 113
Folding in when locking (on-boardcomputer) ...................................... 231
Folding in/out (automatically )....... 113
Folding in/out (electrically) ........... 113
Out of position (troubleshooting) ... 113
Parking position ............................. 114
Resetting ....................................... 113
Storing settings (memory func-
tion) ............................................... 115 Index
11
Page 24 of 369
Tyres/wheels ................................. 347
Vehicle data ................................... 358
Telephone
Accepting a call (multifunction
steering wheel) .............................. 225
Authorising a mobile phone (con-
necting) ......................................... 281
Authorising a mobile phone via
the device manager (connecting) ... 282
Connecting a mobile phone
(device manager) ........................... 282
Connecting a Mobile phone (gen-
eral information) ............................2 80
Display message ............................ 263
Introduction ................................... 225
Menu (on-board computer) ............ 225
Number from the phone book ....... .225
Redialling ....................................... 226
Rejecting/ending a call ................. 225
See also Digital Owner's Manual ... 277
Telephone compartment ................ 290
Telephone module with Bluetooth ®
(SAP profile) Activating and connecting the
module .......................................... .284
Charging a mobile phone .............. .286
Connecting the mobile phone ....... .284
Connecting the module via a USB
cable .............................................. 283
Data modem mode ........................ 285
Installing the module ..................... 283
Introduction ................................... 283
Saving/deleting the PIN for the
SIM card ........................................ 285
Settings ......................................... 285
SIM card mode .............................. 284
Text messages ............................... 285
Transferring the phone book .......... 285
Temperature
Coolant .......................................... 218
Coolant (on-board computer,
Mercedes-AMG vehicles) .............. .231
Engine oil (on-board computer,
Mercedes-AMG vehicles) .............. .231
Outside temperature ..................... .217
Setting (climate control) ................ 133
Transmission oil (on-board com-
puter, Mercedes-AMG vehicles) ..... 231 TEMPOMAT
Function/notes ............................ .176
Text messages
Telephone module with Blue-
tooth ®
(SAP profile) ....................... 285
Through-loading ................................ 291
Timing (RACETIMER) ......................... 232
TIREFIT kit .......................................... 319
Declaration of conformity ................ 28
Important safety notes .................. 319
Storage location ............................ 317
Tyre pressure not reached ............. 321
Tyre pressure reached ................... 321
Tool
see Vehicle tool kit
Top Tether ............................................ 59
Total distance recorder .................... 221
Tow-away protection
Activating ......................................... 76
Deactivating ..................................... 77
Function .......................................... .76
Tow-starting
Emergency engine starting ............ 331
Fitting the towing eye .................... 328
Important safety notes .................. 327
Removing the towing eye ............... 329
Towing
Important safety notes .................. 327
Notes for 4MATIC vehicles ............ 330
Transporting the vehicle ................ 330
Towing a trailer
Axle load, permissibl e.................... 359
ESP ®
(Electronic Stability Pro-
gram) ............................................... 75
Failure check for LEDs ................... 216
General notes ................................ 213
Parking Pilot .................................. 196
Pulling away with a traile r.............. 147
Trailer tow hitch display message .. 262
Towing away
Fitting the towing ey e.................... 328
Removing the towing eye ............... 329
With both axles on the ground ....... 329
With front axle raised ..................... 329
Towing eye ......................................... 317 Index
21
Page 147 of 369
!
Do not warm up the engine when the vehicle
is stationary. Drive off immediately. Avoid
high engine speeds and driving at full throttle
until the engine has reached its operating
temperature.
Only shift the automatic transmission to the
desired drive position when the vehicle is sta- tionary.
Where possible, avoid spinning the drive
wheels when pulling away on slippery roads.
You could otherwise damage the drive train.
! Mercedes-AMG vehicles:
avoid full-load
operation and engine speeds greater than
5000 rpm when the engine is cold. This will
help to protect the engine and maintain
smooth engine operation. Key positions
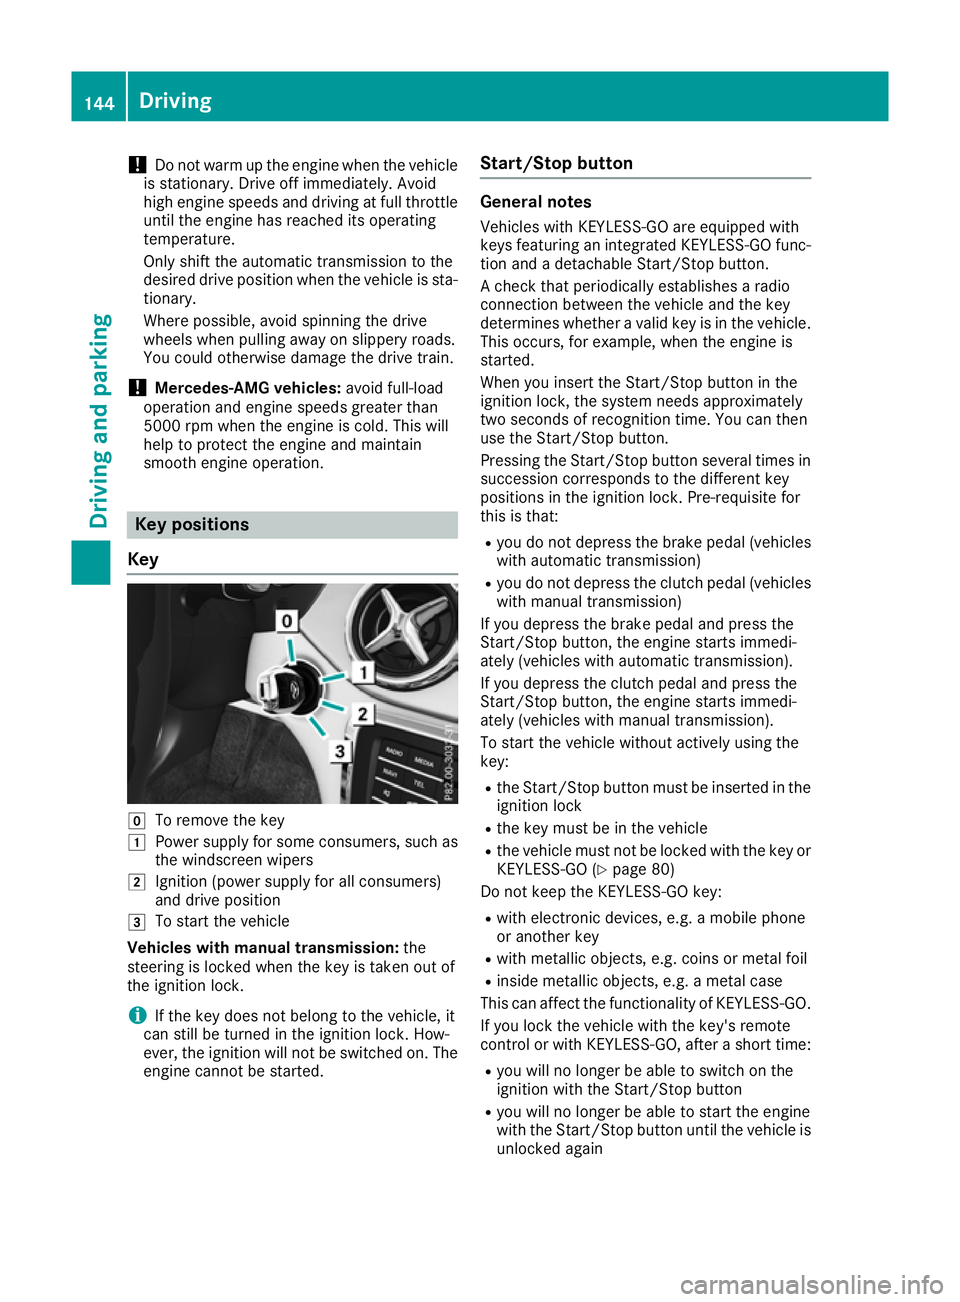
Key g
To remove the key
1 Power supply for some consumers, such as
the windscreen wipers
2 Ignition (power supply for all consumers)
and drive position
3 To start the vehicle
Vehicles with manual transmission: the
steering is locked when the key is taken out of
the ignition lock.
i If the key does not belong to the vehicle, it
can still be turned in the ignition lock. How-
ever, the ignition will not be switched on. The engine cannot be started. Start/Stop button General notes
Vehicles with KEYLESS-GO are equipped with
keys featuring an integrated KEYLESS-GO func- tion and a detachable Start/Stop button.
A check that periodically establishes a radio
connection between the vehicle and the key
determines whether a valid key is in the vehicle.This occurs, for example, when the engine is
started.
When you insert the Start/Stop button in the
ignition lock, the system needs approximately
two seconds of recognition time. You can then
use the Start/Stop button.
Pressing the Start/Stop button several times in
succession corresponds to the different key
positions in the ignition lock. Pre-requisite for
this is that:
R you do not depress the brake pedal (vehicles
with automatic transmission)
R you do not depress the clutch pedal (vehicles
with manual transmission)
If you depress the brake pedal and press the
Start/Stop button, the engine starts immedi-
ately (vehicles with automatic transmission).
If you depress the clutch pedal and press the
Start/Stop button, the engine starts immedi-
ately (vehicles with manual transmission).
To start the vehicle without actively using the
key:
R the Start/Stop button must be inserted in the
ignition lock
R the key must be in the vehicle
R the vehicle must not be locked with the key or
KEYLESS-GO (Y page 80)
Do not keep the KEYLESS-GO key:
R with electronic devices, e.g. a mobile phone
or another key
R with metallic objects, e.g. coins or metal foil
R inside metallic objects, e.g. a metal case
This can affect the functionality of KEYLESS-GO.
If you lock the vehicle with the key's remote
control or with KEYLESS-GO, after a short time:
R you will no longer be able to switch on the
ignition with the Start/Stop button
R you will no longer be able to start the engine
with the Start/Stop button until the vehicle is
unlocked again 144
DrivingDriving and parking
Page 234 of 369
X
Press the :or9 button to set the
selected display.
X Press the abutton to store the entry.
The yellow indicator lamp on the auxiliary
heating button lights up.
Comfort Switching belt adjustment on/off
X Press the =or; button on the steering
wheel to select the Settings Settingsmenu.
X Press the :or9 button to select the
Convenience
Convenience submenu.
X Press ato confirm.
X Press the :or9 button to select the
Belt adjustment
Belt adjustment function.
When the Belt adjustment
Belt adjustment function is acti-
vated, the seat belt is displayed in orange in
the multifunction display.
X Press the abutton to save the setting.
Further information on belt adjustment
(Y page 45).
Switching the fold mirrors in when lock-
ing function on/off This function is only available when the vehicle is
equipped with the electrical fold-in function.
When you activate the Auto. fold-in mir‐
Auto. fold-in mir‐
rors
rors function, the exterior mirrors are folded in
when the vehicle is locked. When you unlock the vehicle and then open the driver's or front-
passenger door, the exterior mirrors fold out
again.
If you have switched on the Auto. fold-in
Auto. fold-in
mirrors
mirrors function and you fold in the exterior
mirrors using the button on the door
(Y page 113), they will not fold out automati-
cally. The exterior mirrors can then only be fol-
ded out using the button on the door.
X Press the =or; button on the steering
wheel to select the Settings
Settings menu.
X Press the :or9 button to select the
Convenience Convenience submenu.
X Press ato confirm.
X Press the :or9 button to select the
Auto. fold-in mirrors
Auto. fold-in mirrors function.
If the Auto. fold-in mirrors
Auto. fold-in mirrors function is
switched on, the multifunction display shows the exterior mirror in orange.
X Press ato save the setting. Resetting to factory settings X
Press the =or; button on the steering
wheel to select the Settings
Settingsmenu.
X Press the :or9 button to select the
Factory setting
Factory setting submenu.
X Press ato confirm.
The Reset all settings?
Reset all settings? function
appears.
X Press the :or9 button to select No
Noor
Yes
Yes.
X Press the abutton to confirm the selec-
tion.
If you have selected Yes Yes, the multifunction
display shows a confirmation message.
For safety reasons, not all functions are reset:
the Limit Limit speed
speed(winter
(winter tyres)
tyres)function of
the permanent speed limiter can only be set in
the Vehicle
Vehicle submenu.
If you want to reset the Daytime driving Daytime driving
lights
lights function in the Lights
Lightssubmenu, you
must turn the key to position 1in the ignition
lock. AMG menu (Mercedes-AMG vehicles)
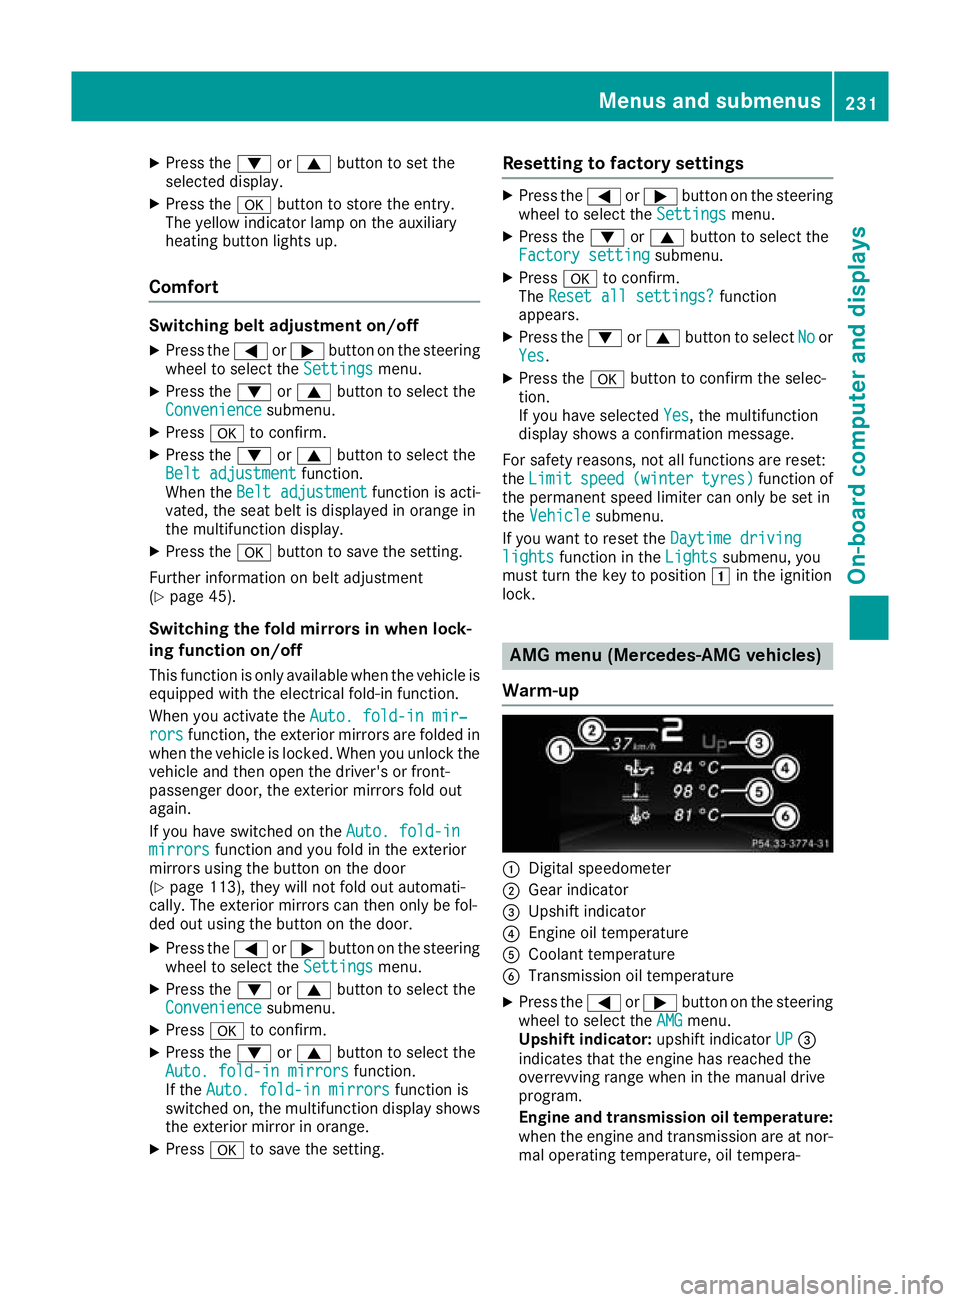
Warm-up :
Digital speedometer
; Gear indicator
= Upshift indicator
? Engine oil temperature
A Coolant temperature
B Transmission oil temperature
X Press the =or; button on the steering
wheel to select the AMG AMGmenu.
Upshift indicator: upshift indicatorUP UP=
indicates that the engine has reached the
overrevving range when in the manual drive
program.
Engine and transmission oil temperature: when the engine and transmission are at nor-
mal operating temperature, oil tempera- Menus and submenus
231On-board computer and displays Z
Page 235 of 369
ture
?and Bare displayed in white in the
multifunction display.
If the multifunction display shows oil temper- ature ?orB in blue, the engine or the
transmission are not yet at normal operating
temperature. Avoid using the full output of the engine during this time.
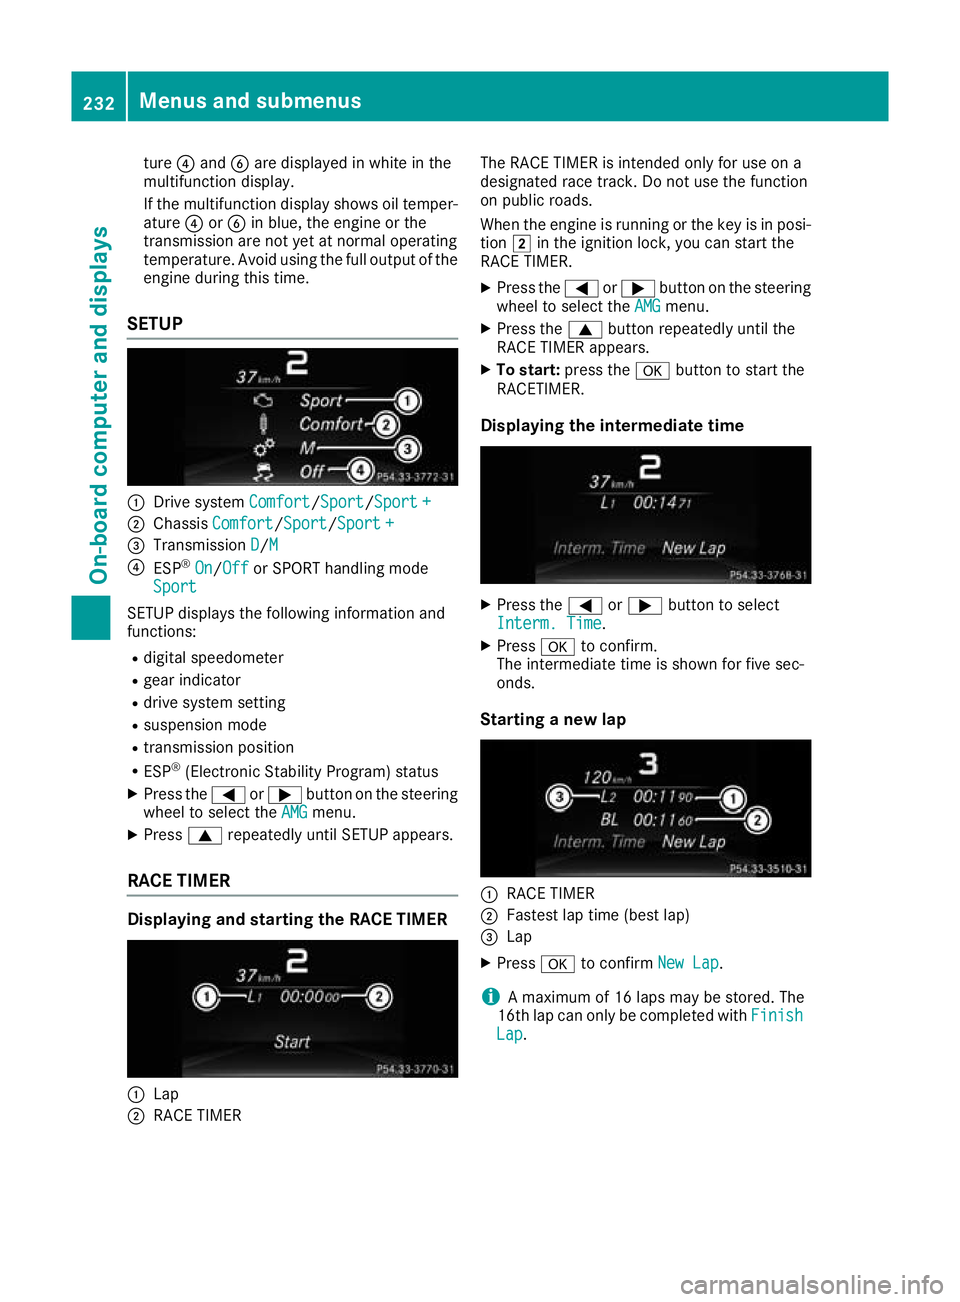
SETUP :
Drive system Comfort Comfort/Sport
Sport/Sport +
Sport +
; Chassis Comfort
Comfort/Sport Sport/Sport +
Sport +
= Transmission D
D/MM
? ESP ®
On
On/ Off
Off or SPORT handling mode
Sport
Sport
SETUP displays the following information and
functions:
R digital speedometer
R gear indicator
R drive system setting
R suspension mode
R transmission position
R ESP ®
(Electronic Stability Program) status
X Press the =or; button on the steering
wheel to select the AMG
AMG menu.
X Press 9repeatedly until SETUP appears.
RACE TIMER Displaying and starting the RACE TIMER
:
Lap
; RACE TIMER The RACE TIMER is intended only for use on a
designated race track. Do not use the function
on public roads.
When the engine is running or the key is in posi- tion 2in the ignition lock, you can start the
RACE TIMER.
X Press the =or; button on the steering
wheel to select the AMG AMGmenu.
X Press the 9button repeatedly until the
RACE TIMER appears.
X To start: press the abutton to start the
RACETIMER.
Displaying the intermediate time X
Press the =or; button to select
Interm. Time Interm. Time.
X Press ato confirm.
The intermediate time is shown for five sec-
onds.
Starting a new lap :
RACE TIMER
; Fastest lap time (best lap)
= Lap
X Press ato confirm New Lap
New Lap.
i A maximum of 16 laps may be stored. The
16th lap can only be completed with Finish
Finish
Lap
Lap . 232
Menus and submenusOn-board computer and displays
Page 307 of 369
Closing the bonnet
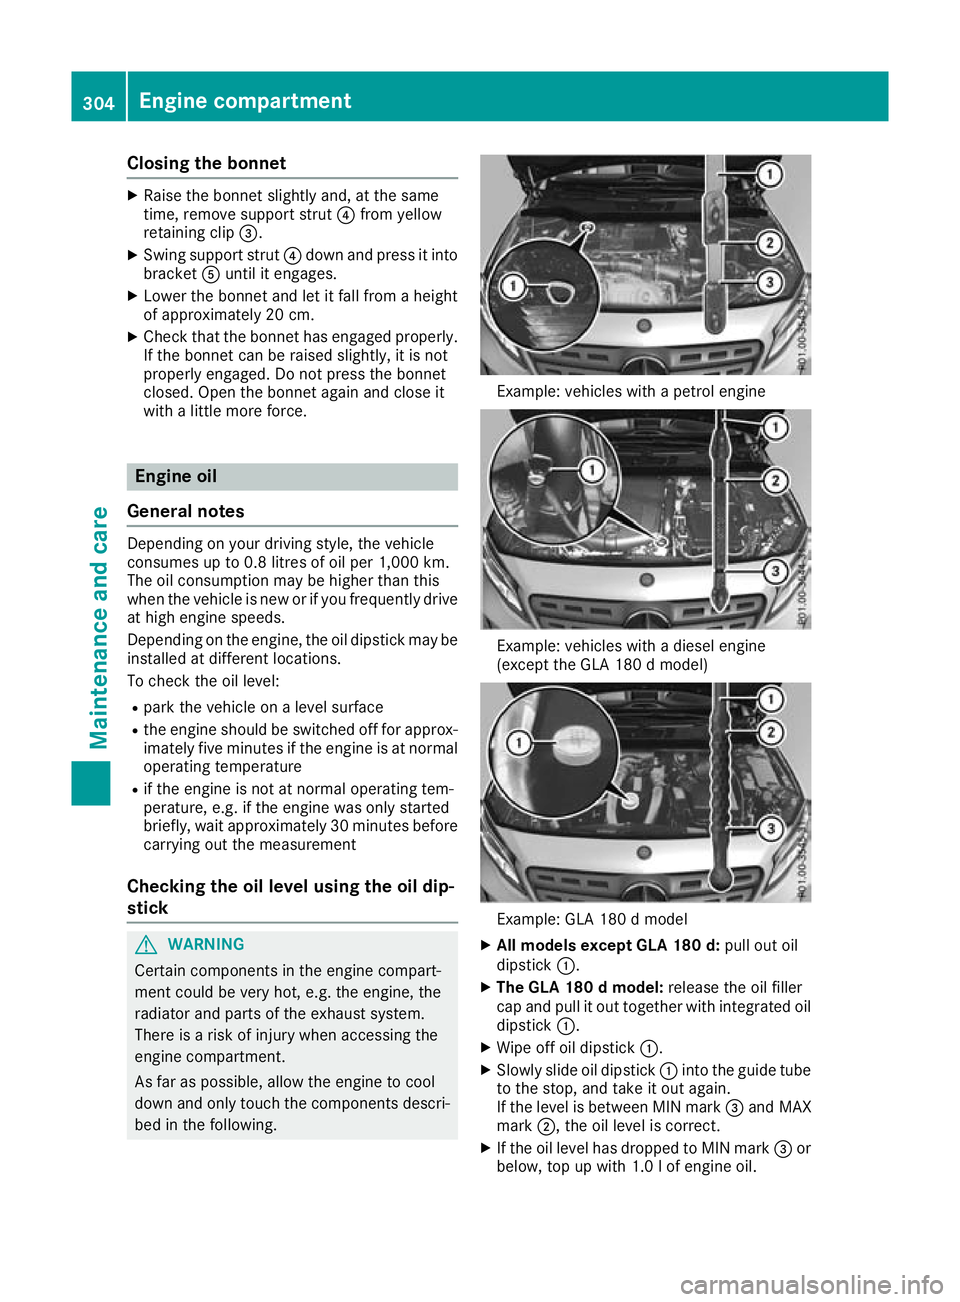
X
Raise the bonnet slightly and, at the same
time, remove support strut ?from yellow
retaining clip =.
X Swing support strut ?down and press it into
bracket Auntil it engages.
X Lower the bonnet and let it fall from a height
of approximately 20 cm.
X Check that the bonnet has engaged properly.
If the bonnet can be raised slightly, it is not
properly engaged. Do not press the bonnet
closed. Open the bonnet again and close it
with a little more force. Engine oil
General notes Depending on your driving style, the vehicle
consumes up to 0.8 litres of oil per 1,000 km.
The oil consumption may be higher than this
when the vehicle is new or if you frequently drive
at high engine speeds.
Depending on the engine, the oil dipstick may be installed at different locations.
To check the oil level:
R park the vehicle on a level surface
R the engine should be switched off for approx-
imately five minutes if the engine is at normal
operating temperature
R if the engine is not at normal operating tem-
perature, e.g. if the engine was only started
briefly, wait approximately 30 minute sbefore
carrying out the measurement
Checking the oil level using the oil dip-
stick G
WARNING
Certain components in the engine compart-
ment could be very hot, e.g. the engine, the
radiator and parts of the exhaust system.
There is a risk of injury when accessing the
engine compartment.
As far as possible, allow the engine to cool
down and only touch the components descri- bed in the following. Example: vehicles with a petrol engine
Example: vehicles with a diesel engine
(except the GLA 180 d model)
Example: GLA 180 d model
X All models except GLA 180 d: pull out oil
dipstick :.
X The GLA 180 d model: release the oil filler
cap and pull it out together with integrated oil dipstick :.
X Wipe off oil dipstick :.
X Slowly slide oil dipstick :into the guide tube
to the stop, and take it out again.
If the level is between MIN mark =and MAX
mark ;, the oil level is correct.
X If the oil level has dropped to MIN mark =or
below, top up with 1.0 lof engine oil. 304
Engine compartmentMaintenance and care
Page 308 of 369
Topping up engine oil
G
WARNING
Certain components in the engine compart-
ment could be very hot, e.g. the engine, the
radiator and parts of the exhaust system.
There is a risk of injury when accessing the
engine compartment.
As far as possible, allow the engine to cool
down and only touch the components descri- bed in the following. G
WARNING
If engine oil comes into contact with hot com- ponents in the engine compartment, it may
ignite. There is a risk of fire and injury.
Make sure that engine oil does not spill out
over the filler neck. Allow the engine to cool
down and thoroughly clean the components
that have come into contact with engine oil
before you start the engine. H
Environmental note
When topping up the oil, take care not to spill
any. If oil enters the soil or waterways, it is
harmful to the environment.
! Use only engine oils and oil filters that are
approved for vehicles with a service system. A
list of the engine oils and oil filters that have
been tested and approved in accordance with Mercedes-Benz Specifications for Service
Products is available at any Mercedes-Benz
Service Centre.
The following cause engine failure or damage
to the exhaust system:
R Use of engine oils and oil filters that have
not been expressly approved for the service system
R Replacement of engine oil and oil filter after
the replacement interval specified by the
service system has expired
R Use of engine oil additives
! Do not add too much oil. Topping up with too
much engine oil can result in damage to the
engine or to the catalytic converter. Have
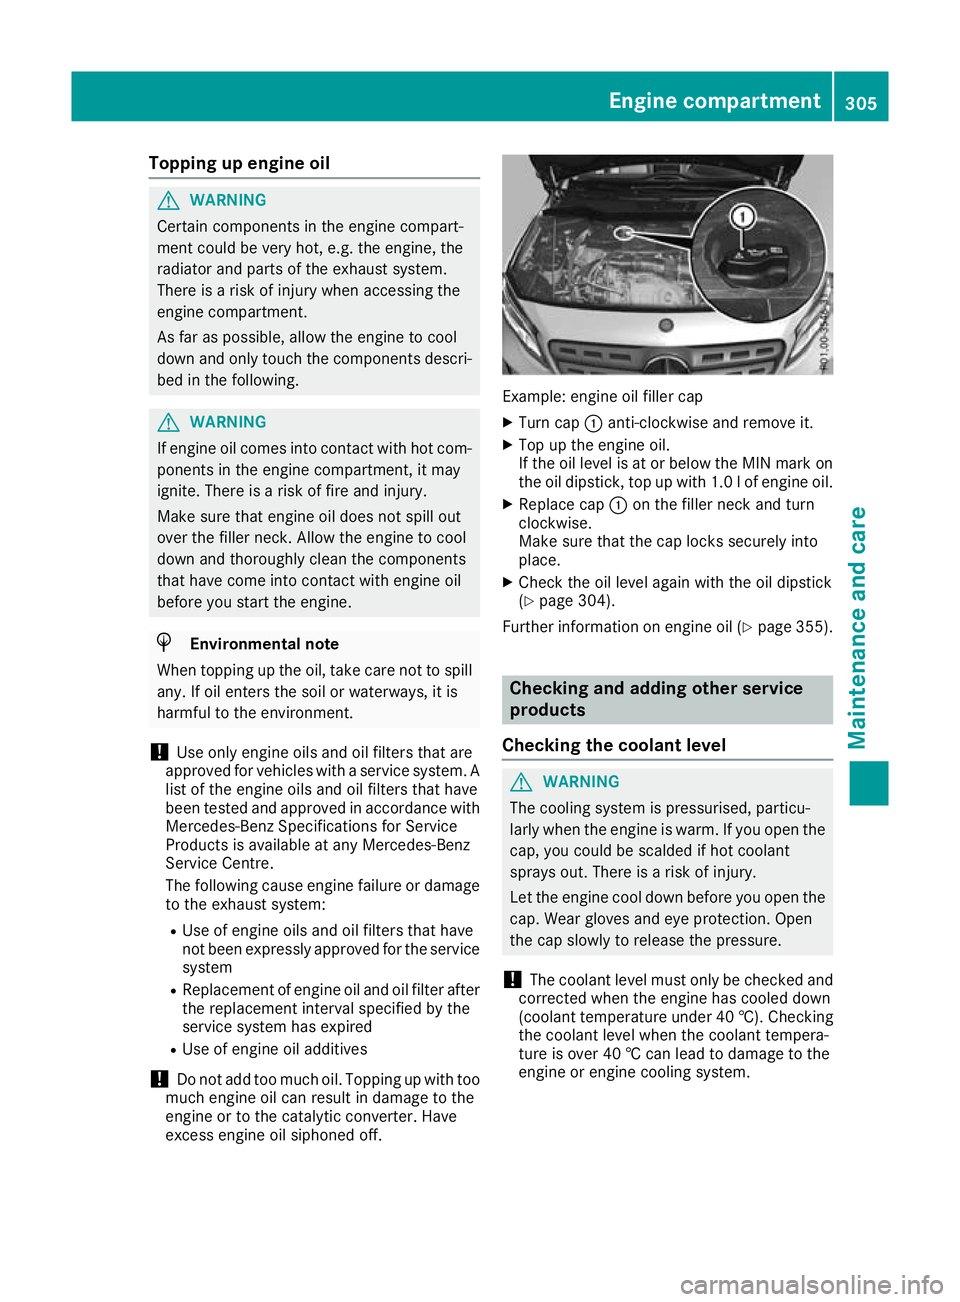
excess engine oil siphoned off. Example: engine oil filler cap
X Turn cap :anti-clockwise and remove it.
X Top up the engine oil.
If the oil level is at or below the MIN mark on
the oil dipstick, top up with 1.0 lof engine oil.
X Replace cap :on the filler neck and turn
clockwise.
Make sure that the cap locks securely into
place.
X Check the oil level again with the oil dipstick
(Y page 304).
Further information on engine oil (Y page 355). Checking and adding other service
products
Checking the coolant level G
WARNING
The cooling system is pressurised, particu-
larly when the engine is warm. If you open the cap, you could be scalded if hot coolant
sprays out. There is a risk of injury.
Let the engine cool down before you open the
cap. Wear gloves and eye protection. Open
the cap slowly to release the pressure.
! The coolant level must only be checked and
corrected when the engine has cooled down
(coolant temperature under 40 †). Checking
the coolant level when the coolant tempera-
ture is over 40 † can lead to damage to the
engine or engine cooling system. Engine compartment
305Maintenance and care Z