2017 MERCEDES-BENZ GLA SUV light
[x] Cancel search: lightPage 325 of 369
X
To reduce the tyre pressure: depress pres-
sure release button :next to pressure
gauge ;.
X When the tyre pressure is correct, unscrew
the filler hose from the valve of the sealed
tyre.
Please note that tyre sealant may leak out
when unscrewing the filler hose.
X Screw the valve cap onto the tyre valve of the
sealed tyre.
X Pull the tyre sealant bottle out of the tyre
inflation compressor.
The filler hose stays on the tyre sealant bottle.
X Drive to the nearest qualified specialist work-
shop and have the tyre changed there.
X Have the tyre sealant bottle replaced as soon
as possible at a qualified specialist workshop.
X Have the tyre sealant bottle replaced every
four years at a qualified specialist workshop. Battery (vehicle)
Important safety notes
Work on the battery, e.g. removing or fitting,
requires specialist knowledge and the use of
special tools. Therefore, always have work on
the battery carried out at a qualified specialist
workshop. G
WARNING
Work carried out incorrectly on the battery
can lead, for example, to a short circuit and
thus damage the vehicle electronics. This can lead to function restrictions applying to
safety-relevant systems, e.g the lighting sys-
tem, the ABS (anti-lock braking system) or the
ESP ®
(Electronic Stability Program). The oper-
ating safety of your vehicle may be restricted.
You could lose control of the vehicle, for
example:
R when braking
R in the event of abrupt steering manoeuvres
and/or when the vehicle's speed is not
adapted to the road conditions
There is a risk of an accident.
In the event of a short circuit or a similar inci- dent, contact a qualified specialist workshop immediately. Do not drive any further. Always
have work on the battery carried out at a
qualified specialist workshop.
Further information about ABS (Y page 68) and
ESP ®
(Y page 72). G
WARNING
Electrostatic build-up can lead to the creation of sparks, which could ignite the highly explo-
sive gases of a battery. There is a risk of an
explosion.
Before handling the battery, touch the vehicle body to remove any existing electrostatic
build-up.
The highly flammable gas mixture is created
while the battery is charging and when jump-
starting.
Always make sure that neither you nor the bat-
tery is electrostatically charged. Electrostatic
charge is created, for example:
R by wearing synthetic-fibre clothing
R by friction between clothing and the seat
R if you pull or push the battery across carpet or
other synthetic materials
R if you rub the battery with a cloth G
WARNING
During the charging process, a battery produ- ces hydrogen gas. If a short circuit occurs or
sparks are created, the hydrogen gas can
ignite. There is a risk of an explosion.
R Make sure that the positive terminal of a
connected battery does not come into con-
tact with vehicle parts.
R Never place metal objects or tools on a bat-
tery.
R It is important that you observe the descri-
bed order of the battery terminals when
connecting and disconnecting a battery.
R When jump-starting, make sure that the
battery poles with identical polarity are
connected. 322
Battery (vehicle)Breakdo
wn assis tance
Page 327 of 369
In order for the battery to achieve the maximum
possible service life, it should always be suffi-
ciently charged.
Like other batteries, the vehicle battery may
discharge over time if you do not use the vehicle. In such cases, have the battery disconnected at
a qualified specialist workshop. However, you
can also charge the battery with a charger rec-
ommended by Mercedes-Benz. For more infor-
mation, please contact a qualified specialist
workshop.
Have the battery charge checked more fre-
quently if you use the vehicle mainly for short
trips or if you leave it standing idle for an exten- ded period. Consult a qualified specialist work-
shop if you wish to leave your vehicle parked up
for a long period of time.
When you park the vehicle, remove the key if you do not require any electrical consumers. The
vehicle will then use very little energy, thus con- serving battery power.
If the power supply has been interrupted, e.g. if
the battery was discharged, you will have to:
R set the clock using the multimedia system;
see the separate operating instructions
R reset the function for folding the exterior mir-
rors in/out automatically, by folding the mir-
rors out once (Y page 113) Charging the battery
G
WARNING
During charging and jump-starting, explosive
gases can escape from the battery. There is a risk of an explosion.
Particularly avoid fire, naked flames, creating
sparks and smoking. Ensure there is sufficient
ventilation while charging and jump-starting.
Do not lean over a battery. G
WARNING
Battery acid is caustic. There is a risk of injury. Avoid contact with the skin, eyes or clothing.
Do not breathe in any battery gases. Do not
lean over the battery. Keep the batteries out of the reach of children. Immediately rinse off
battery acid thoroughly with plenty of clean
water and seek medical attention at once. G
WARNING
A discharged battery can freeze at tempera-
tures below freezing point. When jump-start-
ing the vehicle or charging the battery, gases can escape from the battery. There is a risk of
an explosion.
Allow the frozen battery to thaw out before
charging it or jump-starting.
! Only use battery chargers with a maximum
charging voltage of 14.8 V.
! Only charge the battery using the jump-start
connection point.
The jump-starting connection point is in the
engine compartment (Y page 325).
X Open the bonnet.
X Connect the battery charger to the positive
terminal and earth point in the same order as
when connecting the donor battery in the
jump-starting procedure (Y page 325).
If the indicator/warning lamps do not light up in
the instrument cluster at low temperatures, it is very likely that the discharged battery has fro-
zen. In this case, you may neither jump-start the vehicle nor charge the battery. The service life of
a battery that has been thawed may be reduced. The starting characteristics may be impaired,
especially at low temperatures. Have the
thawed battery checked at a qualified specialistworkshop.
Only charge the installed battery with a battery
charger which has been tested and approved by Mercedes-Benz. A battery charger unit specially
adapted for Mercedes-Benz vehicles and tested and approved by Mercedes-Benz is available as
an accessory. This device permits charging of
the battery while it is installed. Contact a
Mercedes-Benz Service Centre for information
and availability. Read the battery charger's
operating instructions before charging the bat-
tery. 324
Battery (vehicle)Breakdown assistance
Page 328 of 369
Jump-starting
For the jump-starting procedure, use only the jump-starting connection point, consisting of a pos- itive terminal and an earth point, in the engine compartment. G
WARNING
Battery acid is caustic. There is a risk of injury.
Avoid contact with the skin, eyes or clothing. Do not breathe in any battery gases. Do not lean over the battery. Keep the batteries out of the reach of children. Immediately rinse off battery acid
thoroughly with plenty of clean water and seek medical attention at once. G
WARNING
During charging and jump-starting, explosive gases can escape from the battery. There is a risk of an explosion.
Particularly avoid fire, naked flames, creating sparks and smoking. Ensure there is sufficient
ventilation while charging and jump-starting. Do not lean over a battery. G
WARNING
During the charging process, a battery produces hydrogen gas. If a short circuit occurs or sparks
are created, the hydrogen gas can ignite. There is a risk of an explosion.
R Make sure that the positive terminal of a connected battery does not come into contact with
vehicle parts.
R Never place metal objects or tools on a battery.
R It is important that you observe the described order of the battery terminals when connecting
and disconnecting a battery.
R When jump-starting, make sure that the battery poles with identical polarity are connected.
R It is particularly important to observe the described order when connecting and disconnecting
the jump leads.
R Never connect or disconnect the battery terminals while the engine is running. G
WARNING
A discharged battery can freeze at temperatures below freezing point. When jump-starting the
vehicle or charging the battery, gases can escape from the battery. There is a risk of an explosion.
Allow the frozen battery to thaw out before charging it or jump-starting.
! Vehicles with a petrol engine:
avoid repeated and lengthy starting attempts. Otherwise, the
non-combusted fuel may damage the catalytic converter.
If the indicator/warning lamps do not light up in the instrument cluster at low temperatures, it is very likely that the discharged battery has frozen. In this case you may neither jump-start the vehicle norcharge the battery. Let the battery thaw first. The service life of a battery that has been thawed may
be reduced. The starting characteristics may be impaired, especially at low temperatures. Have the
thawed battery checked at a qualified specialist workshop. Jump-starting
325Breakdown assistance Z
Page 329 of 369
Do not use a rapid charging device to start the vehicle. If your vehicle's battery is discharged, the
engine can be jump-started from another vehicle or from a donor battery using jump leads. Observe the following points:
R the battery is not accessible in all vehicles. If the other vehicle's battery is not accessible, jump-
start the vehicle using a donor battery or a jump-starting device
R vehicles with a petrol engine: jump-start the vehicle only when the engine and exhaust system
are cold
R do not start the engine if the battery is frozen. Let the battery thaw first
R jump-starting may be performed only using batteries with a nominal voltage of 12 V
R only use jump leads that are not damaged and have a sufficient cross-section and insulated
terminal clamps.
R make sure that the two vehicles do not touch
Make sure that:
R the jump leads are not damaged
R non-insulated parts of the terminal clamps do not come into contact with other metal parts while
the jump leads are connected to the battery
R the jump leads cannot come into contact with parts that can move when the engine is running,
such as the V-belt pulley or the fan
X Secure the vehicle by applying the electric parking brake.
X Manual transmission: depress the clutch pedal fully and shift to neutral.
X Automatic transmission: shift the transmission to position j.
X Turn the key to position gin the ignition lock and remove it.
X Switch off all electrical consumers, e.g. rear window heating, lighting etc.
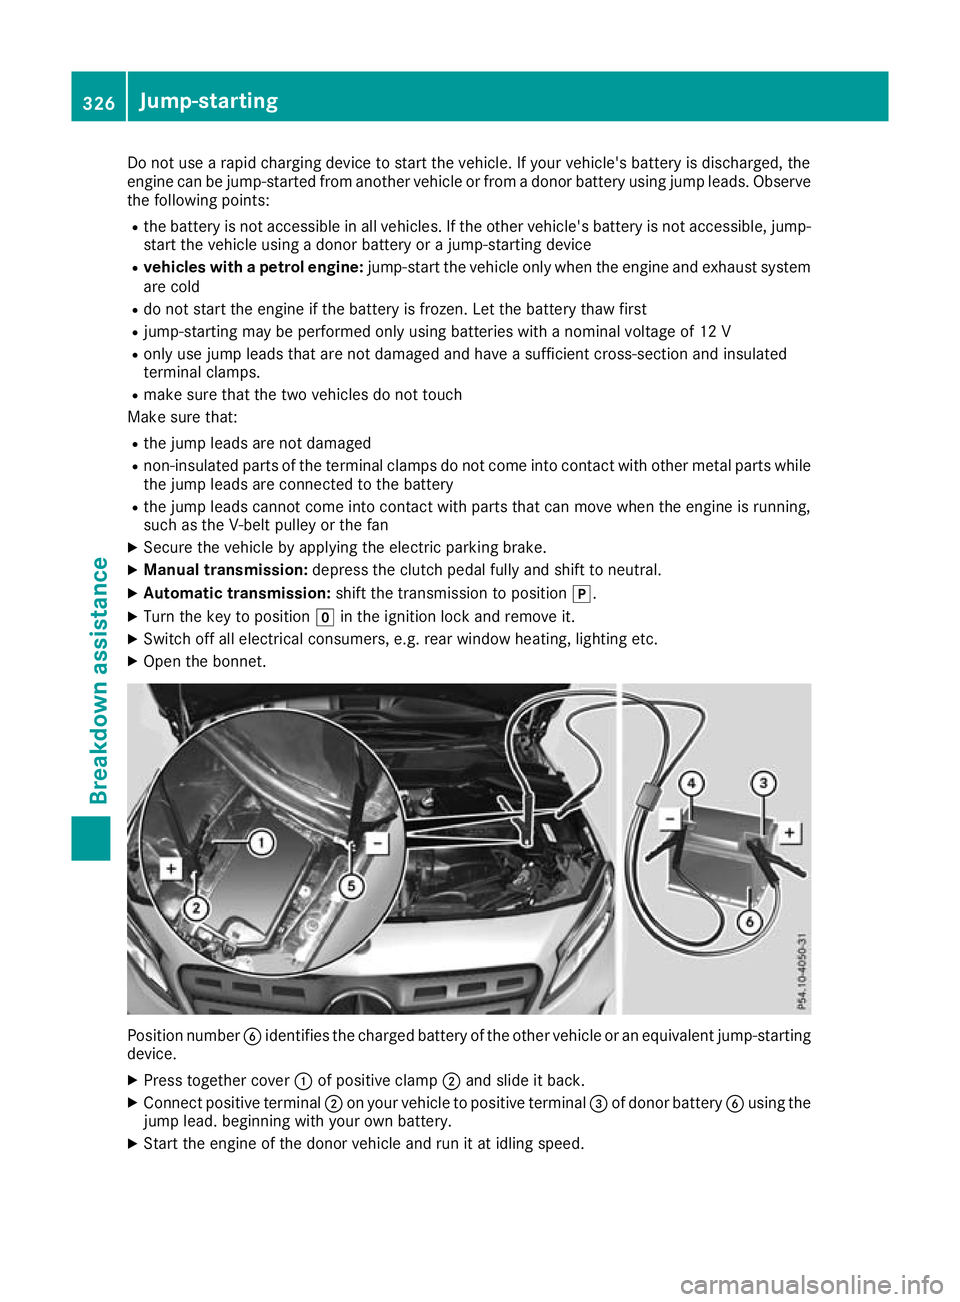
X Open the bonnet. Position number
Bidentifies the charged battery of the other vehicle or an equivalent jump-starting
device.
X Press together cover :of positive clamp ;and slide it back.
X Connect positive terminal ;on your vehicle to positive terminal =of donor battery Busing the
jump lead. beginning with your own battery.
X Start the engine of the donor vehicle and run it at idling speed. 326
Jump-startingBreakdown assistance
Page 341 of 369
Only screw standard valve caps or valve caps
specifically provided by Mercedes-Benz for
your vehicle onto the tyre valve. G
WARNING
If the tyre pressure drops repeatedly, the
wheel, valve or tyre may be damaged. Tyre
pressure that is too low may result in a tyre
blow-out. There is a risk of accident.
R Check the tyre for foreign objects.
R Check whether the wheel is losing air or the
valve is leaking.
If you are unable to rectify the damage, con-
tact a qualified specialist workshop. H
Environmental note
Check the tyre pressure regularly, at least
every 14 days.
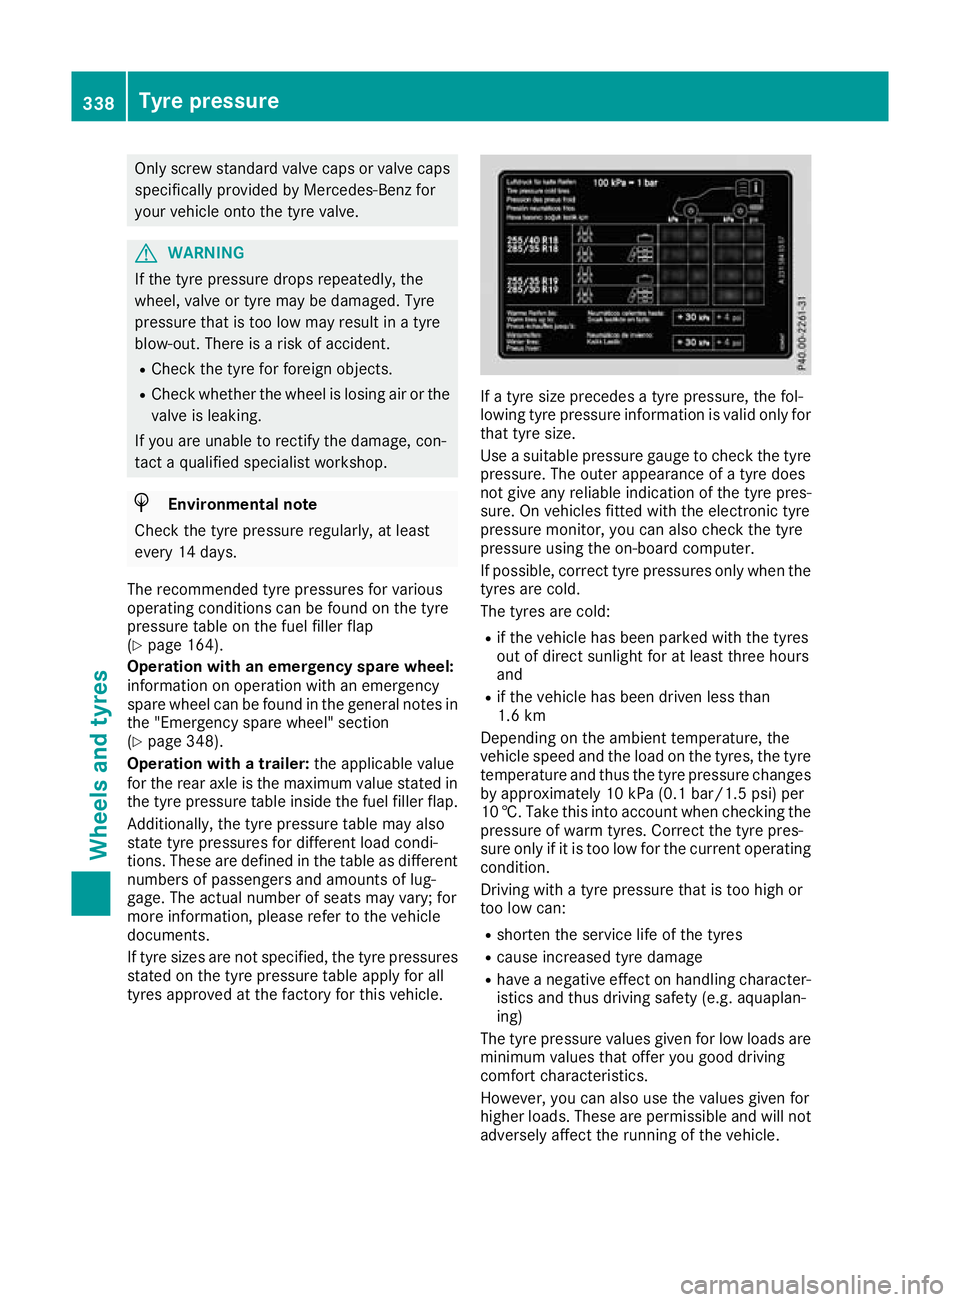
The recommended tyre pressures for various
operating conditions can be found on the tyre
pressure table on the fuel filler flap
(Y page 164).
Operation with an emergency spare wheel:
information on operation with an emergency
spare wheel can be found in the general notes in the "Emergency spare wheel" section
(Y page 348).
Operation with a trailer: the applicable value
for the rear axle is the maximum value stated in the tyre pressure table inside the fuel filler flap.
Additionally, the tyre pressure table may also
state tyre pressures for different load condi-
tions. These are defined in the table as different numbers of passengers and amounts of lug-
gage. The actual number of seats may vary; for
more information, please refer to the vehicle
documents.
If tyre sizes are not specified, the tyre pressures
stated on the tyre pressure table apply for all
tyres approved at the factory for this vehicle. If a tyre size precedes a tyre pressure, the fol-
lowing tyre pressure information is valid only for that tyre size.
Use a suitable pressure gauge to check the tyre
pressure. The outer appearance of a tyre does
not give any reliable indication of the tyre pres-
sure. On vehicles fitted with the electronic tyre
pressure monitor, you can also check the tyre
pressure using the on-board computer.
If possible, correct tyre pressures only when the
tyres are cold.
The tyres are cold:
R if the vehicle has been parked with the tyres
out of direct sunlight for at least three hours
and
R if the vehicle has been driven less than
1.6 km
Depending on the ambient temperature, the
vehicle speed and the load on the tyres, the tyre temperature and thus the tyre pressure changes by approximately 10 kPa (0.1 bar/1.5 psi) per
10 †. Take this into account when checking the
pressure of warm tyres. Correct the tyre pres-
sure only if it is too low for the current operating
condition.
Driving with a tyre pressure that is too high or
too low can:
R shorten the service life of the tyres
R cause increased tyre damage
R have a negative effect on handling character-
istics and thus driving safety (e.g. aquaplan-
ing)
The tyre pressure values given for low loads are minimum values that offer you good driving
comfort characteristics.
However, you can also use the values given for
higher loads. These are permissible and will not
adversely affect the running of the vehicle. 338
Tyre pressureWheels and tyres
Page 343 of 369
Tyre pressure monitor
General notes If a tyre pressure monitor is fitted, the vehicle's
wheels have sensors fitted that monitor the tyre
pressures in all four tyres. The tyre pressure
monitor warns you if the pressure drops in one
or more of the tyres. The tyre pressure monitor
functions only if the corresponding sensors are
fitted to all wheels.
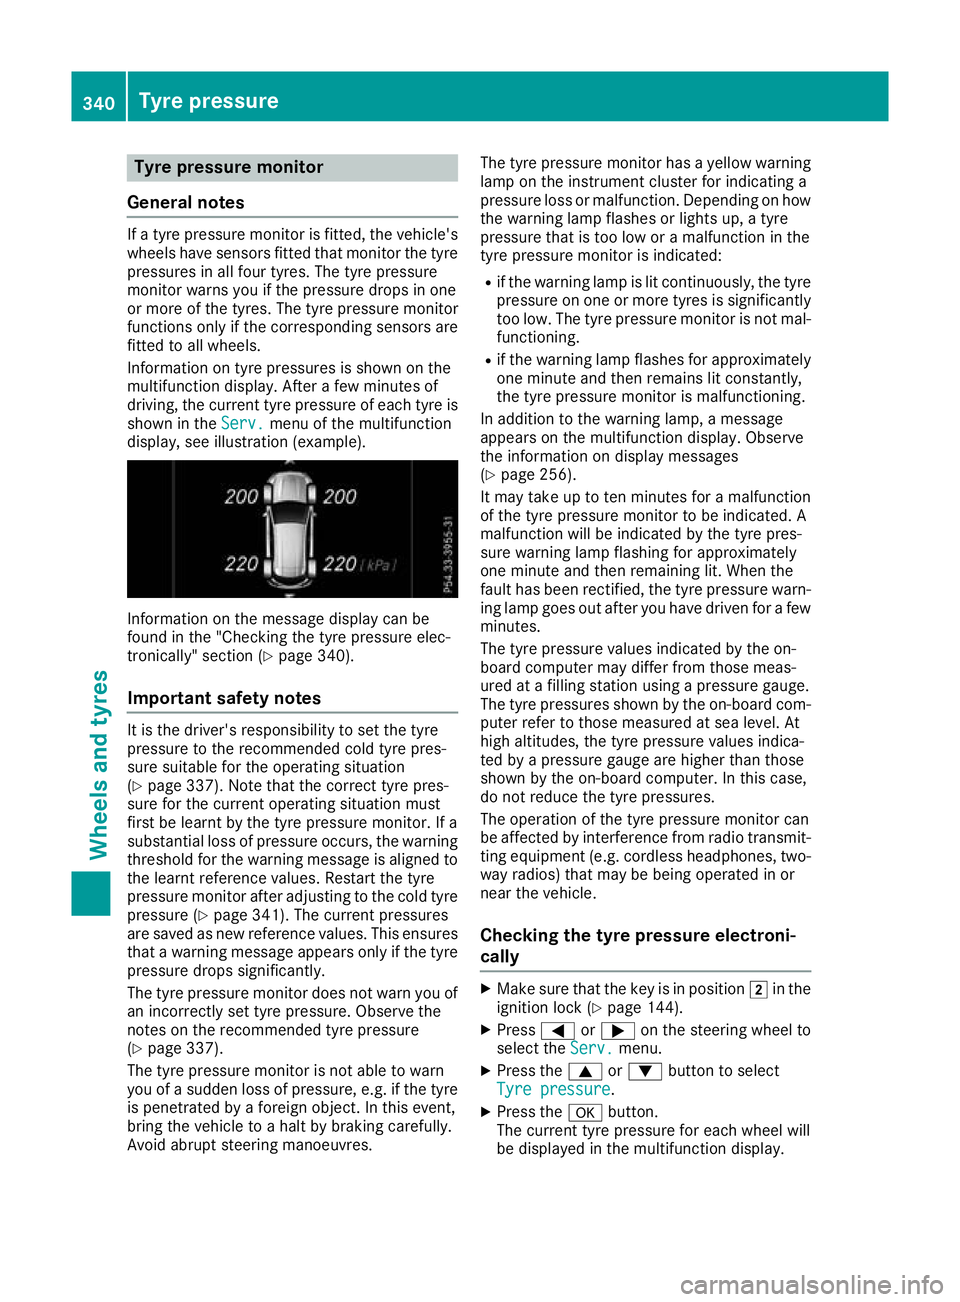
Information on tyre pressures is shown on the
multifunction display. After a few minutes of
driving, the current tyre pressure of each tyre is
shown in the Serv.
Serv. menu of the multifunction
display, see illustration (example). Information on the message display can be
found in the "Checking the tyre pressure elec-
tronically" section (Y page 340).
Important safety notes It is the driver's responsibility to set the tyre
pressure to the recommended cold tyre pres-
sure suitable for the operating situation
(Y page 337). Note that the correct tyre pres-
sure for the current operating situation must
first be learnt by the tyre pressure monitor. If a
substantial loss of pressure occurs, the warning threshold for the warning message is aligned to
the learnt reference values. Restart the tyre
pressure monitor after adjusting to the cold tyre pressure (Y page 341). The current pressures
are saved as new reference values. This ensures that a warning message appears only if the tyre
pressure drops significantly.
The tyre pressure monitor does not warn you of
an incorrectly set tyre pressure. Observe the
notes on the recommended tyre pressure
(Y page 337).
The tyre pressure monitor is not able to warn
you of a sudden loss of pressure, e.g. if the tyre is penetrated by a foreign object. In this event,
bring the vehicle to a halt by braking carefully.
Avoid abrupt steering manoeuvres. The tyre pressure monitor has a yellow warning
lamp on the instrument cluster for indicating a
pressure loss or malfunction. Depending on how
the warning lamp flashes or lights up, a tyre
pressure that is too low or a malfunction in the
tyre pressure monitor is indicated:
R if the warning lamp is lit continuously, the tyre
pressure on one or more tyres is significantly too low. The tyre pressure monitor is not mal-
functioning.
R if the warning lamp flashes for approximately
one minute and then remains lit constantly,
the tyre pressure monitor is malfunctioning.
In addition to the warning lamp, a message
appears on the multifunction display. Observe
the information on display messages
(Y page 256).
It may take up to ten minutes for a malfunction
of the tyre pressure monitor to be indicated. A
malfunction will be indicated by the tyre pres-
sure warning lamp flashing for approximately
one minute and then remaining lit. When the
fault has been rectified, the tyre pressure warn- ing lamp goes out after you have driven for a few minutes.
The tyre pressure values indicated by the on-
board computer may differ from those meas-
ured at a filling station using a pressure gauge.
The tyre pressures shown by the on-board com-
puter refer to those measured at sea level. At
high altitudes, the tyre pressure values indica-
ted by a pressure gauge are higher than those
shown by the on-board computer. In this case,
do not reduce the tyre pressures.
The operation of the tyre pressure monitor can
be affected by interference from radio transmit- ting equipment (e.g. cordless headphones, two-way radios) that may be being operated in or
near the vehicle.
Checking the tyre pressure electroni-
cally X
Make sure that the key is in position 2in the
ignition lock (Y page 144).
X Press =or; on the steering wheel to
select the Serv. Serv.menu.
X Press the 9or: button to select
Tyre pressure
Tyre pressure.
X Press the abutton.
The current tyre pressure for each wheel will
be displayed in the multifunction display. 340
Tyre pressureWheels and tyres
Page 344 of 369
If the vehicle was parked for longer than
20 minutes, the Tyre pressures will be
Tyre pressures will be
displayed
displayed after
aftera
afew
few minutes
minutes of
ofdriv‐
driv‐
ing
ing message is shown.
After a teach-in period, the tyre pressure moni-
tor automatically detects new wheels or new
sensors. As long as a clear allocation of the tyre pressure values to the individual wheels is not
possible, the Tyre
Tyre pressure pressure monitor
monitoractive
active
message is shown instead of the tyre pressure
display. The tyre pressures are already being
monitored.
After an emergency spare wheel has been fitted, the system may still display the tyre pressure of
the removed wheel for a few minutes. If this
occurs, note that the value displayed for the
position where the spare wheel is fitted is not
the same as the current tyre pressure of the
emergency spare wheel.
Warning messages of the tyre pressure monitor If the tyre pressure monitor detects a pressure
loss in one or more tyres, a warning message is
shown in the multifunction display. The yellow
tyre pressure warning lamp then lights up:
R If the Please correct tyre pressure
Please correct tyre pressure
message appears in the multifunction display,
the tyre pressure in at least one tyre is too
low. The tyre pressure must be corrected
when the opportunity arises.
R If the Tyre Tyre pressure
pressure Check
Checktyre(s)
tyre(s) mes-
sage appears in the multifunction display, the
tyre pressure in one or more tyres has drop-
ped significantly. The tyres must be checked.
R If the Tyre pressure Caution Tyre mal‐
Tyre pressure Caution Tyre mal‐
function function message appears in the multifunc-
tion display, the tyre pressure in one or more
tyres has dropped suddenly. The tyres must
be checked.
Observe the instructions and safety notes in the display messages in the "Tyres" section
(Y page 256).
If the position of the wheels on the vehicle is
changed, the tyre pressures may be displayed in
the wrong positions for a short time. After a few minutes of driving, this is rectified and the tyre
pressures are displayed in the correct positions. Restarting the tyre pressure monitor When you restart the tyre pressure monitor, all
existing warning messages are deleted and the
warning lamps go out. The monitor uses the cur-
rently set tyre pressures as the reference values
for monitoring. In most cases, the tyre pressure monitor will automatically detect the new refer- ence values after you have changed the tyre
pressure. However, you can also set reference
values manually as described here. The tyre
pressure monitor then monitors the new tyre
pressure values.
X Use the table on the inside of the fuel filler flap
to ensure that the tyre pressure is set cor-
rectly in all four tyres for the current operating
conditions.
Also observe the notes in the section on tyre
pressures (Y page 337).
X Make sure that the key is in position 2in the
ignition lock (Y page 144).
X Press =or; on the steering wheel to
select the Serv.
Serv. menu.
X Press the 9or: button to select
Tyre pressure Tyre pressure.
X Press the abutton.
The multifunction display shows the current
tyre pressure for each tyre or the Tyre Tyrepres‐
pres‐
sures
sures will
willbe
bedisplayed
displayed after
aftera
afew
few
minutes of driving
minutes of driving message.
X Press the :button.
The multifunction display shows the Use Use
current pressures as new reference current pressures as new reference
values values message.
If you wish to confirm the restart:
X Press the abutton.
The Tyre
Tyre press:
press: monitor
monitor restarted
restarted mes-
sage appears in the multifunction display.
After you have been driving for a few minutes,
the system checks whether the current tyre
pressures are within the specified range. The
new tyre pressures are then accepted as ref- erence values and monitored.
If you wish to cancel the restart: X Press the %button.
The tyre pressure values stored at the last
restart will continue to be monitored. Tyre pressure
341Wheels and tyres Z