2017 MERCEDES-BENZ GLA SUV light
[x] Cancel search: lightPage 280 of 369
General notes
The section on the multimedia system in this
manual describes the basic principles for oper-
ation. More information can be found in the Dig-
ital Owner's Manual. Important safety notes
G
WARNING
If you operate information and communica-
tion equipment integrated in the vehicle when driving, you could be distracted from the traf-
fic situation. This could also cause you to lose control of the vehicle. There is a risk of an
accident.
Only operate this equipment when the traffic
situation permits. If you cannot be sure of this,
stop the vehicle paying attention to road and
traffic conditions and operate the equipment
with the vehicle stationary.
You must observe the legal requirements for the
country in which you are currently driving when operating the multimedia system.
The multimedia system calculates the route to
the destination without taking the following into
account, for example:
R traffic lights
R stop and give way signs
R parking or stopping restrictions
R road narrowing
R other road and traffic rules and regulations
The multimedia system may give incorrect driv-
ing recommendations if the actual road/traffic
situation does not correspond with the digital
map data.
For example:
R a diverted route
R the road layout or the direction of a one-way
street has been changed
For this reason, you must always observe road
and traffic rules and regulations during your
journey. Road and traffic rules and regulations
always have priority over multimedia system
driving recommendations. G
WARNING
Modifications to electronic components, their software as well as wiring could affect their
function and/or the operation of other net-
worked components. This could in particular
also be the case for systems relevant to
safety. They might not function properly any-
more and/or jeopardise the operational
safety of the vehicle. There is an increased
risk of an accident and injury.
Do not attempt to modify the wiring as well as
electronic components or their software.
Always have work on electrical and electronic components carried out at a qualified special-
ist workshop.
If you make any changes to the vehicle elec-
tronics, the general operating permit is ren-
dered invalid. Function restrictions
For safety reasons, some functions are restric-
ted or unavailable while the vehicle is in motion.
You will notice this, for example, because either you will not be able to select certain menu items
or a message will appear to this effect. Operating system
Overview
General notes !
Do not use the space in front of the display
for storage. Objects placed here could dam-
age the display or impair its function. Avoid
any direct contact with the display surface.
Pressure on the display surface may result in
impairments to the display, which could be
irreversible.
Wearing polarised sunglasses may impair your
ability to read the display.
The display has an automatic temperature-con- trolled switch-off feature. The brightness is
automatically reduced if the temperature is too
high. If necessary, the display may temporarily
switch off completely. Operating system
277Multimedia system Z
Page 288 of 369
R
Bluetooth ®
must be activated on the mobile
phone and must be made visible to other devi-
ces
R The Bluetooth ®
SIM Access Profile of the
mobile phone must be activated
Authorising and connecting a mobile
phone
COMAND Online:
X Select Connect device
Connect deviceQSearch for Search for
phones
phonesQSAP phone SAP phoneQStart Start
search
searchQMB SAP module phones MB SAP module phones.
Audio 20:
X Select Connect device
Connect deviceQConnect new Connect new
device
deviceQSAP phone SAP phone.
Multimedia system: X Select the mobile phone.
X Enter and confirm any 16-digit PIN.
X Enter and confirm the same PIN on the mobile
phone.
X Where necessary, enter the SIM card PIN into
the multimedia system and confirm.
i Please observe the messages in the mobile
phone. If necessary, you will be asked to con-
firm further profile requests.
Switching between mobile phones If you have authorised more than one mobile
phone on the module, you can switch between
the individual phones.
X Select the mobile phone in the device man-
ager.
X Confirm the connection request; see the man-
ufacturer's operating instructions.
X Where necessary, enter the SIM card PIN into
the multimedia system and confirm.
Data modem mode X
Connect the mobile phone to the module
(Y page 284).
or
X Insert the SIM card into the SIM card slot on
the module (Y page 284).
X Before connecting for the first time, enable
the module for Internet access and select the mobile phone network provider in the multi- media system (see the Digital Owner's Man-
ual).
Use as a data modem is automatically activa-
ted.
X Activate/deactivate data roaming (see the
Digital Owner's Manual).
For further information on data modem mode
without telephony with COMAND Online (see
the Digital Owner's Manual).
Settings Storing/deleting the SIM card PIN
COMAND Online:
X Select Connect Connect device deviceQMB MBSAP
SAP module
module
phones
phones.
X Highlight the mobile phone.
X To select G: navigate to the right.
X Activate Oor deactivate ªStore PIN
Store PIN.
Audio 20:
X Select Connect device
Connect device.
X Select in the line of the desired
mobile phone.
X Activate Oor deactivate ªStore PIN
Store PIN.
Transferring the phone book In order to use the phone book of the mobile
phone via the multimedia system, the phone
book must be transferred using the module.
The transfer of data may take up to ten minutes.
Transmission occurs automatically after a Blue-
tooth ®
connection is automatically established.
Text messages Requirements
The module is connected with the mobile phone
(Y page 284) or is being used in the SIM card
mode (Y page 284). Operating system
285Multimedia system Z
Page 292 of 369
R
Always stow objects in such a way that they
cannot be tossed about in these or similar
situations.
R Always make sure that objects do not proj-
ect from stowage spaces, luggage nets or
stowage nets.
R Ensure that closable stowage spaces are
shut before beginning your journey.
R Always stow and secure heavy, hard, poin-
ted, sharp-edged, fragile or outsize objects in the load compartment.
Observe the loading guidelines (Y page 288).
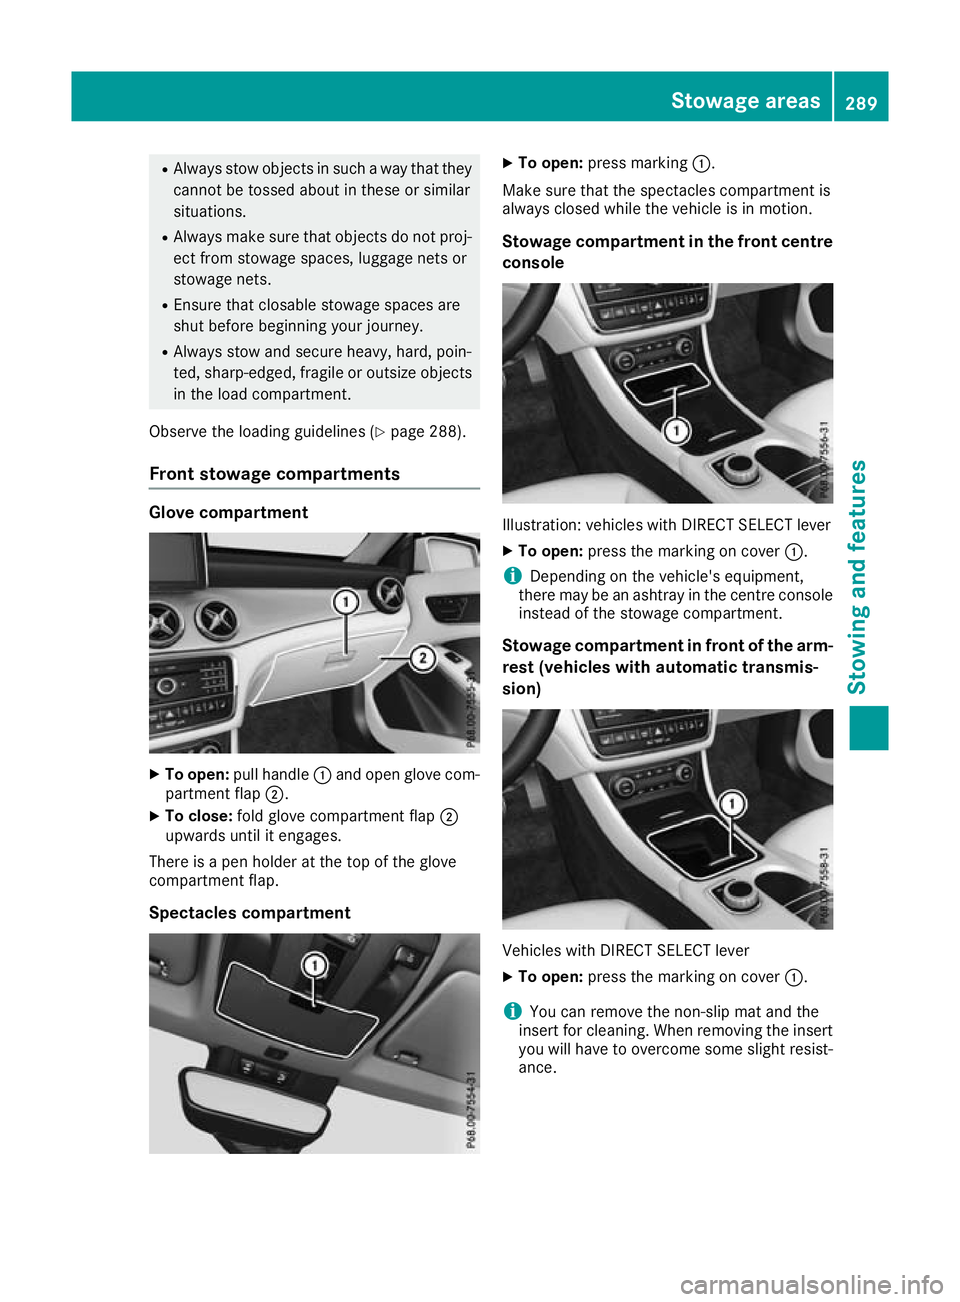
Front stowage compartments Glove compartment
X
To open: pull handle :and open glove com-
partment flap ;.
X To close: fold glove compartment flap ;
upwards until it engages.
There is a pen holder at the top of the glove
compartment flap.
Spectacles compartment X
To open: press marking :.
Make sure that the spectacles compartment is
always closed while the vehicle is in motion.
Stowage compartment in the front centre
console Illustration: vehicles with DIRECT SELECT lever
X To open: press the marking on cover :.
i Depending on the vehicle's equipment,
there may be an ashtray in the centre console
instead of the stowage compartment.
Stowage compartment in front of the arm-
rest (vehicles with automatic transmis-
sion) Vehicles with DIRECT SELECT lever
X To open: press the marking on cover :.
i You can remove the non-slip mat and the
insert for cleaning. When removing the insert
you will have to overcome some slight resist-
ance. Stowage areas
289Stowing an d features Z
Page 296 of 369
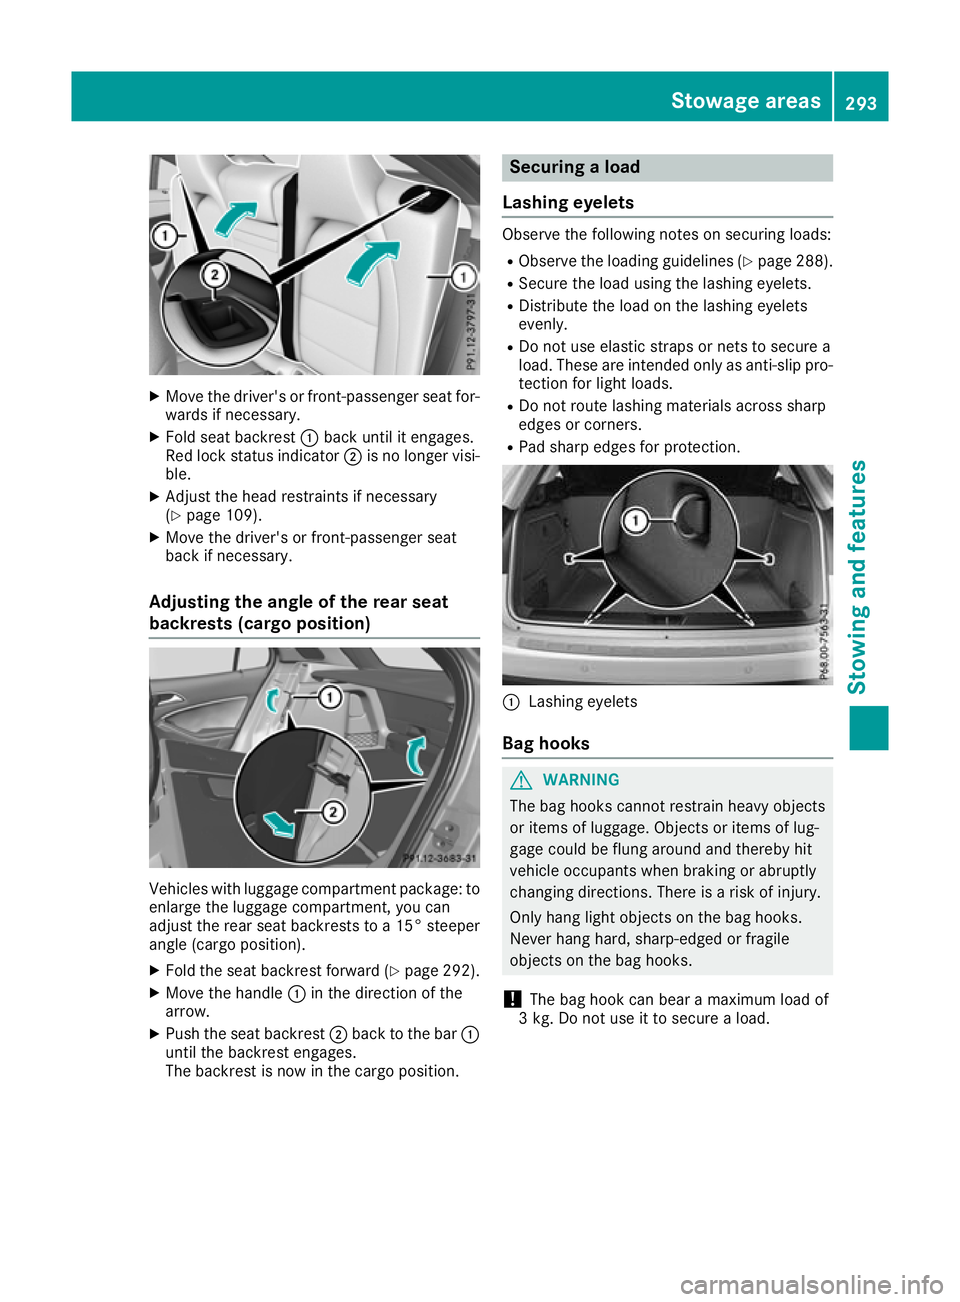
X
Move the driver's or front-passenger seat for-
wards if necessary.
X Fold seat backrest :back until it engages.
Red lock status indicator ;is no longer visi-
ble.
X Adjust the head restraints if necessary
(Y page 109).
X Move the driver's or front-passenger seat
back if necessary.
Adjusting the angle of the rear seat
backrests (cargo position) Vehicles with luggage compartment package: to
enlarge the luggage compartment, you can
adjust the rear seat backrests to a 15° steeper
angle (cargo position).
X Fold the seat backrest forward (Y page 292).
X Move the handle :in the direction of the
arrow.
X Push the seat backrest ;back to the bar :
until the backrest engages.
The backrest is now in the cargo position. Securing a load
Lashing eyelets Observe the following notes on securing loads:
R Observe the loading guidelines (Y page 288).
R Secure the load using the lashing eyelets.
R Distribute the load on the lashing eyelets
evenly.
R Do not use elastic straps or nets to secure a
load. These are intended only as anti-slip pro-
tection for light loads.
R Do not route lashing materials across sharp
edges or corners.
R Pad sharp edges for protection. :
Lashing eyelets
Bag hooks G
WARNING
The bag hooks cannot restrain heavy objects
or items of luggage. Objects or items of lug-
gage could be flung around and thereby hit
vehicle occupants when braking or abruptly
changing directions. There is a risk of injury.
Only hang light objects on the bag hooks.
Never hang hard, sharp-edged or fragile
objects on the bag hooks.
! The bag hook can bear a maximum load of
3 kg. Do not use it to secure a load. Stowage areas
293Stowing and features Z
Page 300 of 369
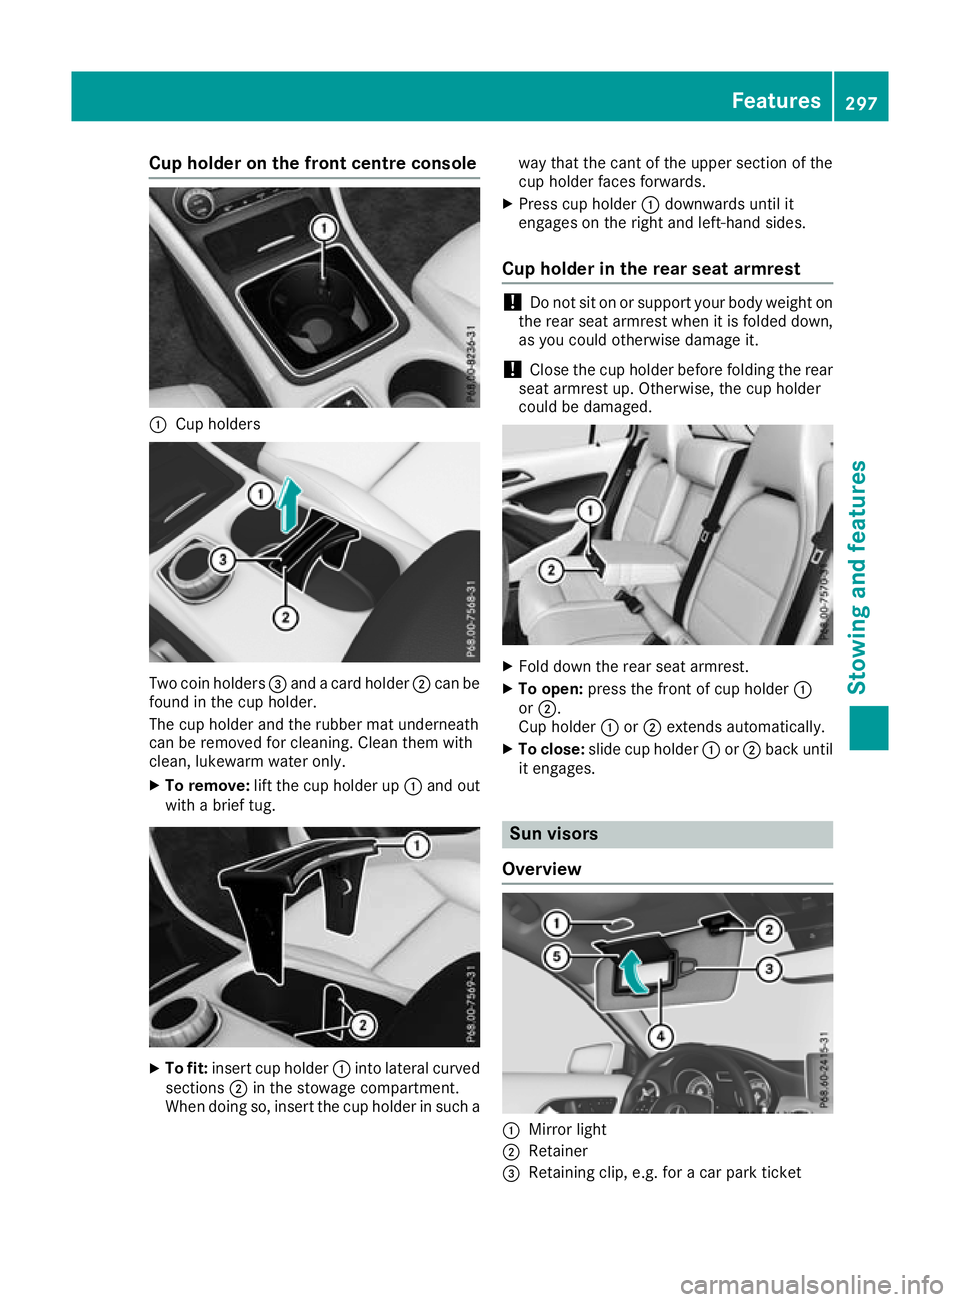
Cup holder on the front centre console
:
Cup holders Two coin holders
=and a card holder ;can be
found in the cup holder.
The cup holder and the rubber mat underneath
can be removed for cleaning. Clean them with
clean, lukewarm water only.
X To remove: lift the cup holder up :and out
with a brief tug. X
To fit: insert cup holder :into lateral curved
sections ;in the stowage compartment.
When doing so, insert the cup holder in such a way that the cant of the upper section of the
cup holder faces forwards.
X Press cup holder :downwards until it
engages on the right and left-hand sides.
Cup holder in the rear seat armrest !
Do not sit on or support your body weight on
the rear seat armrest when it is folded down,
as you could otherwise damage it.
! Close the cup holder before folding the rear
seat armrest up. Otherwise, the cup holder
could be damaged. X
Fold down the rear seat armrest.
X To open: press the front of cup holder :
or ;.
Cup holder :or; extends automatically.
X To close: slide cup holder :or; back until
it engages. Sun visors
Overview :
Mirror light
; Retainer
= Retaining clip, e.g. for a car park ticket Features
297Stowing and features Z
Page 301 of 369
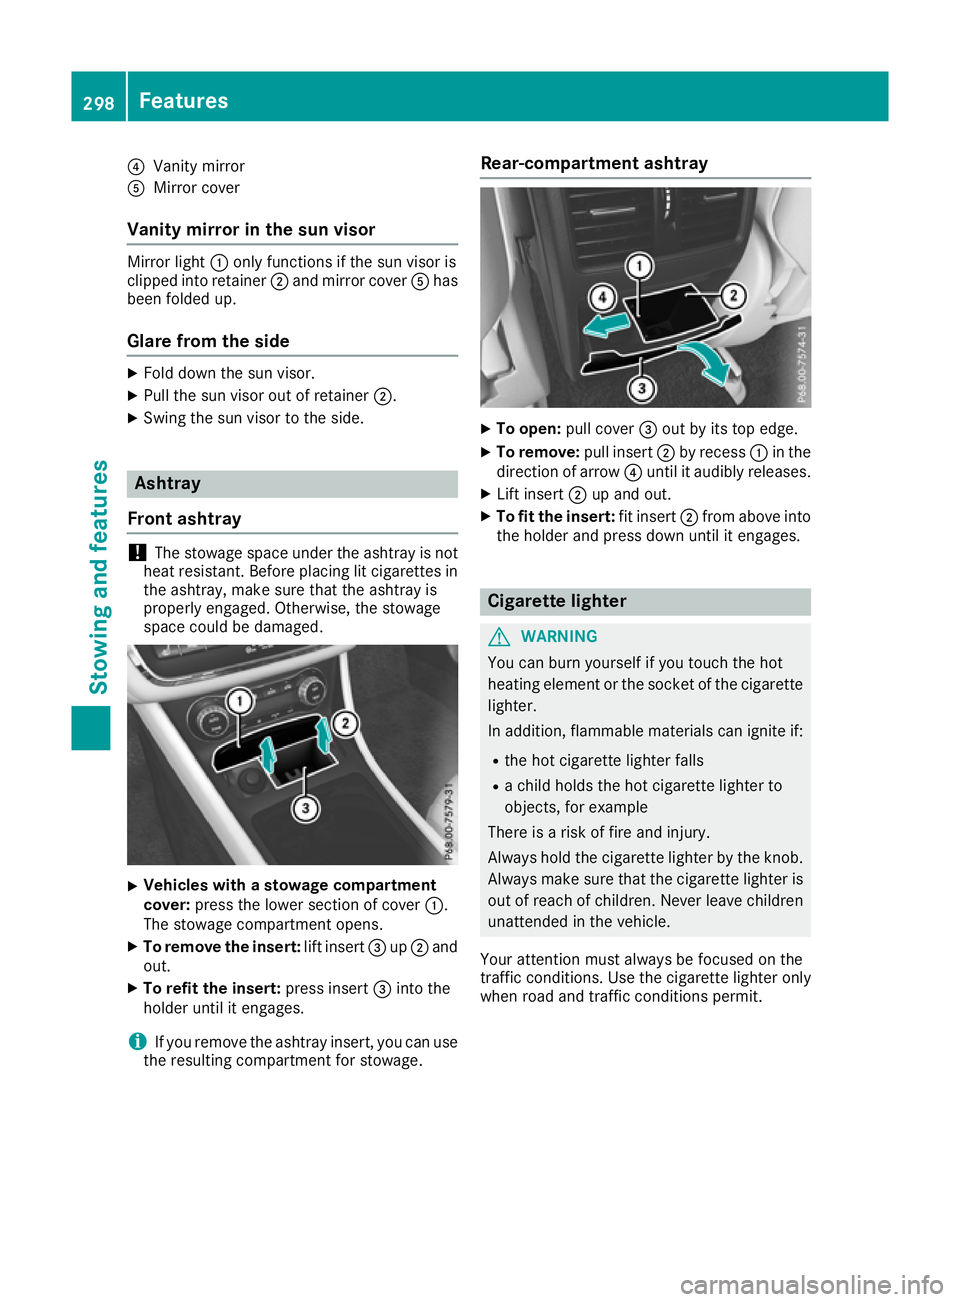
?
Vanity mirror
A Mirror cover
Vanity mirror in the sun visor Mirror light
:only functions if the sun visor is
clipped into retainer ;and mirror cover Ahas
been folded up.
Glare from the side X
Fold down the sun visor.
X Pull the sun visor out of retainer ;.
X Swing the sun visor to the side. Ashtray
Front ashtray !
The stowage space under the ashtray is not
heat resistant. Before placing lit cigarettes in the ashtray, make sure that the ashtray is
properly engaged. Otherwise, the stowage
space could be damaged. X
Vehicles with a stowage compartment
cover:
press the lower section of cover :.
The stowage compartment opens.
X To remove the insert: lift insert=up; and
out.
X To refit the insert: press insert=into the
holder until it engages.
i If you remove the ashtray insert, you can use
the resulting compartment for stowage. Rear-compartment ashtray
X
To open: pull cover =out by its top edge.
X To remove: pull insert;by recess :in the
direction of arrow ?until it audibly releases.
X Lift insert ;up and out.
X To fit the insert: fit insert;from above into
the holder and press down until it engages. Cigarette lighter
G
WARNING
You can burn yourself if you touch the hot
heating element or the socket of the cigarette lighter.
In addition, flammable materials can ignite if:
R the hot cigarette lighter falls
R a child holds the hot cigarette lighter to
objects, for example
There is a risk of fire and injury.
Always hold the cigarette lighter by the knob.
Always make sure that the cigarette lighter is
out of reach of children. Never leave children unattended in the vehicle.
Your attention must always be focused on the
traffic conditions. Use the cigarette lighter only when road and traffic conditions permit. 298
FeaturesStowing and features
Page 302 of 369
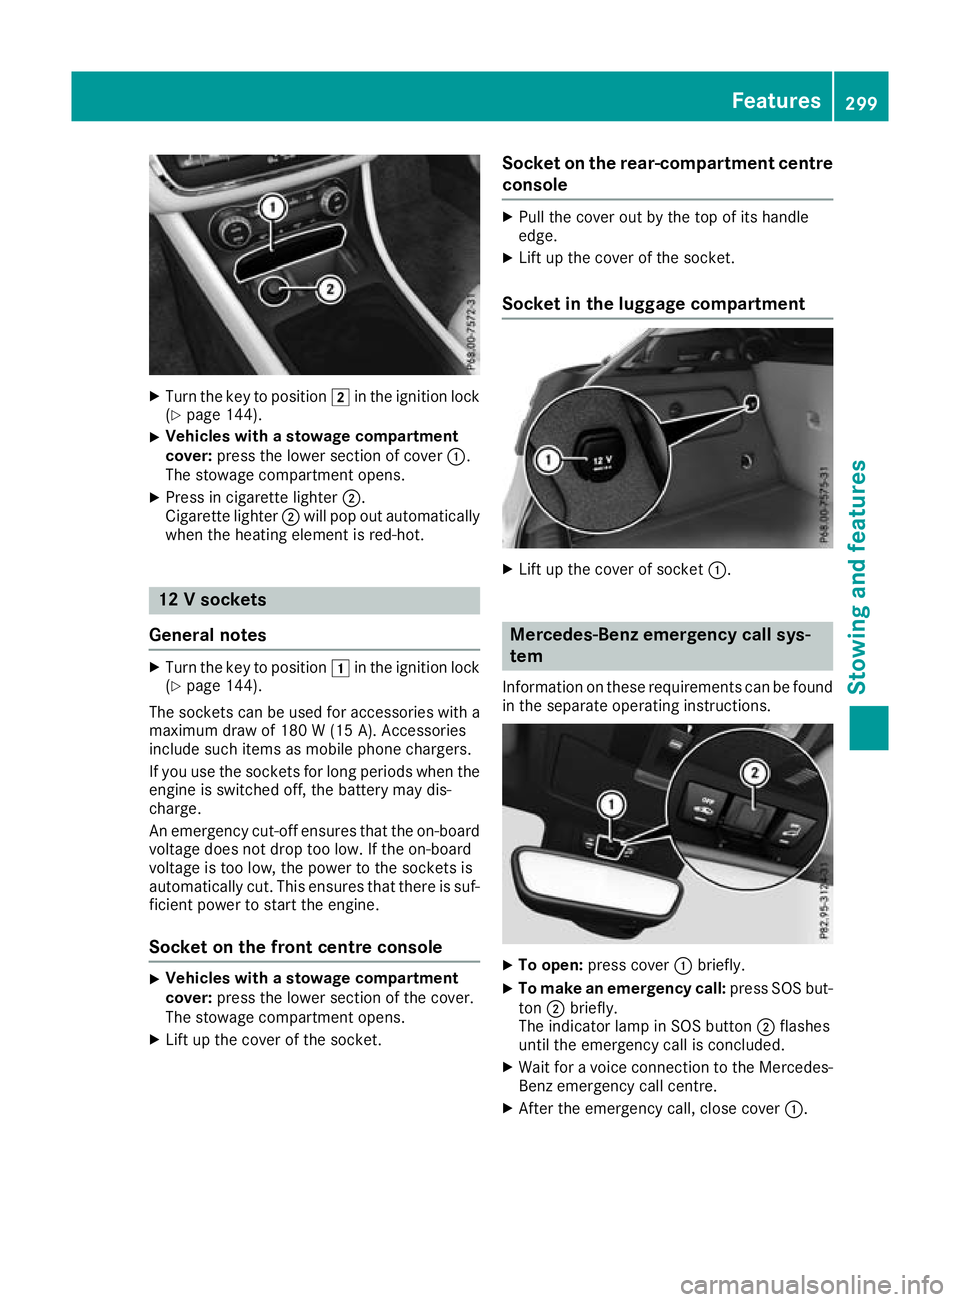
X
Turn the key to position 2in the ignition lock
(Y page 144).
X Vehicles with a stowage compartment
cover: press the lower section of cover :.
The stowage compartment opens.
X Press in cigarette lighter ;.
Cigarette lighter ;will pop out automatically
when the heating element is red-hot. 12 V sockets
General notes X
Turn the key to position 1in the ignition lock
(Y page 144).
The sockets can be used for accessories with a
maximum draw of 180 W (15 A). Accessories
include such items as mobile phone chargers.
If you use the sockets for long periods when the engine is switched off, the battery may dis-
charge.
An emergency cut-off ensures that the on-board
voltage does not drop too low. If the on-board
voltage is too low, the power to the sockets is
automatically cut. This ensures that there is suf- ficient power to start the engine.
Socket on the front centre console X
Vehicles with a stowage compartment
cover:
press the lower section of the cover.
The stowage compartment opens.
X Lift up the cover of the socket. Socket on the rear-compartment centre
console X
Pull the cover out by the top of its handle
edge.
X Lift up the cover of the socket.
Socket in the luggage compartment X
Lift up the cover of socket :. Mercedes-Benz emergency call sys-
tem
Information on these requirements can be found in the separate operating instructions. X
To open: press cover :briefly.
X To make an emergency call: press SOS but-
ton ;briefly.
The indicator lamp in SOS button ;flashes
until the emergency call is concluded.
X Wait for a voice connection to the Mercedes-
Benz emergency call centre.
X After the emergency call, close cover :. Features
299Stowing and features Z
Page 306 of 369
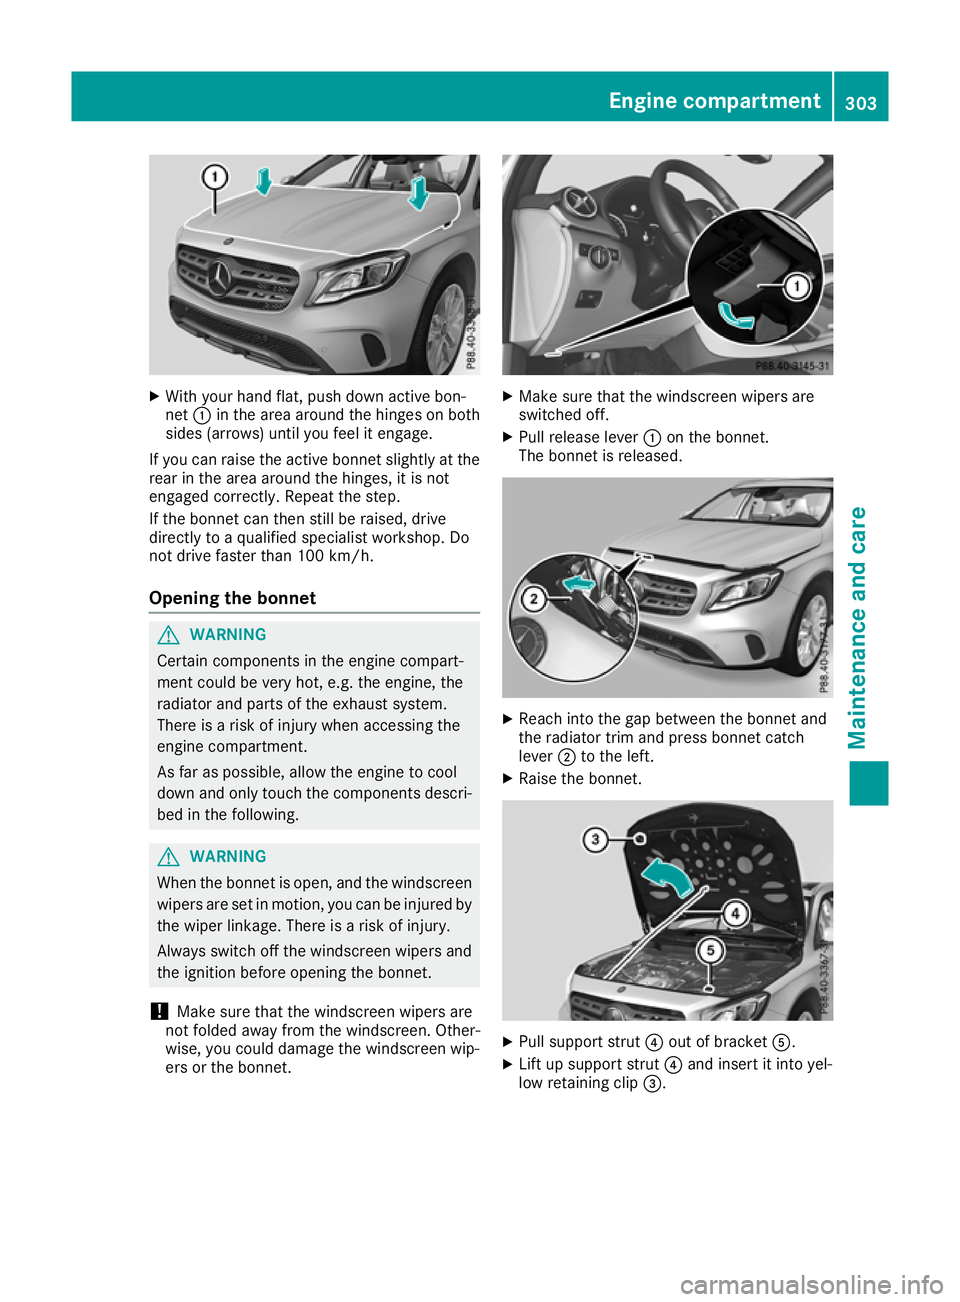
X
With your hand flat, push down active bon-
net :in the area around the hinges on both
sides (arrows) until you feel it engage.
If you can raise the active bonnet slightly at the
rear in the area around the hinges, it is not
engaged correctly. Repeat the step.
If the bonnet can then still be raised, drive
directly to a qualified specialist workshop. Do
not drive faster than 100 km/h.
Opening the bonnet G
WARNING
Certain components in the engine compart-
ment could be very hot, e.g. the engine, the
radiator and parts of the exhaust system.
There is a risk of injury when accessing the
engine compartment.
As far as possible, allow the engine to cool
down and only touch the components descri- bed in the following. G
WARNING
When the bonnet is open, and the windscreen wipers are set in motion, you can be injured by
the wiper linkage. There is a risk of injury.
Always switch off the windscreen wipers and
the ignition before opening the bonnet.
! Make sure that the windscreen wipers are
not folded away from the windscreen. Other-
wise, you could damage the windscreen wip-
ers or the bonnet. X
Make sure that the windscreen wipers are
switched off.
X Pull release lever :on the bonnet.
The bonnet is released. X
Reach into the gap between the bonnet and
the radiator trim and press bonnet catch
lever ;to the left.
X Raise the bonnet. X
Pull support strut ?out of bracket A.
X Lift up support strut ?and insert it into yel-
low retaining clip =. Engine compartment
303Maintenance and care Z