2017 MERCEDES-BENZ GLA SUV radio
[x] Cancel search: radioPage 15 of 369
F
Fault message see Display messages
Favourites
Overview ........................................ 278
Filler cap
see Fuel filler flap
Fire extinguisher .............................. .316
First-aid kit ......................................... 316
Fitting a wheel
Fitting a wheel ............................... 345
Lowering the vehicle ..................... .346
Preparing the vehicle ..................... 343
Raising the vehicle ......................... 344
Removing a wheel .......................... 345
Securing the vehicle against roll-
ing away ........................................ 344
Flat tyre
Changing a wheel/fitting the
spare wheel ................................... 342
MOExtended tyres ......................... 318
Preparing the vehicle ..................... 317
TIREFIT kit ...................................... 319
see Emergency spare wheel
Floormat ............................................. 301
Foglamps
Switching on/off ........................... 117
Frequencies
Mobile phone ................................. 350
Two-way radio ................................ 350
Front foglamps
Display message ............................ 247
Front-passenger front airbag deac-
tivation
Display message ............................ 244
Front-passenger front airbag deac-
tivation system
Operation ......................................... 49
Problems ......................................... 53
System self-test ............................... 52
Front-passenger seat
Folding the backrest forward/
back ............................................... 291
Fuel
Additives ........................................ 354
Consumption statistics .................. 221 Displaying the current consump-
tion ................................................ 221
Displaying the range .....................
.221
Driving tips ................................... .169
E10 ................................................ 353
Fuel gauge ....................................... 34
Grade (petrol) ................................ 353
Important safety notes .................. 353
Low outside temperatures ............. 355
Notes for Mercedes ‑AMG vehi-
cles ................................................ 354
Problem (malfunction) ................... 165
Quality (diesel )............................... 354
Refuelling ....................................... 163
Tank content/reserve fue l............. 353
Fuel filler flap
Opening ......................................... 164
Fuel filter (white display message) .. 251
Fuel level
Calling up the range (on-board
computer) ...................................... 221
Gauge .............................................. 34
Fuel reserve
see Fuel
Fuel tank
Capacity ........................................ 353
Problem (malfunction) ................... 165
Fuses
Allocation chart ............................. 332
Before changing ............................. 332
Fuse box in the engine compart-
ment .............................................. 332
Fuse box in the front-passenger
footwell .......................................... 332
Important safety notes .................. 331 G
Gear indicator (on-board com-
puter, Mercedes-AMG vehicles) ....... 231
Genuine Mercedes-Benz parts ........... 26
Glove compartment .......................... 289
Google™ Local Search
See also Digital Owner's Manua l... 277 12
Index
Page 20 of 369
Applying or releasing manuall
y...... 168
Display message ............................ 237
Electric parking brake .................... 167
Emergency braking ........................ 169
General information ....................... 167
Releasing automaticall y................. 168
Warning lamp ................................. 272
Parking lamps
Display message ............................ 247
Switching on/of f........................... 117
Parking Pilot
Cancelling ...................................... 200
Detecting parking spaces .............. 196
Display Message ............................ 253
Exiting a parking space .................. 199
Function/note s............................. 196
Important safety notes .................. 196
Parking .......................................... 197
Towing a trailer .............................. 196
PASSENGER AIR BAG
Display message ............................ 244
Indicator lamps ................................ 42
Problems (malfunctions) ................ 244
Pedestrian protection
see Bonnet
Petrol .................................................. 353
Pets in the vehicle ............................... 67
Phone book
See also Digital Owner's Manua l... 277
Plastic trim (cleaning instruc-
tions) .................................................. 312
Power windows
see Side windows
PRE-SAFE ®
(anticipatory occupant
protection)
Operation ......................................... 55
PRE-SAFE ®
(preventive occupant
safety system)
Display message ............................ 241
Protection against theft
ATA (Anti-Theft Alarm system) ......... 76
Immobiliser ...................................... 76
Interior motion sensor ..................... 77
Tow-away protection ........................ 76
Protection of the environment
General notes .................................. 26 Pulling away
Automatic transmission ................. 146
General notes ................................ 146
Hill start assist ............................... 147
Manual transmission ...................... 146
Trailer ............................................ 147 Q
QR code Mercedes-Benz Guide App ................. 1
Rescue card ..................................... 30
Qualified specialist workshop ........... 30 R
RACE START important safety notes ................... 188
RACE START (Mercedes-AMG vehi-
cles) .................................................... 188
RACE TIMER (on-board computer,
Mercedes-AMG vehicles) .................. 232
Radio
Selecting a station ......................... 223
see separate operating instructions
Radio mode
See also Digital Owner's Manua l... 277
Radio-based vehicle components
Declaration of conformity ................ 27
Rain closing feature (panorama
sliding sunroof) ................................. 103
Reading lamp ..................................... 119
Rear bench seat
Folding the backrest forwards/
back ............................................... 292
Rear compartment
Setting the air vents ...................... 142
Rear foglamp
Changing the bulb .......................... 123
Display message ............................ 247
Switching on/of f........................... 117
Rear lamps
see Lights
Rear seat
Adjusting the angle of the backr-
ests ................................................ 293
Rear shelf ........................................... 294 Index
17
Page 25 of 369
Traction system
see ETS/4ETS (Electronic Trac-
tion System)
Traffic Sign Assist
Activating ....................................... 208
Activating/deactivating the warn-ing function .................................... 226
Display message ............................ 254
Function/note s............................. 207
Important safety notes .................. 208
Instrument cluster display ............. 208
Trailer
Folding the ball coupling in/out ..... 214
Trailer coupling
see Towing a trailer
Trailer towing
7-pin connecto r............................. 216
Blind Spot Assist ............................ 210
Cleaning the trailer tow hitch ......... 312
Coupling up a traile r...................... 215
Decoupling a traile r....................... 215
Driving tips .................................... 213
Folding in the ball coupling ............ 215
Folding out the ball coupling .......... 214
Important safety notes .................. 212
Lights display message .................. 246
Power supply ................................. 215
Trailer load s................................... 359
Transmission
see Automatic transmission
see Manual transmission
Transmission position display
(DIRECT SELECT lever) ...................... 155
Transporting the vehicle .................. 330
Travelling uphill
Brow of hill ..................................... 175
Driving downhill ............................. 176
Maximum gradient-climbing capa-
bility ............................................... 175
Trim pieces (cleaning instruc-
tions) .................................................. 313
Trip computer (on-board com-
puter) .................................................. 221
Trip meter
Calling up ....................................... 221
Resetting (on-board computer) ...... 222
Turn signal lamp
Replacing bulbs (rear) .................... 123 Turn signals
Replacing bulbs (front) ................... 122
Switching on/of f........................... 118
TV
Operating (on-board computer) ..... 224
see Separate operating instructions
Two-way radio
Frequencies ................................... 350
Installation ..................................... 350
Transmission output (maximum) .... 350
Type identification plate
see Vehicle identification plate
Tyre inflation compressor
see TIREFIT kit
Tyre pressure
Calling up (on-board computer) ..... 340
Display message ............................ 256
Not reached (TIREFIT) .................... 321
Reached (TIREFIT) .......................... 321
Recommended ............................... 337
Tyre pressure loss warning
General notes ................................ 339
Important safety notes .................. 339
Restarting ...................................... 339
Tyre pressure monitor
Checking the tyre pressure elec-
tronically ........................................ 340
Function/note s............................. 340
General notes ................................ 340
Important safety notes .................. 340
Radio type approval for the tyre
pressure monitor ........................... 342
Restarting ...................................... 341
Warning lamp ................................. 276
Warning message .......................... 341
Tyres
Changing a whee l.......................... 342
Checking ........................................ 334
Direction of rotation ...................... 343
Display message ............................ 256
General notes ................................ 347
Important safety notes .................. 334
Information on driving .................... 334
M+S tyres ...................................... 336
MOExtended tyre s......................... 336
Replacing ....................................... 342
Service life ..................................... 335
Storing ........................................... 343 22
Index
Page 30 of 369
Have accessories retrofitted at a qualified
specialist workshop.
You could jeopardise the operating safety of
your vehicle if you use parts, tyres and wheels as
well as accessories relevant to safety that have not been approved by Mercedes-Benz. This
could lead to malfunctions in safety-relevant
systems, e.g. the brake system. Use only genu-
ine Mercedes-Benz parts or parts of equal qual- ity. Use only tyres, wheels and accessories that
have been specifically approved for your vehi-
cle.
Mercedes-Benz tests genuine parts and conver-
sion parts and accessories that have been spe-
cifically approved for your vehicle for their reli-
ability, safety and suitability. Despite ongoing
market research, Mercedes-Benz is unable to
assess other parts. Mercedes-Benz therefore
accepts no responsibility for the use of such
parts in Mercedes-Benz vehicles, even if they
have been officially approved or independently
approved by a testing centre.
In Germany, certain parts are officially approved for installation or modification only if they com-
ply with legal requirements. This also applies to some other countries. All genuine Mercedes-
Benz parts meet the approval requirements. The
use of non-approved parts may invalidate the
vehicle's general operating permit.
This is the case:
R if they cause a change of the vehicle type from
that for which the vehicle's general operating permit was granted
R if other road users could be endangered
R if the emission or noise levels are adversely
affected
Always specify the vehicle identification number (VIN) (Y page 351) when ordering genuine
Mercedes-Benz parts. Owner's Manual
Vehicle equipment
i This Owner's Manual describes all models
and all standard and optional equipment
available for your vehicle at the time of pub-
lication of the Owner's Manual. Country-spe-
cific differences are possible. Note that your
vehicle may not be fitted with all features
described. This is also the case for systems
and functions relevant to safety. Therefore, the equipment on your vehicle may differ from
that in the descriptions and illustrations.
The original purchase contract documentation
for your vehicle contains a list of all the systems in your vehicle.
Should you have any questions concerning
equipment and operation, please consult a
Mercedes-Benz Service Centre.
The Owner's Manual and Service Booklet are
important documents and should be kept in the
vehicle. Operating safety
Declarations of conformity
Wireless vehicle components The following information applies to all compo-
nents of the vehicle and the information sys-
tems and communication devices integrated
into the vehicle that receive and/or transmit
radio waves:
The components of this vehicle that receive
and/or transmit radio waves are compliant with
the basic requirements and all other relevant
conditions of Directive 1999/5/EC. You can
obtain further information from any Mercedes-
Benz Service Centre.
Electromagnetic compatibility The electromagnetic compatibility of the vehicle
components has been checked and certified
according to the currently valid version of Reg-
ulation ECE-R 10.
Jack Copy and translation of the original declaration
of conformity:
EC declaration of conformity
1. The signatory, as a representative
Manufacturer:
BRANO a.s.
74741 Hradec nad Moravicí, Opav-
ská 1000,
Czech Republic
ID no.: 64-387-5933
VAT ID no.: CZ64-387-5933 Operating safety
27Introduction Z
Page 83 of 369
If you do not open the vehicle within approx-
imately 40 seconds of unlocking:
R the vehicle locks again
R protection against theft is reactivated
X To lock: press the &button.
The key centrally locks/unlocks:
R the doors
R the tailgate
R the fuel filler flap
During unlocking, the turn signals flash once.
During locking, they flash three times.
When the locator lighting is activated via the
multimedia system, it lights up when it is dark
after the vehicle is unlocked with the remote
control; see the separate operating instructions.
You can also set an audible signal to confirm
that the vehicle has been locked. The audible
signal can be activated or deactivated using the
on-board computer (Y page 229).
X To open the tailgate automatically from
outside the vehicle: press and hold theF
button until the tailgate opens (Y page 95).
Vehicles with KEYLESS-GO or KEYLESS-GO
start function: X To close the tailgate automatically from
outside the vehicle:
if the key is located in
the immediate vicinity of the vehicle, press
the F button on the key (Y page 90).
When the tailgate closes, you can then
release the button. KEYLESS-GO
General notes Bear in mind that the engine can be started by
any of the vehicle occupants if there is a key in
the vehicle.
Locking and unlocking You can start, lock or unlock the vehicle using
KEYLESS-GO. To do this, you need to carry the
key with you. You can combine the KEYLESS-GO
functions with the functions of a conventional
key. Unlock the vehicle using KEYLESS-GO, for
instance, and lock it using the &button on
the key.
The driver's door and the door on which the
handle is used must both be closed. The key must be outside the vehicle. When locking or
unlocking with KEYLESS-GO, the distance
between the key and the corresponding door
handle must not be greater than one metre.
A check that periodically establishes a radio
connection between the vehicle and the key
determines whether a valid key is in or in the
direct vicinity of the vehicle. This occurs, for
example:
R while starting the engine
R while driving
R when the external door handles are touched
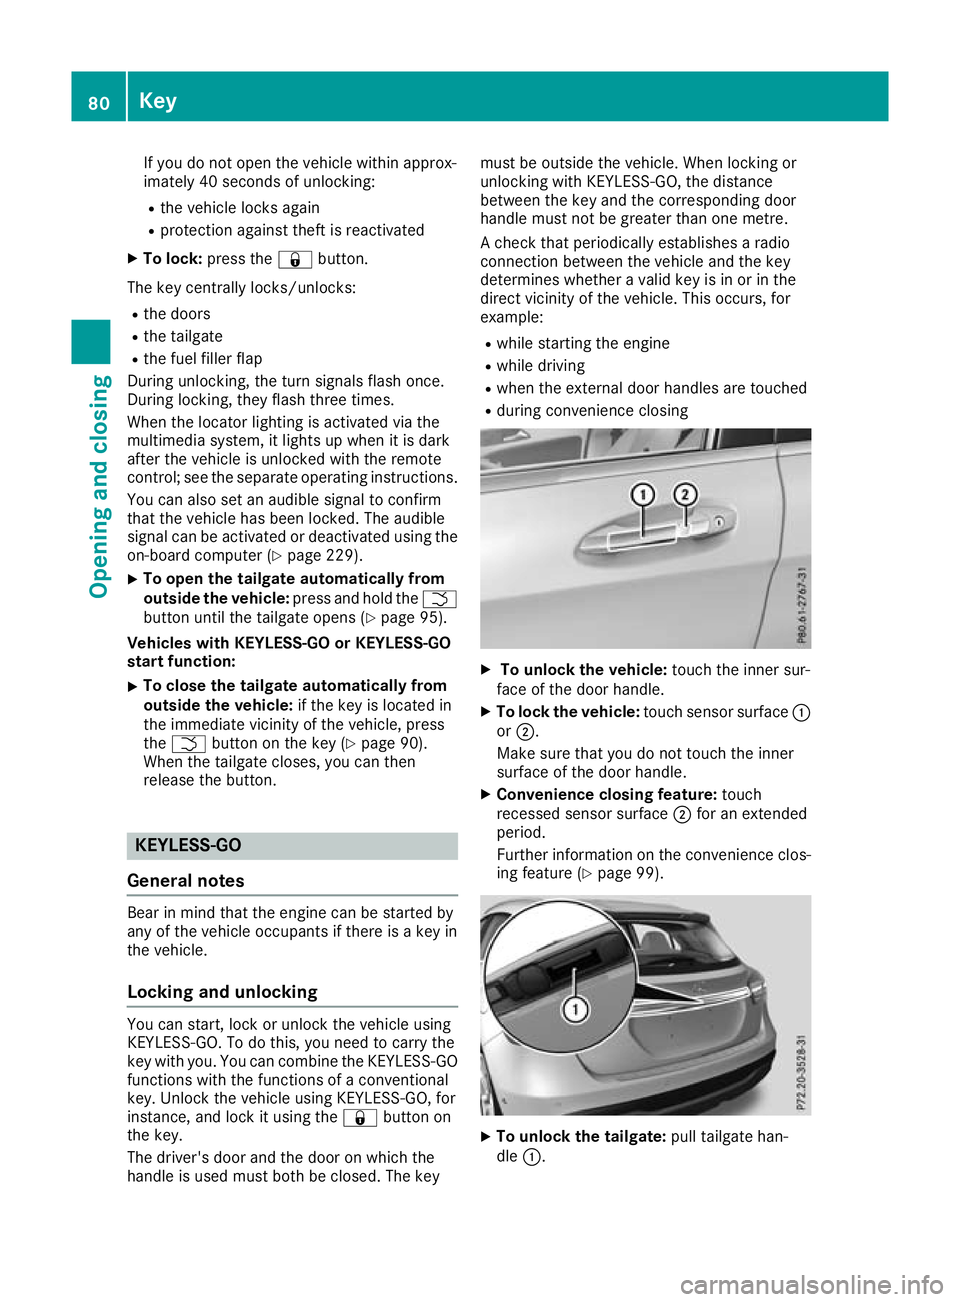
R during convenience closing X
To unlock the vehicle: touch the inner sur-
face of the door handle.
X To lock the vehicle: touch sensor surface :
or ;.
Make sure that you do not touch the inner
surface of the door handle.
X Convenience closing feature: touch
recessed sensor surface ;for an extended
period.
Further information on the convenience clos-
ing feature (Y page 99). X
To unlock the tailgate: pull tailgate han-
dle :. 80
KeyOpening and closing
Page 87 of 369
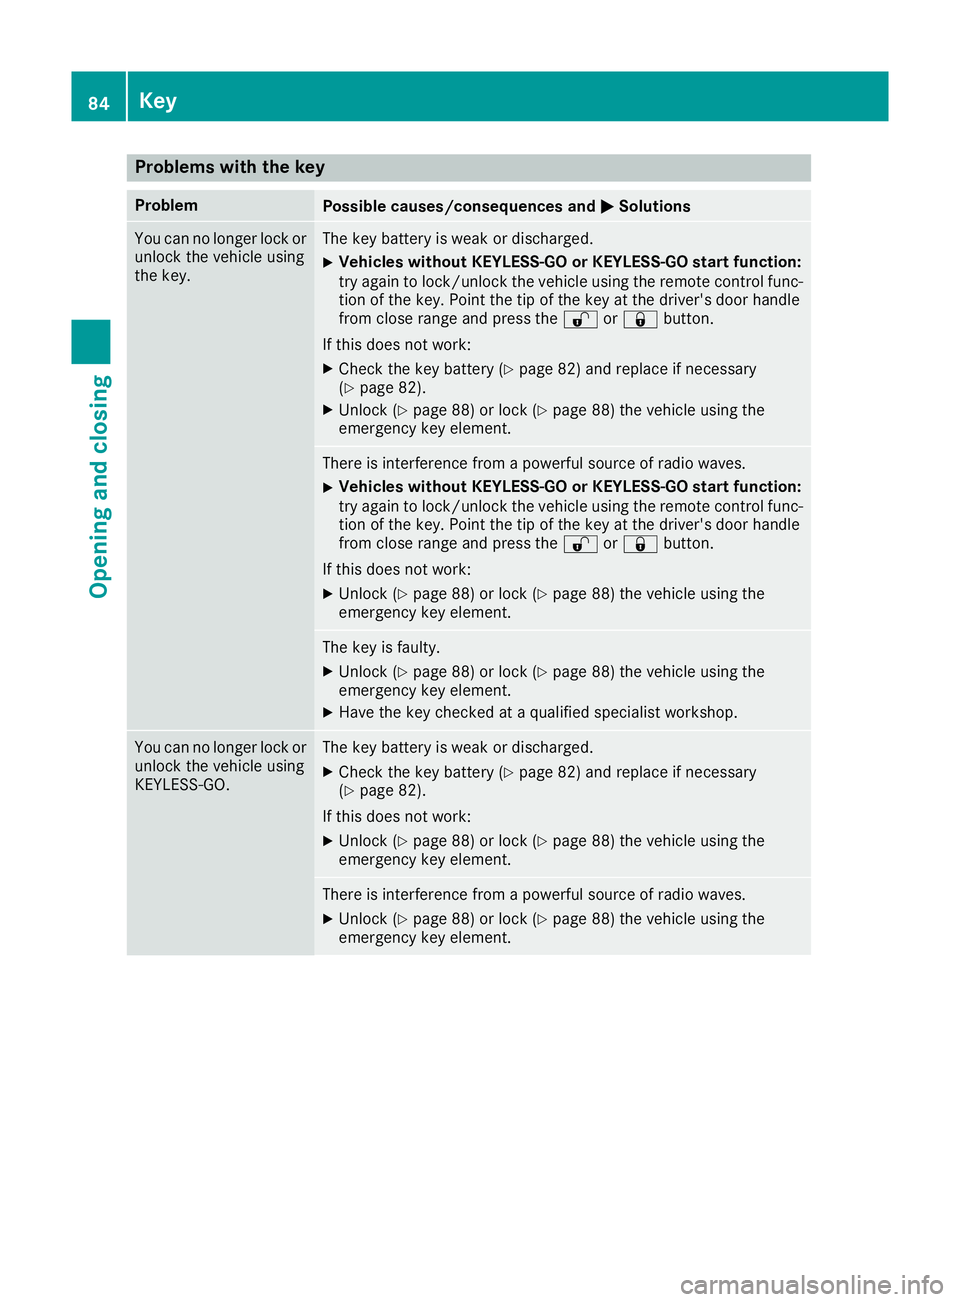
Problems with the key
Problem
Possible causes/consequences and
M
MSolutions You can no longer lock or
unlock the vehicle using
the key. The key battery is weak or discharged.
X Vehicles without KEYLESS-GO or KEYLESS-GO start function:
try again to lock/unlock the vehicle using the remote control func- tion of the key. Point the tip of the key at the driver's door handle
from close range and press the %or& button.
If this does not work: X Check the key battery (Y page 82) and replace if necessary
(Y page 82).
X Unlock (Y page 88) or lock (Y page 88) the vehicle using the
emergency key element. There is interference from a powerful source of radio waves.
X Vehicles without KEYLESS-GO or KEYLESS-GO start function:
try again to lock/unlock the vehicle using the remote control func-
tion of the key. Point the tip of the key at the driver's door handle
from close range and press the %or& button.
If this does not work:
X Unlock (Y page 88) or lock (Y page 88) the vehicle using the
emergency key element. The key is faulty.
X Unlock (Y page 88) or lock (Y page 88) the vehicle using the
emergency key element.
X Have the key checked at a qualified specialist workshop. You can no longer lock or
unlock the vehicle using
KEYLESS-GO. The key battery is weak or discharged.
X Check the key battery (Y page 82) and replace if necessary
(Y page 82).
If this does not work: X Unlock (Y page 88) or lock (Y page 88) the vehicle using the
emergency key element. There is interference from a powerful source of radio waves.
X Unlock (Y page 88) or lock (Y page 88) the vehicle using the
emergency key element. 84
KeyOpening and closing
Page 88 of 369
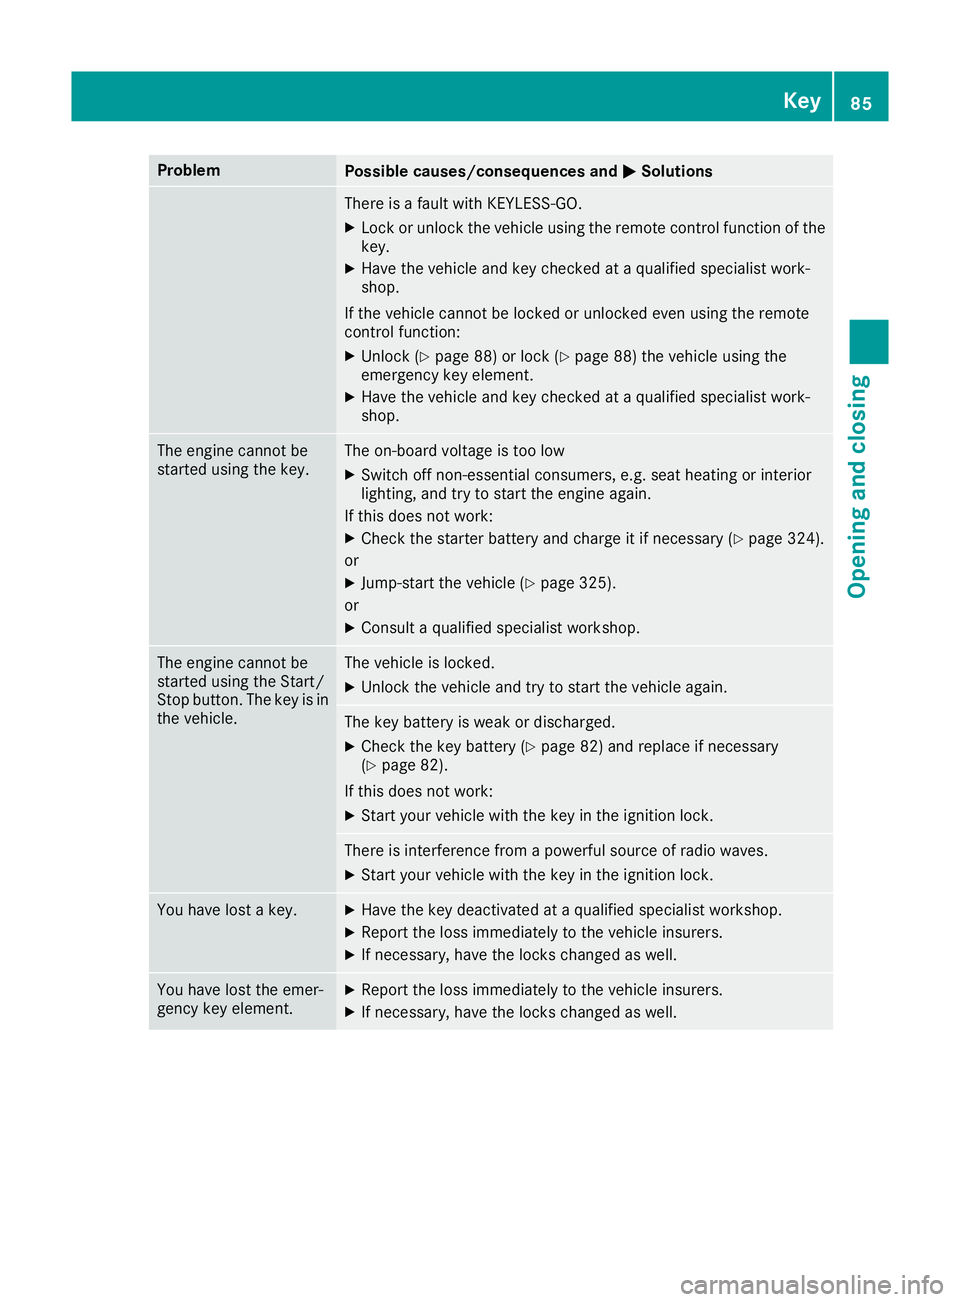
Problem
Possible causes/consequences and
M
MSolutions There is a fault with KEYLESS-GO.
X Lock or unlock the vehicle using the remote control function of the
key.
X Have the vehicle and key checked at a qualified specialist work-
shop.
If the vehicle cannot be locked or unlocked even using the remote
control function: X Unlock (Y page 88) or lock (Y page 88) the vehicle using the
emergency key element.
X Have the vehicle and key checked at a qualified specialist work-
shop. The engine cannot be
started using the key. The on-board voltage is too low
X Switch off non-essential consumers, e.g. seat heating or interior
lighting, and try to start the engine again.
If this does not work:
X Check the starter battery and charge it if necessary (Y page 324).
or
X Jump-start the vehicle (Y page 325).
or
X Consult a qualified specialist workshop. The engine cannot be
started using the Start/
Stop button. The key is in
the vehicle. The vehicle is locked.
X Unlock the vehicle and try to start the vehicle again. The key battery is weak or discharged.
X Check the key battery (Y page 82) and replace if necessary
(Y page 82).
If this does not work: X Start your vehicle with the key in the ignition lock. There is interference from a powerful source of radio waves.
X Start your vehicle with the key in the ignition lock. You have lost a key. X
Have the key deactivated at a qualified specialist workshop.
X Report the loss immediately to the vehicle insurers.
X If necessary, have the locks changed as well. You have lost the emer-
gency key element. X
Report the loss immediately to the vehicle insurers.
X If necessary, have the locks changed as well. Key
85Opening and closing Z
Page 141 of 369
Switch the auxiliary heating on regularly – once
a month – for about ten minutes.
The auxiliary heating timer function calculates
the switch-on time according to the outside
temperature so that the vehicle is preheated by the departure time. When the departure time is
reached, the auxiliary heating continues to heat for a further five minutes and then switches off.
The auxiliary heating heats the air in the vehicle interior to the set temperature. This occurs with-out using the heat of the running engine. The
auxiliary heating is operated directly using the
vehicle's fuel. For this reason, the fuel tank must
be at least Õfull to ensure that the auxiliary
heating functions.
The auxiliary heating/ventilation automatically
adjusts to changes in temperature and weather conditions. For this reason, the auxiliary heating
could switch from ventilation mode to heating
mode or from heating mode to ventilation mode.
The auxiliary heating switches off when the
engine is switched off. The auxiliary ventilation
switches off when you turn the key to key posi-
tion 2(Ypage 144).
The auxiliary heating switches off automatically
after 50 minutes.
You cannot use the auxiliary ventilation to cool
the vehicle interior to a temperature lower than
the outside temperature.
Before switching on X
Turn the key to position 2in the ignition lock
(Y page 144).
X Set the desired temperature.
Auxiliary heating or ventilation can also be
switched on if the manually set climate control is
activated. Optimum comfort is attained by set-
ting the system to automatic mode. Set the tem-
perature to 22 †.
The auxiliary heating or auxiliary ventilation can be switched on/off using the button on the
centre console or the remote control.
The on-board computer can be used to specify
up to three departure times, one of which may
be preselected (Y page 230). Switching the auxiliary heating/venti-
lation on or off using the button on the
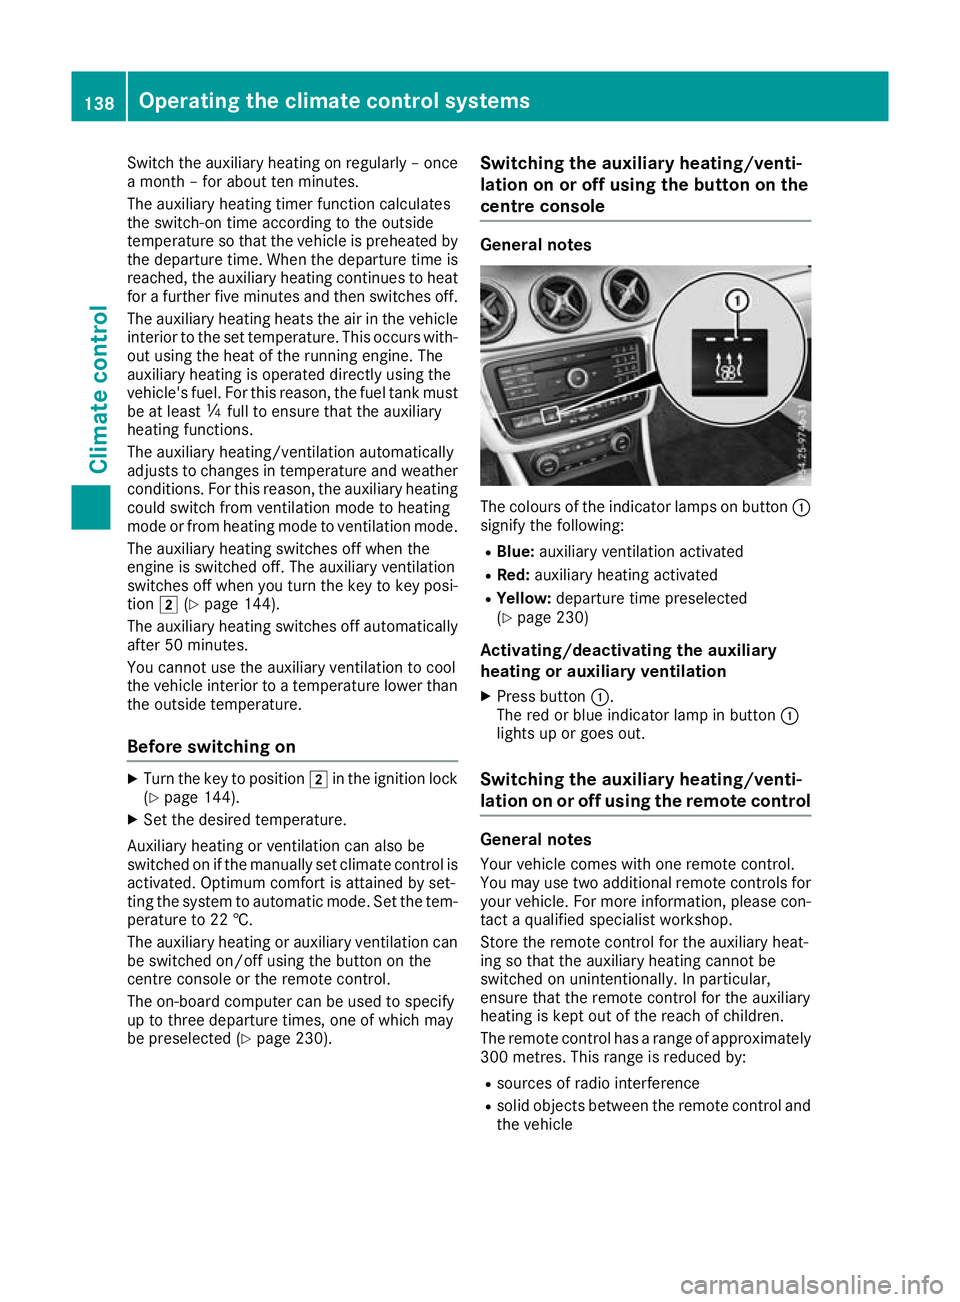
centre console General notes
The colours of the indicator lamps on button
:
signify the following:
R Blue: auxiliary ventilation activated
R Red: auxiliary heating activated
R Yellow: departure time preselected
(Y page 230)
Activating/deactivating the auxiliary
heating or auxiliary ventilation
X Press button :.
The red or blue indicator lamp in button :
lights up or goes out.
Switching the auxiliary heating/venti-
lation on or off using the remote control General notes
Your vehicle comes with one remote control.
You may use two additional remote controls for
your vehicle. For more information, please con-
tact a qualified specialist workshop.
Store the remote control for the auxiliary heat-
ing so that the auxiliary heating cannot be
switched on unintentionally. In particular,
ensure that the remote control for the auxiliary
heating is kept out of the reach of children.
The remote control has a range of approximately
300 metre s. Thisrange is reduced by:
R sources of radio interference
R solid objects between the remote control and
the vehicle 138
Operating the climate control systemsClimate control