2017 MERCEDES-BENZ G-Class check engine
[x] Cancel search: check enginePage 232 of 286
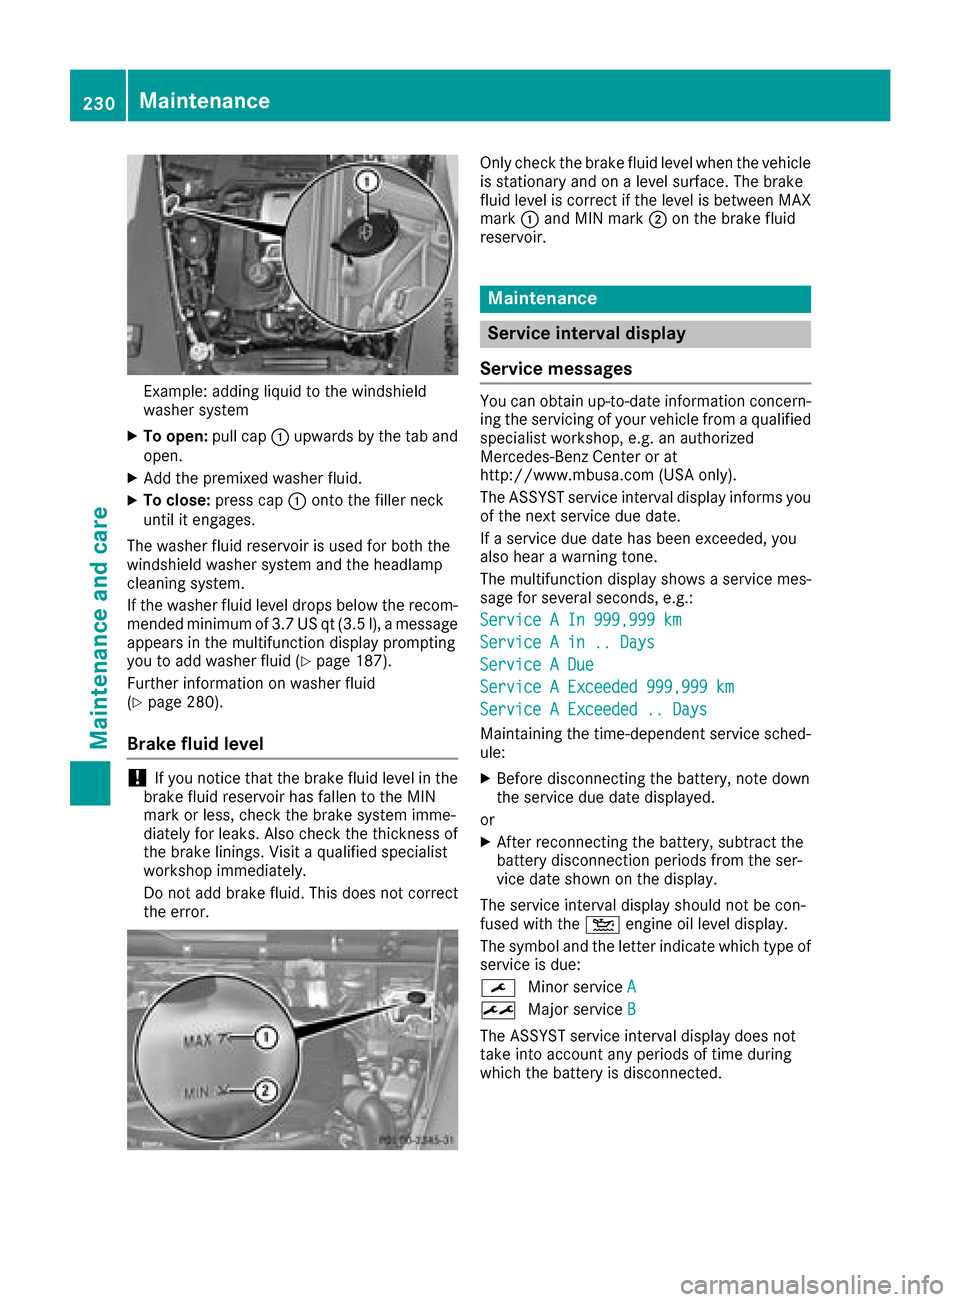
Example: adding liquid to the windshield
washersystem
XTo open: pull cap:upwards by the tab and
open.
XAdd the premixed washe rfluid.
XTo close: press cap :onto the fille rneck
unti lite ngages.
The washe rfluid reservoi risusedf or both the
windshiel dwashers ystem and the headlamp
cleaning system.
If the washe rfluid level drops belo wthe recom-
mended minimu mof3.7 US qt (3.5 l) ,amessage
appear sinthe multifunctio ndisplay prompting
yo utoa ddwashe rfluid (
Ypage 187).
Furtheri nformatio nonwasherf luid
(
Ypage 280).
Brake fluid level
!If yo unotice thatt he brake fluid level in the
brake fluid reservoi rhas fallen to the MIN
mark or less, check the brake system imme-
diately for leaks .Alsoc heck the thicknes sof
the brake linings. Visitaq ualified specialist
workshop immediately.
Do not ad dbrake fluid .Thisd oesn ot correct
the error.
Onlyc heck the brake fluid level when the vehicle
is stationar yand on alevel surface. The brake
fluid level is correct if the level is between MAX
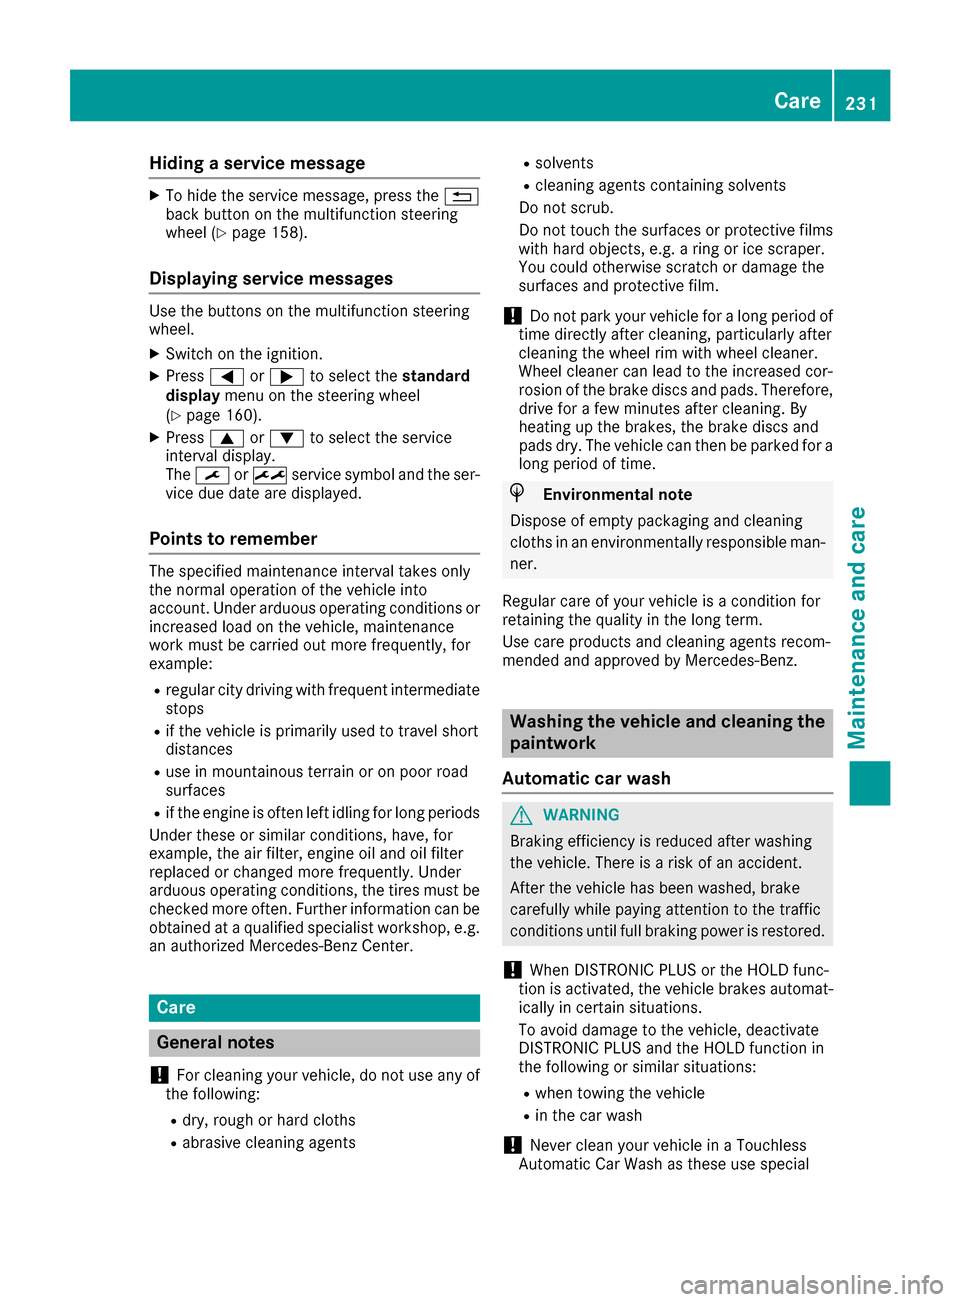
mark :and MIN mark ;on the brake fluid
reservoir.
Maintenance
Service interval display
Service messages
Yo uc an obtai nup-to-date informatio nconcern-
ing the servicing of your vehicl efromaq ualified
specialis tworkshop ,e.g.ana uthorized
Mercedes-Benz Center or at
http://www.mbusa.com (USA only).
The ASSYST servic eintervald isplayinforms you
of the next servic eduedate.
If as ervic eduedate hasb eene xceeded ,you
also hear awarning tone.
The multifunctio ndisplay shows aservic emes-
sage for severa lseconds, e.g.:
ServiceAIn9 99,999km
ServiceAin..D ays
ServiceADue
ServiceAExceeded 999,999k m
ServiceAExceeded .. Days
Maintaining the time-dependent servic esched-
ule:
XBefore disconnecting the battery ,note down
the servic eduedate displayed.
or
XAfter reconnecting the battery ,sub tract the
battery disconnection periods fromt he ser-
vic ed ates hown on the display.
The servic eintervald isplayshouldnot be con-
fused with the 4engine oi llev el display.
The symbo land the letter indicate which typ eof
servic eisdue:
¯ Minor service A
±
Major service B
The ASSYST servic eintervald isplaydoes not
take into account any periods of time during
which the battery is disconnected.
230Maintenance
Maintenance and care
Page 233 of 286
Hidingaservice message
XTo hide the service message, press the %
back button on the multifunction steering
wheel(
Ypage1 58).
Displayings ervice messages
Use the buttons on the multifunction steering
wheel.
XSwitch on the ignition.
XPress=or; to select the standard
display menu on the steering wheel
(
Ypage1 60).
XPress9or: to select the service
interval display.
The ¯ or± service symbol and the ser-
vice due date are displayed.
Points to remember
The specified maintenance interval takes only
the normal operation of the vehiclei nto
account. Under arduous operating conditions or
increased loadont he vehicle, maintenance
work must be carrie dout more frequently, for
example:
Rregular city driving with frequent intermediate
stops
Rif the vehicleisp rimarily usedtotravel short
distances
Ruse in mountainous terrainoronp oor road
surfaces
Rif the engine is often left idling for long periods
Under these or similar conditions, have ,for
example, the air filter, engine oil and oil filter
replaced or changed more frequently. Under
arduous operating conditions, the tires must be
checked more often. Further information can be obtained at aqualified specialist workshop, e.g.
an authorized Mercedes-Benz Center.
Care
General notes
!
For cleaning you rvehicle, do not use any of
the following:
Rdry, roug horhard cloths
Rabrasive cleaning agents
Rsolvents
Rcleaning agents containing solvents
Do not scrub.
Do not touch the surfaces or protective films
with hard objects, e.g. aring or ice scraper.
You coul dotherwise scratch or damage the
surfaces and protective film.
!Do not park you rvehiclef oralong period of
time directly after cleaning, particularly after
cleaning the wheelr im with wheelcleaner.
Wheelc leaner can leadtot he increased cor-
rosionoft he brake discs and pads. Therefore,
drive for afew minutes after cleaning. By
heating up the brakes ,the brake discs and
padsd ry. The vehiclec an then be parked for a
long period of time.
HEnvironmental note
Disposeofe mpty packaging and cleaning
cloths in an environmentally responsiblem an-
ner.
Regula rcare of you rvehicleisac ondition for
retaining the quality in the long term.
Use care products and cleaning agents recom-
mended and approved by Mercedes-Benz.
Washing the vehicle and cleaning the
paintwork
Automatic car wash
GWARNING
Braking efficiency is reduced after washing
the vehicle. There is arisk of an accident.
After the vehicleh as been washed, brake
carefully while paying attention to the traffic
conditions until full braking power is restored.
!When DISTRONIC PLUS or the HOLD func-
tion is activated, the vehicleb rakes automat-
ically in certain situations.
To avoi ddamage to the vehicle, deactivate
DISTRONIC PLUS and the HOLD function in
the following or similar situations:
Rwhen towing the vehicle
Rin the car wash
!Never cleany ourv ehicleinaT ouchless
Automatic Ca rWash as these use special
Care231
Maintenance and care
Z
Page 242 of 286
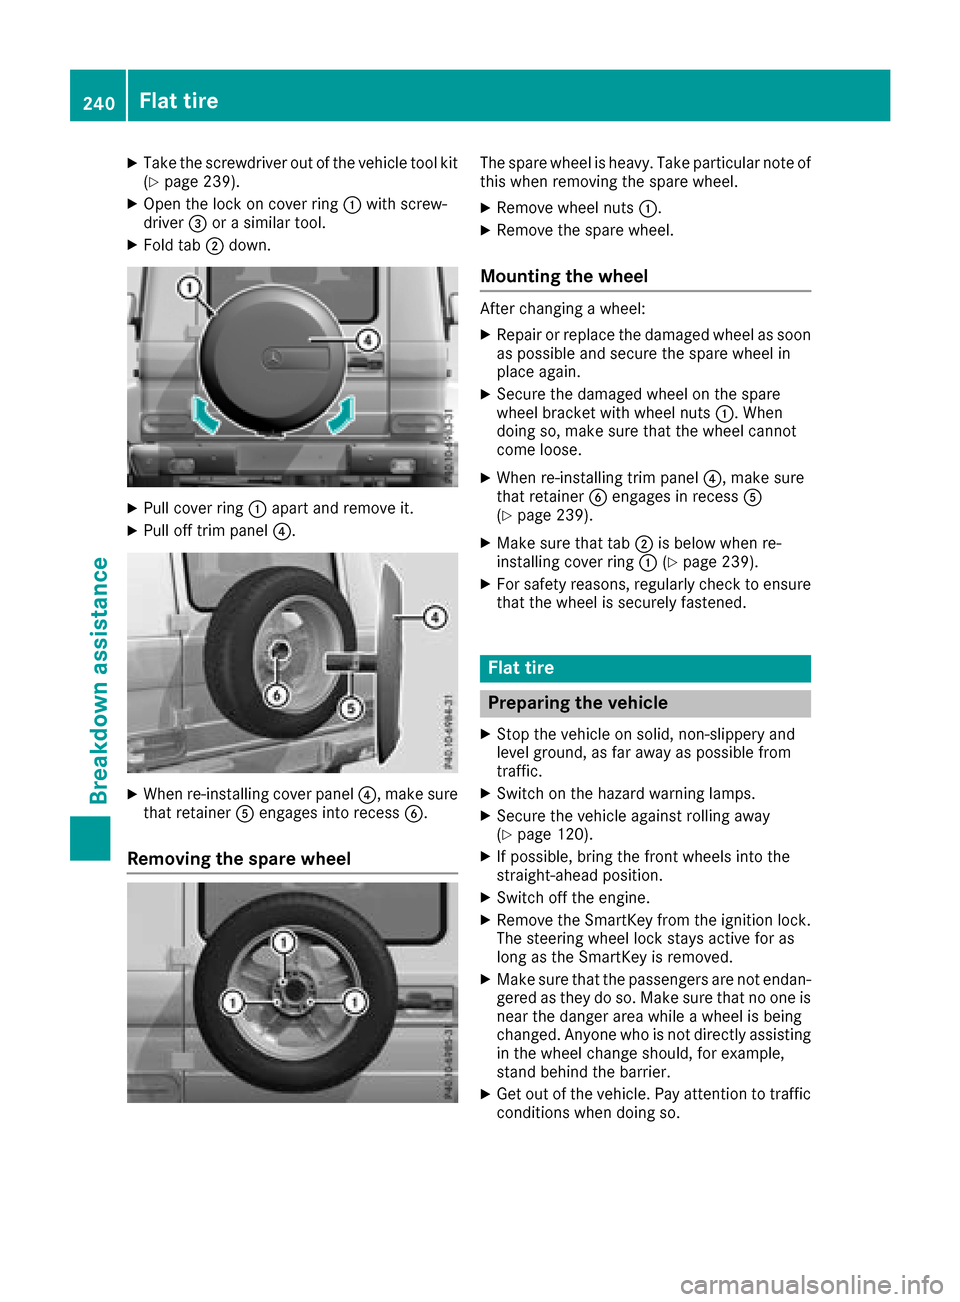
XTake the screwdriver out of the vehicle tool kit(Ypage 239).
XOpen the lock on cover ring :with screw-
driver =oras imilar tool.
XFold tab ;down.
XPull cover ring :apart and remove it.
XPull off trim panel ?.
XWhen re-installing cover panel ?,make sure
that retainer Aengages into recess B.
Removing the sparew heel
The spare wheel is heavy. Take particular noteo f
this when removing the spare wheel.
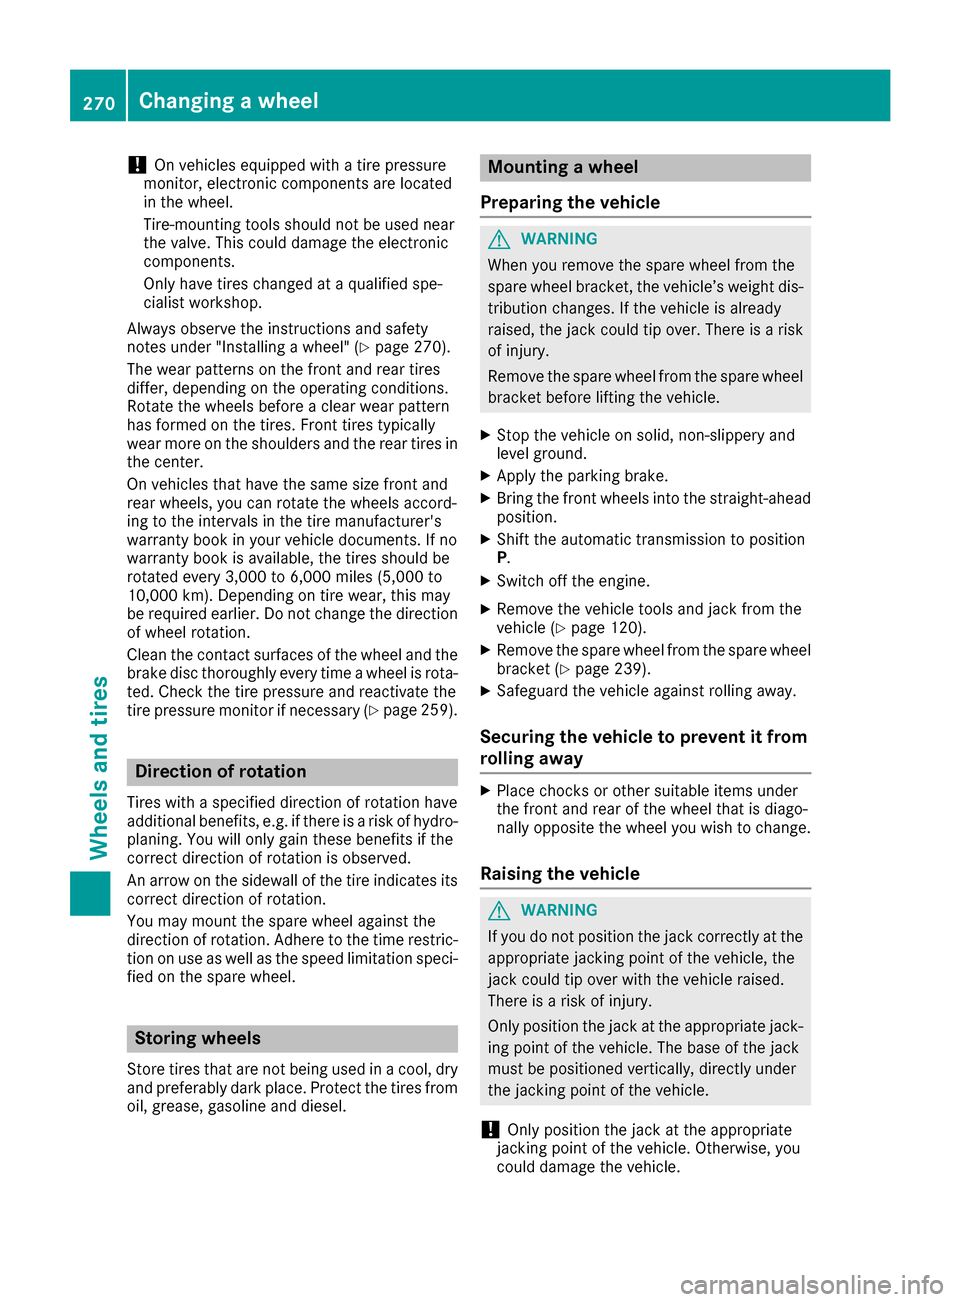
XRemove wheel nuts :.
XRemove the spare wheel.
Mounting the wheel
After changingawheel:
XRepair or replace the damaged wheel as soon
as possible and secure the spare wheel in
place again.
XSecure the damaged wheel on the spare
wheel bracket with wheel nuts :.When
doing so, make sure that the wheel cannot
come loose.
XWhen re-installing trim panel ?,make sure
that retainer Bengages in recess A
(
Ypage 239).
XMake sure that tab ;is below when re-
installing cover ring :(Ypage 239).
XFor safety reasons, regularly check to ensure
that the wheel is securely fastened.
Flat tire
Preparing the vehicle
XStop the vehicle on solid, non-slippery and
level ground, as far away as possible from
traffic.
XSwitch on the hazard warning lamps.
XSecure the vehicle against rolling away
(Ypage 120).
XIf possible, bring the front wheels into the
straight-ahead position.
XSwitch off the engine.
XRemove the SmartKey from the ignition lock.
The steerin gwheel lock stays active for as
long as the SmartKey is removed.
XMake sure that the passengers are not endan-
gered as they do so. Make sure that no one is
near the danger area while awheel is being
changed. Anyon ewho is not directly assisting
in the wheel change should, for example,
stand behind the barrier.
XGet out of the vehicle. Pay attention to traffic
conditions when doing so.
240Flat tire
Breakdown assistance
Page 245 of 286

Charging thebattery
!
Only use battery chargers witham aximum
chargin gvoltage of 14.8 V.
GWARNING
During chargin gand jump-starting, explosive
gases can escape from th ebattery. Thereisa
ris kofane xplosion.
Particularly avoid fire, open flames, creating
sparks and smoking. Ensure there is sufficient
ventilatio nwhile chargin gand jump-starting.
Do no tlean ove rabattery.
GWARNING
Battery acid is caustic .Thereisar iskofi njury.
Avoid contac twiths kin, eyes or clothing .Do
no tinhale any battery gases.Don otlean over
th eb attery. Keep childre naway from batter-
ies. Wash away battery acid immediately with
plenty of clean wate rand seek medical atten-
tion.
GWARNING
Ad ischarged battery can freezeatt empera-
tures below freezing point. When jump-start-
ing th evehicle or chargin gthe battery, gases
can escape from th ebattery. Thereisar isko f
an explosion.
Allow th efroze nbattery to thaw out before
chargin gitorjump-starting.
!Only charge th ebattery usingt hejump-
starting connection point.
The jump-startin gconnection pointisint he
enginec ompartmen t(
Ypage 243).
XOpen thehood.
XConnect th ebattery charge rtothepositive
terminal and ground pointint hesame order
as when connecting th edonor battery in the
jump-startin gprocedure (
Ypage 243).
Keep away from fir eand open flames. Do not
lean ove rabattery. Never charge th ebattery if it
is still installed in th evehicle ,unless you use a
battery charge rwhichh as been tested and
approved by Mercedes-Benz. Abattery charger
unit specially adapted for Mercedes-Ben zvehi-
cle sand tested and approved by Mercedes-
Ben zisa vailable as an accessory. It permits the
chargin gofthebattery in its installed position.
Contac tanauthorized Mercedes-Ben zCenter
for further informatio nand availability. Read the
battery charger's operatin ginstructionsb efore
chargin gthe battery.
If th ewarning and indic
ator lamps do no
tlight up
on th einstrumen tcluste rwhen temperatures
are low, it is probably because th edischarged
battery has frozen.Int hisc asey ou may neither
jump-star tthe vehicle no rcharge th ebattery.
The servic elife of athawed-out battery may be
shorter. The starting characteristic scan be
impaired, particularly at low temperatures. Have
th et hawed-out battery checked at aqualified
specialist workshop.
Jump-starting
For th ejump-startin gprocedure, use only th ejump-startin gconnection pointint heenginec om-
partment, consisting of apositiv etermi nal and aground point.
GWARNING
Battery acid is caustic .Thereisar iskofi njury.
Avoid contac twiths kin, eyes or clothing .Donotinhale any battery gases.Don otlean ove rthe
battery. Keep childre naway from batteries .Wash away battery acid immediately withp lenty of
clean wate rand seek medical attention.
GWARNING
During chargin gand jump-starting, explosive gases can escape from th ebattery. Thereisar isk
of an explosion.
Jump-starting243
Breakdown assistance
Z
Page 246 of 286

Particularly avoid fire, open flames, creatingsparks and smoking. Ensure there is sufficient ven-
tilation while charging and jump-starting. Do not lean over abattery.
GWARNING
During the charging process, abattery produces hydrogen gas. If ashort circuit occurs or sparks
are created, the hydrogen gas can ignite. There is arisk of an explosion.
RMake sure that the positive terminal of aconnected battery does not come into contact with
vehicle parts.
RNever place metal object sortools on abattery.
RIt is importan tthat you observe the described order of the battery terminals when connecting
and disconnectin gabattery.
RWhen jump-starting, make sure that the battery poles with identical polarity are connected.
RIt is particularly importan ttoobserve the described order when connectin gand disconnecting
the jumper cables.
RNever connect or disconnect the battery terminals while the engine is running.
GWARNING
Ad ischarged battery can freeze at temperatures below freezin gpoint. When jump-starting the
vehicle or charging the battery, gases can escape from the battery. There is arisk of an explosion.
Allow the frozen battery to thaw out before charging it or jump-starting.
!Avoid repeated and lengthy starting attempts. Otherwise, the catalytic converter could be
damaged by the non-combusted fuel.
If the warning and indicator lamps do not light up on the instrument cluster when temperatures are
low, it is probably because the discharged battery has frozen. In this case, you may neither charge
the battery nor jump-start the vehicle. The service life of athawed-out battery may be shorter .The
starting characteristics can be impaired, particularly at low temperatures. Have the thawed-out
battery checked at aqualified specialist workshop.
Do not start the vehicle using arapid charging device. If your vehicle's battery is discharged, the
engine can be jump-started from another vehicle or from asecond battery using jumper cables.
Observe the following points:
RThe battery is not accessible in all vehicles. If the other vehicle's battery is not accessible, jump-
start the vehicle using asecond battery or ajump-starting device.
RYou may only jump-start the vehicle when the engine and exhaust system are cold.
RDo not start the engine if the battery is frozen. Let the battery thaw first.
RJump-starting may be performed only using batteries with anominal voltage of 12 V.
ROnly use jumper cables which have asufficient cross-section and insulated terminal clamps.
RIf the battery is fully discharged, leave the battery that is being used to jump-start connected for
afew minutes before attempting to start .This charges the battery slightly.
RMake sure that the two vehicles do not touch.
Make sure that:
Rthe jumper cables are not damaged.
Rwhen the jumper cables are connected to the battery, uninsulated sections of the terminal clamp
do not come into contact with other metal sections.
Rthe jumper cables cannot come into contact with parts which can move when the engine is
running, such as the V-belt pulley or the fan.
244Jump-starting
Breakdown assistance
Page 247 of 286

XApply the parking brake.
XShift the automatic transmission to positionP.
XMake sure thatthe ignition is switched off. All indicator lamps in the instrument cluster must be
off.
XSwitch off al lelectrical consumers, e.g .rea rw indo wd efroster, lighting, etc.
XOpe nthe hood.
Position number Bidentifie sthe chargedb attery of the otherv ehicleorane quivalent jump-starting
device.
The jump-starting connectio npoint consists of contacts ;and =.
XLiftu pc over :of positive terminal ;in the direction of the arrow.
XConnect positive terminal ;on your vehicl etopositive terminal ?of donor battery Busing the
jumpe rcable .Alway sbegin with positive terminal ;on your ownv ehiclefirst.
XStar tthe engine of the donor vehicl eand runitati dlingspeed.
XConnect negative terminal Aof donor battery Bto ground point =of your vehicl eusing the
jumpe rcable ,connecting the jumpe rcable to donor battery Bfirst.
XStar tthe engine.
XBefore disconnecting the jumpe rcables, le tthe engine runf or severalminutes.
XFirst, remove the jumpe rcable sfrom ground point =and negative terminal A,then from pos-
itive clamp ;and positive terminal ?.Begin each time at the contacts on your ownv ehiclefirst.
XClose cover :of positive terminal ;afte rremoving the jumpe rcables.
XHav ethe battery checked at aquali fied specialist workshop.
Jump-starting is not considered to be anormalo perating condition.
iJumpe rcable sand furtheri nformationregarding jump-starting can be obtained at any qualified
specialist workshop.
Jump-starting245
Breakdo wn assis tance
Z
Page 272 of 286
!On vehicles equipped withatire pressure
monitor, electronic componentsa re located
in the wheel.
Tire-mounting tools should not be used near
the valve. This could damage the electronic
components.
Only have tires changed at aqualified spe-
cialist workshop.
Alwayso bserve the instructionsa nd safety
notes under "Installing awheel" (
Ypage 270).
The wear patterns on the front and rear tires
differ, depending on the operating conditions.
Rotate the wheels before aclear wear pattern
has formed on the tires. Front tires typically
wear more on the shoulders and the rear tires in the center.
On vehicles that have the same size front and
rear wheels, you can rotate the wheels accord-
ing to the intervals in the tire manufacturer's
warranty book in your vehicle documents. If no
warranty book is available, the tires should be
rotated every 3,000 to 6,000 miles (5,000 to
10,000 km). Depending on tire wear, this may
be required earlier. Do not change the direction
of wheel rotation.
Cleant he contact surfaces of the wheel and the
brake disc thoroughly every time awheel is rota-
ted. Check the tire pressure and reactivate the
tire pressure monitor if necessary (
Ypage 259).
Direction of rotation
Tires with aspecified direction of rotation have
additional benefits, e.g. if there is arisk of hydro-
planing. You will only gain these benefits if the
correct direction of rotation is observed.
An arrow on the sidewall of the tire indicates its
correct direction of rotation.
You may mount the spare wheel against the
direction of rotation. Adhere to the time restric-
tion on use as well as the speed limitation speci-
fied on the spare wheel.
Storing wheels
Store tires that are not being used in acool, dry
and preferably dark place. Protect the tires from
oil, grease, gasoline and diesel.
Mounting awheel
Preparing the vehicle
GWARNING
When you remove the spare wheel from the
spare wheel bracket, the vehicle’s weight dis-
tribution changes. If the vehicle is already
raised, the jack could tip over. There is arisk
of injury.
Remove the spare wheel from the spare wheel
bracket before lifting the vehicle.
XStop the vehicle on solid, non-slippery and
level ground.
XApply the parking brake.
XBring the front wheels into the straight-ahead
position.
XShift the automatic transmission to position
P.
XSwitch off the engine.
XRemove the vehicle tools and jack from the
vehicle (Ypage 120).
XRemove the spare wheel from the spare wheel
bracket (Ypage 239).
XSafeguard the vehicle against rolling away.
Securing the vehicletop revent it from
rolling away
XPlace chocks or other suitablei tems under
the front and rear of the wheel that is diago-
nally opposite the wheel you wish to change.
Raising the vehicle
GWARNING
If you do not position the jack correctly at the
appropriate jacking point of the vehicle, the
jack could tip over with the vehicle raised.
There is arisk of injury.
Only position the jack at the appropriate jack-
ing point of the vehicle. The base of the jack
must be positioned vertically, directly under
the jacking point of the vehicle.
!Only position the jack at the appropriate
jacking point of the vehicle. Otherwise, you
could damage the vehicle.
270Changing awheel
Wheels and tires
Page 282 of 286
The antifreeze/corrosion inhibitor concentra-
tion in the engine cooling system should:
Rbe at least 50%. This will protectthe engine
cooling system against freezin gdown to
approximately -35 ‡(-37 †).
Rnot exceed 55% (antifreez eprotection down
to -49 ‡[-45 †]). Otherwise, heat will not be
dissipated as effectively.
Mercedes-Benz recommends an antifreeze/
corrosion inhibitor in accordanc ewith MB Spec-
ifications for ServiceP roducts 310.1.
iWhen the vehicle is first delivered, it is filled
with acoolant mixture that ensures adequate
antifreeze and anti-corrosion protection.
iThe coolant is checked at specified intervals
at aq ualified specialist workshop.
The engine cooling system is filled with coolant
at the factor ywhich contains antifreeze/corro-
sion inhibitor that ensures protection down to
approximately -35 ‡(-37 †).
Capacity
Missing values were not availableatt ime of
going to print.
ModelCapacity
G5 50Approx.1 1.1 US qt
(10.5 l)
G63A MGApprox.1 4.6 US qt
(13.8 l)
G65A MG
Windshield/headlamp cleaning sys-
tem
Important safety notes
GWARNING
Windshield washer concentrate could ignite if it comes into contact with hot engine compo-
nentsort he exhaust system. There is arisk of
fire and injury.
Make sure that no windshield washer con-
centrate is spilled next to the filler neck.
!Do not add distilled or de-ionized water to
the washer fluid container. Otherwise, the
level sensor may be damaged.
!Only MB SummerFit and MB WinterFit
washer fluid should be mixed together. The
spray nozzles may otherwise become
blocked.
Do not use distilled or de-ionized water. Other-
wise, the level sensor may give afalse reading.
When handling washer fluid, observe the impor-
tant safety notes on service products
(
Ypage 276).
At temperatures above freezing:
XFill the washer fluid reservoir with amixture of
water and windshield washer fluid, e.g. MB
SummerFit.
Add 1part MB SummerFit to 100 parts water.
At temperatures below freezing:
XFill the washer fluid reservoir with amixture of
water and washer fluid, e.g. MB WinterFit.
For the correctm ixing ratio refer to the infor-
mation on the antifreeze reservoir.
iAdd windshield washer fluid, e.g. MB Sum-
merFit or MB WinterFit, to the washer fluid all
year round.
Climate control system refrigerant
Important safety notes
The climate control system of your vehicle is fil-
led with refrigerant R‑ 134a.
The instruction label regarding the refrigerant
type used can be found on the radiator cross
member.
!Only the refrigerant R‑134a and the PAG oil
approved by Mercedes-Benz may be used.
The approved PAG oil may not be mixed with
any other PAG oil that is not approved for
R-134a refrigerant.O therwise, the climate
control system may be damaged.
Servicew ork, such as refilling with refrigerant or
replacing component parts, may only be carried
out by aqualified specialist workshop. All appli-
cable regulations must be adhered to, SAE
standard J639 included.
Always have work on the climate control system carried out at aqualified specialist workshop.
280Service products and filling capacities
Technical data