2017 MERCEDES-BENZ G-Class door lock
[x] Cancel search: door lockPage 72 of 286
SmartKey.Thisf unction remains active for five
minutes or unti lyou ope naf ront door.
The sid ewindow scanno tbeo perate dfrom the
rearw hent he overrid efeature for the sid ewin-
dow sisa ctivate d(
Ypage 56).
Convenience opening
i
The convenience opening feature can only
be operate dusing the SmartKey .The Smart-
Key mus tbec lose to the driver'sd oorh andle.
You can ventilate the vehicl ebefore yo ustart
driving .Todot his,the SmartKey is used to carry
outt he following functions simultaneously:
Runlock the vehicle
Ropenthe sid ewindows
Rope nthe sliding sunroof
Rswitch on the seatv entilation for the driver's
and front-passenger seat
XPoint the tip of the SmartKey at the driver's
doo rhandle.
XPress and holdt he% button on the Smart-
Key unti lthe sid ewindow sand the sliding
sunroof are in the desire dposition.
XTo interrupt convenience opening: release
the % button.
Convenience closin gfeature
Important safety notes
GWARNING
Whent he convenience closing feature is oper-
ating, parts of the bod ycould become trapped
in the closing are aofthe sid ewindow and the
sliding sunroof.T here isariskofi njury.
Observe the complete closing procedure
when the convenience closing feature is oper-
ating. Make sure that no bod yparts are in
close proximity during the closing procedure.
Operation
iThe "convenience closing feature "can only
be operate dusing the SmartKey .The Smart-
Key mus tbec lose to the driver'sd oorh andle.
Wheny oulock the vehicle, yo ucan simultane-
ously:
Rclose the sid ewindows
Rclose the sliding sunroof
XPoint the tip of the SmartKey at the driver's
doo rhandle.
XPress and holdt he& button on the Smart-
Key unti lthe sid ewindow sand the sliding
sunroof are fully closed.
XMake sure that al lthe sid ewindow sand the
sliding sunroof are closed.
XTo interrupt convenience closing: release
the & button.
Problems with the side windows
GWARNING
Closing the sid ewindow swithi ncreased force or withoutt he anti-entrapment feature could lead
to serious or evenf atalinjury. Make sure that nobody can become trapped when closing the side
windows.
70Side windows
Opening and closing
Page 74 of 286
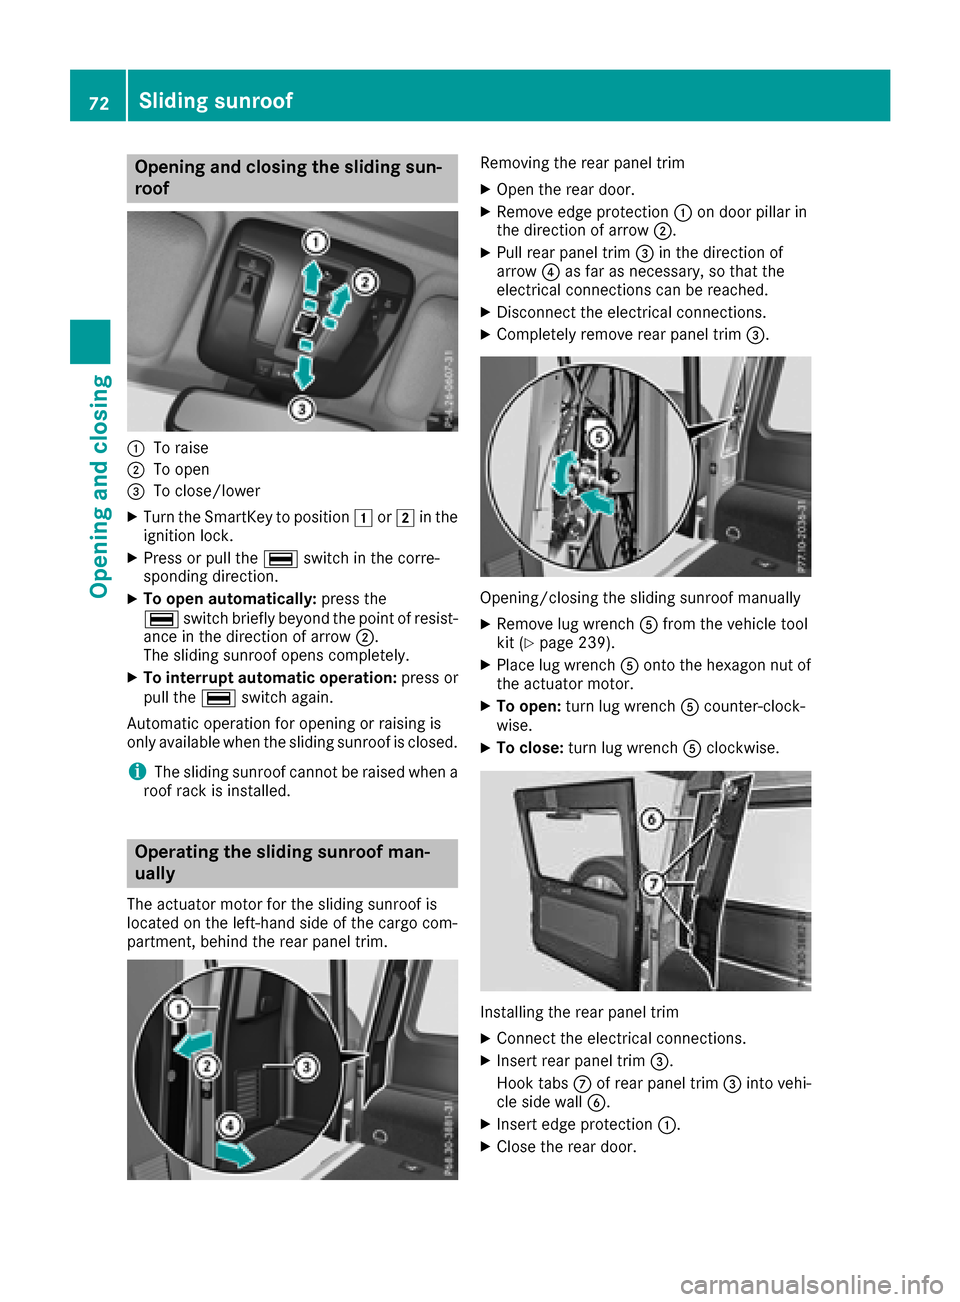
Opening and closing the sliding sun-
roof
:To raise
;To open
=To close/lower
XTurn the SmartKey to position1or2 in the
ignition lock.
XPress or pull the ¡switch in the corre-
spondin gdirection.
XTo open automatically: press the
¡ switch briefly beyond the point of resist-
ance in the direction of arrow ;.
The sliding sunroof opens completely.
XTo interrupt automatic operation: press or
pull the ¡switch again.
Automatic operation for opening or raising is
only available when the sliding sunroof is closed.
iThe sliding sunroof cannot be raised when a
roof rack is installed.
Operating the sliding sunroof man-
ually
The actuator motor for the sliding sunroof is
located on the left-hand side of the cargo com-
partment, behind the rear panel trim.
Removing the rear panel trim
XOpen the rear door.
XRemove edge protection :on door pillar in
the direction of arrow ;.
XPull rear panel trim=in the direction of
arrow ?as far as necessary, so that the
electrical connections can be reached.
XDisconnect the electrical connections.
XCompletely remove rear panel trim =.
Opening/closing the sliding sunroof manually
XRemove lug wrenchAfrom the vehicle tool
kit (Ypage 239).
XPlace lug wrench Aontothe hexagon nut of
the actuator motor.
XTo open: turn lug wrench Acounter-clock-
wise.
XTo close: turn lug wrench Aclockwise.
Installing the rear panel trim
XConnec tthe electrical connections.
XInser trear panel trim =.
Hook tabs Cof rear panel trim =into vehi-
cle side wall B.
XInsertedge protection :.
XClose the rear door.
72Sliding sunroof
Opening and closing
Page 82 of 286
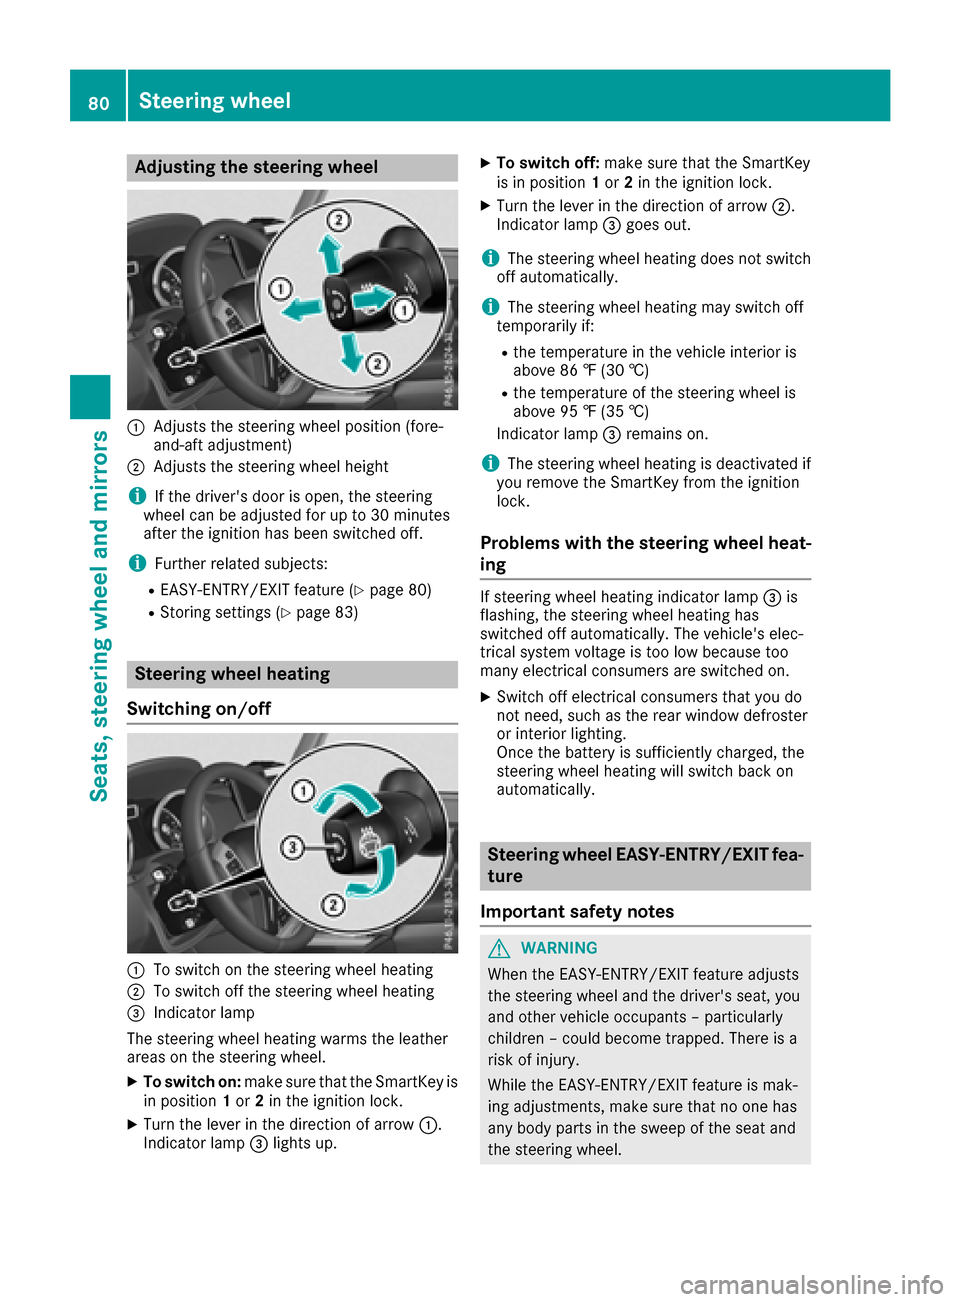
Adjusting thesteering wheel
:Adjusts th esteering whee lposition (fore-
and-af tadjustment)
;Adjusts th esteering whee lheight
iIf th edriver's door is open ,the steering
whee lcan be adjusted for up to 30 minute s
after th eignition has been switched off .
iFurther relatedsubjects :
REASY-ENTRY/EXIT feature (Ypage 80)
RStoring settings(Ypage 83)
Steering wheel heating
Switchin gon/off
:To switch on th esteering whee lheating
;To switch off th esteering whee lheating
=Indicato rlamp
The steering whee lheating warm sthe leather
areas on th esteering wheel.
XTo switch on: makesuret ha tthe SmartKey is
in position 1or 2in th eignition lock.
XTurn th elever in th edirection of arrow :.
Indicato rlamp =lights up.
XTo switch off :mak esuret hatthe SmartKey
is in position 1or 2in th eignition lock.
XTurn th elever in th edirection of arrow ;.
Indicato rlamp =goes out .
iThe steering whee lheating does no tswitch
off automatically.
iThe steering whee lheating may switch off
temporarily if:
Rth et em perature in th evehicl einterior is
abov e86‡ (30 †)
Rthet em perature of th esteering whee lis
abov e95‡ (35 †)
Indicato rlamp =remain son.
iThe steering whee lheating is deactivated if
you remove th eSmartKey from th eignition
lock.
Problemsw ith thesteering wheel heat-
ing
If steering whee lheating indicator lamp =is
flashing, th esteering whee lheating has
switched off automatically. The vehicle's elec -
trical system voltag eistoolow because to o
man yelectrical consumer sare switched on .
XSwitchoff electrical consumer sthaty ou do
no tn eed, suc hastherear window defroste r
or interior lighting .
Once th ebattery is sufficientl ycharged, th e
steering whee lheating will switch bac kon
automatically.
Steering wheel EASY-ENTRY/EX ITfea-
tu re
Import ant safety notes
GWARNIN G
When th eEASY-ENTRY/EXIT feature adjust s
th es teering whee land th edriver's seat ,you
and other vehicl eoccupant s–particularly
children –could become trapped .There is a
ris kofi njury.
Whil ethe EASY-ENTRY/EXIT feature is mak -
ing adjustments ,makes uret hatnoo nehas
any body part sintheswee poft heseat and
th es teering wheel.
80Steering wheel
Seats ,steering wheel and mirrors
Page 83 of 286
If somebodybecomes trapped:
Rpress one of the memory function position
buttons, or
Rpress one of the memory function memory
buttons, or
Rmove the switch for steering wheel adjust-
ment in the opposite direction to that in
which the steering wheel is moving
The adjustment process is stopped.
GWARNING
If you drive off whilet he EASY-ENTRY/EXIT
feature is making adjustments, you could lose
control of the vehicle.T here isarisk of an
accident.
Alway swaitu ntil the adjustment process is
complete before driving off.
!Do not activate the EASY-ENTRY/EXIT fea-
ture, if the seat backrest is reclined too far
backwards. This can damage the front or rear
seats. You must first move the backrest to a
vertical position.
The EASY-ENTRY/EXIT feature makes getting in
and out of you rvehicle easier.
You can activate and deactivate the EASY-
ENTRY/EXIT feature in the on-board computer
(
Ypage 166).
Position of the steering whee lwhen the
EASY-ENTRY/EXIT feature is active
The steering wheel moves upwards and towards
the dashboard if:
Ryou remove the SmartKey from the ignition
lock or
Ryou open the driver's door and the SmartKey
is in position 0or 1in the ignition lock
iThe steering wheel only moves upwards and
towards the dashboard if it has not already
reached the uppers teering limiter.
Position of the steering whee lfor driv-
ing
The steering wheel is moved to the last selected positionw hen:
Rthe driver's door is closed
Ryou insert the SmartKey into the ignition lock
The last positionoft he steering column is stored
when you switch off the ignition or when you
store the setting with the memory function
(
Ypage 83).
Mirrors
Rear-view mirror
XAdjust the rear-view mirror in such away that
you have agood view of road and traffic con-
ditions behind you.
Exteriorm irrors
Adjusting the exterio rmirrors
GWARNING
The exterior mirror on the front-passenger
side reduces the size of the image.V isible
objects are actually closer than they appear.
This means that you could misjudge the dis-
tance from road users traveling behind, e.g.
when changing lane. There is arisk of an acci-
dent.
For this reason, always make sure of the
actual distance from the road users traveling
behind by glancing over you rshoulder.
Mirrors81
Seats, steeringw heel and mirrors
Z
Page 84 of 286
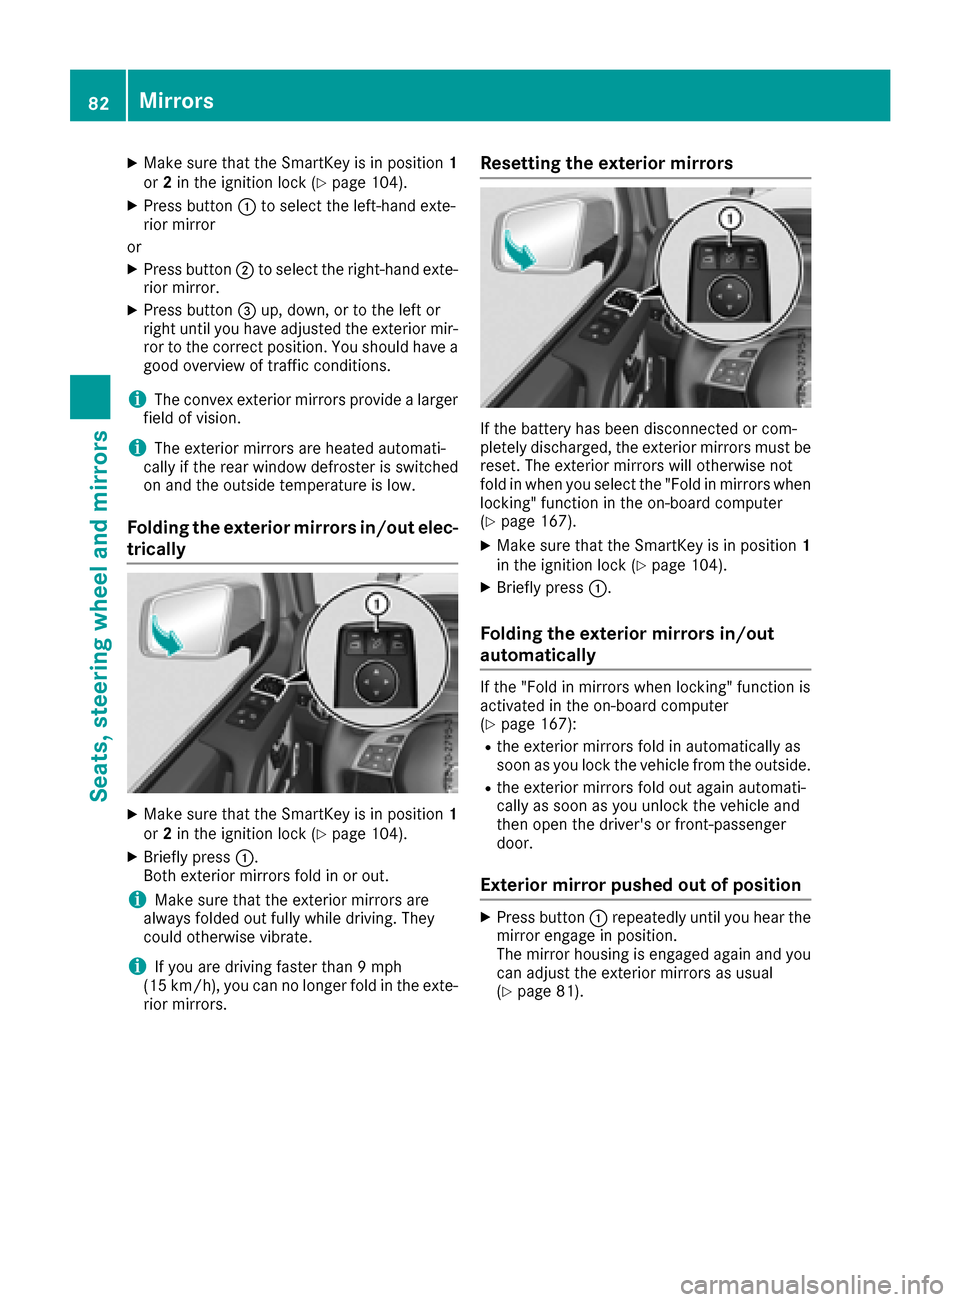
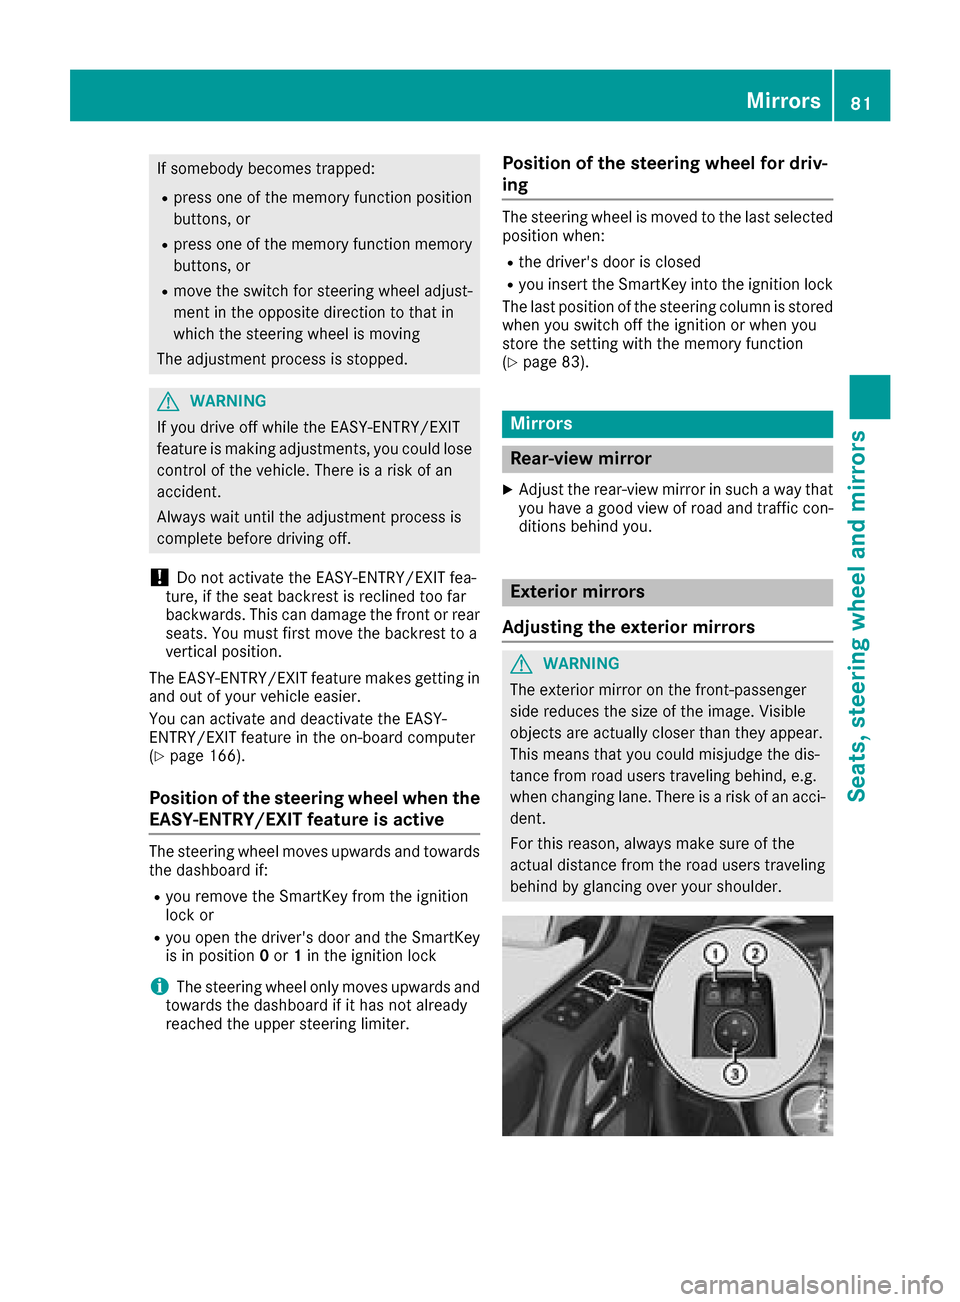
XMake sure that the SmartKey is in position1
or 2in the ignition lock (Ypage 104).
XPress button :to select the left-hand exte-
rior mirror
or
XPress button ;to select the right-hand exte-
rior mirror.
XPress button =up, down, or to the left or
right until you have adjusted the exterior mir- ror to the correct position. You should have a
good overview of traffic conditions.
iThe convex exterior mirrors provide alarger
field of vision.
iThe exterior mirrors are heated automati-
cally if the rear window defroster is switched
on and the outside temperature is low.
Folding the exterior mirrors in/out elec-
trically
XMake sure that the SmartKey is in position 1
or 2in the ignition lock (Ypage 104).
XBriefly press :.
Both exterior mirrors fold in or out.
iMake sure that the exterior mirrors are
always folded out fully while driving. They
could otherwise vibrate.
iIf you are driving faster than 9mph
(15 km/h), you can no longer fold in the exte-
rior mirrors.
Resetting the exterior mirrors
If the battery has been disconnected or com-
pletely discharged, the exterior mirrors must be
reset. The exterior mirrors will otherwise not
fold in when you select the "Fold in mirrors when
locking" function in the on-board computer
(
Ypage 167).
XMake sure that the SmartKey is in position 1
in the ignition lock (Ypage 104).
XBriefly press :.
Folding the exterior mirrors in/out
automatically
If the "Fold in mirrors when locking" function is
activated in the on-board computer
(
Ypage 167):
Rthe exterior mirrors fold in automatically as
soon as you lock the vehicle from the outside.
Rthe exterior mirrors fold out again automati-
cally as soon as you unlock the vehicle and
then open the driver's or front-passenger
door.
Exterior mirror pushed out of position
XPress button :repeatedly until you hear the
mirror engage in position.
The mirror housing is engaged again and you
can adjust the exterior mirrors as usual
(
Ypage 81).
82Mirrors
Seats, steering wheela nd mirrors
Page 86 of 286
the vehicleasaresultoft he adjustments
being made .There is ariskofana ccident.
Onlyu sethe memory functio nonthe driver's
side when the vehicl eisstationary.
GWARNING
When the memory functio nadjusts the seat or
steering wheel, yo uand othe rvehicl eoccu-
pants –particularly children –could become
trapped .There is ariskofi njury.
Whil ethe memory functio nism aking adjust-
ments ,makes uret hatnoo ne hasa ny body
parts in the swee pofthe seat or steering
wheel. If somebod ybecome strapped ,imm e-
diately release the memory functio nposit ion
button. The adjustment proces sisstopped.
GWARNING
Childre ncould become trapped if theya cti-
vate the memory function, particularly when
unattended .There is ariskofi njury.
When leaving the vehicle, always take the
SmartKeyw ithy ou and lock the vehicle. Never
leav echildren unsupervised in the vehicle.
With the memory function, yo ucan stor eupto
threed ifferent settings, e.g .for threed ifferent
people.
The following setting sarestored as asingle
memory preset:
Rpositio nofthe seat, backrest and head
restraint
Rdriver's side :steering whee lposit ion
Rdriver's side :posit ionoft he exterio rmirrors
on the driver's and front-passenge rsides
XMake sure thatt he SmartKeyisinp osition 2
(Ypage 104 )orthatthe respectiv edooris
open.
XAdjust the seat (Ypage 76 )and hea drestraint
(Ypage 76).
XOn the driver'ss ide,adjus tthe steering wheel
(Ypage 80 )and the exterio rmirrors
(Ypage 81).
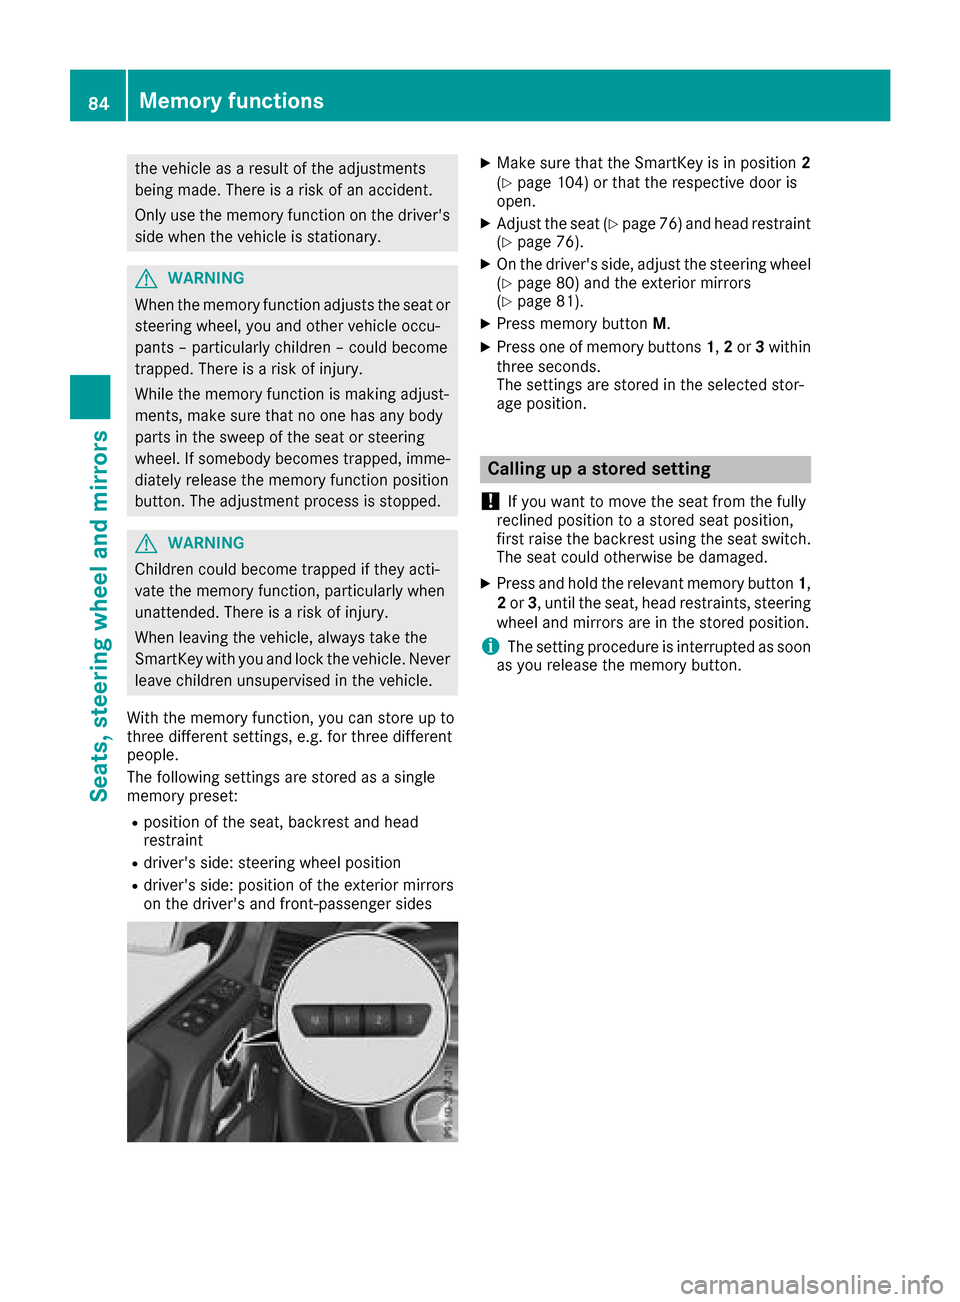
XPress memory button M.
XPress one of memory buttons 1,2 or 3within
threes econds.
The settings are stored in the selecte dstor-
ag ep osition.
Calling up astored setting
!
If yo uwanttom ove the sea tfrom the fully
recline dposition toas tored sea tposition,
first raise the backres tusing the sea tswitch.
The sea tcould otherwise be damaged.
XPress and hol dthe relevant memory button 1,
2 or 3,u nti lthe seat, hea drestraints, steering
whee land mirrors are in the stored position.
iThe setting procedur eisinterruptedass oon
as yo urelease the memory button.
84Memory functions
Seats, steering wheel andmirrors
Page 90 of 286
Interior lighting
Overview of interior lighting
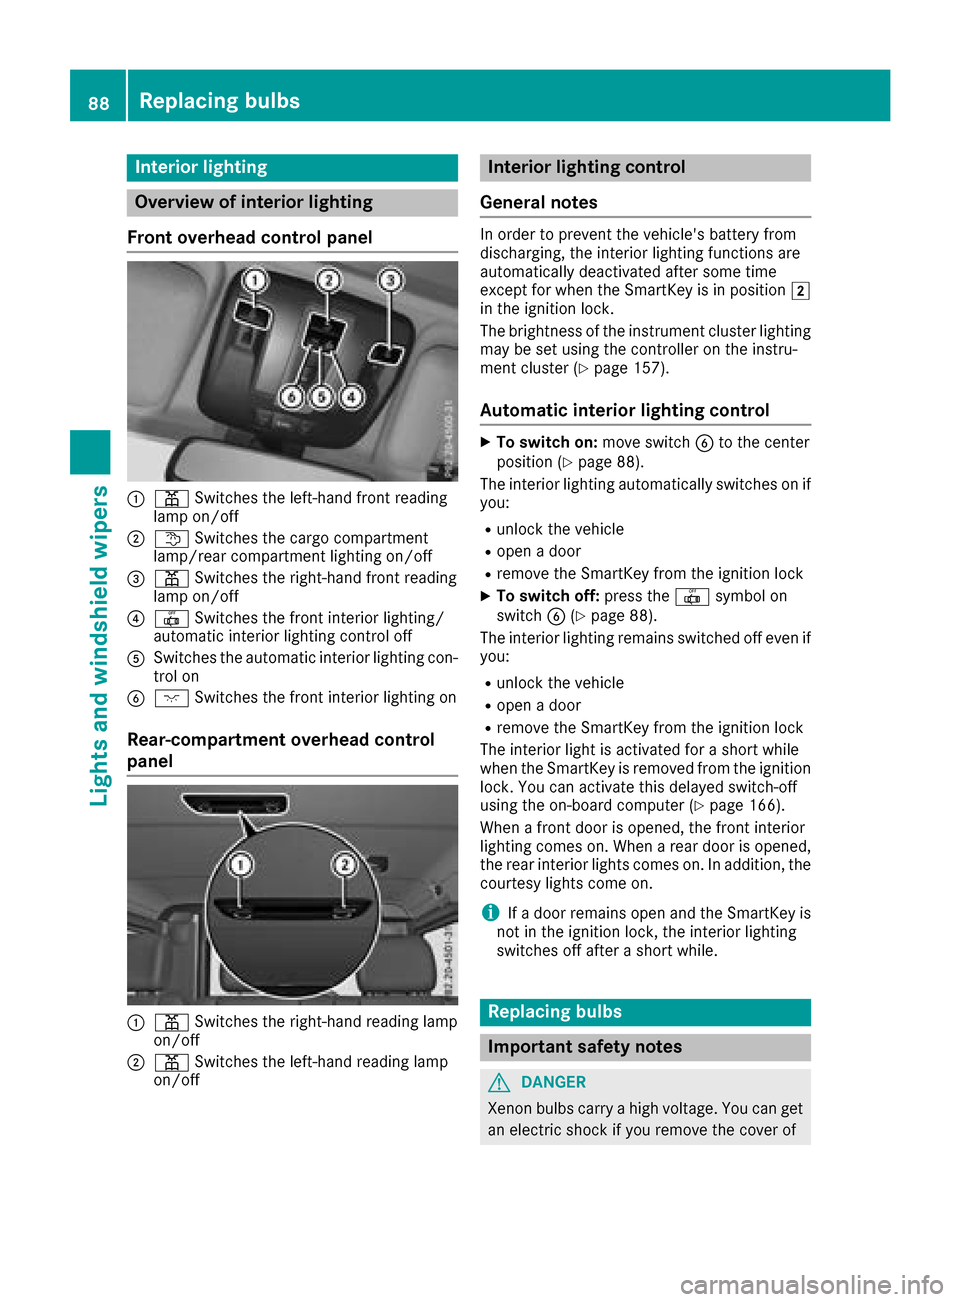
Fron toverhea dcontrol panel
:p Switches th eleft-han dfront reading
lamp on/off
;t Switches th ecargo compartmen t
lamp/rear compartmen tlighting on/off
=p Switches th eright-hand fron treading
lamp on/off
?| Switches th efront interio rlighting /
automatic interior lighting control off
ASwitches th eautomatic interio rlighting con-
trol on
Bc Switches th efront interio rlighting on
Rear-compartment overhea dcontrol
panel
:p Switches th eright-hand reading lamp
on/off
;p Switches th eleft-han dreading lamp
on/off
Interior lighting control
General notes
In order to preven tthe vehicle's battery from
discharging, th einterior lighting function sare
automatically deactivated after som etime
except for when th eSmartKey is in position 2
in th eignition lock.
The brightness of th einstrumen tcluste rlighting
may be set usin gthe controller on th einstru-
men tcluste r(
Ypage 157).
Automati cinterior lighting control
XTo switch on: moveswitch Bto th ecenter
position (Ypage 88) .
The interior lighting automatically switches on if
you:
Runlock th evehicl e
Ropen adoor
Rremove th eSmartKey from th eignition loc k
XTo switch off :press th e| symbol on
switch B(Ypage 88).
The interior lighting remain sswitched off eve nif
you:
Runlock th evehicl e
Ropen adoor
Rremove th eSmartKey from th eignition loc k
The interior ligh tisactivated for ashort while
when th eSma rtKey is remove dfromt heignition
lock. You can activat ethisd elaye dswitch-off
usin gthe on-board computer (
Ypage 166).
When afront door is opened, th efront interior
lighting comes on .When arear door is opened,
th er ear interior lights comes on .Inaddition ,the
courtesy lights come on .
iIfad oor remain sopen and th eSmartKey is
no tint heignition lock, th einterior lighting
switches off after ashort while .
Replacingbulbs
Important safety notes
GDANGER
Xenon bulbs carry ahigh voltage. You can get
an electric shock if you remove th ecover of
88Replacingb ulbs
Lightsand windshield wipers
Page 94 of 286

XTurn bulb=counter-clockwise, applying
slight pressure, and pull it out of the bulb
holder.
XInsert the new bulb into the bulb holder and,
applying slight pressure, turn it clockwise
until it engages.
XInstall lens ;.
XTighten screws :.
Windshield wipers
Switching the windshield wipers
on/off
!
Do not operate the windshield wipers when
the windshield is dry, as this could damage
the wiper blades. Moreover, dust that has col-
lected on the windshield/rear window can
scratc hthe glass if wiping takes place when
the windshield/rear window is dry.
If it is necessary to switch on the windshield
wipers in dry weather conditions, alwaysu se
washer fluid when operating the windshield
wipers.
!If the windshield wipers leave smears on the
windshield/rear window after the vehicle has
been washed in an automatic car wash, this
may be due to wax or other residue. Clean the
windshield/rear window with washer fluid
after an automatic car wash.
!Intermittent wiping with rain sensor: due to
optical influences and the windshield becom-
ing dirty in dry weather conditions, the wind-
shield wipers may be activated inadvertently.
This could then damage the windshield wiper
blades or scratc hthe windshield.
For this reason, you should alwayss witch off
the windshield wipers in dry weather.
1$ Windshield wipers off
2ÄIntermittent wipe, normal
3ÅIntermittent wipe, frequent
4°Continuous wipe, slow
5¯Continuous wipe, fast
BíSingle wipe
î Wipes with washer fluid
XSwitch on the ignition.
XTurn the combination switch to the corre-
sponding position.
In the ÄorÅ position, the appropriate
wiping frequency is set automatically according
to the intensity of the rain. In the Åposition,
the rain sensor is more sensitiv ethan in the
Ä position, causing the windshield wiper to
wipe more frequently.
Intermittent wiping is interrupted if you stop the vehicle and open afront door. This protects
people getting into and out of the vehicle from
being sprayed with water.
Intermittent wiping continues when all doors are
closed and:
Ryou shift the automatic transmission to drive
position Dor reverse gear R
or
Ryou change the wiper setting on the combi-
nation switch
92Windshield wipers
Lights and windshield wipers