2017 MERCEDES-BENZ E-CLASS SALOON display
[x] Cancel search: displayPage 310 of 497

Battery disconnection periods
The AS
SYST PLUS service inter val display
can only calculate the service due da tewhen
th e bat tery is connected. #
Notedown the service due date displa yed on
th e instrument display before disconnecting
th e battery (→ page 306). Engine compartment
Ac
tive bonn et(pedestrian pr otection) Operation of
the active bonnet (pedestrian
pr otection)
In cer tain accident situations, therisk of injury
to pedestrians can be reduced bythe actuation
of the active bonn et. The rear area of the engine
bonn etisraised byappr oximately 85 mm.
Fo rth e drive tothewo rkshop, reset the trig‐
ge red active bonn etyourself. If the active bonn et
has been triggered, pedestrian pr otection may
be limited.
A qu alified specialist workshop must re-ins tate
th e full functionality of the active bonn et. The active bonnet is not
available in all coun‐
tries.
Re setting the active bonnet &
WARNING Danger of bu rns from hot
component parts in the engine compart‐
ment
Cer tain component parts in the engine com‐
partment may be very hot, e.g. the engine,
th era diator and parts of theex haust sy stem. #
Let the engine cool down and only
to uch the component parts described
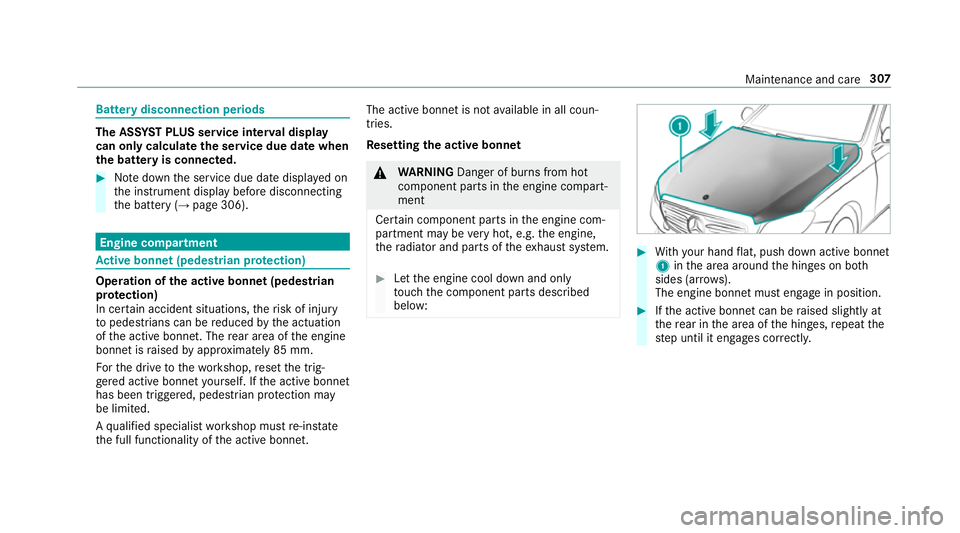
below: #
With your hand flat, push down active bonnet
1 inthe area around the hinges on bo th
sides (ar rows).
The engine bonnet must engage in position. #
Ifth e active bonn etcan be raised slight lyat
th ere ar in the area of the hinges, repeat the
st ep until it engages cor rectl y. Maintenance and care
307
Page 313 of 497

Engine oil
Checking
the engine oil le vel using the oil
dip stick &
WARNING Danger of bu rns from hot
component parts in the engine compart‐
ment
Cer tain component parts in the engine com‐
partment may be very hot, e.g. the engine,
th era diator and parts of theex haust sy stem. #
Let the engine cool down and only
to uch the component parts described
below: Depending on
the engine, the oil dipstick may be
ins talled in the engine compartment in dif fere nt
locations.
Wa iting time before checking the oil le vel:
R engine at normal operating temp erature: five
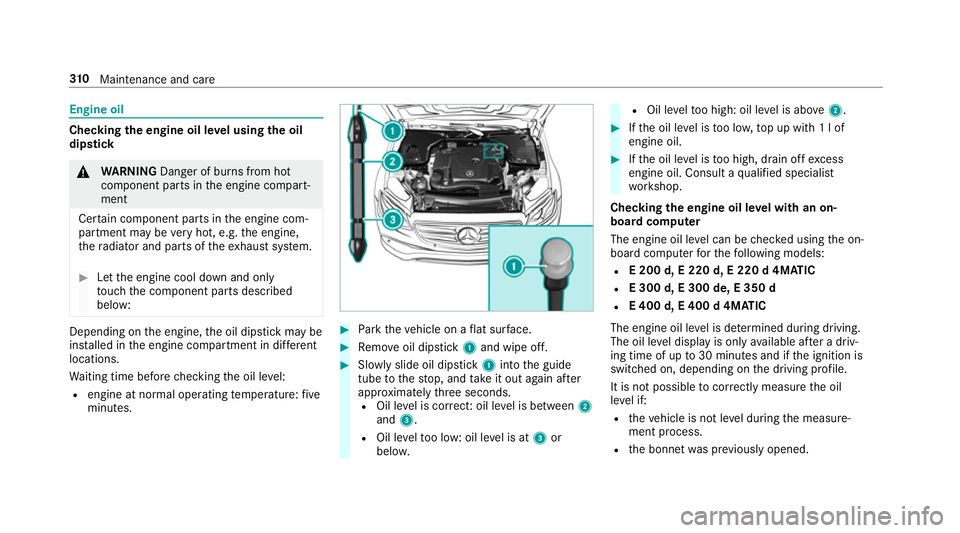
minutes. #
Park theve hicle on a flat sur face. #
Remo veoil dipstick 1and wipe off. #
Slowly slide oil dipstick 1into the guide
tube tothestop, and take it out again af ter
appr oximately thre e seconds.
R Oil le vel is cor rect: oil le vel is between 2
and 3.
R Oil le velto o low: oil le vel is at 3or
belo w. R
Oil le velto o high: oil le vel is abo ve2 . #
Ifth e oil le vel is too lo w,top up with 1 l of
engine oil. #
Ifth e oil le vel is too high, drain off excess
engine oil. Consult a qualified specialist
wo rkshop.
Checking the engine oil le vel with an on-
board computer
The engine oil le vel can be checked using the on-
board computer forth efo llowing models:
R E 200 d, E 220 d, E 220 d 4MATIC
R E 300 d, E 300 de, E 350 d
R E 400 d, E 400 d 4MATIC
The engine oil le vel is de term ined during driving.
The oil le vel display is only available af ter a driv‐
ing time of up to30 minutes and if the ignition is
switched on, depending on the driving profile.
It is not possible tocor rectly measu rethe oil
le ve l if:
R theve hicle is not le vel during the measure‐
ment process.
R the bonn etwa s pr eviously opened. 310
Maintenance and care
Page 314 of 497

The engine must be
restar ted and the engine oil
le ve l will be de term ined again when driving.
On-board computer: , Service .
Engine oil level:
Yo u will see one of thefo llowing display
messa ges in the multifunction displa y:#
Engine oil level Measuring now: measu re‐
ment of the oil le vel is not yet possible.
Re peat there qu est af ter a maximum of 30
minutes' driving. #
Engine oil level OK andthe bar display for
indicating the oil le vel in the multifunction
display is green and is between "min" and
"max": the oil le vel is cor rect. #
Engine oil level Add 1,0 l andthe bar display
fo r indicating the oil le vel in the multifunction
display is orange and is below "min": top up
with 1 l of engine oil. #
Reduce engine oil level andthe bar display
fo r indicating the oil le vel in the multifunction
display is orange and is abo ve"max": drain
off theexc ess engine oil. Consult a qualified
specialist workshop. #
For engine oil level turn on ignition: switch on
th e ignition tocheck the engine oil le vel. #
Engine oil level System inoperative : sensor
fa ulty or not connected. Consult a qualified
specialist workshop. #
Engine oil level System currently unavail. :
close the bonn et.
To pping up engine oil &
WARNING Danger of bu rns from hot
component parts in the engine compart‐
ment
Cer tain component parts in the engine com‐
partment may be very hot, e.g. the engine,
th era diator and parts of theex haust sy stem. #
Let the engine cool down and only
to uch the component parts described
below: &
WARNING Risk offire and injury from
engine oil
If engine oil comes into con tact wi thhot
component parts in the engine compart‐
ment, it may ignite. #
Make sure that no engine oil is spilled
next tothefiller opening. #
Allow the engine tocool off and thor‐
oughly clean the engine oil from compo‐
nent parts before starting theve hicle. *
NO
TEEngine dama gecaused byan
incor rect oil filter, incor rect oil or addi‐
tives #
Do not use engine oils or oil filters
which do not cor respond tothe specifi‐
cations explicitly prescribed forthe
service inter vals. #
Do not alter the engine oil or oil filter in
order toachie velonger change inter vals
th an presc ribed. #
Do not use additives. Maintenance and care
311
Page 315 of 497

#
Follow the instructions in the service
inter val display rega rding the oil
ch ange. *
NO
TEDama gecaused bytopping up too
much engine oil To
pping up too much engine oil can cause
damage tothe engine or the catalytic con‐
ve rter. #
Have excess engine oil remo ved at a
qu alified specialist workshop. #
Turn cap 1anti-clockwise and remo veit. #
Top up the engine oil. #
Replace cap 1and turn it clockwise as far
as it will go. #
Check the oil le vel again (→ page310). Che
cking the coolant le vel &
WARNING Danger of bu rns from hot
component parts in the engine compart‐
ment
Cer tain component parts in the engine com‐
partment may be very hot, e.g. the engine,
th era diator and parts of theex haust sy stem. #
Let the engine cool down and only
to uch the component parts described
below: &
WARNING Danger of bu rns from hot
coolant
The engine cooling sy stem is pressurised,
particularly when the engine is warm. If you
open the cap, you could be scalded byhot
coolant spr aying out. #
Let the mo tor cool down before opening
th e cap. #
When opening the cap, wearglove s and
pr otective eyew ear. 312
Maintenance and care
Page 316 of 497

#
Slowly turn the cap half a turn toallow
pressure toescape. #
Park theve hicle on a le vel sur face. #
Check the coolant temp erature display in the
instrument clus ter.
The coolant temp erature must be below
70 °C. #
Slowly turn cap 1anti-clockwise torelie ve
exc ess pressure. #
Continue turning cap 1anti-clockwise and
re mo veit.
The coolant le vel is cor rect:
R ifth e engine is cold up tomar ker bar 2
R ifth e engine is warm upto1.5 cm over
mar ker bar 2 #
If necessar y,top up with coolant that has
been appr ovedby Mercedes-Benz.
R Further information on coolant (→ page375) To
pping up the windsc reen washer sy stem &
WARNING Danger of bu rns from hot
component parts in the engine compart‐
ment
Cer tain component parts in the engine com‐
partment may be very hot, e.g. the engine,
th era diator and parts of theex haust sy stem. #
Let the engine cool down and only
to uch the component parts described
below: &
WARNING Danger of bu rns when open‐
ing the bonn et
If yo u open the engine bonn etwhen the
engine has overheated or during a fire inthe
engine compartment, you could come into
contact with hot gases or other escaping
operating fluids. #
Before opening the bonn et, allow the
engine tocool down. #
Intheeve nt of a fire inthe engine com‐
partment, keep the engine bonn et
closed and call thefire service. &
WARNING ‑ Risk of fire and injury due to
windscreen washer concentrate
Wi ndsc reen washer concentrate is highly
fl ammable. It could ignite if it comes into
con tact wi thhot engine component parts or
th eex haust sy stem. Maintenance and care
313
Page 323 of 497

Obser
vethefo llowing information: Information on cleaning and car
eAvoiding vehicle damage
Seat belts Clean withwarm wate r and soap solution. R
Do not use chemical cleaning agents.
R Do not dry seat belts byheating them toove r 80 °C or
ex posing them todirect sunlight.
Display Cleanthe sur face carefully wi tha mic rofibre clo thand
TFT/LCD display cleaner. R
Swit choff the display and allow tocool.
R Do not use any other cleaning products.
Plastic trim R
Clean with a damp microfibre clo th.
R Ifth e trim is very dirty: use a cleaning agent recommen‐
ded byMercedes-Benz. R
Do not apply sticke rs,fi lms etc.
R Do not allow cosmetics, insect repellent or sun cream to
come in contact wi th the plastic trim.
Genuine wood/t rim
elements R
Clean wi tha mic rofibre clo th.
R Blackpiano-lac quer look: clean with a damp clo thand
soap solution.
R Ifth e trim is very dirty: use a cleaning agent recommen‐
ded byMercedes-Benz. Do not use solvent-based cleaning agents, polishes or
waxes.
Ro of lining
Clean with a brush or dry shampoo.
Carpet Use carpet andtextile cleaning agents recommended by
Mercedes-Benz. 320
Maintenance and care
Page 328 of 497

MOExtended tyres (run-flat tyres)
&
WARNING Risk of accident when driving
in li mp-home mode
When driving in emergency mode the han‐
dling characteristics are impaired. e.g. when
cornering, when accelerating stronglyand
when braking. #
Do not exceed the specified maximum
speed. #
Avoid any abrupt steering and driving
manoeuvres as well as driving over
obs tacles (kerbs, pot holes, off-road).
This applies, in pa rticular, toa loaded
ve hicle. #
Stop driving in the emer gency mode if
yo u notice:
R banging noise
R vehicle vibration
R smoke which smells like rubber
R continuous ESP ®
inter vention
R crac ksin tyre side walls #
After driving in emergency mode ha ve
th erims checkedby aqu alified special‐
ist workshop with rega rd totheir fur ther
use. #
The defective tyre must be replaced in
eve rycase. Wi
th MOExtended tyres (run-flat tyres), you can
continue todrive your vehicle even if there is a
tot al loss of pressure in one or more tyres. How‐
eve r,th e tyre af fected must not show any clearly
visible damage.
Yo u can recognise MOExtended tyres bythe
MOExtended marking which appears on the side
wa ll of the tyre.
Ve hicles with tyre pressure loss warning sys‐
te m: MOExtended tyres may only be used in
conjunction wi than activated tyre pressure loss
wa rning sy stem.
Ve hicles with tyre pressure monitoring sys‐
te m: MOExtended tyres may only be used in
conjunction wi than activated tyre pressure mon‐
itoring sy stem. If a pressure loss
warning message appears in
th e multifunction display:
R Check the tyre for dama ge.
R If driving on, obser vethefo llowing no tes.
Driving distance possible in limp-home mode
af te r the pressure loss warning: Load condition Driving distance pos‐
sible in limp-homemode
Pa rtially laden 80 km
Fu lly laden 30 km R
The driving dis tance possible in li mp-home
mode may vary depending on the driving
st yle.
R Maximum permissible speed 80 km/h.
If a tyre has gone flat and cannot be replaced
with an MOEx tended tyre, you can use a stand‐
ard tyre as a temp orary measure. Breakdown assis
tance 325
Page 350 of 497

The tyre pressure
table sho ws there commended
tyre pressure for all tyres appro vedfo rth is vehi‐
cle. The recommended tyre pressures apply for
cold tyres under various operating conditions,
i.e. loading and/or speed of theve hicle.
If one or more tyre sizes precede a tyre pres‐
sure, the tyre pressure information following is
only valid forth ose tyre sizes. If
th e preceding tyre sizes are complemented by
th e+ symbol, the tyre pressure information
fo llowing sho wsalternative tyre pressures.
These tyre pressures may impr oveyour vehicle's
ri de comfort. Fuel consum ption may then
increase slightl y.
The load conditions "partially laden" and "fully
laden" are defined in theta ble for dif fere nt num‐
be rs of passengers and amounts of luggage. The
actual number of seats may dif fer from this.
Be sure toalso obse rveth efo llowing fur ther
re lated subjects:
R Notes on tyre pressure (→ page 345) Ty
re pressure moni toring sy stem Fu
nction of the ty repressure moni toring sys‐
tem
The sy stem checks the tyre pressure and the
tyre temp erature of the tyres fitted totheve hicle
by means of a tyre pressu resensor.
New tyre pressure sensors, e.g. in winter tyres,
are automatically taught-in thefirs t time they are
driven. The tyre pressure and
the tyre temp erature
appear in the multifunction display
(→ page 255).
If th ere is a subs tantial pressure loss or if the
tyre temp erature is excessive, a warning will be
given:
R Via display messages (→ page417).
R Viath eh warning lamp in the instrument
clus ter (→ page 454).
It is the driver's responsibility toset the tyre
pressure tothere commended cold tyre pressure
suitable forth e operating situation. Set the tyre
pressure for cold tyres using a tyre pressu re
ga uge. Notethat the cor rect tyre pressure for
th e cur rent operating situation mu stfirs t be
ta ught-in tothe tyre pressure monitoring sys‐
te m.
In most cases, the tyre pressure monitoring sys‐
te m will auto maticallyupdate the new refere nce
va lues af teryo u ha vechanged the tyre pressure.
Yo u can, ho wever,also update there fere nce val‐
ues byrestarting the tyre pressure monitoring
sy stem manually (→ page 348). Wheels and tyres
347